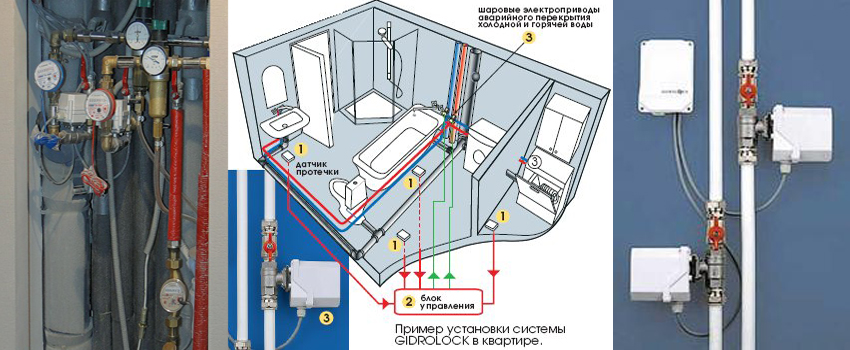
- Rules for competent installation
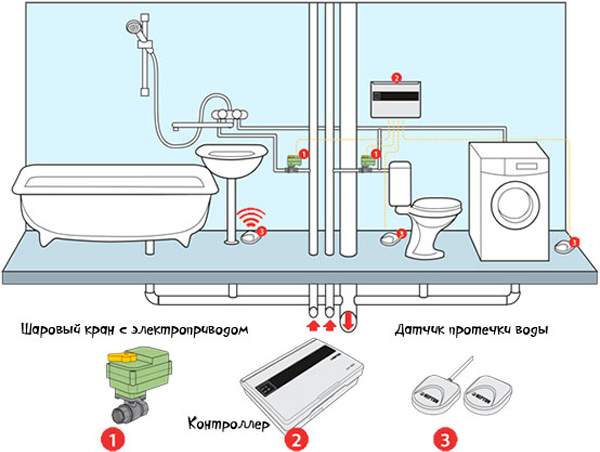
- Stage # 1 - tie-in ball valve
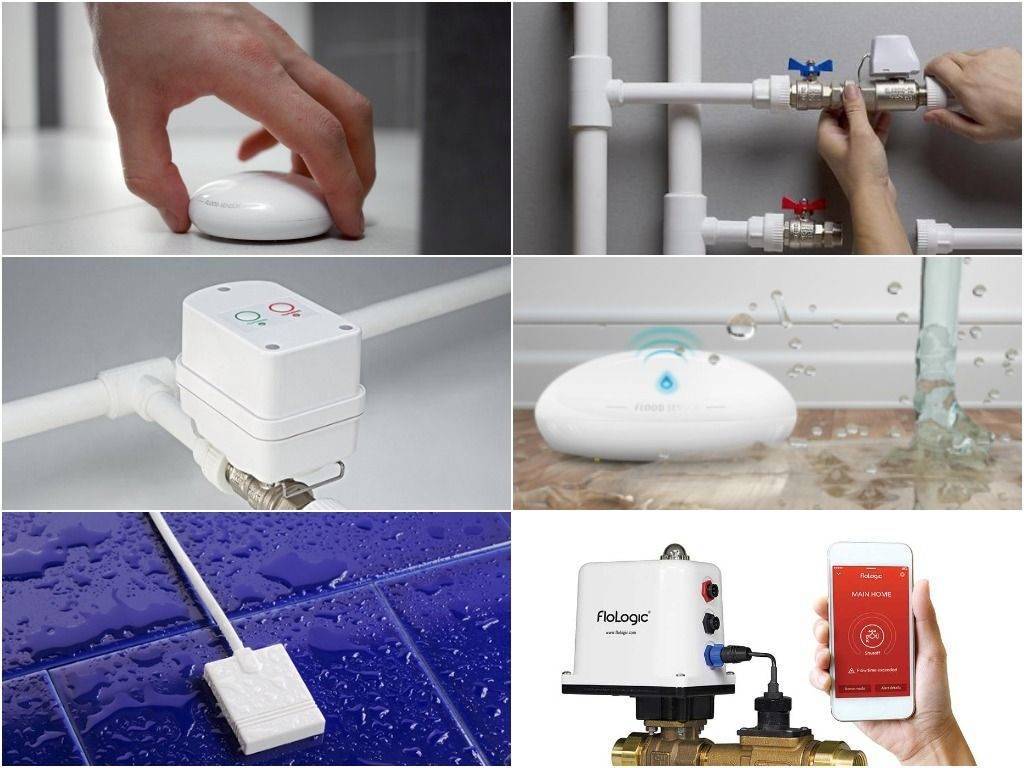
- Stage # 2 - installing the sensor
- Stage # 3 - controller installation
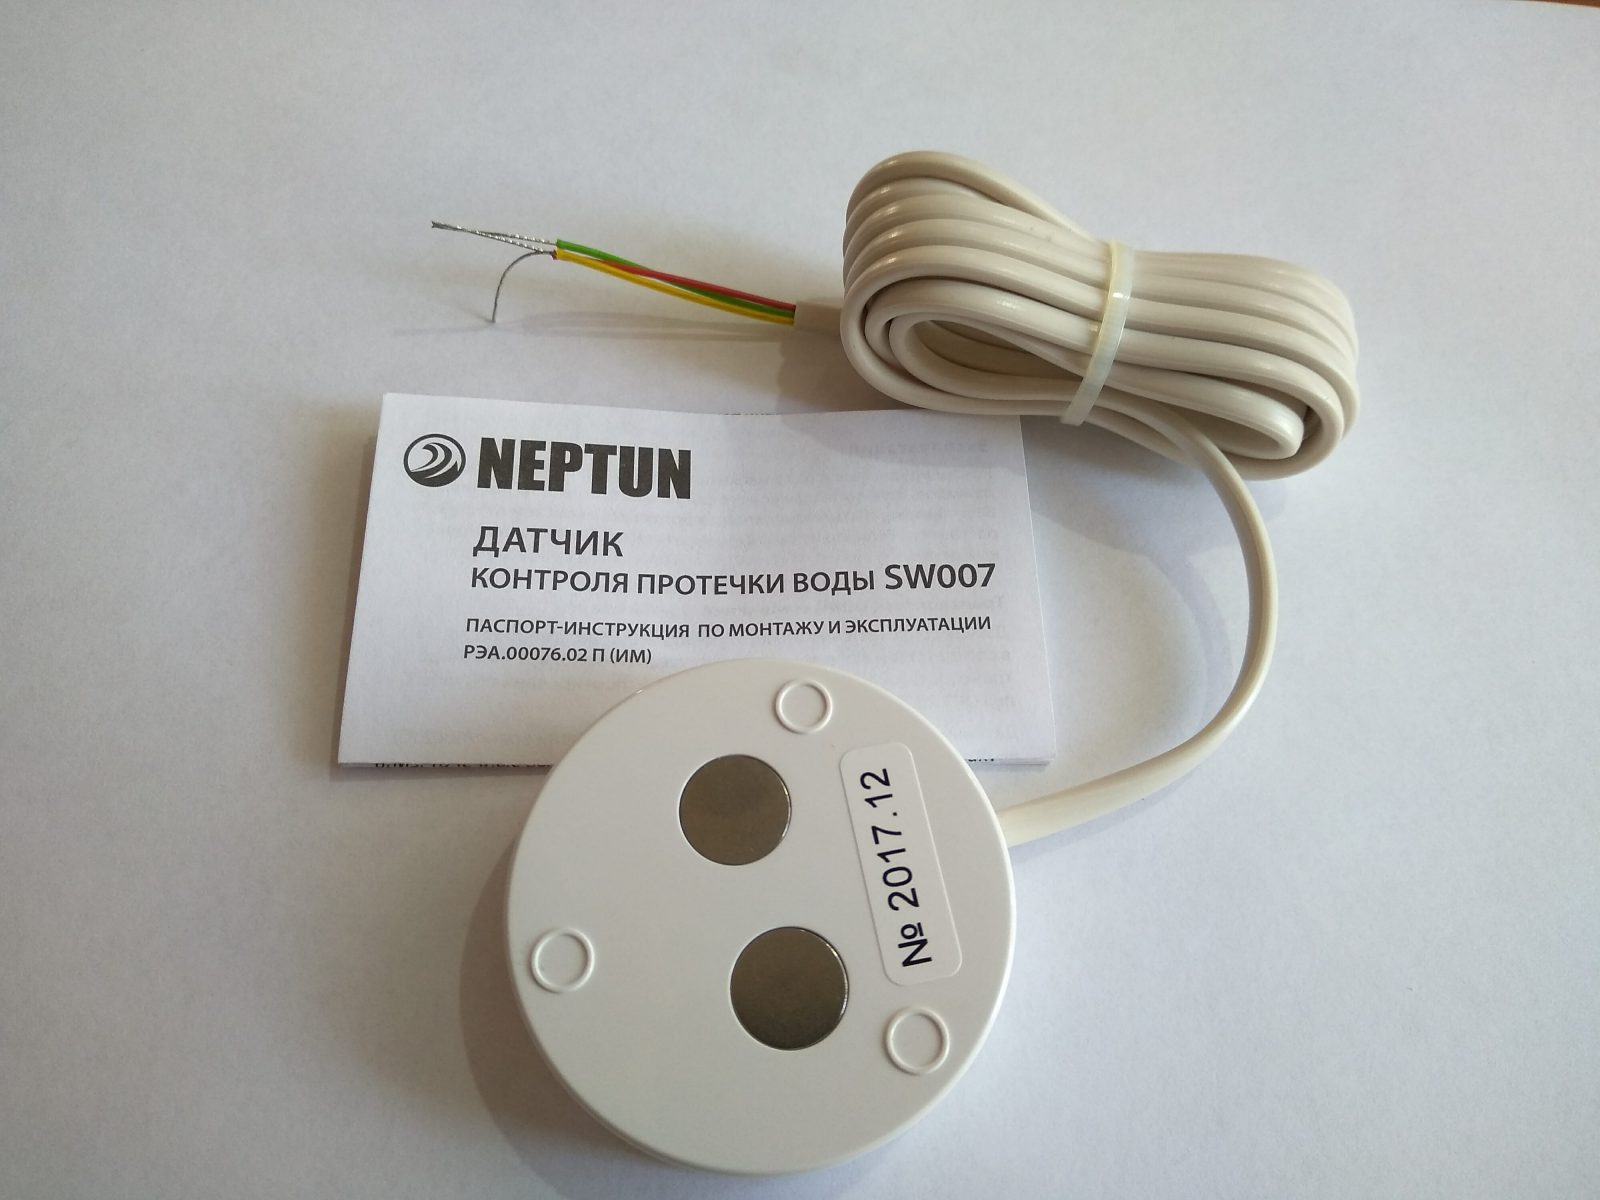
- Installing a flood sensor from the manufacturer
- Aquastorage systems
- "Aquaguard" classic
- "Aquaguard Expert"
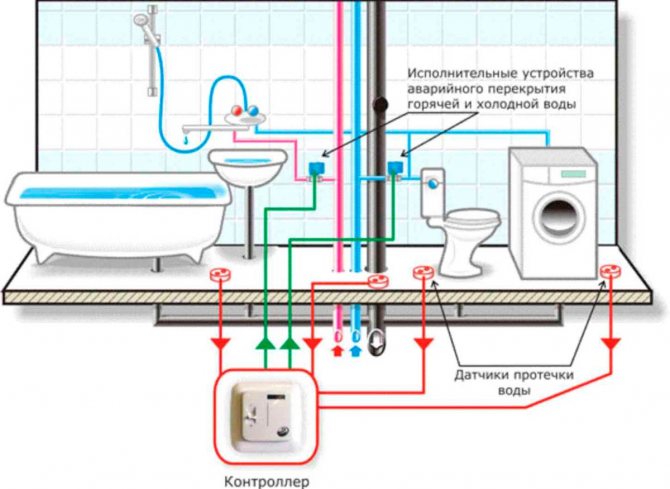
- Sensors and their location
- Apartments
- A private house
- How to install "Aquastop" yourself
- Connection and setup
- Water leakage sensor which company is better to choose
- How to signal a water leak
- Do-it-yourself leak protection
- The easiest way is based on the use of a transistor
- Do-it-yourself water watchman
- Installation of wireless water leakage sensors
- How to check the water sensor.
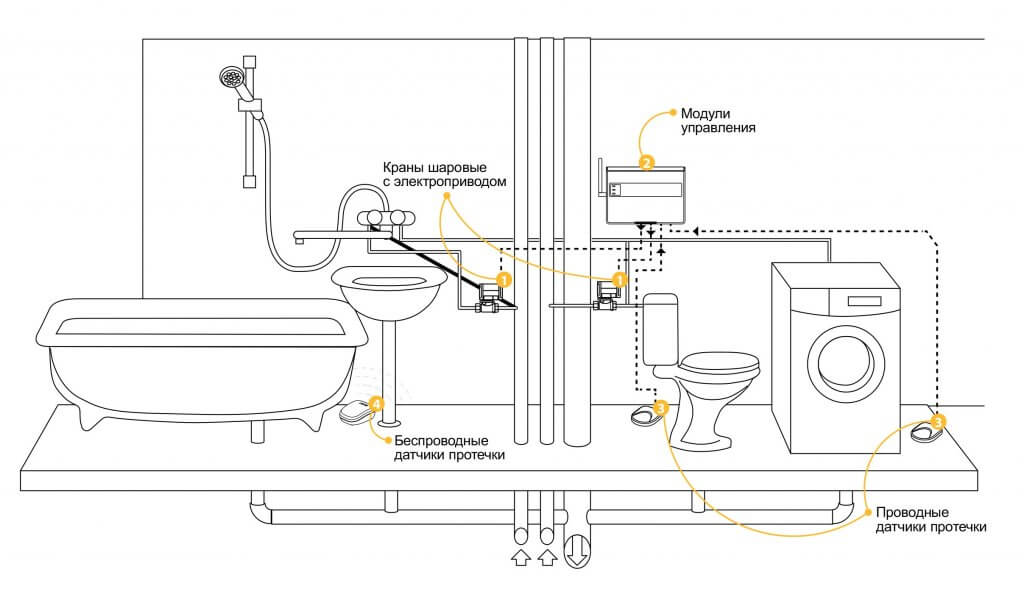
Rules for competent installation
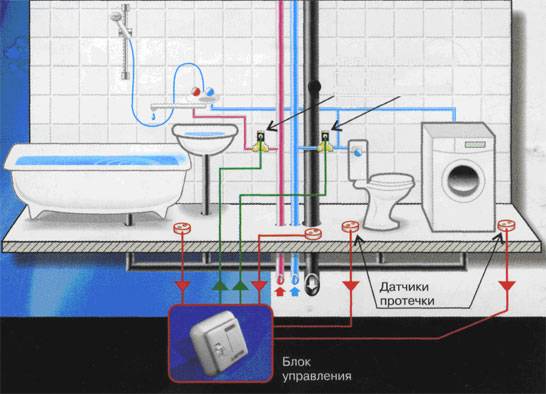
Before proceeding with the installation of the system, you should draw up a detailed layout of all its elements, on which you will need to mark the location of each device. In accordance with it, it is checked once again whether the length of the connecting wires included in the kit is sufficient for installation, if they are provided for by the design of the devices. The actual installation is carried out in the following sequence:
- We mark the areas for installing sensors, cranes and the controller.
- According to the connection diagram, we lay the installation wires.
- We cut ball valves.
- Installing sensors.
- We mount the controller.
- We connect the system.
Let's take a closer look at the most important stages.
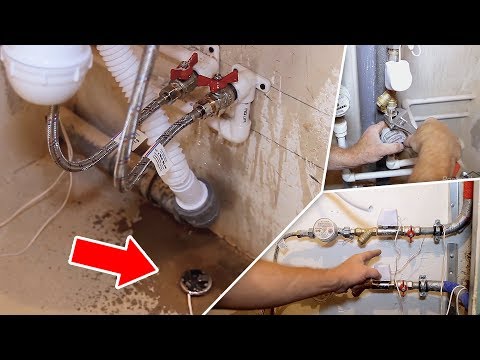
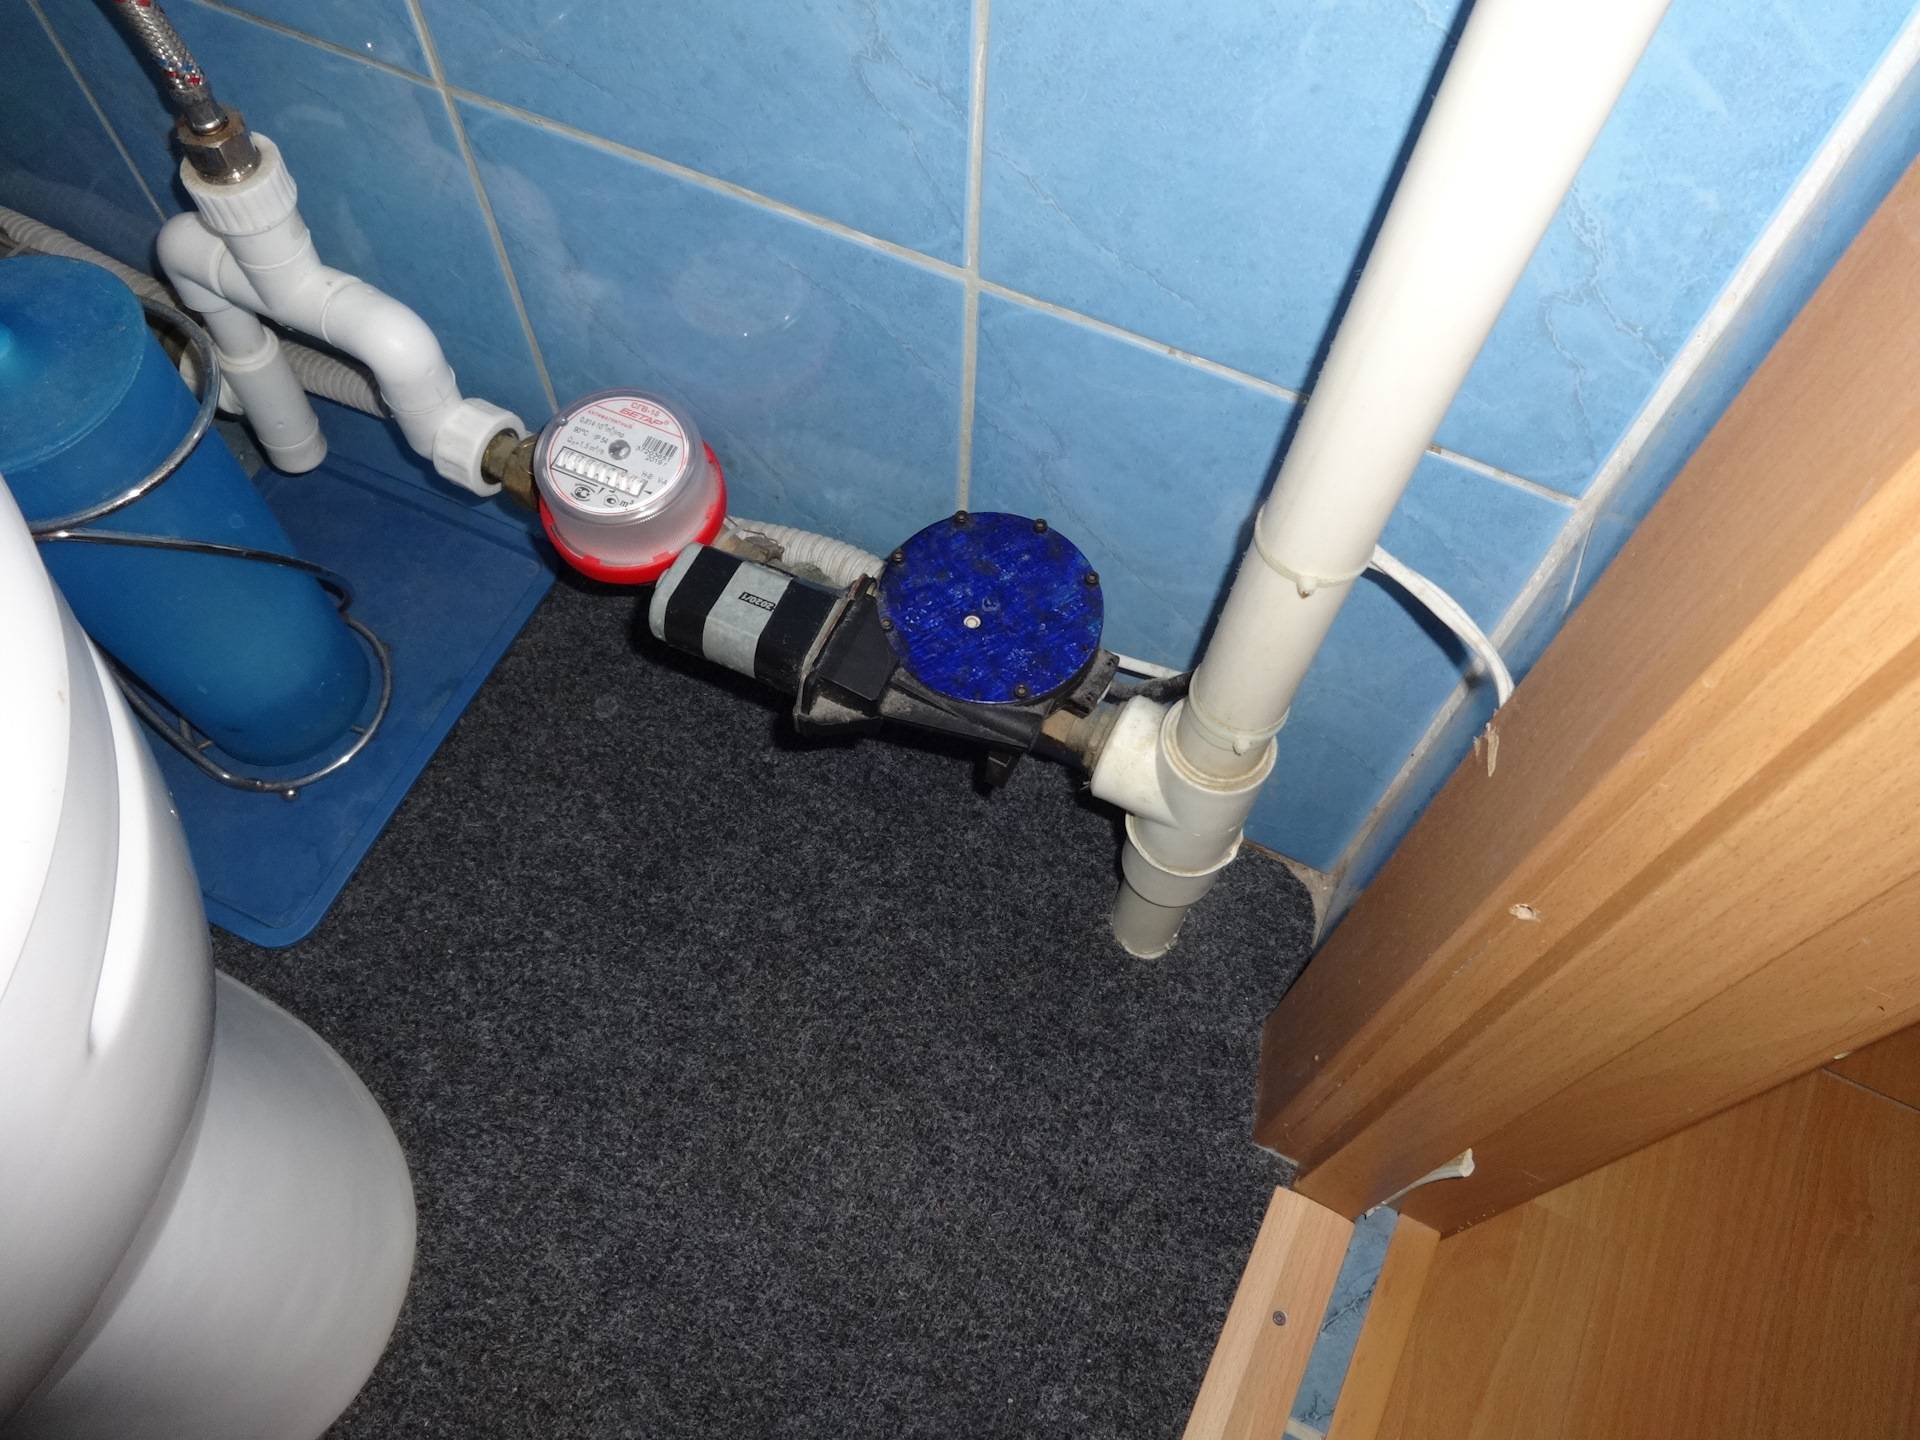
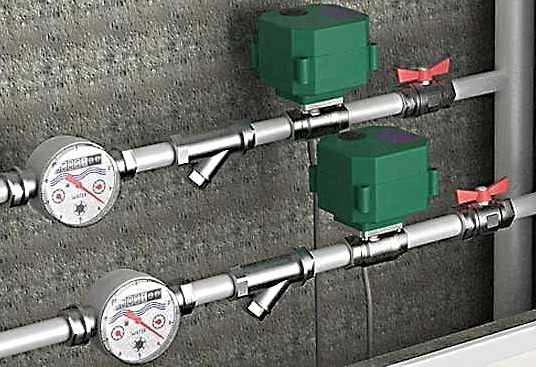
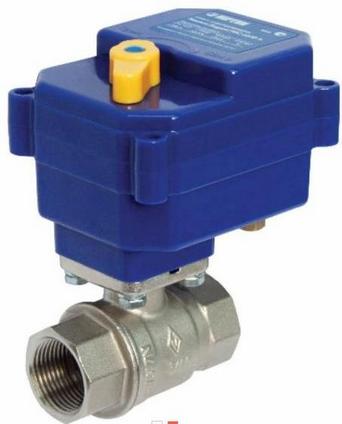
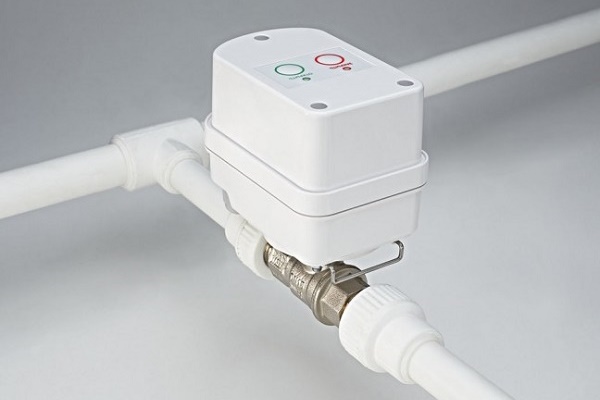
Stage # 1 - tie-in ball valve
As already noted, the installation of an electric ball valve is best left to a specialist. The device is mounted after the manual valves at the inlet of the pipeline. It is strictly forbidden to install structures instead of cranes at the input.
Before the node, it is recommended to put filters on the pipeline that purify the water. So the devices will last longer. It is also necessary to provide them with uninterrupted power supply. In operating mode, the device consumes about 3 W, at the time of opening / closing the valve - about 12 W.
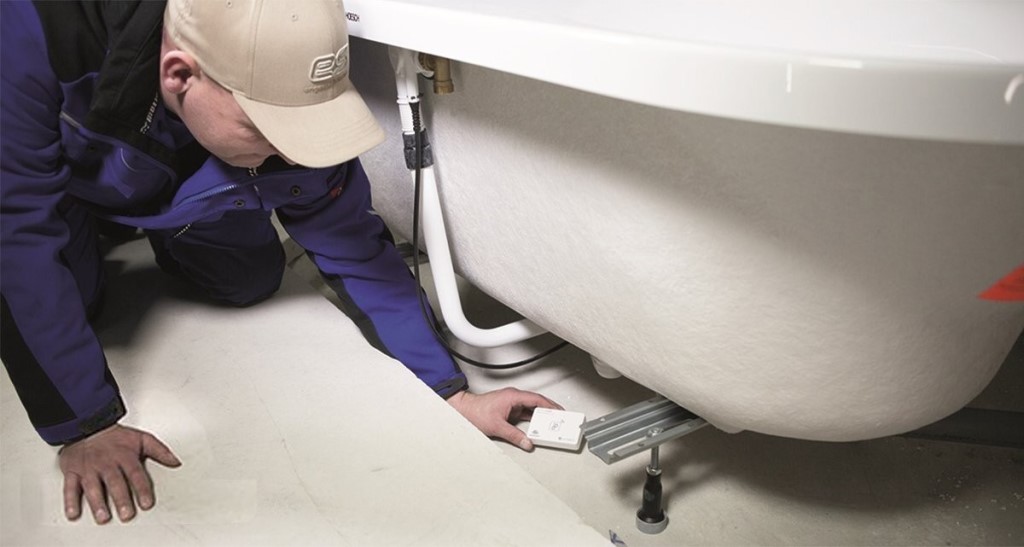
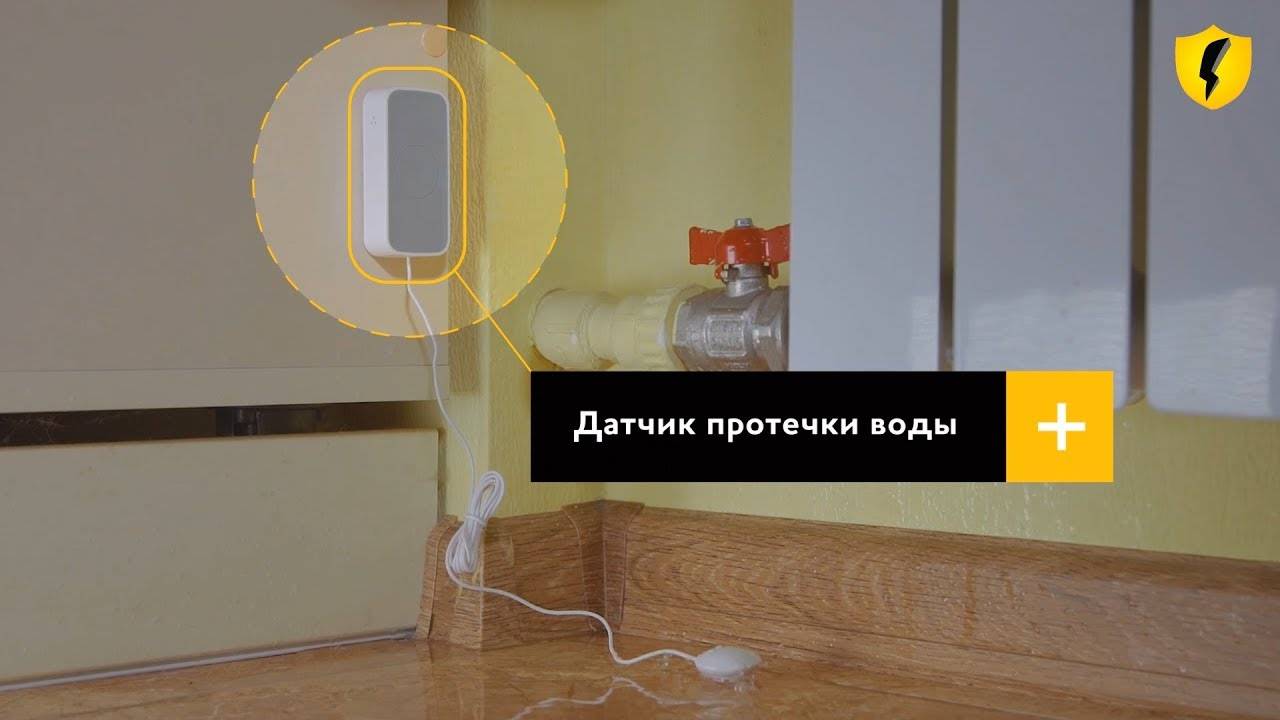
Stage # 2 - installing the sensor
The device can be installed in two ways:
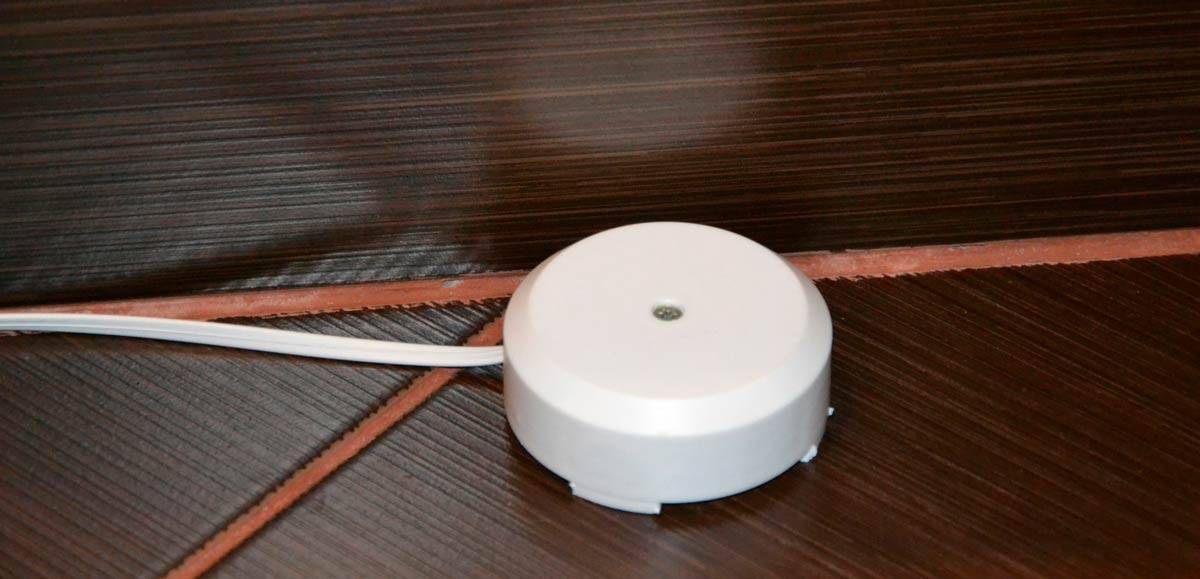
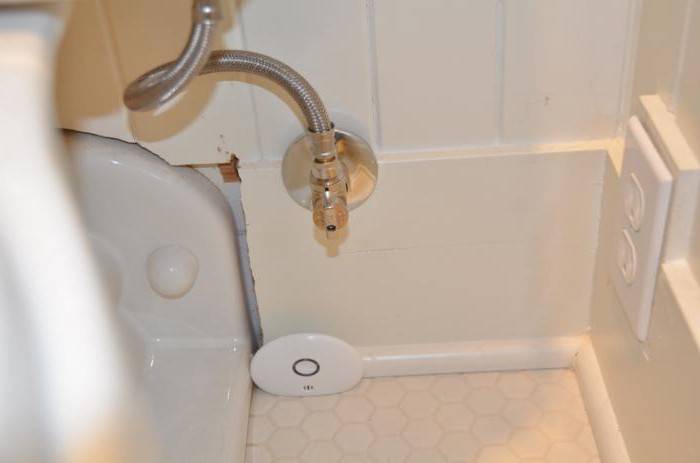
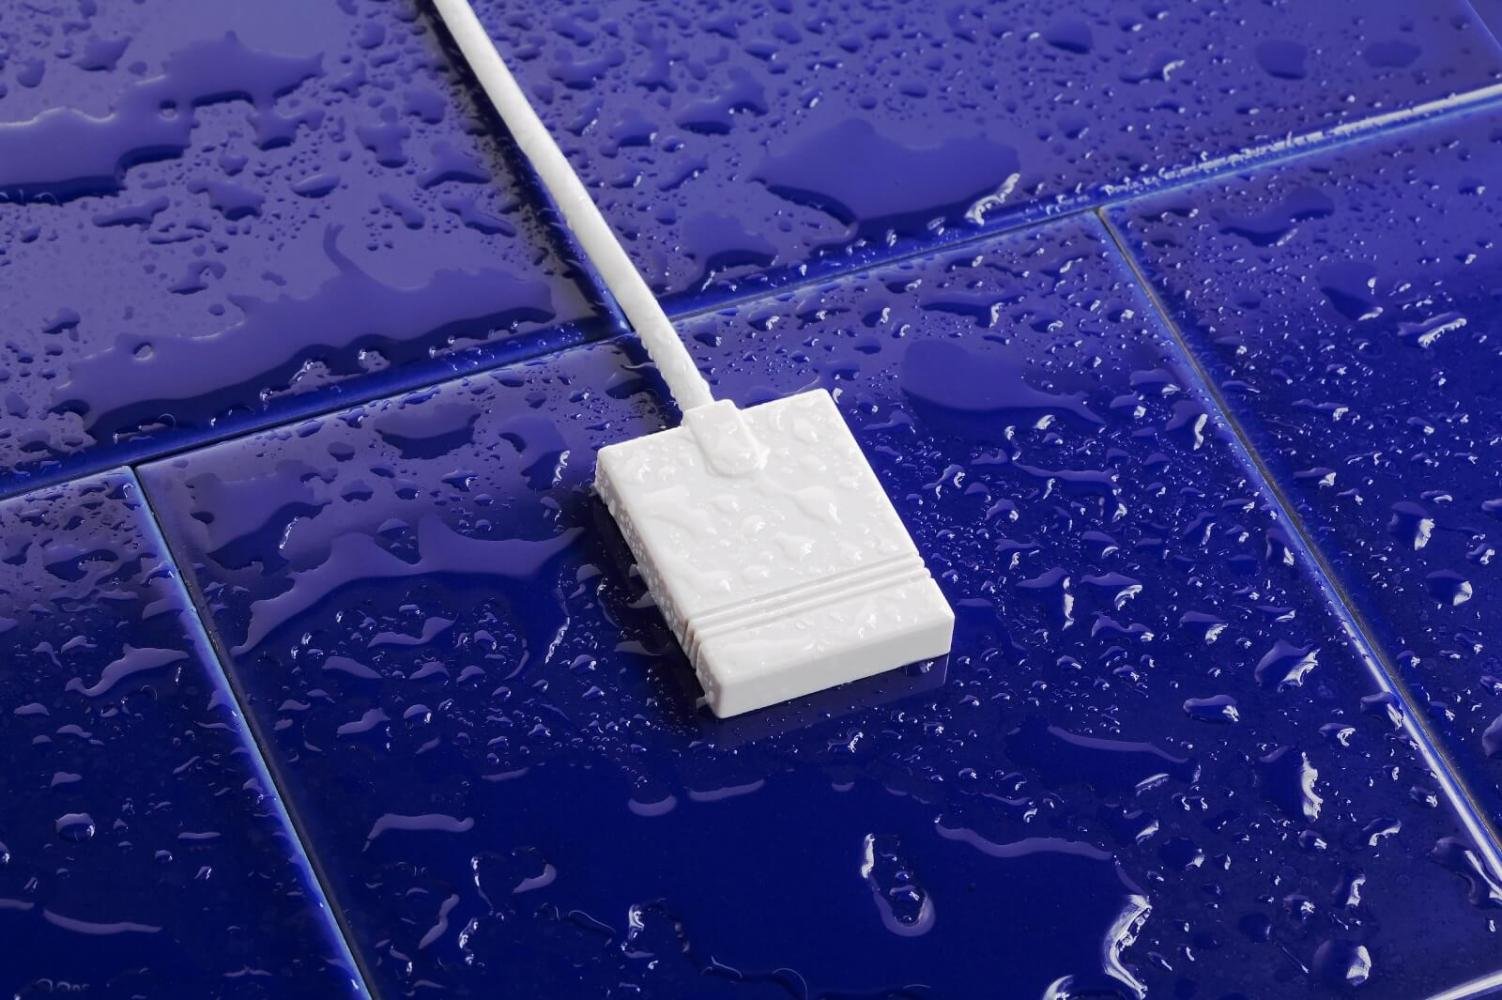
- Floor installation. This method is recommended by the manufacturer. It involves inserting the device into a tile or floor covering in areas where water is likely to accumulate in case of a possible leak. In this case, the contact plates of the sensor are brought to the floor surface so that they are raised to a height of about 3-4 mm. This setting eliminates false positives. The wire to the device is supplied in a special corrugated pipe.
- Floor surface installation. In this case, the device is laid directly on the surface of the floor covering with the contact plates facing down.
Installing a water leak sensor with your own hands is quite simple, especially if the second method is used.
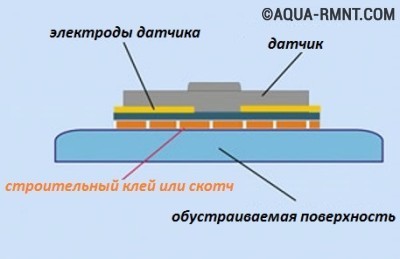
Manufacturers recommend installing a water leakage sensor in the floor. So that the panel with contacts is raised by 3-4 mm. This eliminates the possibility of false positives.
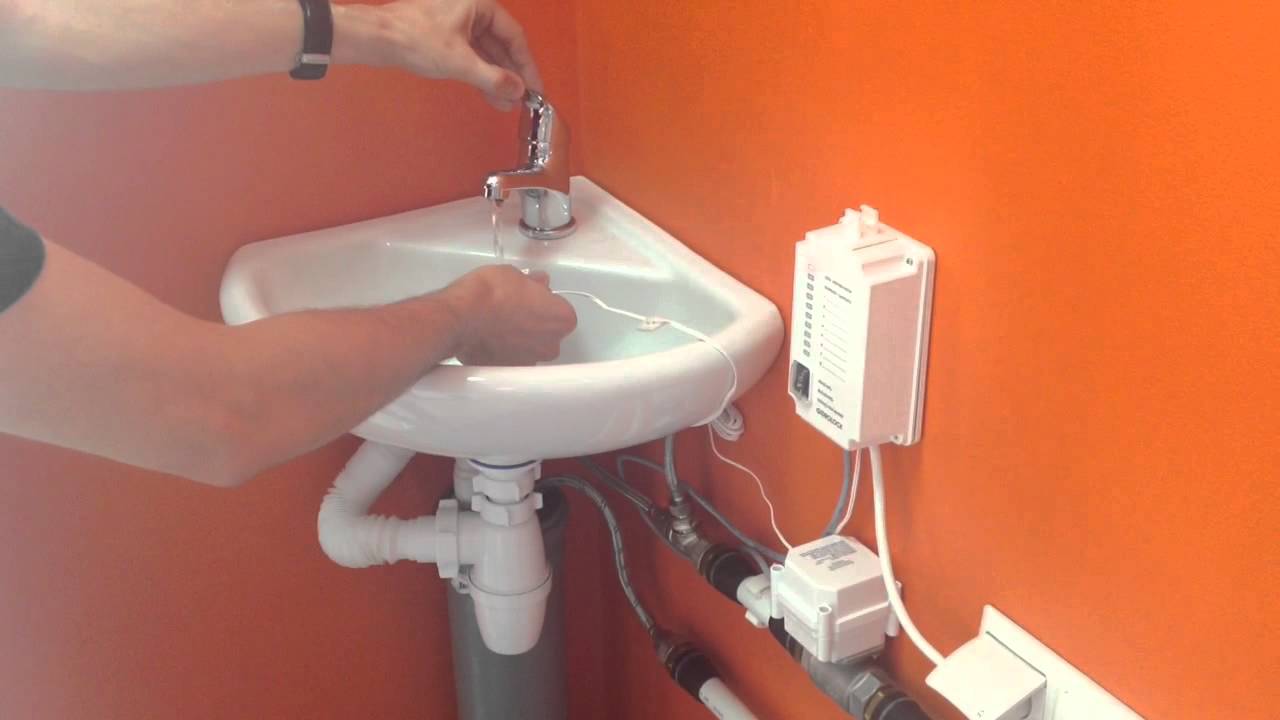
Stage # 3 - controller installation
Power to the controller must be supplied from the power cabinet. Zero and phase are connected to the device according to the connection diagram. To install the device, you need to perform the following operations:
We are preparing a hole in the wall for mounting the controller box.
We drill recesses for power wires from the installation site to the power cabinet, to each sensor and to the ball valve.
We install the mounting box on the prepared place in the wall.
We prepare the device for installation. We remove its front cover by alternately pressing on the latches on the front of the device with a thin slotted screwdriver. We remove the frame and connect all the wires in accordance with the diagram. We install the prepared controller in the mounting box and fix it with at least two screws.
We assemble the device
Carefully put the frame back in place. We impose the front cover and press on it until both latches work.
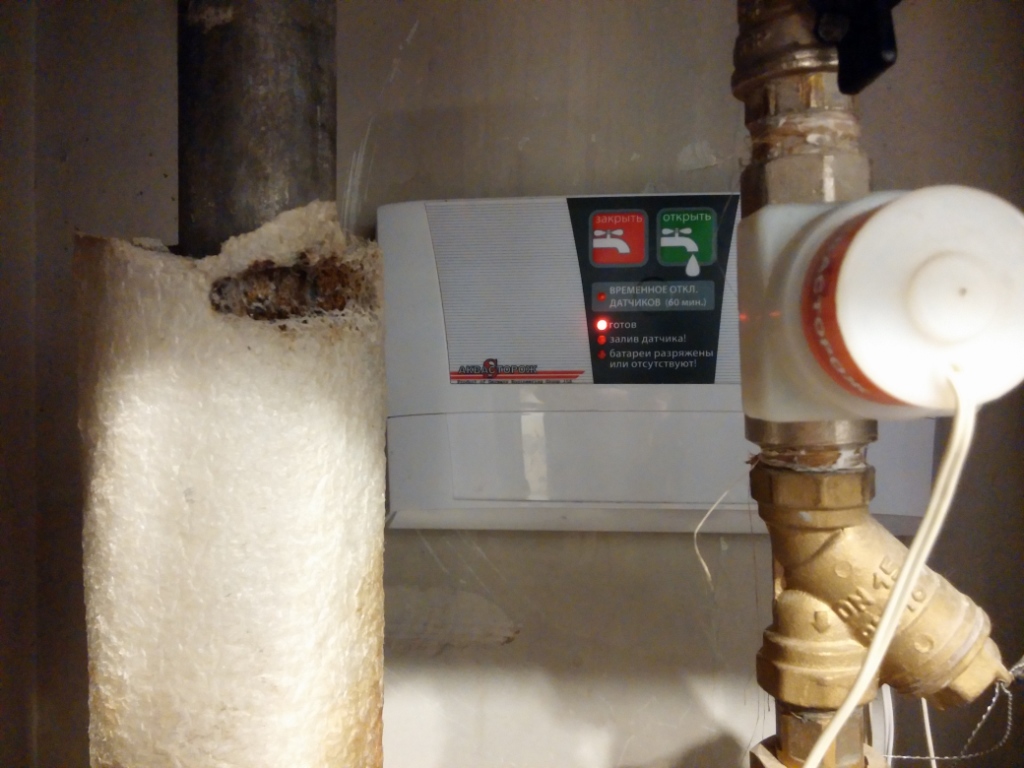
If the system is assembled correctly, after pressing the power button, it starts working. This is usually indicated by a glowing indicator on the controller. When a leak occurs, the indication color changes from green to red, a buzzer sounds and the tap blocks the water supply.
To eliminate the emergency, the manual valves of the pipeline are closed and the power to the controller is turned off. Then the cause of the accident is eliminated. The leakage sensors are wiped dry, the controller is powered on and the water supply is opened.

Properly installed leak protection system reliably protects against all sorts of troubles associated with water leakage
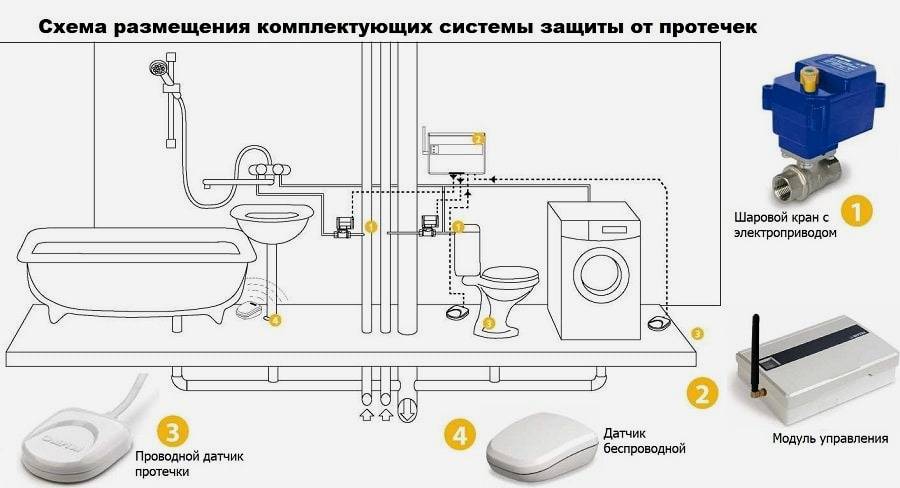
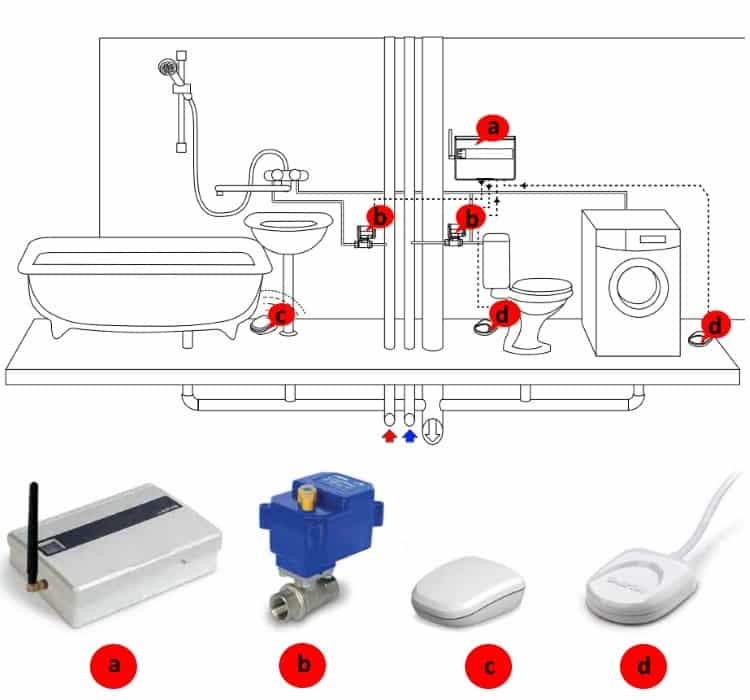
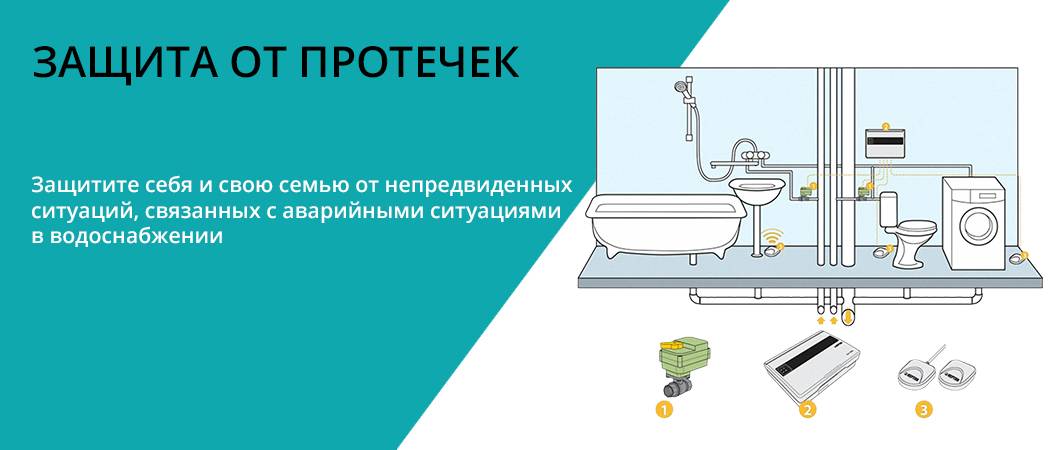
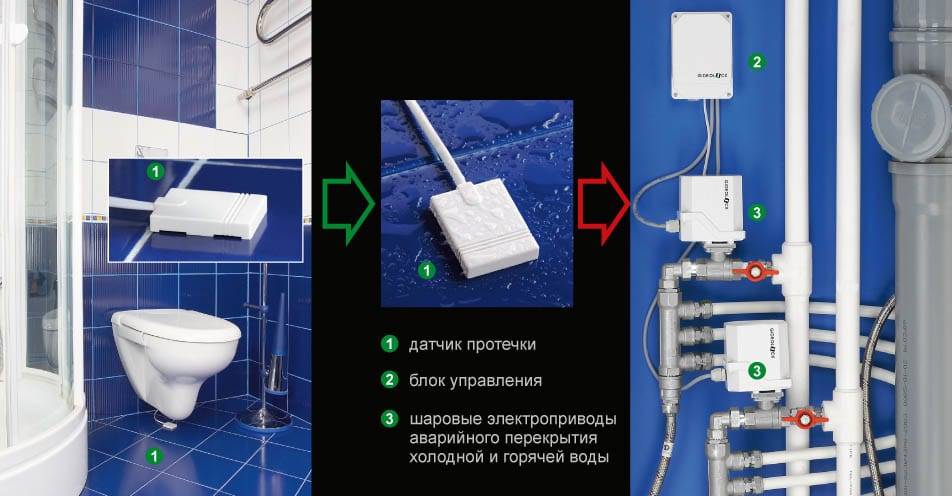
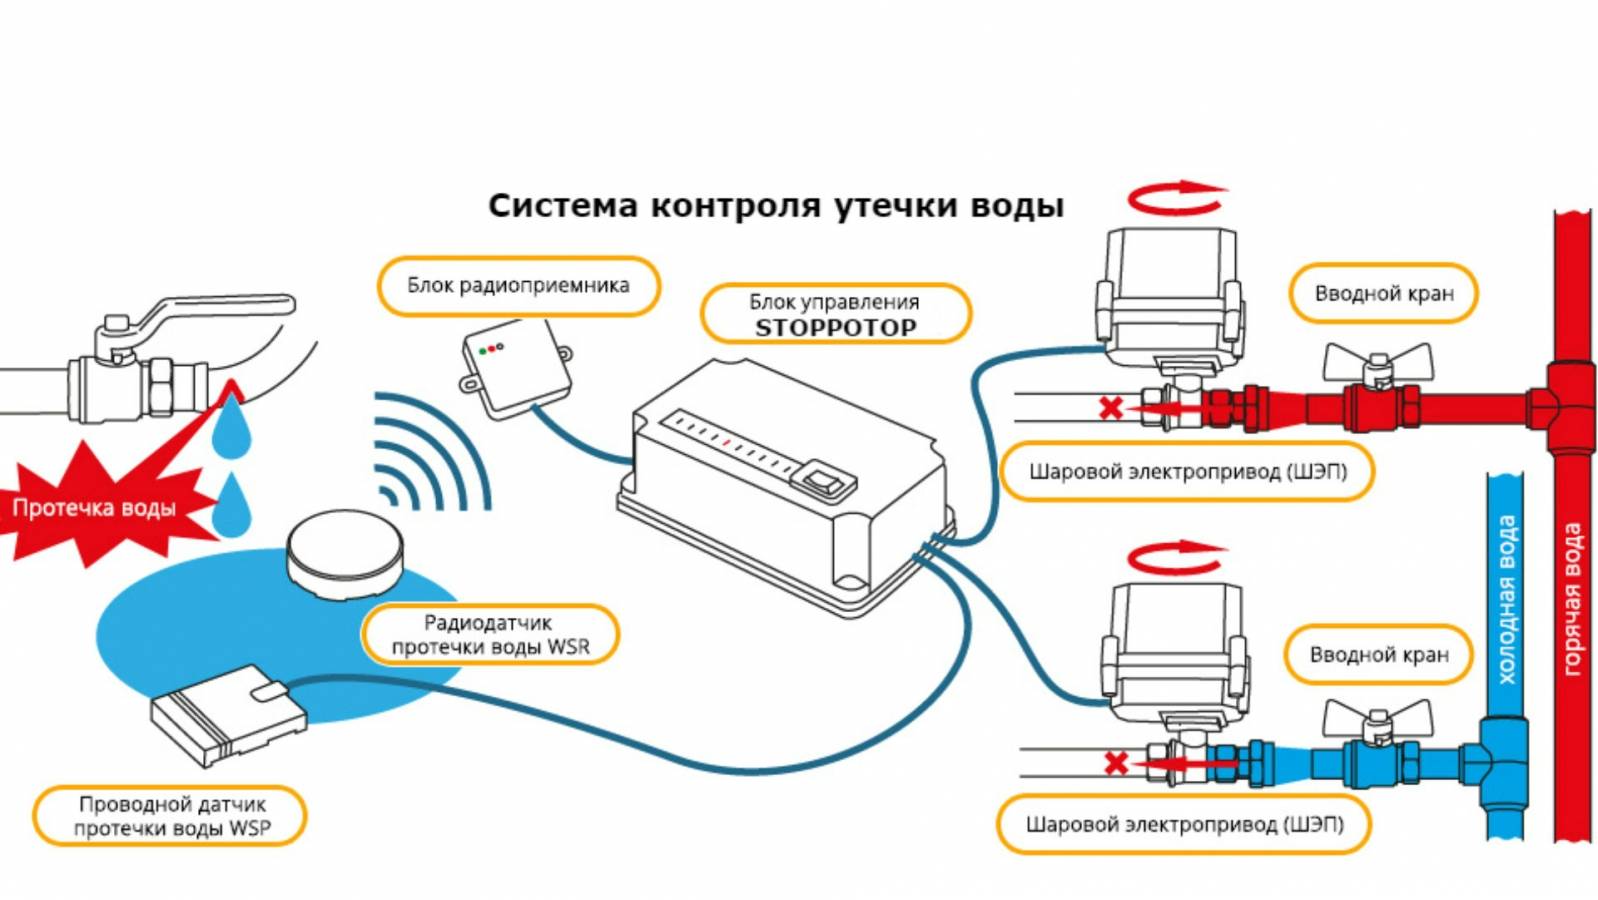
Installing a flood sensor from the manufacturer
Collecting the protection system is not difficult. The control box is mounted on the wall. Then the batteries are mounted. If necessary, make a power supply.
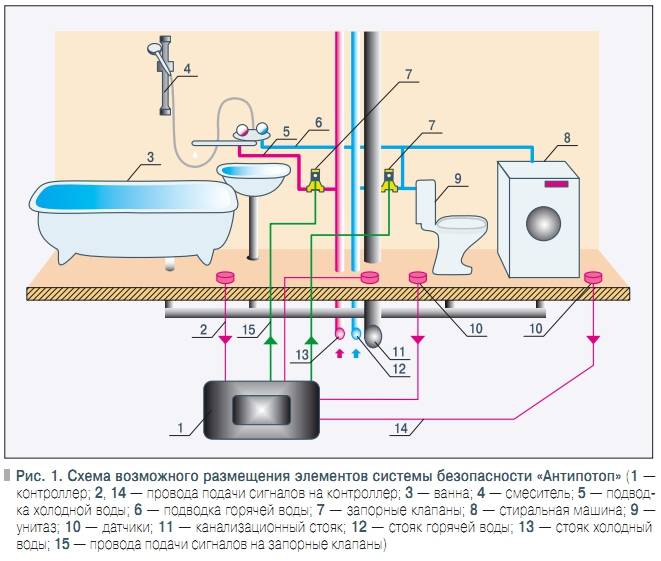
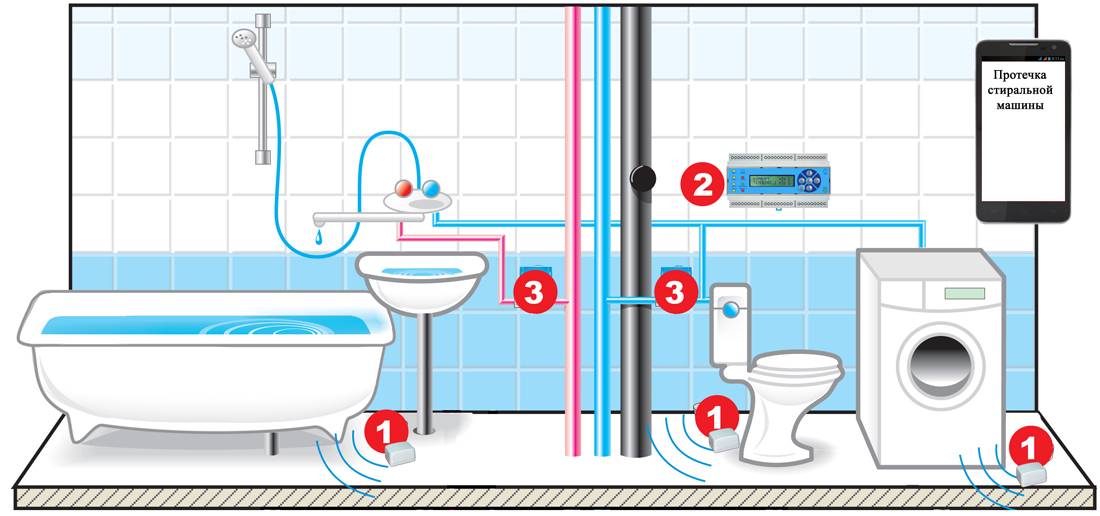
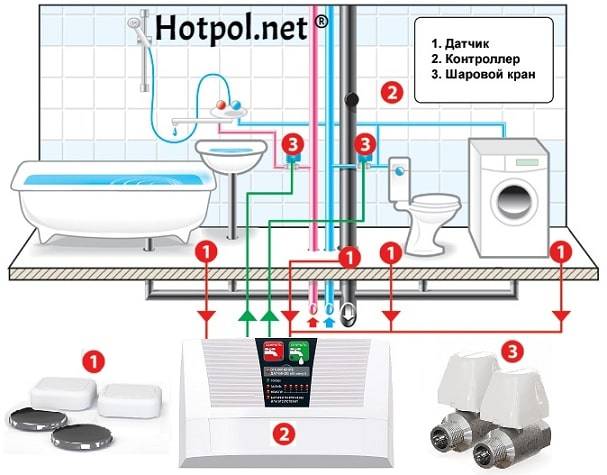
Sensor locations:
- Under the bath or shower;
- Under the sink and toilet;
- Under washing machines and dishwashers;
- Behind the radiators
- Immediately at the point of entry and installation of the counter.
Then the signal cable is laid. Next, connect the sensors to the controller. If the system is wireless, then the action is performed with each sensor.
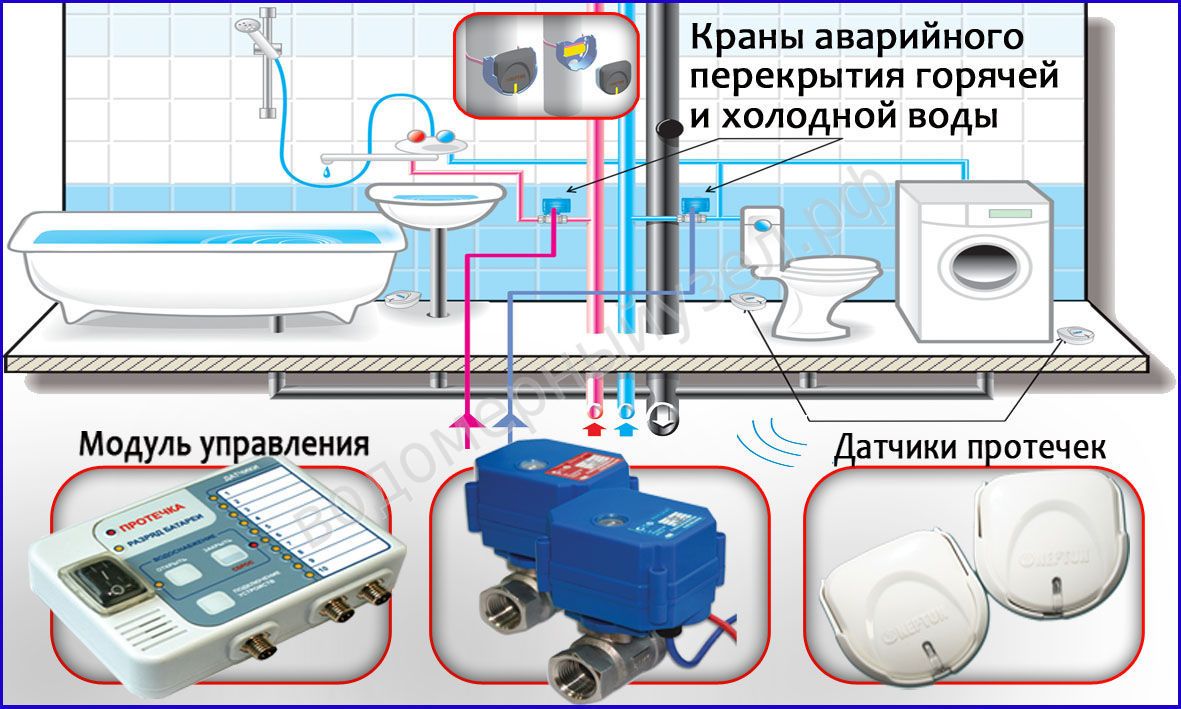
The ball valve is installed at the hot and cold water inlet points. It is also provided at the inlet of each riser or at the outlet of the boiler, if the system is autonomous. Servo drives are connected to the control unit. Everyone is given their own number and program.
This completes the installation process. You can safely go on vacation without fear of flooding your neighbors. The system is quite reliable, there is no doubt about its effectiveness.
Aquastorage systems
These systems of a Russian manufacturer are unique and are considered an innovative solution for protecting housing from water leaks, unplanned repairs and unnecessary financial expenses. The system is designed in such a way that they are able to block hot and cold water. In the event of an accident and moisture ingress, the system recognizes a leak, reacts instantly and gives a sound or light signal.
More
"Aquaguard" classic
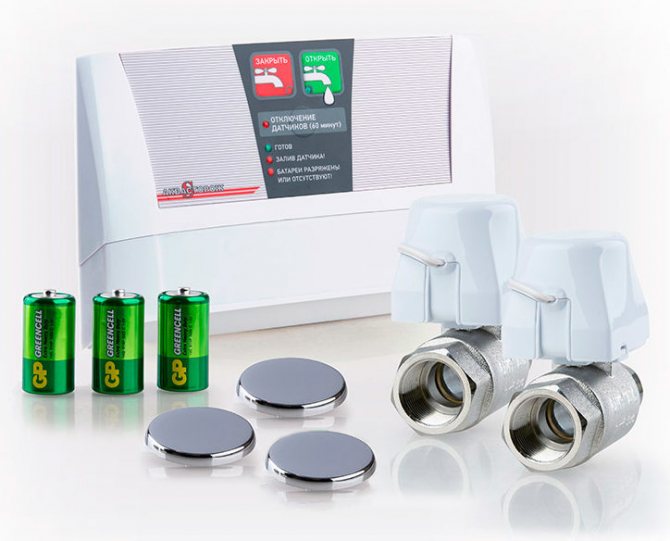
The device has three sensors, instantly and automatically blocks the supply of cold and hot water. Protect property and home. Light and sound sensors located on the central unit will instantly respond to water leakage and warn the owner.
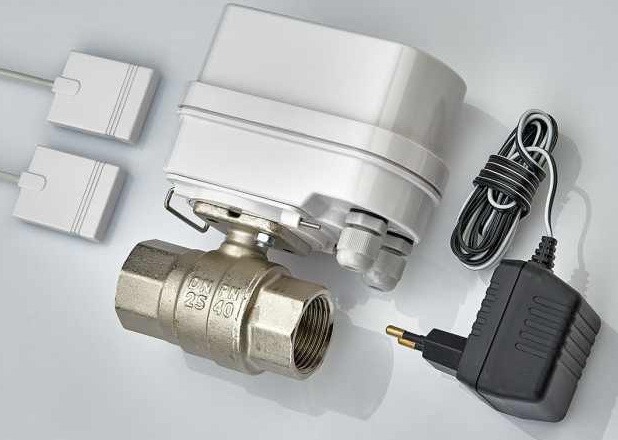
The device is equipped with:
- control unit;
- three sensors;
- ball valves - 2 pcs.;
- a set of batteries;
- set of wires.
| Specifications | Description | |
| 1 | Manufacturer: | Aquaguard |
| 2 | Producing country: | Russia |
| 3 | Color: | White |
| 4 | Crane closing time, sec: | 2.5 |
| 5 | Sensor height, cm: | 1.3 |
| 6 | Controller height, cm: | 12 |
| 7 | Output power, W: | 40 |
| 8 | Pressure, bar: | 16 |
| 9 | Sensor length, cm: | 5.3 |
N"Aquaguard" classic
Advantages:
- brass taps;
- the device gives a signal with sound or light;
- signal transmission method - wired;
- minimalism in the style of execution;
- it is possible to connect several sensors at the same time;
- the open circuit monitoring function is active;
- sufficient wire length.
Flaws:
not found.
"Aquaguard Expert"
The system will reliably and effectively protect apartments from the flood and its consequences, promptly respond and notify.

The device has a power of 40 W, is able to respond to water leakage within two seconds and block the water supply.
Equipment:
- Control block;
- battery pack;
- ball valves - 2 pcs;
- sensors - 4 pcs;
| Specifications | Description | |
| 1 | Type of | leakage protection system |
| 2 | signaling | sound, light |
| 3 | Maximum number of taps | 6 |
| 4 | Maximum number of sensors | unlimited |
| 5 | housing material | plastic, brass |
| 6 | pressure, bar | 16 |
| 7 | Response time | 2.5 seconds |
"Aquaguard Expert"
Advantages:
- the ability to connect an additional unlimited number of sensors;
- type of signal transmission - wired;
- average closing time - 2.5 seconds;
- Batteries included;
- sufficient number of sensors included.
Flaws:
short wire.
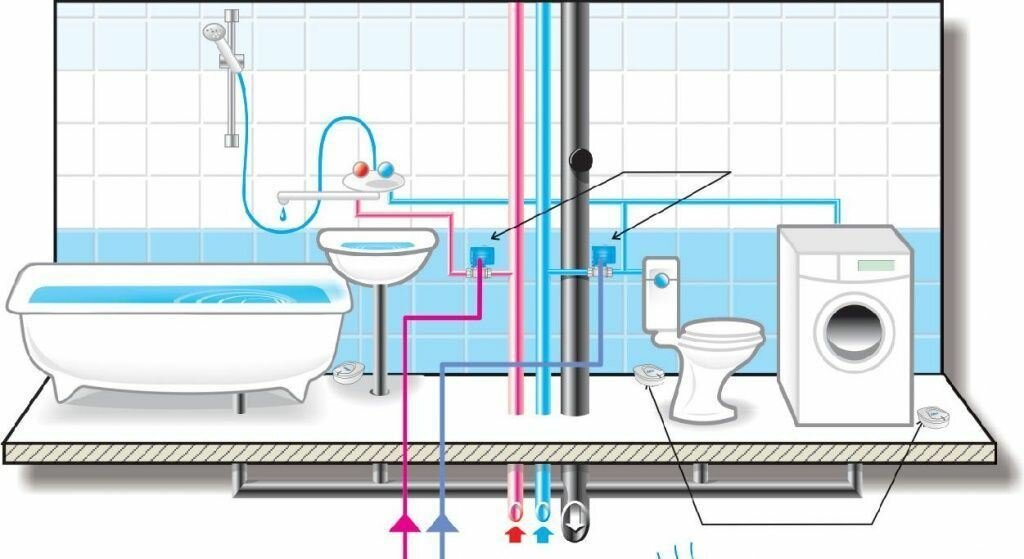
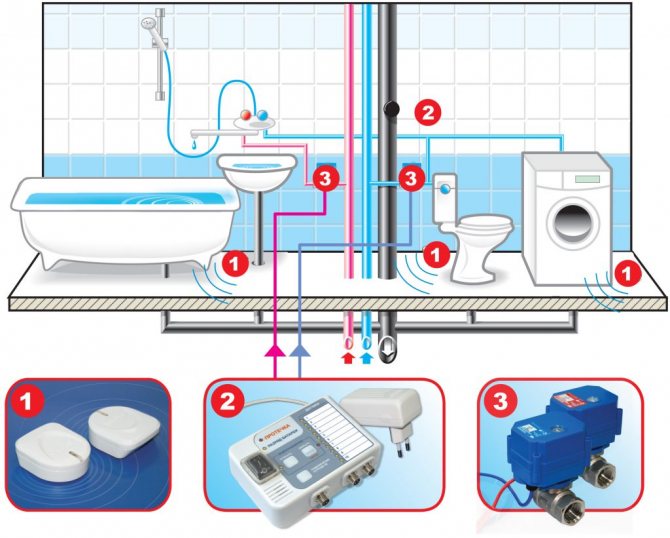
Sensors and their location
It would be logical to place the sensors where there may be water breakthroughs:
- under the bath;
- dishwasher;
- washing machine;
- boiler plant;
- heating boiler;
- batteries and towel dryers;
- at the lowest points of the floor. This is where the water will begin to accumulate;
- if the bathroom is separate, you can put one signaling device in the area of \u200b\u200bthe toilet bowl.
Moreover, the sensor should not be located nearby, but under something. Strictly speaking, in places where water is likely to appear or accumulate. We will talk about the response time of the sensor, it is different for each manufacturer, but the whole system may not work properly precisely because of the unsuccessful location of the sensor.

If this is a radio sensor, then it is worth considering the distance at which it will work effectively. It may happen that a wall or partition interferes with the radio signal.

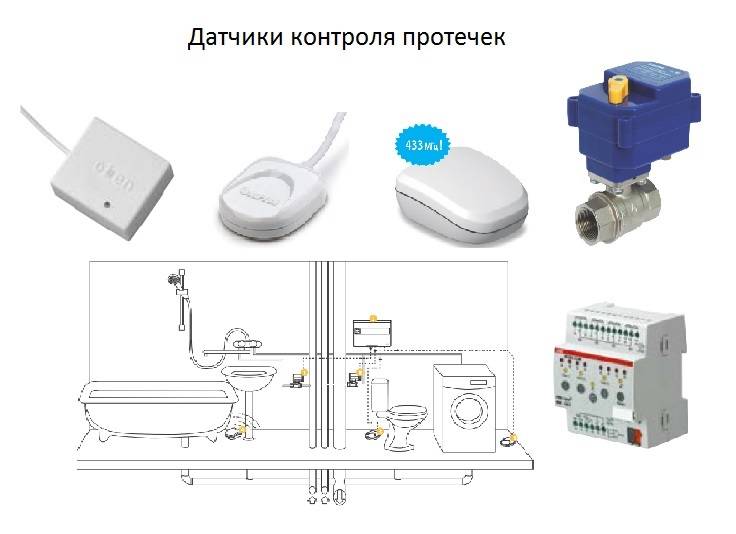
There are also two options for installing the sensor:
- Level with the floor.
- On the surface of the floor.
The difference in height gives a gain in the scale of flooding.
It is difficult to mount to the level on your own - you need special tools, but on the surface it is easier. Just place the sensors in areas of probable flooding.
Apartments
It is clear that in apartment buildings houses centralized water supply and in case of an emergency, it is more comfortable to cut off not the entire riser, but only the wiring in the apartment. But there is a small problem here. It is more logical to assume that shut-off valves on automation should be correctly installed on pipes BEFORE water meters.
But the management company insists on such modernization AFTER the meter. And if a tee is placed after the counter to connect the toilet flush tank? Automation simply nowhere to put.
There is, of course, a way out.
Before installing leakage protection systems, it is better to contact the management company and agree on this issue.
One more situation. If the apartment has two water supply systems. One for the bath and bathroom, and the second for the kitchen for washing. As they say, there are two ways.
- Cardinal - to install automation on all risers.
- Economical - to protect only the bathrooms.
But, nowadays dishwashers are popular and they also need to be controlled. Add to this the washing machine in the kitchen. And you get a full zone of control. The correct solution is to install two modules. Of course, there is also an economical option - to stretch the wires from the control module for sensors through the entire apartment to the kitchen. The decision, as always, is up to the owner of the home.
Heating completes the picture. In old houses, they also require control. Exit - in front of each battery you need to put an automatic shut-off valve with a flood sensor.
A private house
Most often, water is supplied to the house by a pump and then diverges through the system. Leaks and causes are the same as in apartment buildings. The water leakage protection system can be equipped here as well. The task is to turn off the pump in case of flooding. So, turning on / off the pump should be through a relay. Through it, connect the controller, which, when flooded, will give a signal to close the ball valve or water supply valve. Water consumption schemes for private houses are different, you need expert advice. He will study the water distribution scheme and tell you how to properly place locking devices to prevent flooding. Servo-operated taps after the pump are usually sufficient.
But heating also consumes water. And the boiler should not work without water. There are different situations. But the main task is not to leave it without water and start circulation along a small circuit. Again, we will not describe the different options - it is more correct for the owner to get advice from experts in boiler equipment. It's better not to joke with this.
There are systems with automated heating boilers. If an accident occurs and the leakage protection works, the boiler will automatically stop due to critical overheating.This, of course, is not a standard situation for him, but not critical.
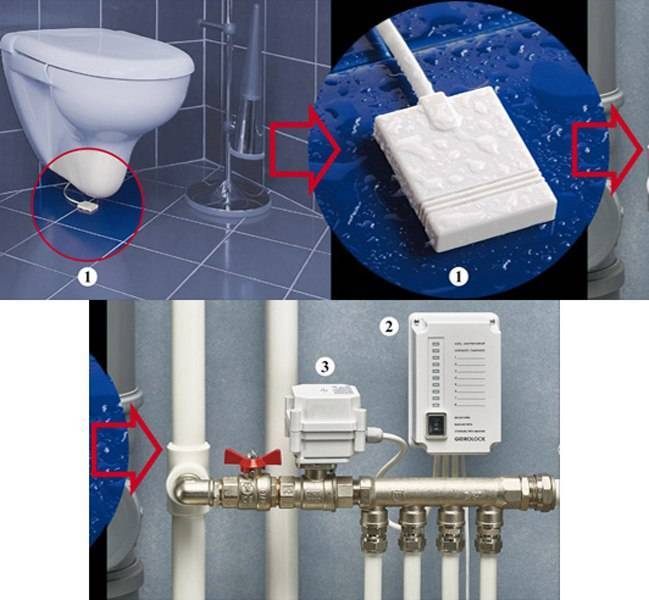
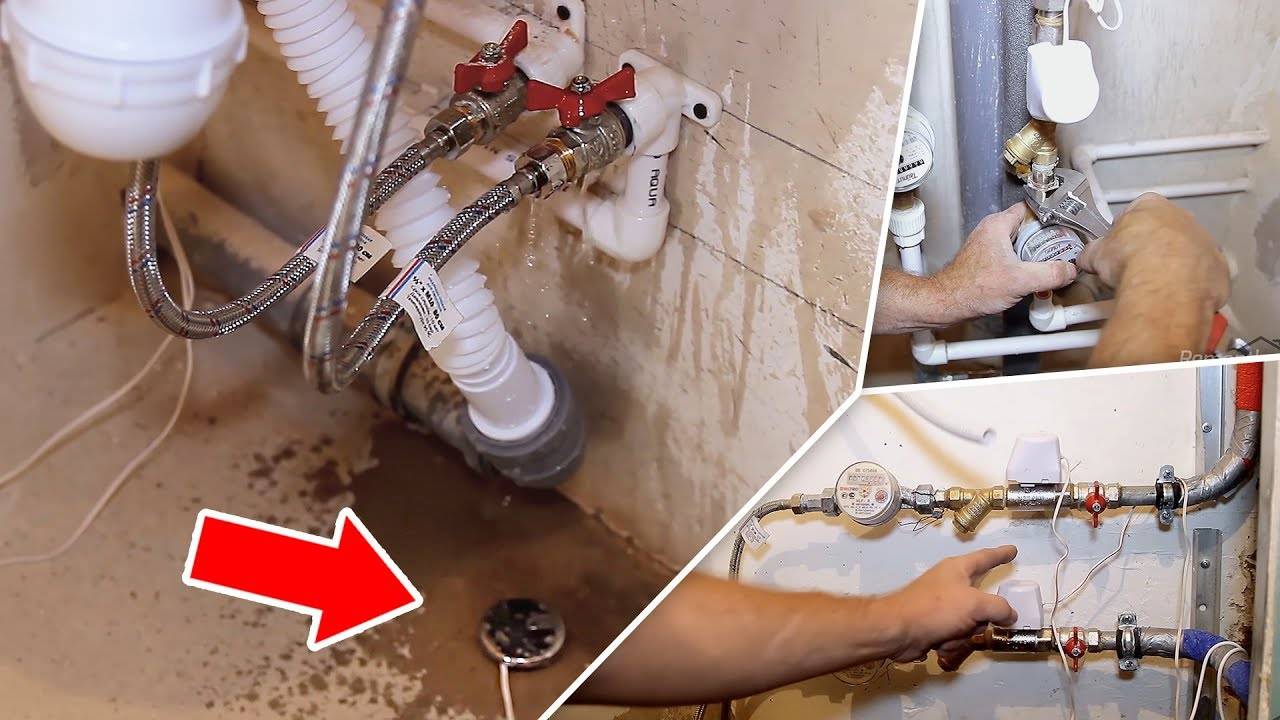
How to install "Aquastop" yourself
Installation of a water leakage sensor with a valve will include 3 stages at once - installation of ball electromagnetic valves with a shutter mechanism, leakage sensors, and after installation of the controller. Ball valves must always be installed downstream of inlet type valves.


The shut-off valves cut into the water supply lines - first, the water supply should be shut off, the wiring should be disconnected from the inlet valves, and then the tap should be installed. If the pipe outlet will have an internal thread, then the tap equipment should be screwed into the input valve. If the thread is of an external type, then first you need to install an American - the fitting will help connect both sections of the pipe and not rotate them.
The threaded connection must be sealed, and for this you can use FUM tape, tow or sealant. The American should be tightened with a key of the required size. When installing an Aquastop faucet, you must first determine the direction of water flow. It is impossible to turn the stop valves on the other side, and for this the direction of flow is marked with an arrow on the tap. The disconnected wiring must be connected to the Aquastop faucet. Install a filter, meter and other elements of plumbing.
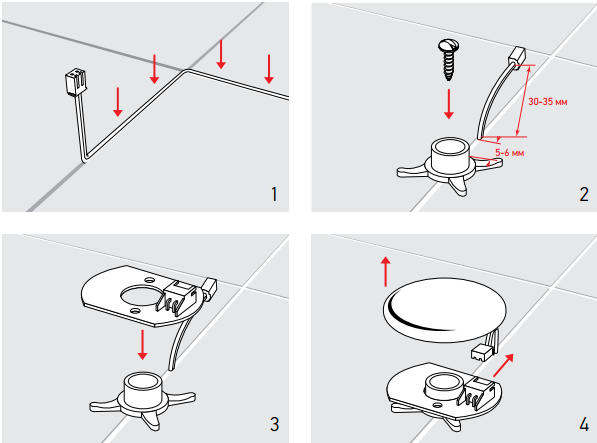
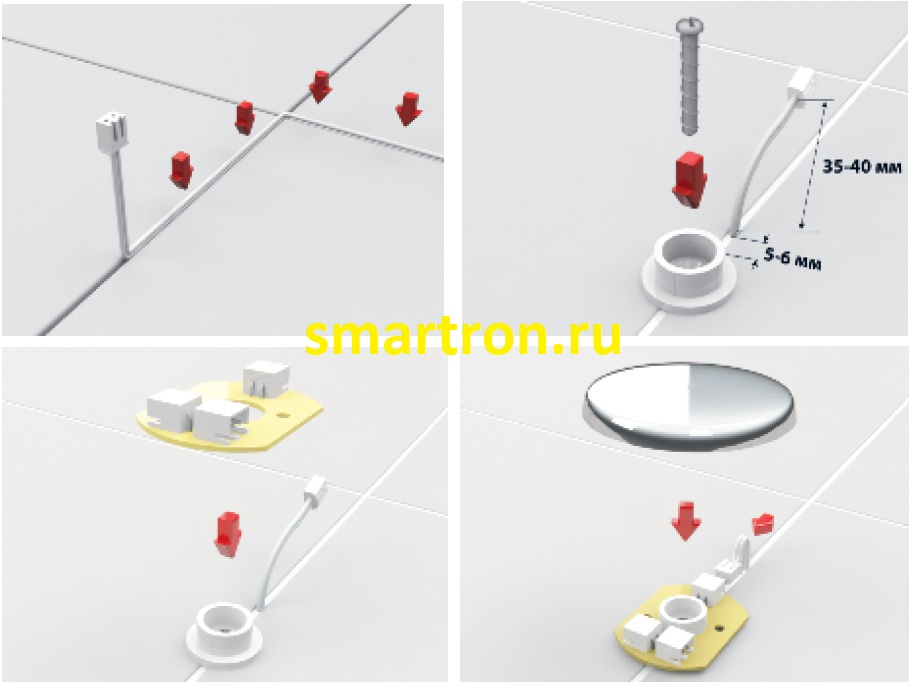
Humidity should not exceed 70%. Markings should be applied to the wall by attaching the bottom plate to the base, and then mark the mounting points for the screws. Having drilled holes in the right places, you should fix the plate on which the controller will be installed.
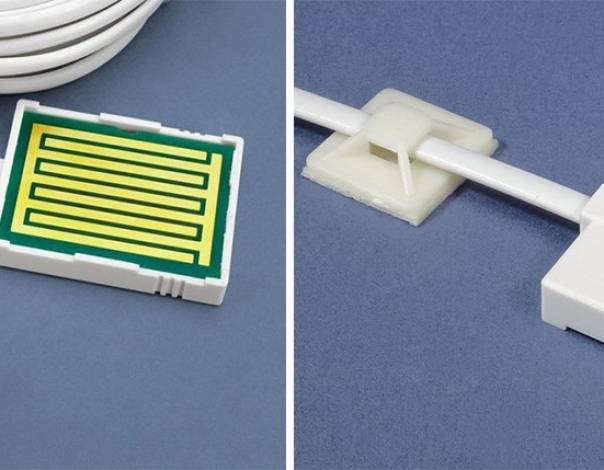
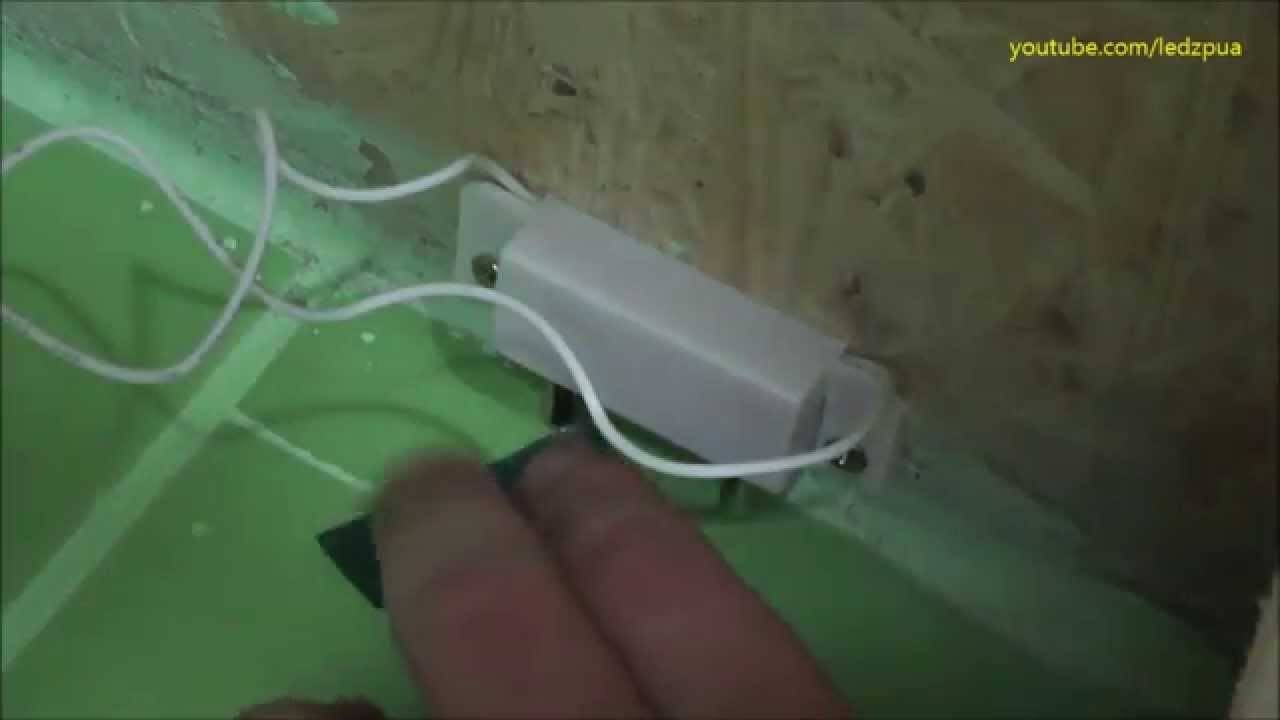
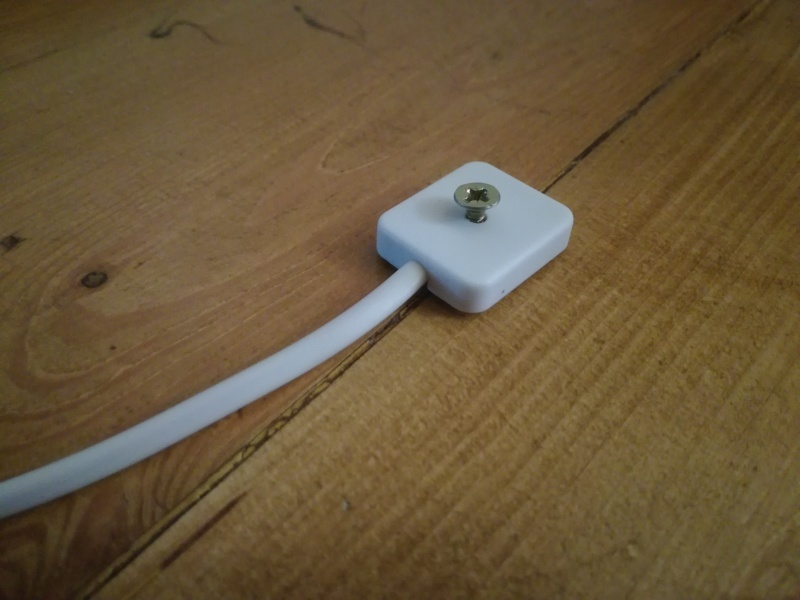
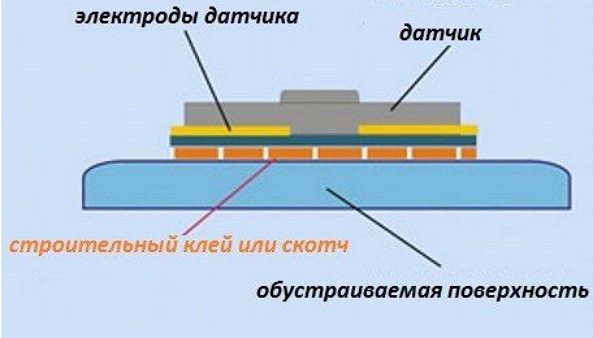
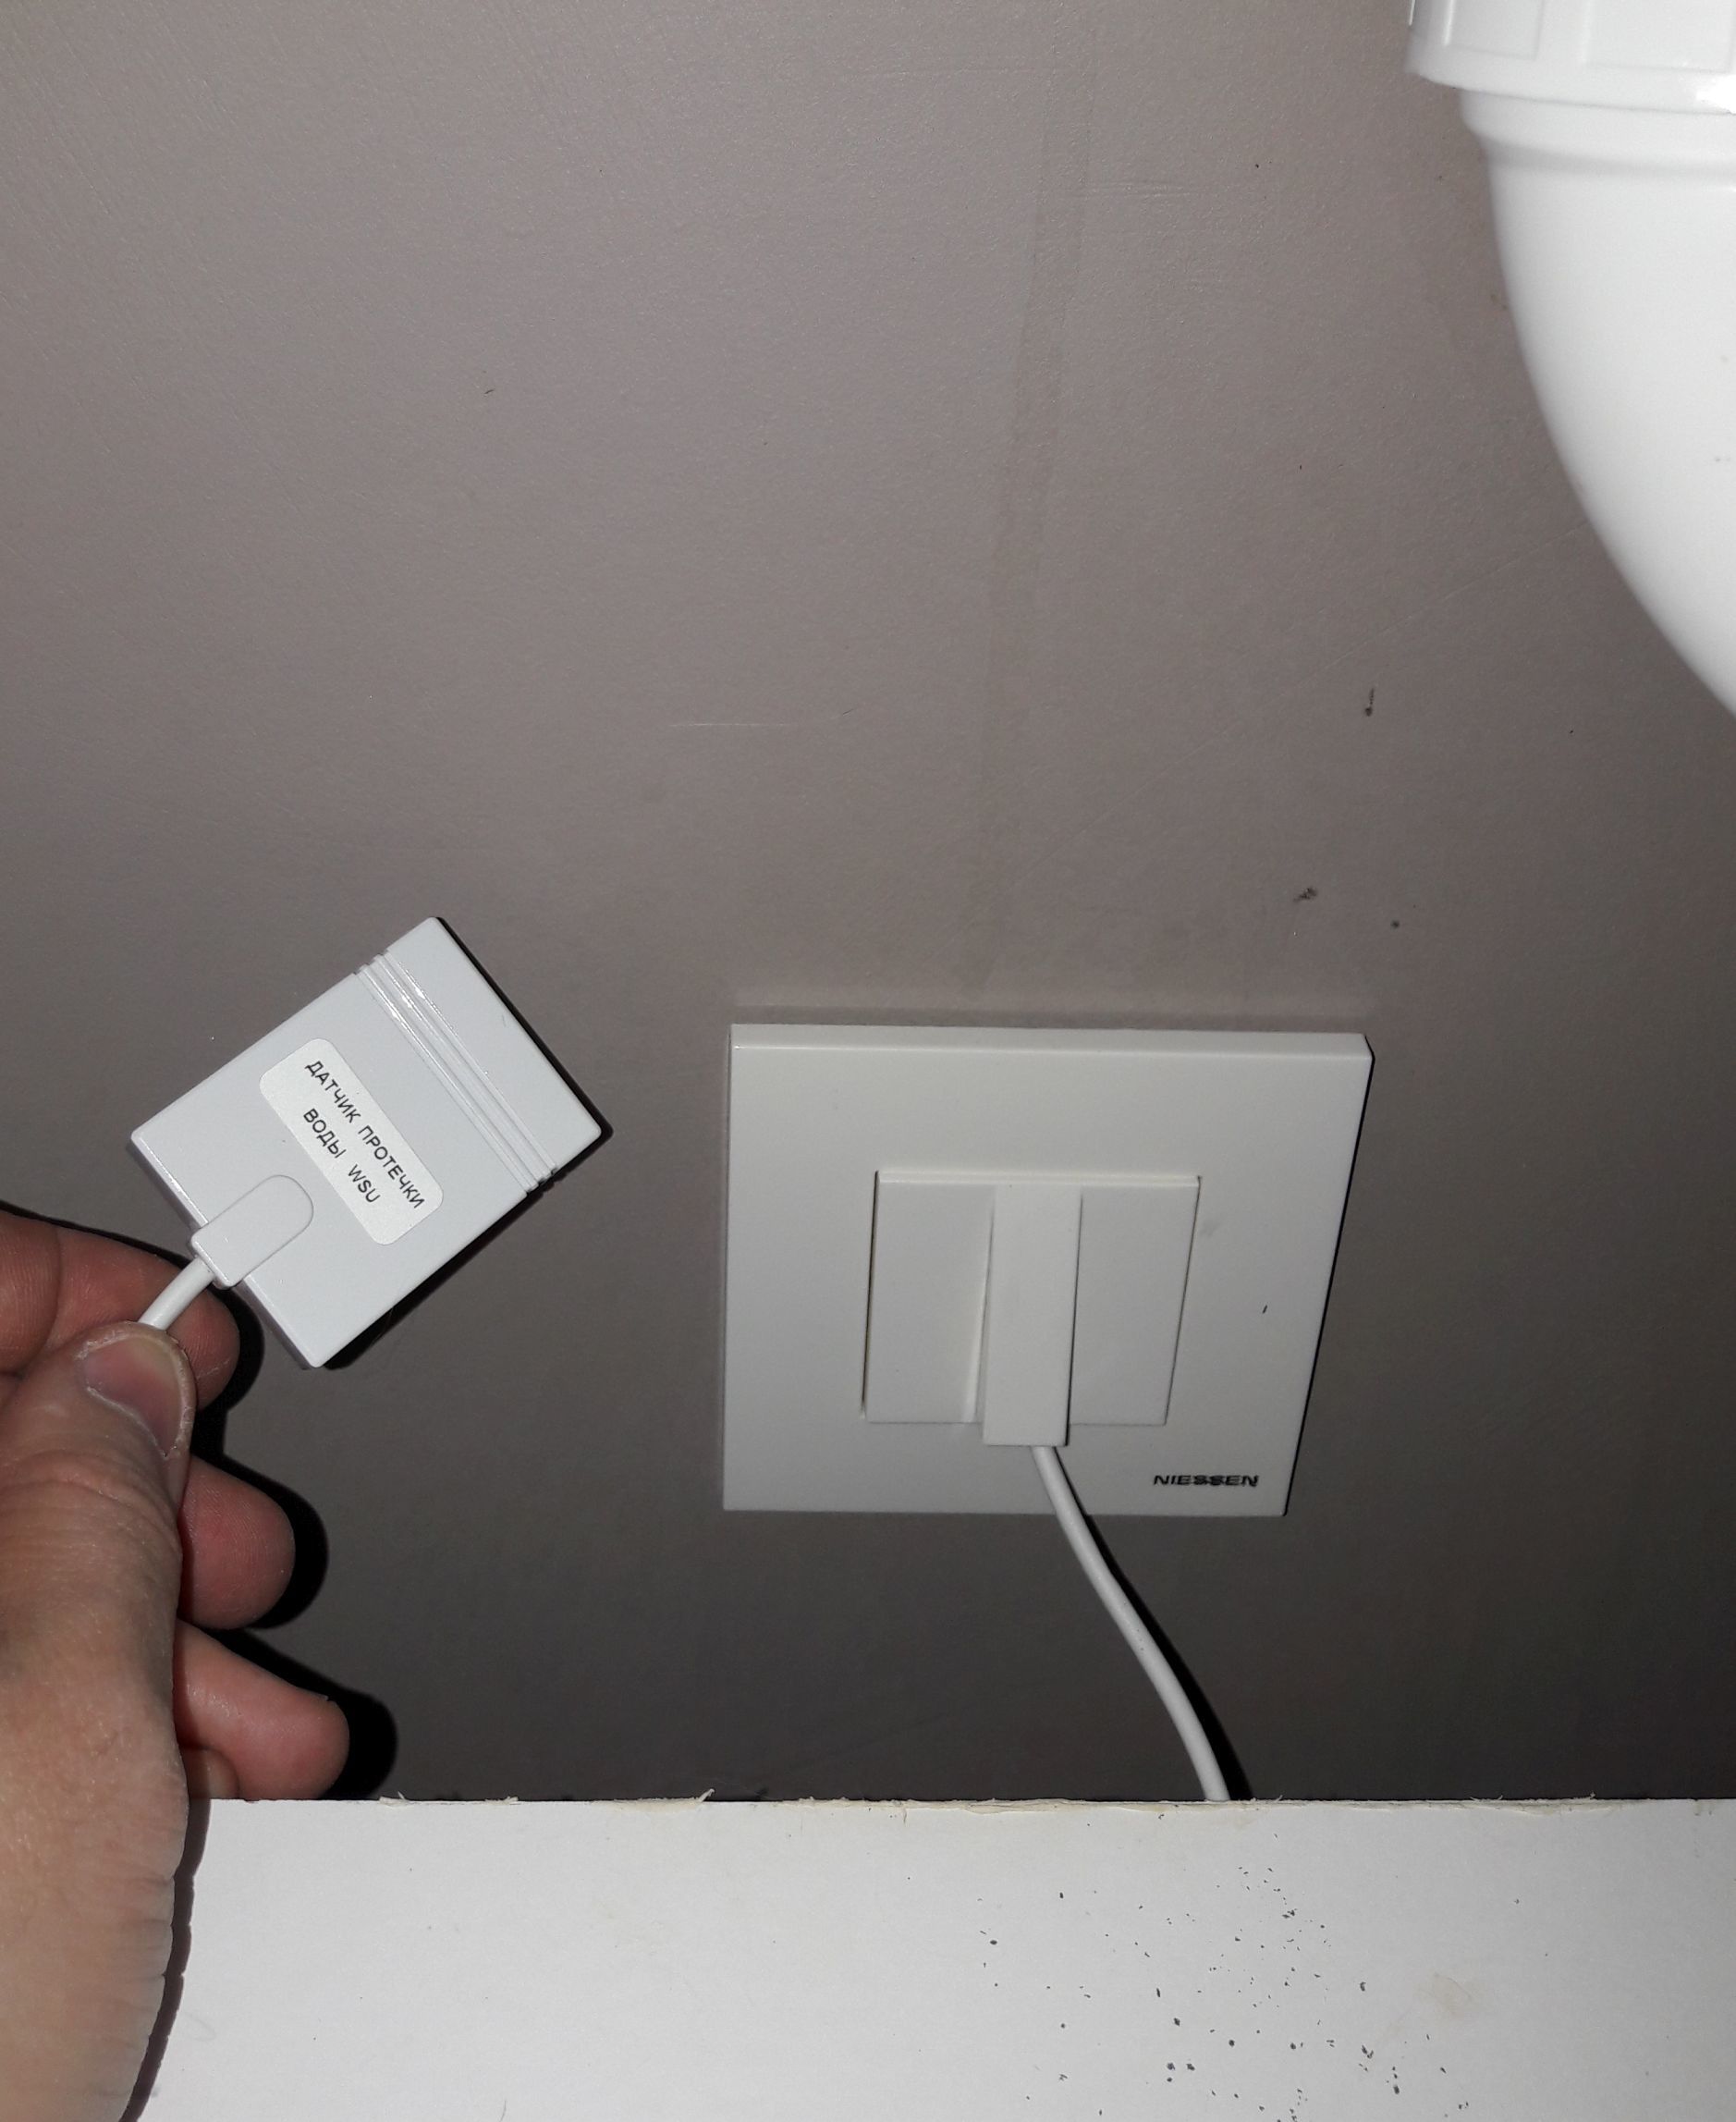
When fixing the sensor on the floor, the wire can be hidden in the plinth, in the seams between the floor tiles. Fix the sensor base on the floor. A decorative cap should be put on the plate. Wireless sensors can also be included in the kit, which will greatly simplify the installation procedure. Sensors should be mounted on double-sided tape.
Before putting the system into operation, it must be configured:
- Connect taps to the controller.
- Connect the sensors to the power supply. The sockets for connection on the board will be numbered and also have the corresponding designations. Wireless sensors do not need to be connected.
- Connect the battery pack, and all wires should be led out through a special hole in the case.
That's all, as you can see, the setup will not cause trouble.
Connection and setup
The general control of the crane is carried out through a two-channel ZigBee relay Aqara.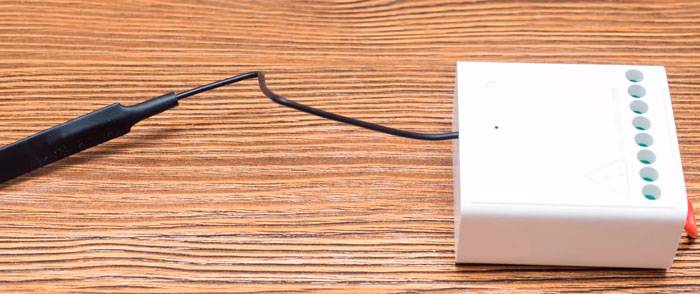
It is slightly larger than a matchbox.
It has 8 pins on one side and an external zigbee antenna on the other.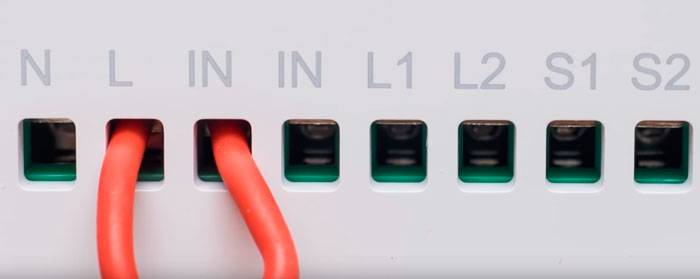
The two contacts “L” and “IN” are initially shorted by a jumper.
Mistake #3
Be sure to check how well the terminals in these connectors are clamped, otherwise, if the contact disappears, you can burn the relay.
When the jumper is loose, power to the internal circuitry is lost. As a result, losing its shunt, the built-in power meter burns out.
L1 and L2 are the control phases through which the load is connected.
S1 and S2 - terminals for a mechanical two-gang switch. Through them, you can manually close or open the water by simply pressing a button, similar to how you turn off the light in the bathroom.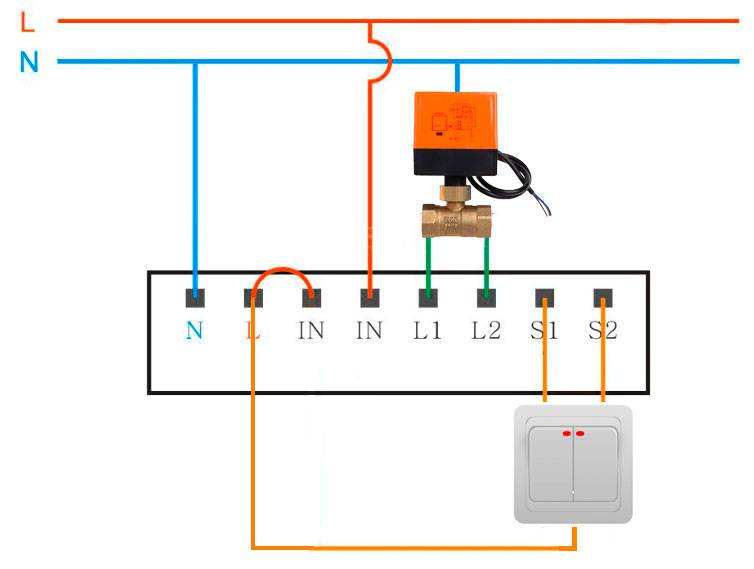
The automation connection is as follows. First of all, you apply power to the relay.
Connect the neutral conductor to the first contact, and the phase conductor to the fourth. Next, this zigbee relay needs to be connected to the gateway. To do this, use the connection wizard through the MiHome application.
In the gateway plugin, select the Device tab, click Add Child Device and select the wireless relay in the windows that open.
After that, on the relay need to press a button and hold it for 5 seconds until the LED starts flashing. After a while, the device will report successful pairing.
Open the first setup step - select a location (Select Room).
In the second step, set the device name. The last stage is the successful addition of the device to the system.
As a result, it should appear in the list of gateway devices and the general MiHome list.
Water leakage sensor which company is better to choose
Polls have shown that users prefer both Russian and foreign brands, which are working hard in the direction of innovation, creating new multifunctional devices. The rating provides brief information on each of them:
- Aqara is a trademark of the well-known Xiaomi corporation, established in 2015, which produces smart home products. All devices created by the brand are made of environmentally friendly plastic, they are fireproof and do not consume much energy.
- Rubetek is a manufacturer from Russia that has been producing lines of smart devices since 2014. The company creates electronics not only for the home, but also offers a lot of ideas for small and medium-sized businesses, as well as for developers, management companies, installers.
- Digma is a trademark owned by Nippon Klick from the UK, which is recognized as an international manufacturer of digital electronics.Digma has been developing and creating smart devices since 2005, having reached considerable heights in this direction today.
- Hiper is another UK brand that has been making home appliances and electronics since 2001. All products of the company are certified, they meet modern safety and environmental standards, while having excellent technical characteristics.
- Ajax is an international technology company from Ukraine, founded in 2011, that produces wireless security systems. Ajax products are represented in more than 90 countries and are in great demand due to their quality and innovative technologies.
- Neptun is a Russian company that has been manufacturing electrical heating systems, electrical products and engineering infrastructure solutions since 1991. The trademark has many awards and prizes, including international ones, confirming the quality of the goods.
- Neo is another manufacturer from Russia that produces smart appliances and electronics in serial and single quantities. In its developments, the company uses modern technologies in the field of navigation, power supply and wireless communication, which allow achieving good quality results.
How to signal a water leak
The solution to the issue came to life from the yachting world. Since the ship's premises of the lower tier (especially the holds) are below the waterline, water regularly accumulates in them. The consequences are clear, the question is how to deal with it. It is irrational to set up a separate watch sailor for control. Then who will give the command to turn on the pump?
There are effective tandems: a water presence sensor and an automatic pump.As soon as the sensor detects the filling of the hold, the pump motor turns on and pumping is performed.
The water sensor is nothing more than a simple swivel float connected to a pump switch. When the water level rises by 1-2 cm, the alarm and the pump motor are activated at the same time.
Comfortable? Yes. Safely? Of course. However, such a system is unlikely to be suitable for a residential building.
- Firstly, if the water reaches a level of 1-2 cm over the entire area of the room, it will run through the threshold of the front door to the landing (not to mention the neighbors below).
- Secondly, an exhaust pump is completely unnecessary, since it is necessary to immediately find and localize the cause of the breakthrough.
- Thirdly, the float system for rooms with a flat floor is inefficient (unlike boats with a keeled bottom shape). While the “necessary” level for triggering is reached, the house will fall apart from dampness.
Therefore, a more sensitive alarm system against leaks is needed. This is a matter of sensors, and the executive part can be of two types:
1. Alarm only. It can be light, sound, or even connected to a GSM network. In this case, you will receive a signal on your mobile phone, and you will be able to call the emergency team remotely.
2. Shutting off the water supply (unfortunately, this design does not work with the heating system, only plumbing)
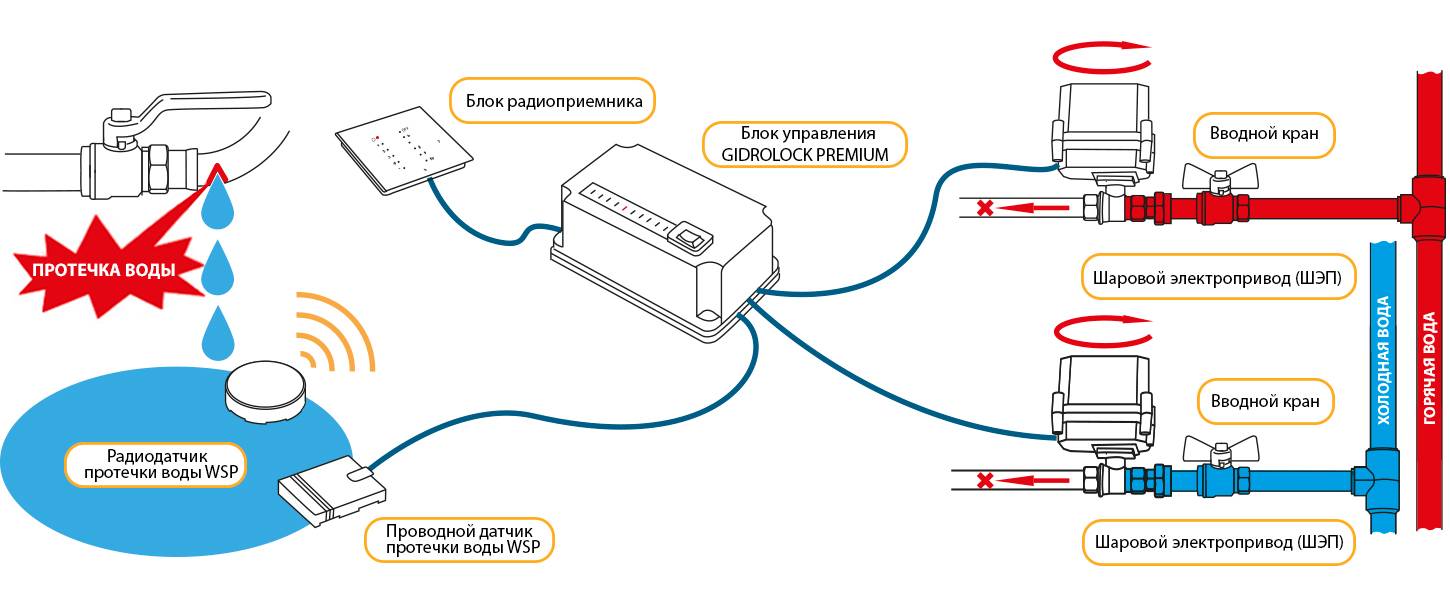
After the main valve, which supplies water from the riser to the apartment (it does not matter, before or after the meter), a solenoid valve is installed. When a signal is given from the sensor, the water is blocked, and further flood stops.Naturally, the water shutdown system also signals a problem in any of the above ways.
These devices are offered in a wide range of plumbing stores. It would seem that the material damage from the flood is potentially higher than the price of peace. However, the majority of citizens live by the principle "until the thunder breaks out, the peasant will not cross himself." And more progressive (and prudent) homeowners make a water leakage sensor with their own hands
Naturally, the water shutdown system also signals a problem in any of the above ways. These devices are offered in a wide range of plumbing stores. It would seem that the material damage from the flood is potentially higher than the price of peace. However, the majority of citizens live by the principle "until the thunder breaks out, the peasant will not cross himself." And more progressive (and prudent) homeowners make a water leakage sensor with their own hands.
Do-it-yourself leak protection
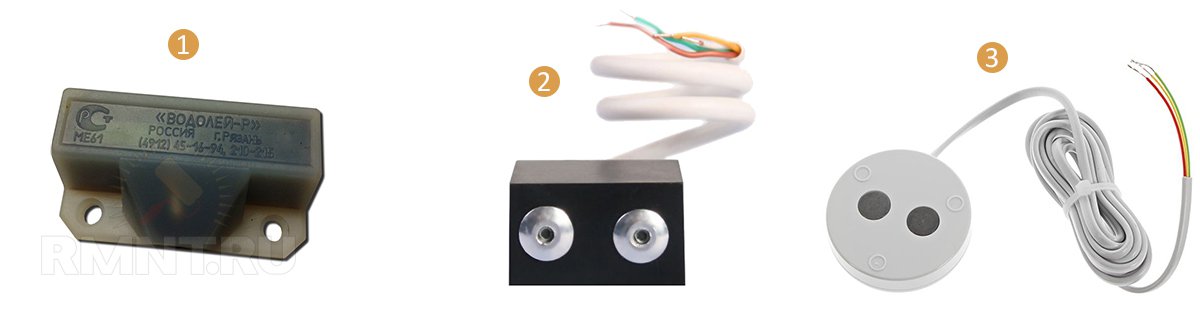
Any person who is familiar with a soldering iron and has minimal skills as an amateur radio electronics can assemble an electrical circuit that works on the appearance of an electric current in it if there is water between the contacts. There are many options, both simple and more complex. Let's give some examples.
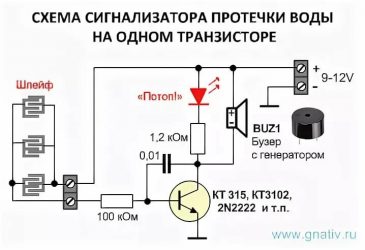
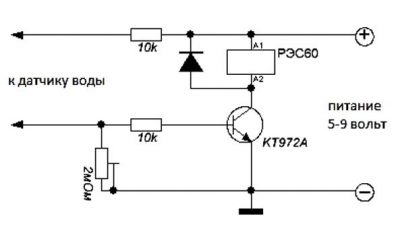
The easiest way is based on the use of a transistor
The circuit uses a fairly large range of composite transistors (for details about which models we are talking about - see the image). In addition to it, the following elements are used in the scheme:
- power supply - a battery with a voltage of up to 3 V, for example, CR1632;
- a resistor ranging from 1000 kOhm to 2000 kOhm, which controls the sensitivity of the device to respond to the appearance of water;
- sound generator or signal LED light.
A semiconductor device is in a closed state in a circuit where the power supply is not allowed to make it work with the installed power. If there is an additional source of current caused by leakage, the transistor opens and power is supplied to the sound or light element. The device works as a signaling device for water leakage.
The housing for the sensor can be made from the neck of a plastic bottle.
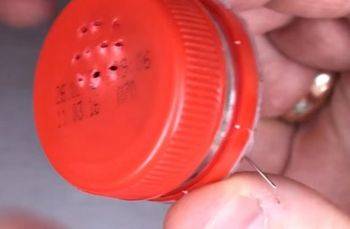
Of course, the above version of the simplest circuit can only be used to understand the principles of operation, the practical value of such a sensor is minimal.
Do-it-yourself water watchman
Unlike the previous method, where the presence of a person is required to eliminate the leak, here the signal is sent to an emergency device that automatically shuts off the water supply. To generate such a signal, it is required to assemble a more complex electrical circuit, in which the LM7555 chip plays the main role.
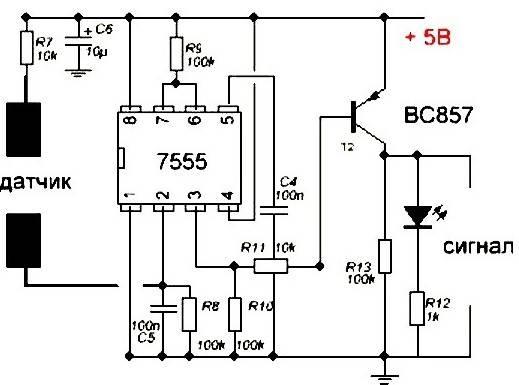
The presence of a microcircuit allows you to stabilize the signal parameters due to the comparative analog device contained in it. It works on those signal parameters that are necessary to activate the emergency device that shuts off the water.
As such a mechanism, a solenoid valve or a ball valve with an electric drive is used. They are built into the plumbing system immediately after the inlet water supply valves.
This circuit can also be used as a sensor to provide light or sound signals.
In conclusion, we can add that the leakage sensor is not a particularly complex device that will be inaccessible to the average man in the street, if you want, you can assemble it yourself at home. The functions that this small nondescript box performs should be implemented in every home, and the benefits from it are simply invaluable.
Installation of wireless water leakage sensors
Before installation, you need to determine the installation location. It is best to choose areas of room surfaces where leakage is most likely to occur. For example, under the sink or bathtub, near the dishwasher or washing machine. At the same time, we recommend installing a wired sensor in the sanitary cabinet for more convenient removal in case of an accident.
How to check the water sensor.
Checking the water sensor is done by simply wetting the sensor contacts. As a result, we get the operation of the system. This is the easiest and most effective way to check the sensor.
We also recommend wiping the sensor contacts once every 6 months to avoid desensitization of the sensor contacts.
If you use the Premium block, you can also turn the block off and on. After loading, the Premium unit checks for the presence and resistance of the WSP+ sensors connected to it. As a result, on the premium unit, those zones to which the WSP+ sensors are connected will light up, confirming that the unit sees them.
Attention, when checking wireless sensors, do not cover them from above with your hand, so as not to create a shielding effect


