- Portable washbasins on racks
- Washbasin with cabinet
- Varieties of reservoirs
- DIY Instructions
- From a plastic bottle
- From the canister
- On racks
- Built-in cabinet (moidodyr)
- heated
- Stationary washbasin
- Overhead and built-in washbasins
- Features of installing a mortise washbasin
- Stage 1
- Stage 2
- Stage 3
- Stage 4
- Stage 5
- In the interior
- Washbasins without bottom
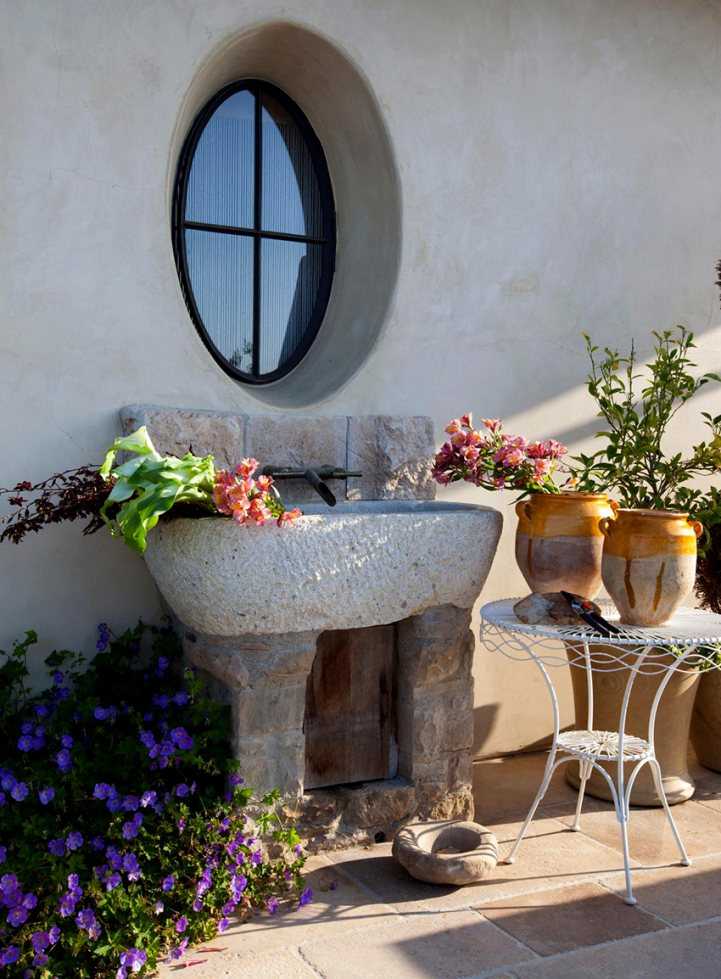
- Sink in solid wood
- wooden bath
- How to make a washbasin for a summer residence from a plastic bottle with your own hands: step by step instructions and photos
- Video: the process of making the simplest model of a street washstand
- Placement rules
- Do-it-yourself heated washstand
- Heating device
- practical way
- Instruction:
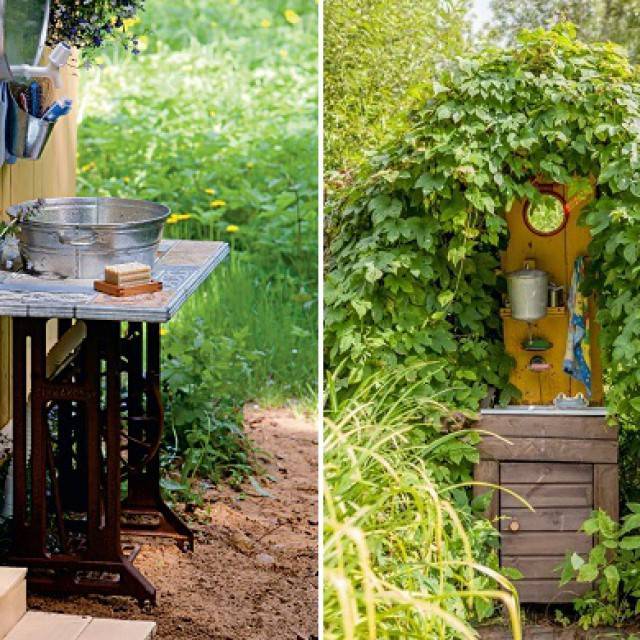
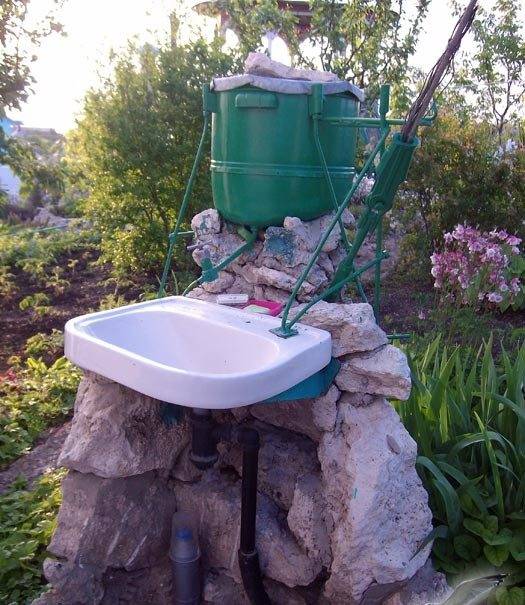
Portable washbasins on racks
This outdoor washbasin for giving does not have such a large selection of design variations as the previous one, however, it is much more practical for a number of reasons.
The main advantage can be understood from the name of this design, since, unlike most types of washbasins, they can be carried and used in the country house on the street. It is due to mobility that craftsmen from gardens and summer cottages take on their manufacture.
Washbasin on racks
For the manufacture of such a washbasin, it is necessary to make a container.This can be done according to the description presented a little higher, in the "Hinged from the canister" section. In addition to the tank, you will need a base on which it will hang. For its manufacture, you can use wooden bars, but better - a metal rod with a cross section of 5-7 mm. The fact is that structures from the latest version of materials are smaller in size, but lighter and more durable. Do-it-yourself washbasin for giving, photo:
In order to connect the rods, you need welding. The bottom platform should be wide to give stability to the structure. 2 variations of supporting elements are popular:
- In this case, the washbasin has 2 legs, which are located on two parallel rods. Due to the two legs, it is difficult to overturn the structure on its side, and the supporting parallel bars prevent falling back or forward.
- "H"-shaped. This scheme is similar in appearance and properties to the previous one. The only difference is an additional rod, it must be welded perpendicular to the foot supports, so that the letter "H" is formed. This additional element will protect the structure from driving around the legs.
The legs, as well as the support, are made of rods, their length can be different, but not more than one and a half meters, otherwise the structure may bend over time under the weight of water in the container. In order for the tank to stay on its "legs", two hooks can be welded. In addition, it can be hung up, or a small “basket” can be welded into which the container will need to be inserted.
Appearance
This design is quite simple in construction and does not take up much space, it can be carried and installed in those places where you need to wash your hands. This washbasin for giving without heating is very convenient to use.
Washbasins made of wood are less mobile due to their weight. Therefore, portable structures made of this material are quite difficult to meet.
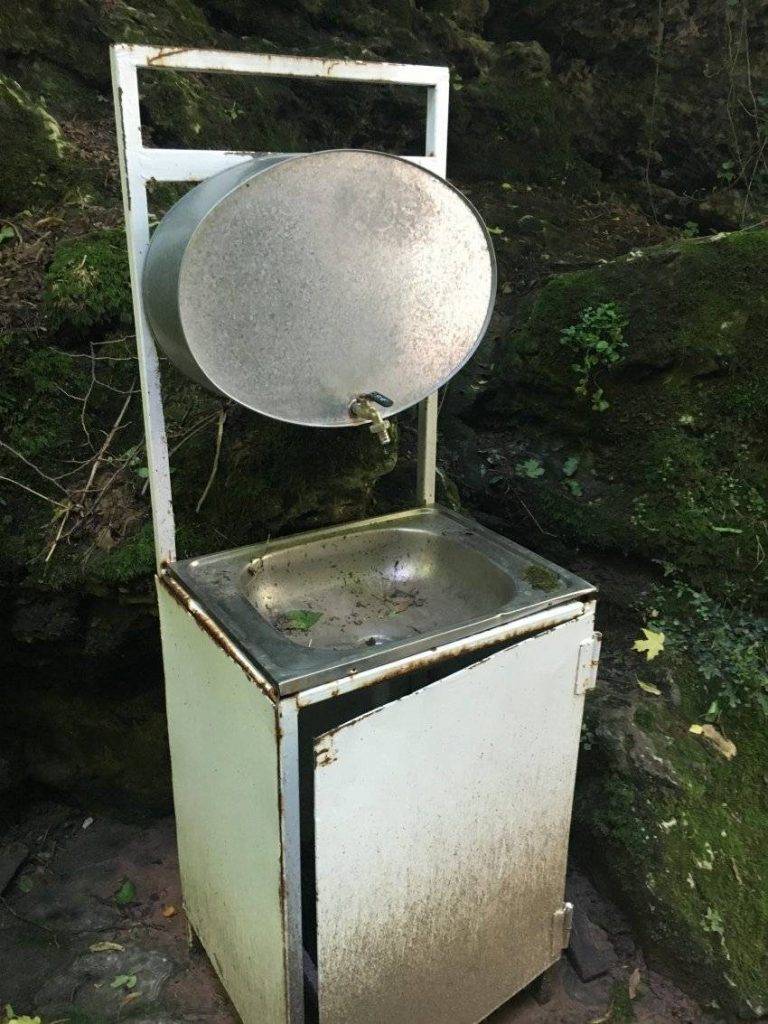
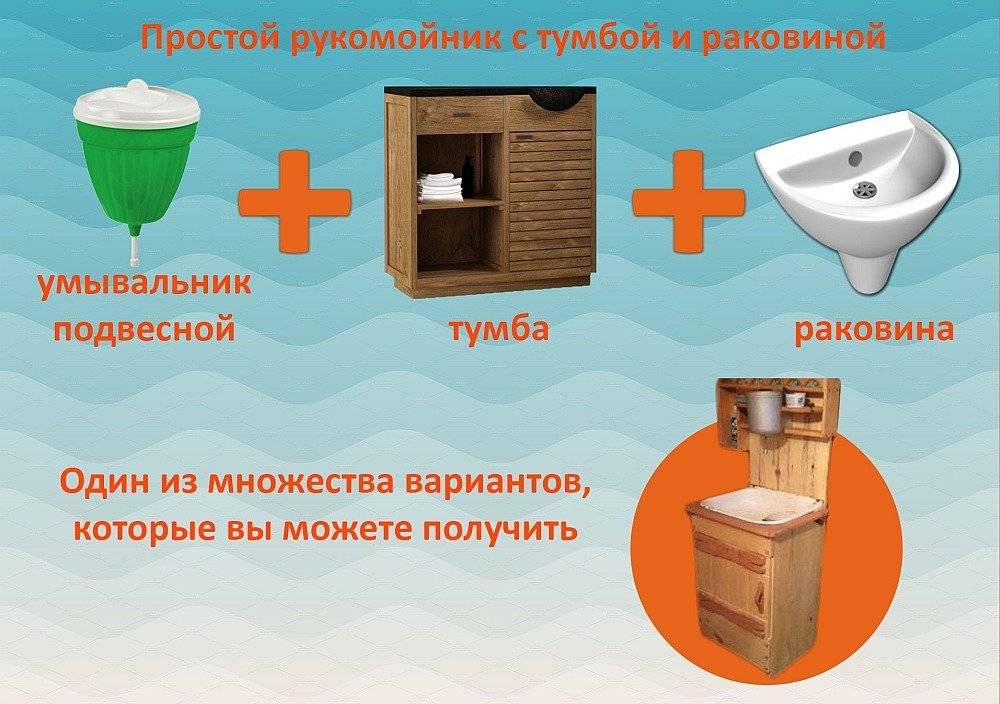
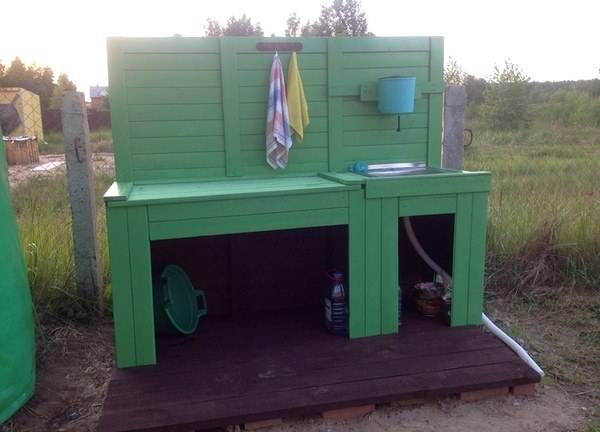
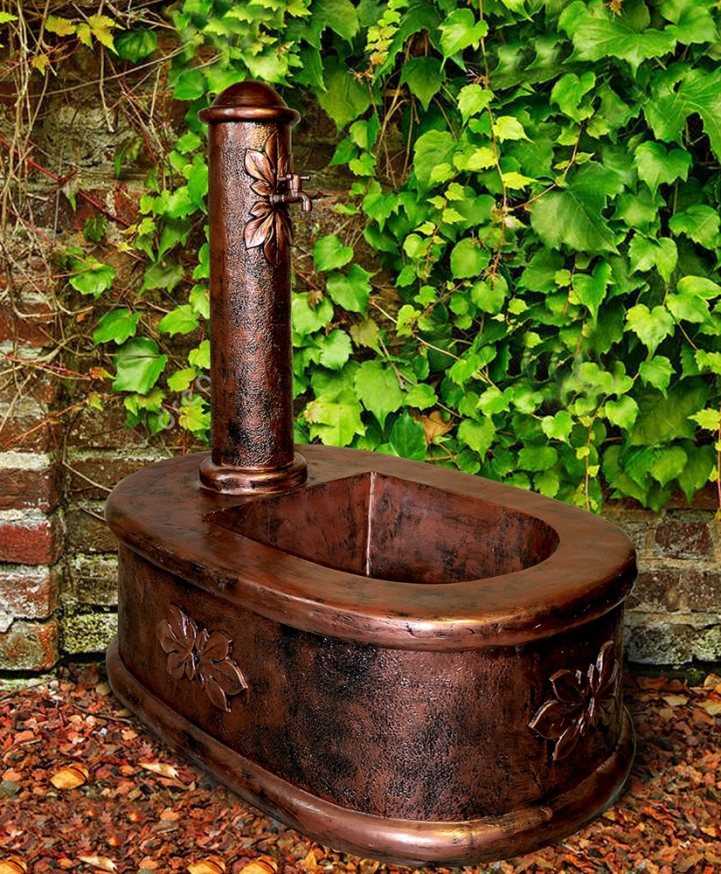
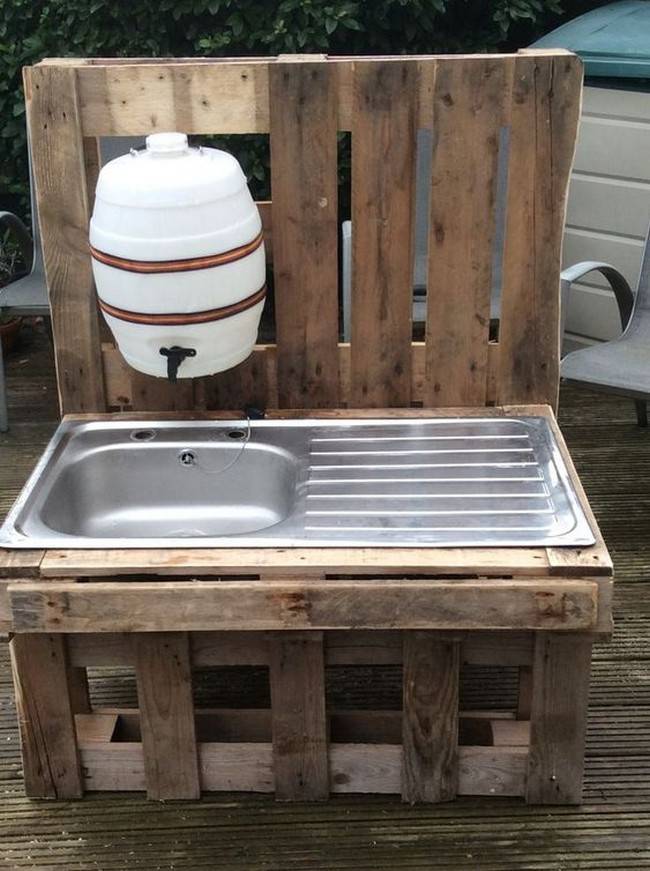
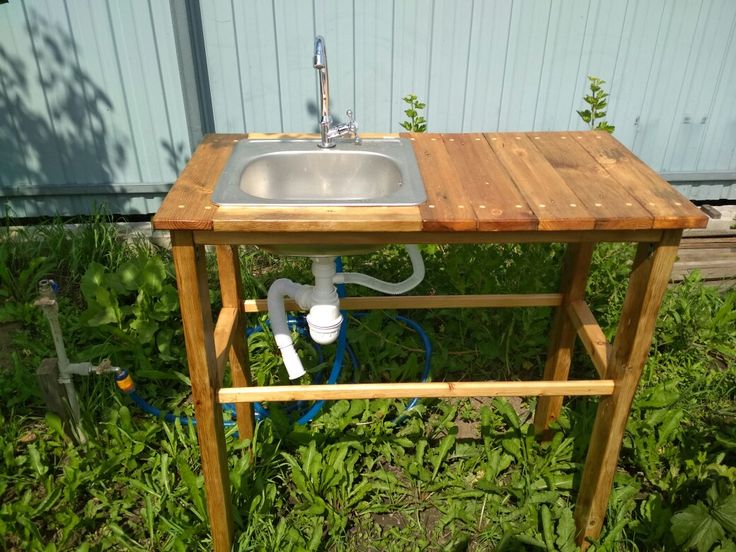
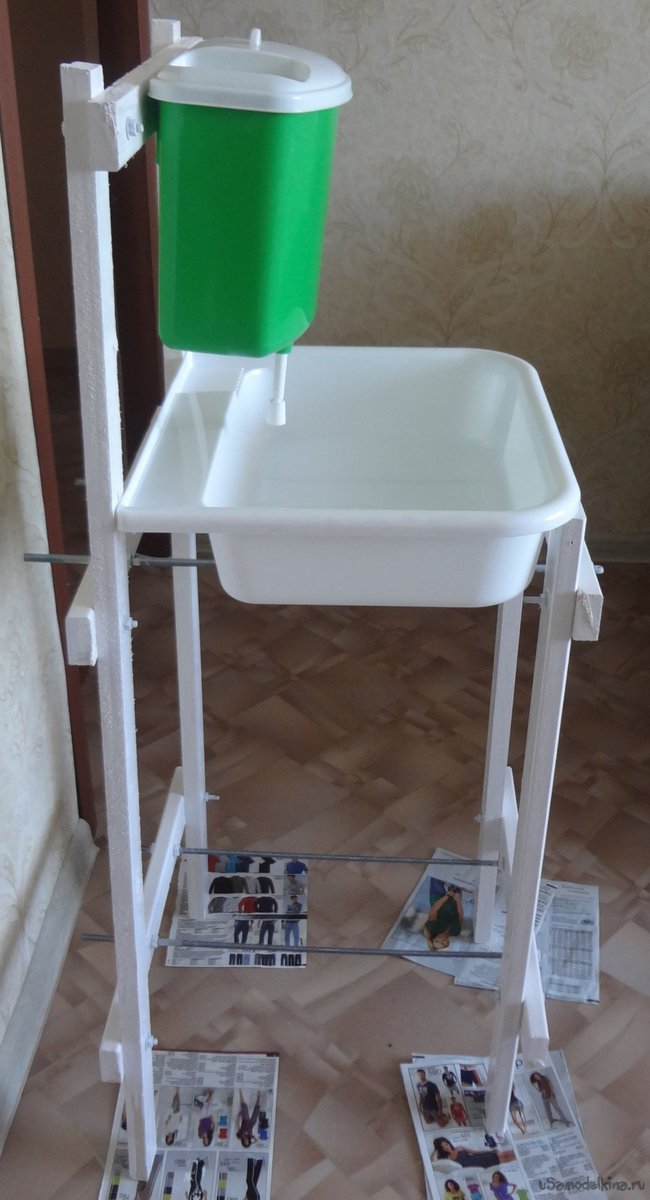
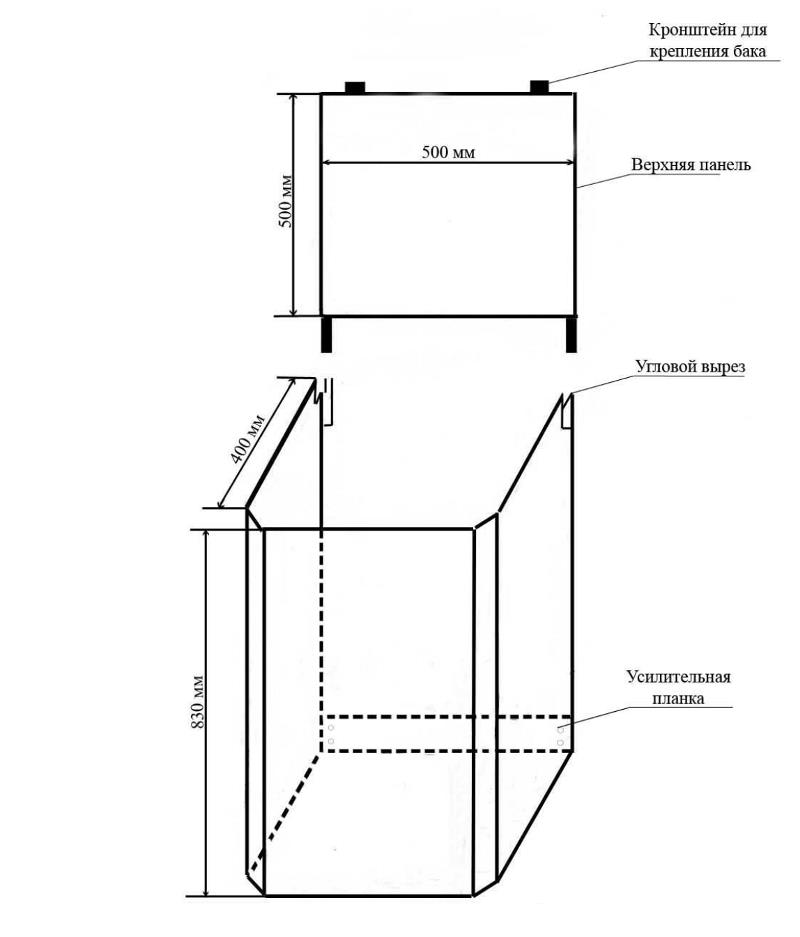
Washbasin with cabinet
A more solid and convenient do-it-yourself country washbasin can be made with a pedestal and its own support for a bulk tank. Such a model can be installed on the street, on a covered veranda and in the house. To create it, you will need materials, however, for reasons of economy, you can not purchase them specifically, but use improvised or leftovers from construction and installation work in another direction.
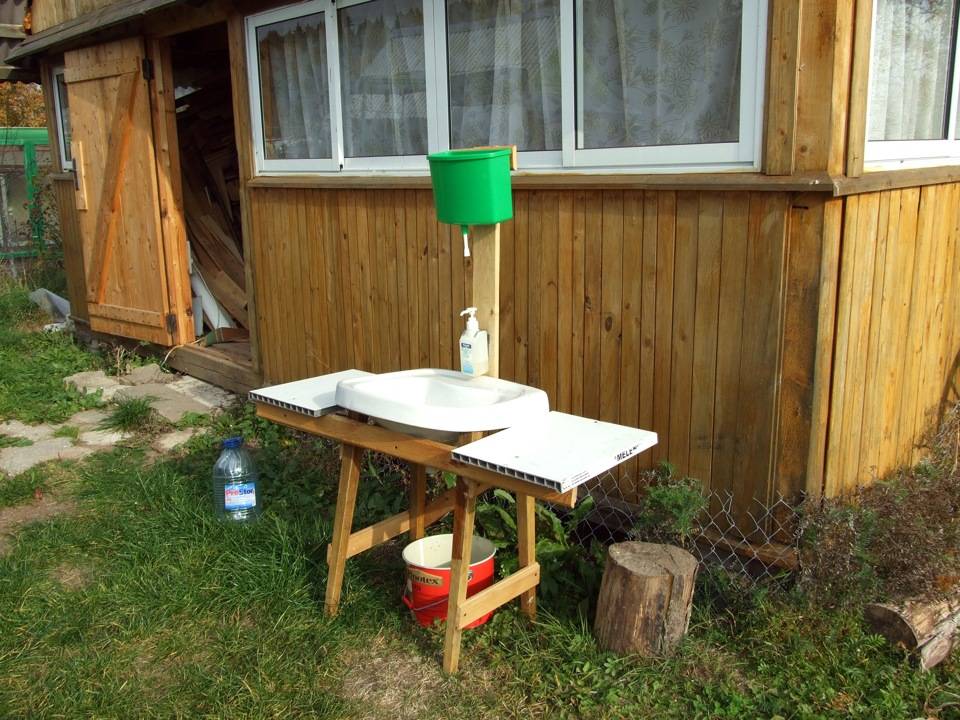
The main elements of such a washstand, called "moydodyr", are a sink (in this capacity, you can even use an old sink dismantled during repairs) and a filling tank, which can be purchased ready-made or made by yourself. In the second case, certain skills will be required. If a washstand is provided for giving without heating, the tank may be plastic. If you want to provide maximum comfort and provide "moidodyr" with a heating element, it is advisable to choose a container made of metal.
A washbasin with a cabinet is a frame structure sheathed with sheet or panel material. It can be used as:
- plywood,
- plastic,
- polycarbonate,
- polymer panels,
- sheet steel, etc.
The photo shows another version of the cabinet, in the manufacture of which wooden boards were used.
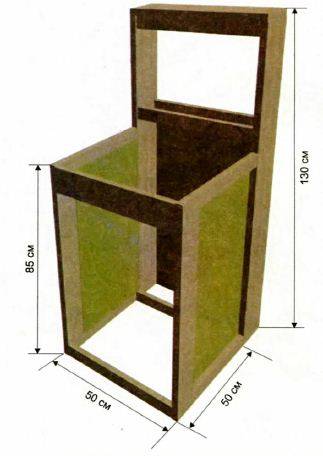
For the frame of the washbasin with a cabinet, wooden bars with a square in cross section (the side of the square is 50-80 mm) or a corner made of steel 25x25 or 40x40 mm are used.
Work is performed in the following order:
- Measurement of the sink and calculation of the dimensions of the cabinet.
- Cutting the frame material (bar or corner) according to the given dimensions (8 identical segments to form the upper and lower horizontal squares).
- Cutting off vertical racks (4 bars).
- Assembly (knocking down, welding, etc.) of the frame.
Important: When installing the washbasin outdoors, materials that are not resistant to moisture are recommended to be painted or varnished. Drainage of water is organized in the most convenient way
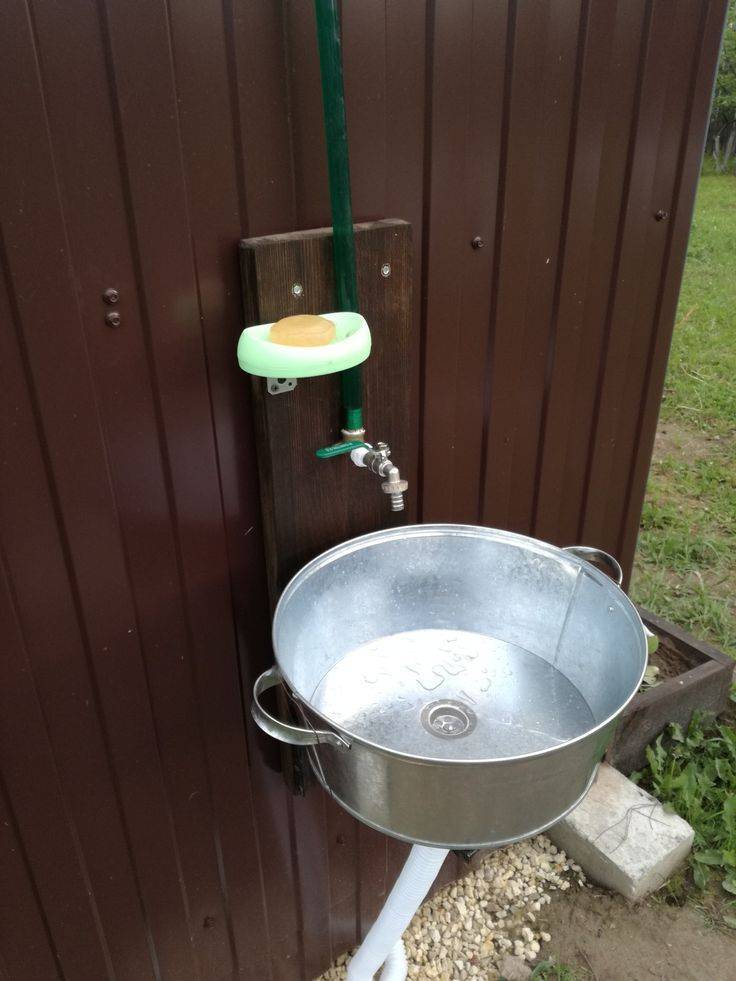
Drainage of water is organized in the most convenient way.
- The easiest way is to substitute a bucket to collect wastewater.
- For stationary structures, you can arrange a drain into a sewer or ditch.
- With good soil permeability, water can be drained into the soil, after filling the drain site with drainage material (crushed stone, gravel, etc.) to a height of 25-35 cm.
When sheathing the frame on all walls of the pedestal, except for the front, sheets or panels are fixed rigidly. Two or one (depending on the dimensions of the product) doors are arranged in the front part. A tank or bucket is placed in the cabinet under the sink, where water will drain.
Cabinet installation and sink installation
A frame vertical superstructure should be installed above the sink, on which the water tank will be fixed.
Such a washbasin can be additionally equipped with a countertop and a dish dryer made of slats.
In the summer, a garden shower for a summer residence is very useful. You don't have to buy it, but you can make it yourself.


And about the features of installing a drain in the bath there is information here.
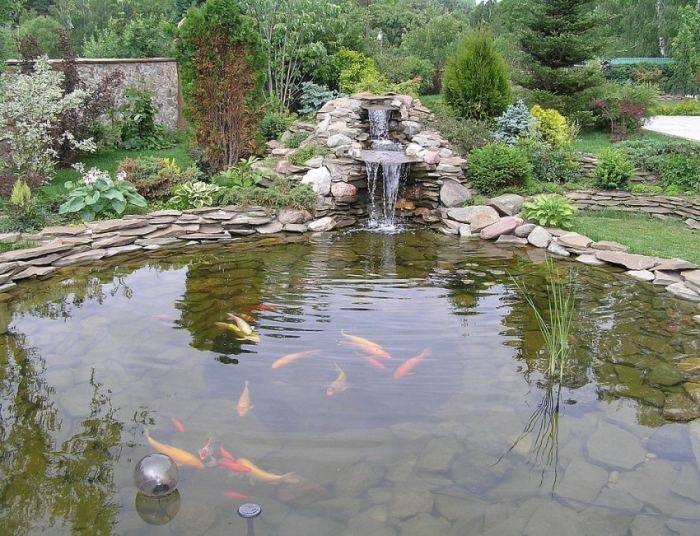
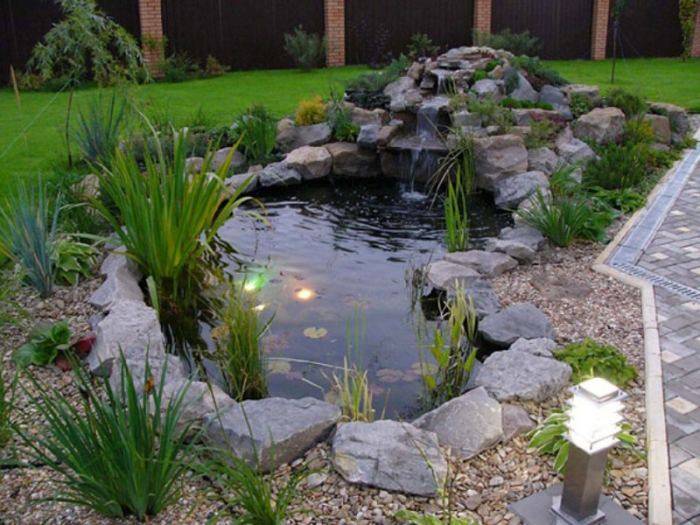
Varieties of reservoirs
The configuration of artificial ponds can be formal with a drawn geometric perimeter, or irregular, imitating natural counterparts.
Another design feature is the bottom level.In raised ornamental ponds, which, as a rule, have the correct geometric shape, the depth is set by the height of the sides built on the surface of the earth. This inexpensive option will be of seasonal importance, since at a shallow depth the water will quickly freeze at sub-zero temperatures.
In winter, such a shallow reservoir will need to be dried and only annual plants can serve as an additional decoration.
For the construction of buried reservoirs, more complex construction work will be required, but such a design will make it possible to implement all possible ideas for equipping a pond in a country house or in the courtyard of a private house.
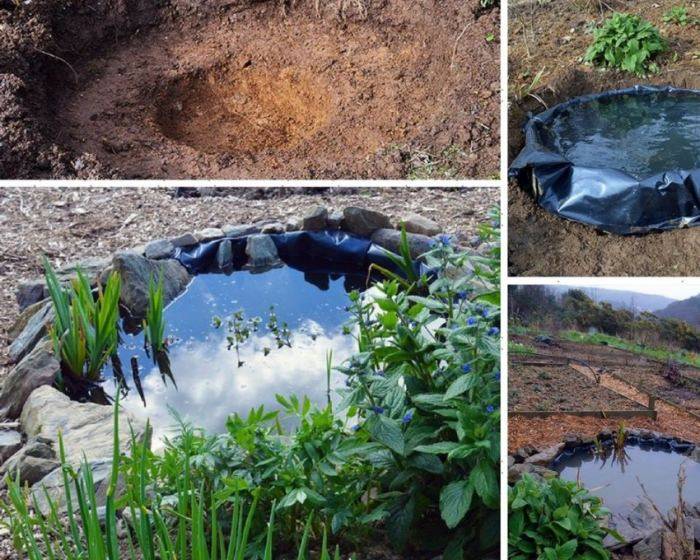
DIY Instructions
Let's start with the simplest.
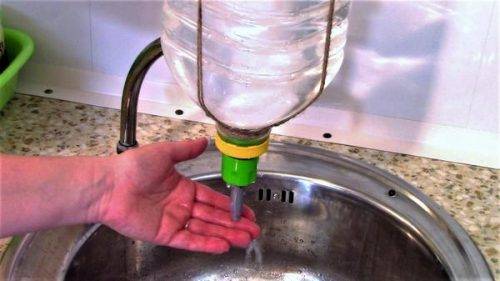
From a plastic bottle
You can take any bottle, from one and a half liters to five liters. Punch a small hole in the side of the bottle cap and hang the container upside down. When screwed on, the hole in the lid is tightly closed, but if you unscrew it slightly, the jet will immediately pour out. The main problem is only in the adjustment so that the water pressure does not tear off the lid.
A slightly more complicated way is to build a stock from a syringe. We take a regular syringe and cut off the upper part where the needle is connected. We cut a round hole in the lid and thread it through a homemade stock. The pressure in the bottle will press the piston head firmly, and the pressure on the piston will force the water to flow.
From the canister

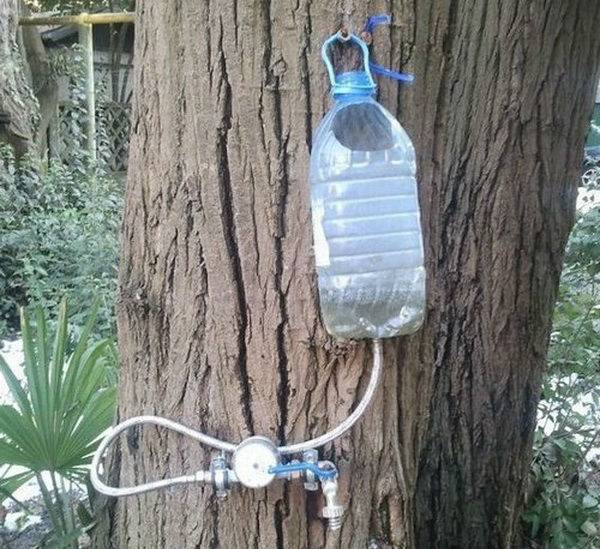
It's more convenient to use. You can take a plastic or metal canister and cut a hole for a faucet in its lower part.To make the connection airtight, provide the faucet with rubber gaskets on the outside and inside.
If your canister is large, then you should think about draining. To do this, a hole is punched in the bottom of the canister, and a corrugated pipe is connected leading to the drain point (drainage ditch)
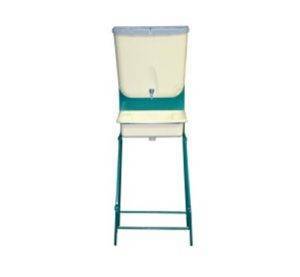
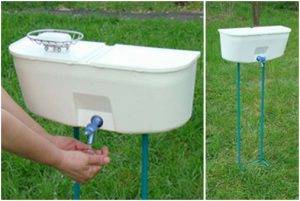
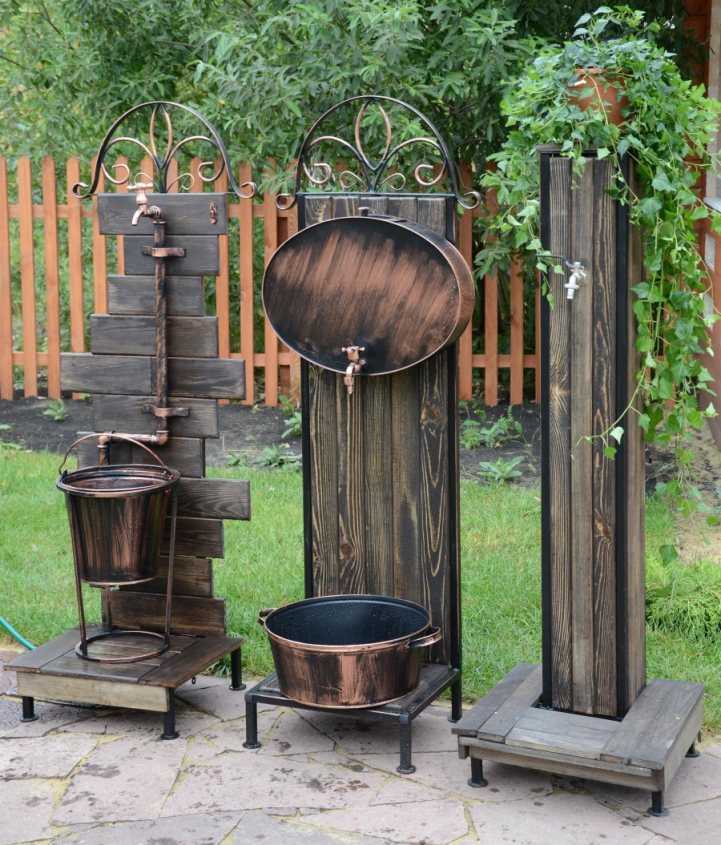
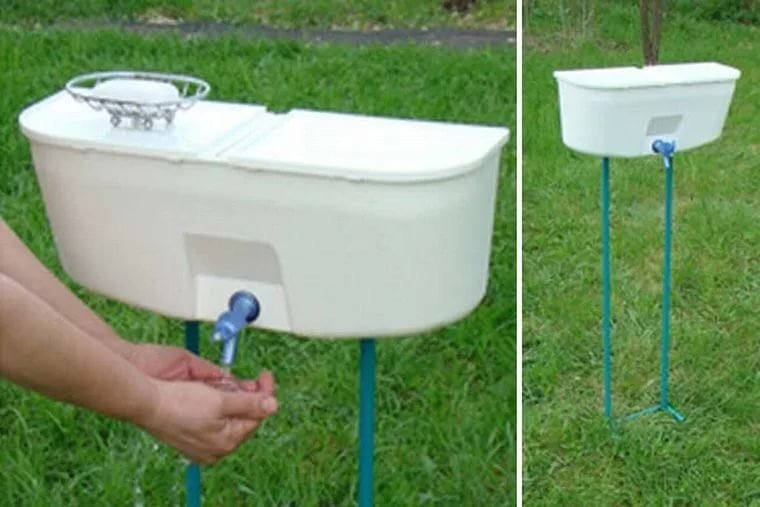
On racks
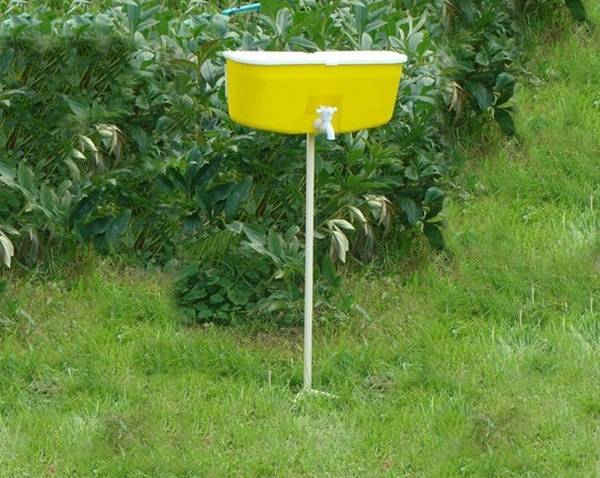
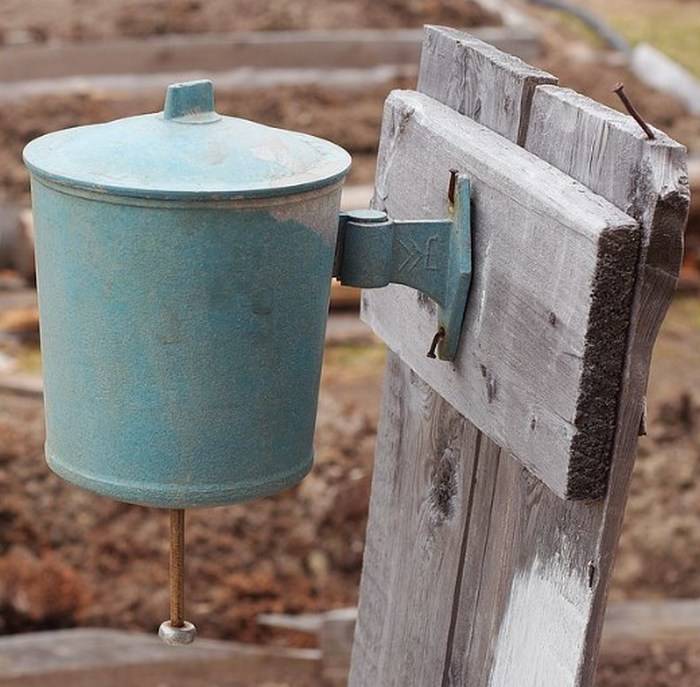
This is the same washstand, but with supports. Supports can be created from anything - reinforcement, wood, plastic. There are purchased supports - as a rule, they come with a crossbar, with which they drive the legs into the soil. The main thing is to take care of resistance to moisture, especially the supporting part of the racks. The tank is mounted on supports, the legs of which must be dug into the ground to a depth directly proportional to the weight of the device. Capacity can be taken from 10 liters.
Expert opinion
Kulikov Vladimir Sergeevich
For particularly heavy structures, it is better to concrete the legs of the frame.
Built-in cabinet (moidodyr)
If you are not a fan of hastily made things, then you can try this option. It will make you sweat, but the result will reward you in full. To do this, you need a sink, tank, plywood, etc. If you are lucky enough to find a real wooden cabinet, plywood is not needed.
In general terms, “moidodyr” should be a structure where a sink will be built into the upper part of the cabinet, and a tank is fixed above it. It is recommended to treat the wooden surface with varnish or paint to protect it from moisture. "Moydodyr" is very convenient to use, it can be equipped with a mirror, soap dishes or a towel holder.
heated
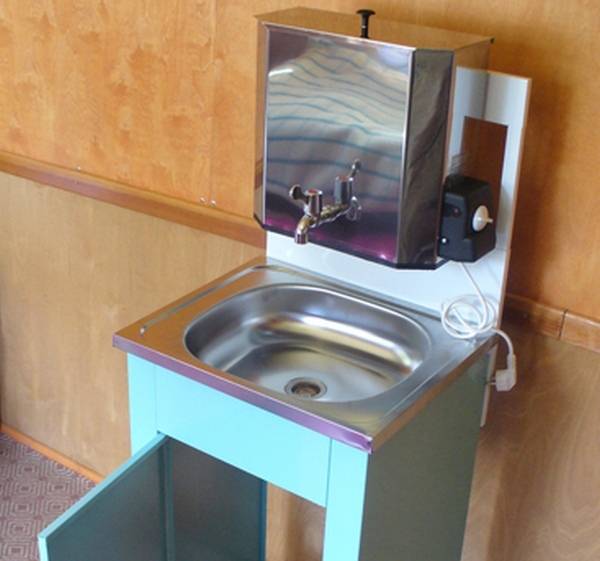
What is the peculiarity of such a device? It will allow you to use hot water in the country - this is a rare happiness.Of course, a place for such a device must be chosen deliberately, since you can’t get far from a banal outlet. As a heating element, you can use both a conventional boiler (but this is a rather unsafe option), and a heating element with the possibility of thermoregulation.
Calculate the volume of the tank, the power of the heating element should be directly proportional, otherwise you will either wait a long time for heating, or vice versa, you will get boiling water
Pay special attention during installation to the insulation of the wire. If the tank is divided into sections, instead of a tap, there should be a mixer
Tanks fit metal and plastic.
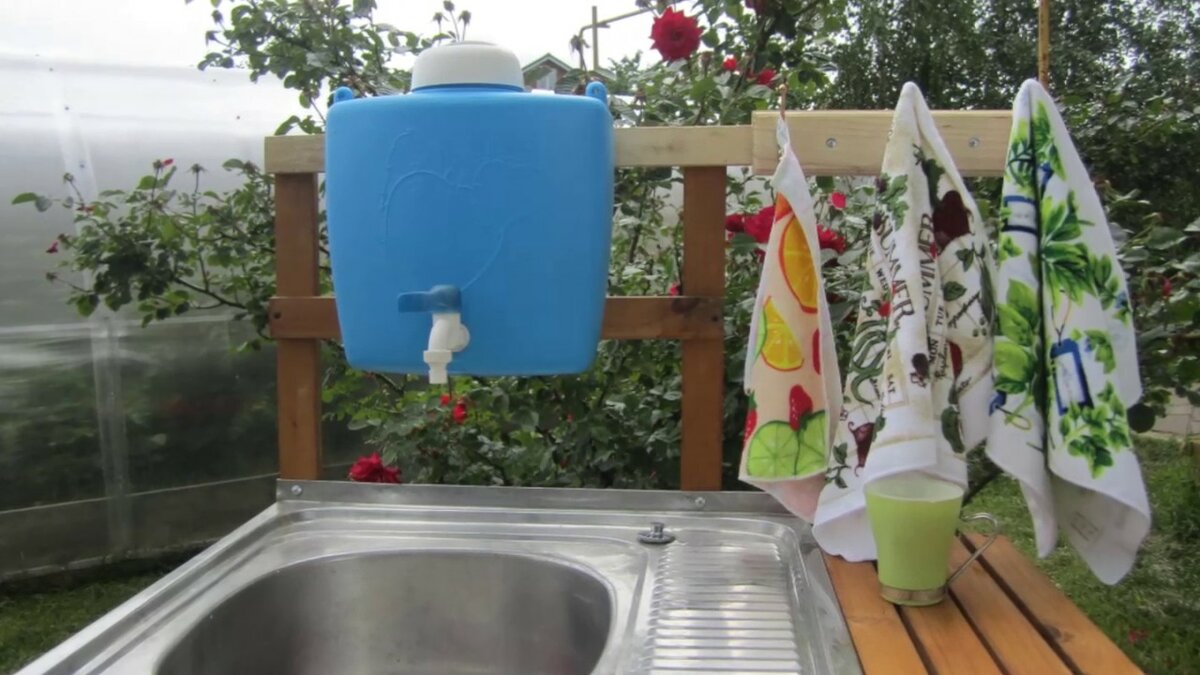
Stationary washbasin
If there is a need and desire to build a washbasin with a tap, you will need to familiarize yourself with simple knowledge in plumbing.
Take a large container made of soft plastic. It is desirable that there is a wide neck. Next, you should buy a faucet (for supplying water), two rubber gaskets, nuts, washers in a plumbing store.


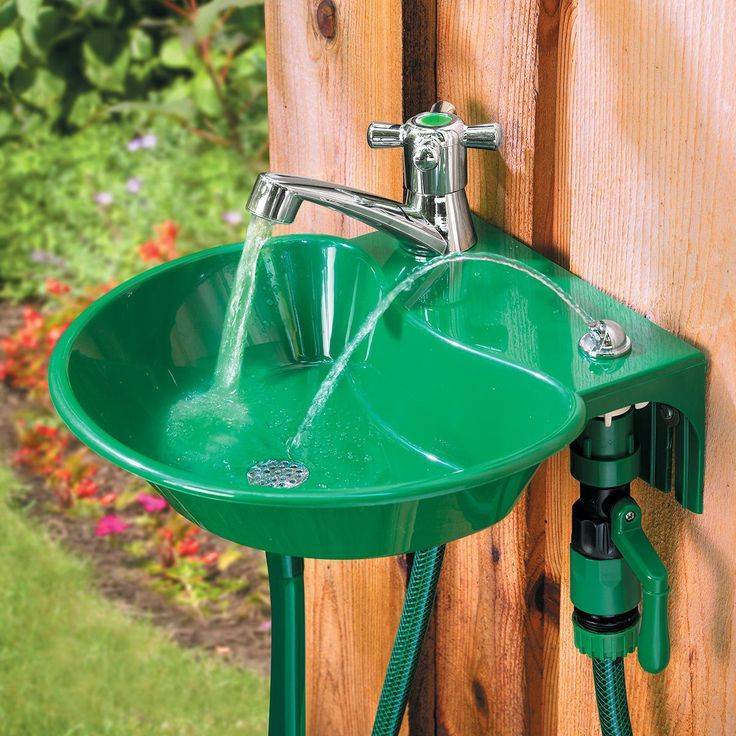


Do not forget to wind a linen winding on the drive, which must first be soaked with a special liquid.
To install this design, take a small cabinet or make a stand out of improvised means. Attach the can and fill with water. This version of the washbasin with cabinet looks more civilized, as it also has a faucet for water supply.
Overhead and built-in washbasins
The overhead sink is a sink that is installed on a flat and even base - a cabinet or countertop with legs. The bowl is made of various materials - white and colored faience, natural and artificial stone, glass, metal. The shape can also be different: round, oval, rectangular.The advantages of overhead bowls include an interesting and original appearance, as well as the ability to install almost anywhere in the bathroom where it is possible to bring communications.
Overhead bowls can be installed on any surface.
Built-in sinks cut into the countertop and are considered the most practical and ergonomic. Mortise washbasins are divided into 3 types according to the installation method:
- The bowl is located under the countertop.
- The sides of the sink are above the countertop and rest on it.
- Semi-recessed model: the bowl cuts into the countertop partially and protrudes beyond it.
Such sinks most often crash into the countertop, which acts as a dressing table. In addition, it is convenient to keep frequently used hygiene products on it. Another advantage of mortise sinks is that they are the least susceptible to cracks, chips and other mechanical damage, as they are almost completely closed.
Read more: Installing a sink with a cabinet.
Features of installing a mortise washbasin
The installation of the sink is started after the supply of water pipes and sewerage to the location of the bowl is completed. Consider the installation procedure using the example of inserting a sink with protruding sides into a wooden countertop.
Stage 1
First of all, you need to mark the countertop for cutting the hole. Some manufacturers attach a template to the bowl, according to which it is convenient to transfer markup. If there is no such template, you can do the following:
- The bowl is turned upside down and traced around the edge with a pencil.
- While the bowl is upside down, measure the width of the rim on all sides.
- Remove the sink from the table.
- Inside the drawn contour, another one is drawn, taking into account the width of the side.
The markup is ready!
Stage 2
Next, along the inner contour, you need to cut a hole. It is most convenient to do this with an electric jigsaw, but first you need to drill a hole in the countertop so that the jigsaw blade can enter there.
To start cutting a hole for the washbasin, you first need to drill a hole for the jigsaw blade.
Then, carefully, trying not to go beyond the line, cut a hole with a jigsaw.
Cutting a hole for a wash basin.
Stage 3
The cut end is treated with sandpaper and 2-3 layers of sealant are applied to fill all the pores and make the surface waterproof.
Cut ends must be treated with sealant
Stage 4
A faucet and a siphon are installed on the sink. After that, a tape of waterproof material is carefully glued along the side, which acts as a sealant. Also, fasteners are installed on the side at an equal distance from each other, which are attached by the manufacturer.
Stage 5
A layer of sealant is applied to the edge of the inverted sink, after which the sink is installed in the hole and the fasteners are tightened. The protruding sealant is carefully removed with a damp cloth, but in such a way that a thin strip remains for reliable protection against water leakage under the sink. After that, the siphon is connected to the sewer, and the flexible hoses of the mixer are connected to the water intake points. Do-it-yourself mortise sink installed!
We examined the main types of bathroom sinks, which differ in the installation method. Almost all types can be installed with your own hands, without resorting to the help of specialists.To do this, you need to be able to use a simple set of plumbing tools and follow the installation instructions supplied by manufacturers with their products.
In the interior
So far, it is rare to find wooden sinks in interiors. It may seem that they are not compatible with plumbing at all, but this is not the case, for which there are enough examples.
When there was no faience and porcelain, almost everything was made of wood, not to mention fonts, barrels and troughs. Then it was possible to surprise guests with a bathroom made of cast iron, but not made of wood.


The material familiar to our great-great-grandfathers today is a curiosity for many. At the same time, lovers of natural and eco-friendly interiors believe that this is a mandatory attribute of a stylish and expensive room design.
Corner sink with wood cabinet
We have long been accustomed to fine wood furniture, floors, so if you want to really surprise your friends and amaze them to the core, make or buy a wooden sink.
| Beauty and form | The decoration of plumbing will be its luxurious and unique texture. Thanks to the skill, it can be turned into any form:
|
| Breed | It is advisable to use moisture-resistant and hard wood species for manufacturing. These include:
|
| Treatment |
|
Washbasins without bottom
Manufacturers often surprise us with their models, sometimes leading us into a stupor. For example, the company "Lago" offered a variant of a wooden sink, in which "there is no bottom." Of course, this is only an optical illusion and it is present, but you must admit that such an unconventional approach can lead both to delight and bewilderment.
Sink "without a bottom"
If you study the design and execution of the model, we can say that it will be possible to reproduce it with your own hands. To do this, you will need a worktop with a thickness of 80-90 mm, made from finger-jointed wooden beams. It will need to make a rectangular hole in it, which will serve as a sink.
For this design, keep the wood structure intact and coat the surface of the countertop with several coats of lacquer. Have you forgotten that the most interesting thing in this model is hidden at the bottom?
For it, prepare a transparent glass, placing under it, for example, 3D images. So you can get interesting visual effects.
If you do not use anything, then you get the illusion of the illusion of the absence of a bottom. Which will also be interesting.
General view of the sink in the interior
A specially designed water drainage allows you to get all of the above effects. It does not leave from below, as in ordinary shells, but passes through a slot located on the back wall of the bottom, and then enters the siphon along the chute.
This made it possible:
- make the bottom cover whole;
- surprise acquaintances and friends with the "lack of a bottom" at the sink, if you hide the siphon and use transparent glass.
Sink in solid wood
This option shows how to make a do-it-yourself wooden sink in an array of glued beams.
Below is the process instruction:
- It is necessary to glue the bars together.The thickness depends only on your wishes.
Wooden beams glued together
- Mark them up.
Approximately this markup
- Take a circular saw and cut it to the desired depth.
We cut through the circular
- Take a chisel and a hammer and remove the excess.
Remove excess with a hammer and chisel
- Sand the resulting container.
Take a drill with a grinding wheel and sand the bottom
- We make a hole for the drain.
Drill with a nozzle to make a drain hole
- Take epoxy glue and coat the resulting sink.
Brush the sink with epoxy
wooden bath
Now let's talk about a larger sink - a bathroom. Its price in retail chains goes off scale, so why not make it yourself if you have the time and desire?
The process cannot be called simple, but it can still be done.
- You also need to prepare special woodworking tools.
- The principle of operation is one thing - you need to make a sealed wooden box. What is the need for a high-quality fit of wooden structural elements to each other. Do not hope that the wood will swell from the water and close all the cracks.
- An important moment in the manufacture of a wooden bathtub is the polished surface at the end of the stripping stage. Otherwise, it will be unsafe to take water procedures in it.


How to make a washbasin for a summer residence from a plastic bottle with your own hands: step by step instructions and photos
When you urgently need a washbasin in your summer cottage, you should use the easiest way to make it from a large plastic bottle. Such a solution will last for some time until you build a more advanced and reliable design.The principle of operation of such washstands is standard, regardless of the version - the water for washing comes from a plastic container fixed in a vertical position on any support with the neck down.
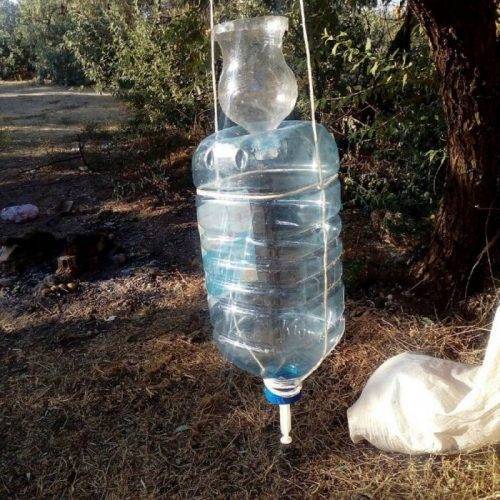
The water inlet can be modified in different ways
The universal scheme for the manufacture of a plastic washbasin is as follows:
- Pre-rinse the container from the remaining liquid. It is recommended to take a five-liter plastic bottle for drinks.
- Cut off the bottom completely or in half, leaving it as a protection against water debris.
- Hang the resulting container vertically so that the neck is pointing down. For fixing use twine, wire or something at your discretion.
This process is almost complete. You can experiment with a water outlet (bottle neck with a screw cap). What are the options:
- Let it be as it is. If you want to wash, slightly unscrew the lid until water flows out. In order not to accidentally unscrew it completely, you can make a small hole in its side. The downside is that it is not always possible to set the optimal jet.
- A hole is drilled in the center of the lid, where a nail is inserted so that the cap is inside the tank and cannot slip out. The device is activated by pressing the tip of the nail and lifting it. The disadvantage of this design is the rapid rusting of the carnation, which is constantly in a humid environment. Other improvised materials can become an alternative to a nail: a syringe, a faucet from a box of wine.
- A water tap is mounted in the bottle cap, which you can buy or use a used one. Secure it with tape.
Video: the process of making the simplest model of a street washstand
Improving a water drain is possible with a little effort and time. It is proposed to consider the option where the following components are used:
- connector with a valve for hoses (purchased at a gardening store);
- marker or marker;
- plasticine;
- waterproof glue;
- five liter bottle.
Step-by-step instruction:
-
First, disassemble the marker, as it will require its body to work without the insides, which you will remove. Now remove the rubber gasket located under the valve in the connector.
-
With the help of the extracted parts, proceed to refine the valve, i.e., make it heavier. This is necessary so that the valve properly retains water in the washbasin. Extend it with a marker, after filling the tube with plasticine balls. Now grease the pin with glue and insert it into the hole in the felt-tip pen body. To make the valve easier to enter the tube, you can correct it using wire cutters. Wait for the details to set.
-
Next, cut a hole in the bottle cap with the same diameter as the connector. Coat the thread of the connecting blank with glue and insert into the cover.
-
Tighten the nut from the connector from the outside. Let the structure dry and mount the modified valve in its original place in the connector. Set the sealing gum to its original position as well.
-
Cut a circle in the bottom of the bottle where the water will be poured. To make it easier to fill the container, a funnel obtained from a smaller plastic bottle is inserted from above. At the same time, it will serve as a cover.
-
To hang the washstand on a tree or other fixed support, prepare 1.5 meters of twine. Tie them around the neck of the tank first, then the body itself. Secure with tape.
It remains to screw the lid with a built-in valve and make sure that the system works.
For ease of use, a connector for garden hoses with an outlet valve is mounted in the lid
Placement rules
- The dimensions of the reservoir should be commensurate with the area of the hacienda, not only for aesthetic reasons. No matter how attractive the photos of large ponds look, they should not be erected in a standard dacha of 5 acres.
- So that excess moisture does not harm buildings, plants and people, an artificial lake should not occupy more than 10% of the land.
- The pond must be placed away from trees, the roots of which can damage the walls of the pit. In addition, foliage can become a source of clogging and rotting water.
- If there are no special requirements for breeding rare species of fish or plants, the pond should be placed in a non-shaded area, with access to sunlight for 7-8 hours a day.
- The smaller the area of the reservoir, the more often it needs to be cleaned, raking out garbage with a net and changing part of the water.
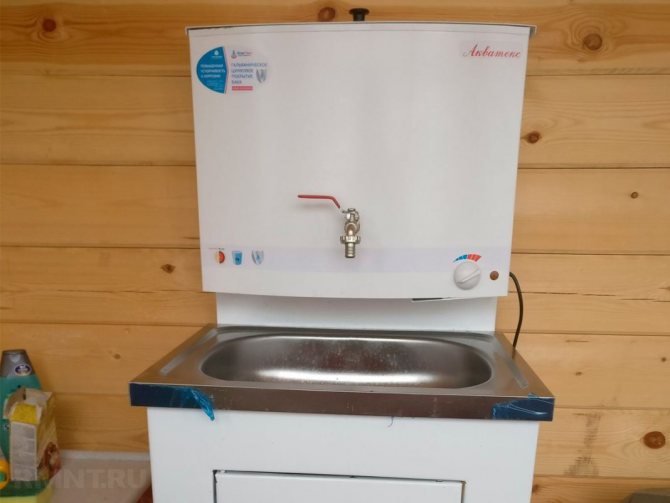
Do-it-yourself heated washstand
A washbasin, in which there will be not only cold, but also hot water, is a real luxury for a summer residence. Such structures, as a rule, are installed permanently, since they require connection to the mains. By design, such a metal washstand for giving can be a “moidodyr” or a model on a stand.
To heat the liquid in the tank, you can use a conventional boiler, however, experienced craftsmen recommend purchasing a special heating element with a thermostat
Please note that the power of the heating element must be selected in accordance with the volume of the tank. With insufficient power, you will have to wait a long time until the water heats up, and with too much power, it is likely that the water will overheat
In addition, you should choose the optimal design and heating mode. If there is only one tank and it is not divided into chambers, the water will need to be heated to a temperature of about 40 ° C, with a divided tank (one section for cold, and the other, with a heating element, for hot water), the heating temperature should be higher. The tank in this case is equipped not with an ordinary tap, but with a mixer.
When making a do-it-yourself electric washstand for a heated cottage, to ensure safety, it is important to take care of the insulation of the current-carrying wire, as well as provide the structure with a float level indicator or its more complex analogue, and also, in the absence of a thermostat, a thermometer to control water heating
Heating device
It is easier to purchase a factory heated washbasin, but if necessary, we install the heater in the existing model of the washstand on our own. How to make a device for washing hands in the country, see this video:


To heat water, you can use a boiler, here you need to take into account that you can open the water only when the appliance is turned off.
A more difficult option is to install a heating element with a water heating temperature controller. For greater safety, it is recommended to mount the heating element on the side wall of the tank, as close to the bottom as possible. In this case, splashes will not fall on the contacts and the risk of burnout of the heating element due to low water level will be reduced.
You can buy a ready-made tank with a built-in heating element and install it on a do-it-yourself frame with a cabinet.
It is difficult to do without a sink in the country. We examined the main nuances of how to make a washstand. The choice of model depends on the amount of water used, the period of use, and the functional purpose.
practical way
Instruction:
1. Cut off the bottom of the bottle. Burn the edges with a candle flame so that you don’t cut yourself on them later.2. Step back a couple of centimeters from the top and make holes using a hot awl or nail.3. Find a branch on which to hang the washbasin by inserting a wire into the holes.4. Unscrew the lid and make 7 holes on the side of it with a hot nail. Screw on the plug.5. Pour water into a bottle. The principle of using the washbasin is that it is necessary to unscrew the lid just a little and water will flow. Please note that you can not remove the cork completely, otherwise all the water will be on the ground.6. If you brought a hammer and nails with you, then you can nail the bottle to a tree trunk for greater reliability.
The principle is the same: cut off the bottom, make a hole for the syringe in the cork, cut off the upper narrow part on the syringe, place the syringe in the cork hole with the piston down. Nothing complicated, but how convenient!
Bobrakova Natalia, especially for the Counsellor.
2016, Advisor. All rights reserved. Without the written consent of the author or an active, direct and open to indexing link to the source, the republishing of materials is completely or partially prohibited!


