- Causes of a leaky faucet and its repair
- Faucet gasket wear
- Deterioration of the seal (gland)
- The faucet is leaking - how to fix it yourself?
- Preparation for repair
- Replacing the seal
- Oil seal replacement
- How to fix a leaky ball valve
- Cartridge replacement
- Why is the new faucet leaking?
- Restoration of the crane - "joystick"
- How to fix a bathroom faucet
- Possible breakdowns of single-lever bathroom taps and their causes
- cracked hull
- Gasket wear
- Clogged faucet aerator
- Blockage in a hose or pipe
- Bath/Shower Switch Malfunction
- Causes of the problem
- Cartridge faucet repair
- What may need repair
- How to disassemble
- How to replace the cartridge
- Mistakes that can be made
- General Troubleshooting
- Two-valve faucet repair
- Gasket replacement
- Replacing the sealing insert of the stuffing box
- Shower hose O-ring replacement
- Self-repair of a valve valve
- Replacing the rubber gasket
- Water oozing from under the stem
- Water does not shut off
- "Narrow" places of taps and mixers
- Reducing the water pressure from the spout
- faucet leaking
- Leakage at the point of connection of the water pipe (hose) to the faucet or faucet
- How to fix a faucet in the bathroom if the junction of the spout and body is leaking
- How to fix a kitchen faucet with a flexible spout
Causes of a leaky faucet and its repair
Why does rusty water flow from the tap? Why does water drip from the faucet tube, even if you carefully turn the valve? There are reasons for this:
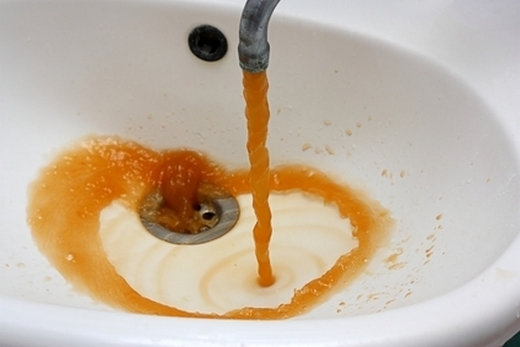
Rusty water flowing from a faucet
Faucet gasket wear
This is the more common reason for yellow water coming out of the tap. The leak starts due to its too strong twisting.
The recipe for repairing a faucet is to install a new gasket. It is better to buy - such sets are sold in stores - but you can cut it out of a sheet of rubber.
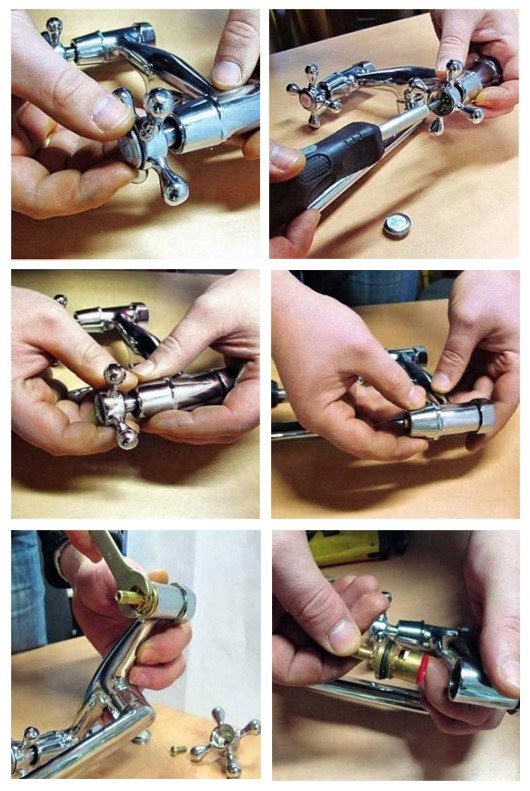
Repairing the crane is done like this:
First unscrew the valve body. Need to rotate counterclock-wise. Pulling out the old gasket in place of which a new. After that, the sealant is wound up to the stop of the edge of the sealant, and with the help of a wrench, the valve is screwed back.
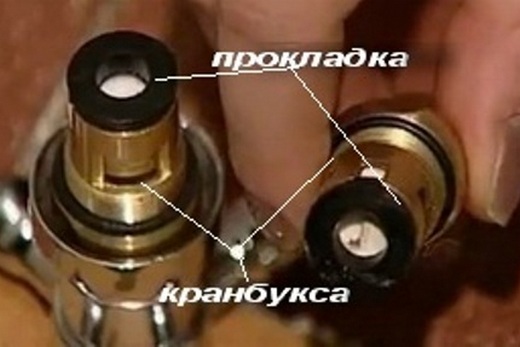
The seal is of two types. There is a seal in the form of a rubber gasket, which is located under the valve. And then there are fiber o-rings that need to match the shape of the faucet.
Deterioration of the seal (gland)
Seal seal worn out
When the faucet is closed, the rusty water does not flow, and if it is open, it immediately starts to flow. Why does yellow water flow when the faucet is open? The answer is that the seal-gland has worn out, thereby depressurization has occurred.
Fluoroplastic seals
Crane repair is as follows:
First you need to purchase an oil seal or you can make it yourself from a fluoroplastic sealing plate.
A seal in the form of a plate can be bought for about 450 rubles. Fluoroplastic seal is resistant to chemicals, except for chlorine.Also, gaskets made of a fluoroplastic sealing plate do not stick and do not stick to the valve body, that is, they can be easily removed without damaging them in case of repair.
After that, the stuffing box nut is unscrewed with a screwdriver and a sealant is placed inside the stuffing box. Then the seal is tightly wound around the valve stem, and the nut is returned to its place, checking the operation of the valve. It should turn easily and smoothly.
The faucet is leaking - how to fix it yourself?
The very process of repairing a mixer can cause some difficulties, especially for beginners who first picked up an adjustable wrench. Preliminary preparation and a simple algorithm of actions will help eliminate emergency leakage and extend the life of the crane.
Preparation for repair
Before you fix the current faucet, you need to follow the main rule of any plumbing repair - turn off the water supply (cold and hot) on the riser, otherwise the problem of a leaking faucet will also be flooded with your apartment and neighbors from below. Only after that you can start repair work.
To work with a crane, it is necessary to prepare tools and materials:
- Wrench.
- Phillips and flat screwdrivers.
- Pliers.
- Wrench.
- Set of gaskets.
- Fluoroplastic sealing tape.
- Silicone seals.
- Rags.
- Sponge and detergent for cleaning the elements of the mixer from debris.
- Low capacity for collecting water.
This simple kit is enough to fix a leak.
Replacing the seal
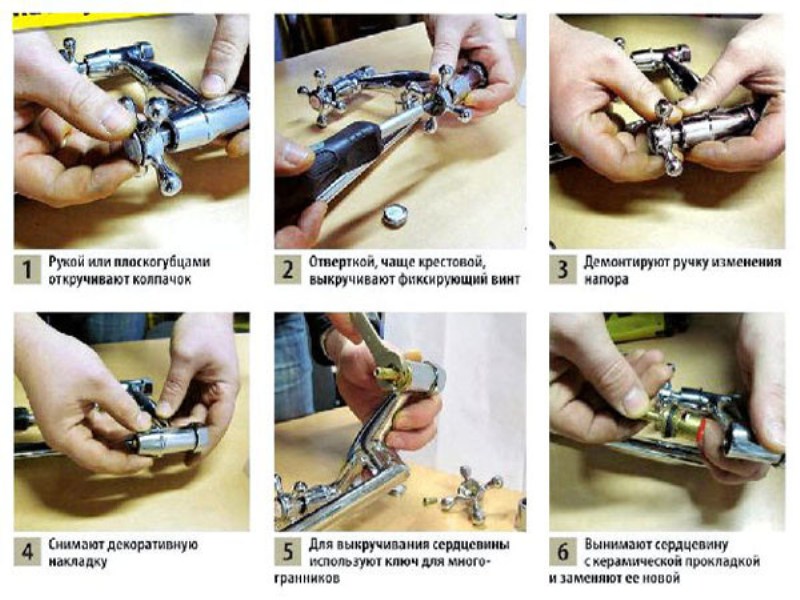
The procedure for replacing the gasket of the valve locking mechanism is as follows:
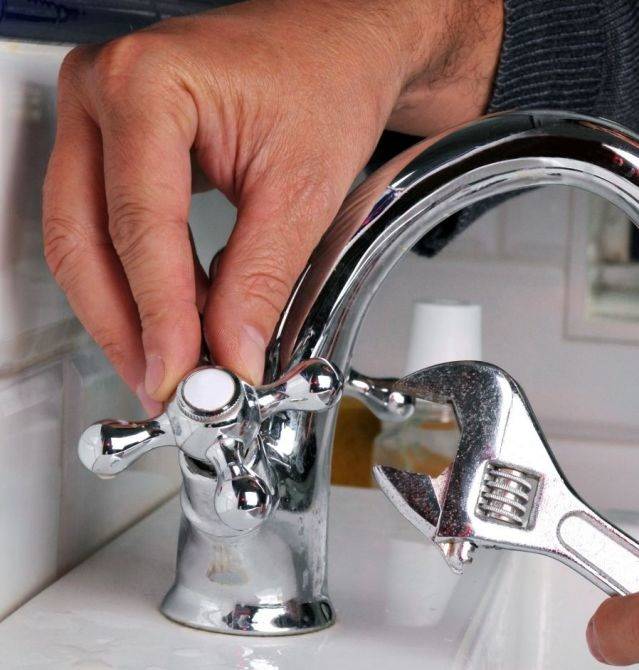
- Disassemble the valve - pull out the plug and carefully unscrew the screw under it, then use an adjustable wrench to unscrew the core (counterclockwise) and remove the crane box.
- Replace the gasket and fix it in the box.
- Install all elements in reverse order.
Steps to replace the valve seal
If the shower faucet is leaking, it is necessary to carefully unscrew the shower hose using an adjustable wrench, replace the used gasket and install the hose in place. The same sequence of actions is carried out when replacing rubber seal under the goose nut.
Oil seal replacement
In case of wear of the stuffing box seal, there are two ways to do it:
- Unscrew the stuffing box nut with a screwdriver and replace the stuffing box itself.
- Or make a "homemade" liner from fluoroplastic tape.
If the work is done correctly, the leak will stop and the valve will turn smoothly.
How to fix a leaky ball valve
Repair of a ball valve consists in disassembling and cleaning it, if necessary, a complete replacement of the locking mechanism.
The work is carried out in the following sequence:
- Loosen the screw and remove the lever.
- Unscrew the threaded screw.
- Remove the faucet dome together with the plastic part.
- Remove the ball from the attachment point and inspect it. If there are defects or damage, it must be replaced.
- Remove the seals and check them for deposits and signs of wear.
- Remove plaque and other dirt on the sealing elements of the ball mechanism and apply special grease to them.
- Reinstall all parts and check the tightness of the connection.
There are no leaks in a properly assembled faucet, and the temperature is regulated by a slight turn of the lever.
Cartridge replacement
Cartridges are much more convenient to use than crane boxes, but if they fail, the entire mechanism must be replaced.
Fast faucet cartridge replacement
The repair process will be carried out in the following sequence:
- Open the plug on the mixer lever and unscrew the fixing screw.
- Remove the decorative elements of the product and unscrew the nut that presses the cartridge.
- Remove the mechanism and check the condition of its gaskets at the end - you can try to replace them.
- If the seals cannot be replaced, a new disk element is installed in the mixer.
- Reassemble in reverse order.
Why is the new faucet leaking?
There are situations when a recently purchased and installed faucet starts to leak. The reason for this misunderstanding is a factory marriage, which is almost impossible to identify outwardly.


Cracks or chips inside the faucet cannot be repaired on their own; even professional plumbers cannot do it. Therefore, you will have to contact the store with a request to replace the defective product.
Face a problem when it's flowing faucet in bathroom or kitchen, you can at any time. There are two ways to solve it - call a specialist at home or carry out repairs on your own. When you know, how to fix a leak from a faucet yourself, there are no more difficulties with repairs.
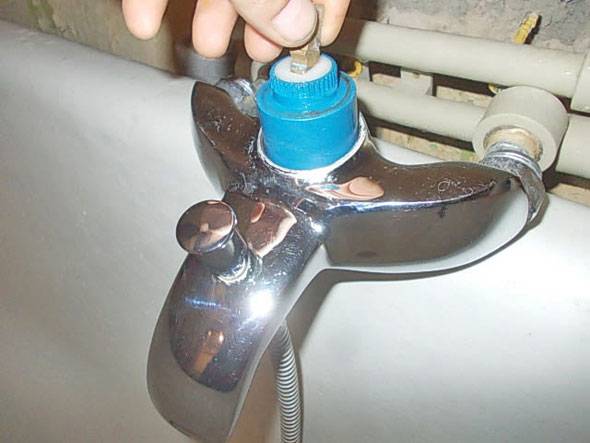
Restoration of the crane - "joystick"
Often, the reason for the leakage of a single-lever mixer is a malfunction of the cartridge, which is made of plastic. As a result, the part wears out quickly during operation and cannot be repaired. To fix the problem, you need to replace it.
Stages of work.
- Shut off the water supply to the mixer.
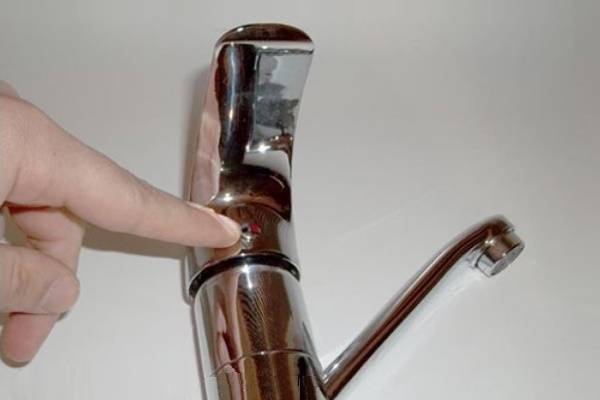
- Remove the plug located near the base of the instrument arm.
- Remove the screw underneath.
- Remove the handle.
If there are difficulties in the process of extracting the mixer lever, it is important to slowly “twist” it with smooth movements to the right and left.
- Loosen the nut that secures the cartridge.
- Install a new cartridge, secure it with nuts. After that, it is necessary to cover it with a lever and fix it with a special screw. Next, a colored plug is mounted on the original place, after which the cause of the tap leak is considered eliminated.
Remember the restoration of the “joystick” crane should be done as carefully as possible so that as a result of the force applied, the pressure does not damage the plastic parts.
This is interesting: Technical characteristics of cast iron sewer pipes - we read in detail
How to fix a bathroom faucet
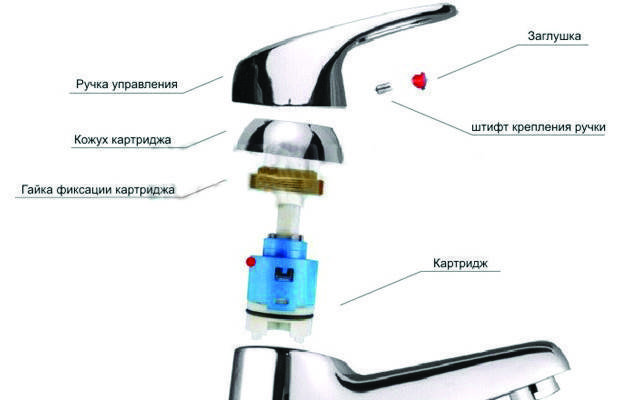
If the single-lever mixer flows. Recently, double-lever mixers are gradually becoming a thing of the past, and they are being replaced by mixers with one lever. Their main advantage is ease of use. By turning left and right, the water temperature is regulated, and the pressure supplied up and down. The main place in their design is occupied by cartridges: ball or disk. They need to be changed less often, since the tap in such designs does not leak as often, unlike rubber gaskets. The service life will be longer.
Externally, ball and disc cartridges are not much different from each other, but inside they have significant differences. They are not interchangeable, i.e., instead of a ball cartridge, it will not be possible to put a disk one.Therefore, when buying a single-lever mixer, you need to know or ask the seller which cartridge is used in this model in case of further troubleshooting.
How to repair a faucet that has one lever and a ball cartridge as a filling? It's not that hard, just follow the instructions.
- Shut off hot and cold water, because the valves responsible for the flow of water into the room are located in the apartment. Then open the faucet in the bathroom and drain the water remaining in the pipes after being cut off from the water pressure.
- You need to unscrew the bolt that secures the mixing handle.
- Then lift up the lever connection with a slight loosening. Remove it.
- Now the threaded connection that appears is unscrewed (removed) clockwise.
- When the dome of the crane is removed, the plastic part is turned out.
- If contamination is found on the seal, it must be removed. If the seal itself is worn out, it should be replaced.
- Then the ball (ball cartridge) is removed for the purpose of detailed inspection. If it is found that the part is out of order, or there is any defect, then the current ball cartridge must be replaced.
If a leak appears at the attachment point of the lever that switches from the mixer to the shower. Water does not always leak from the tap, sometimes drops are found in the area of \u200b\u200bswitching from the mixer to the shower. A gasket is installed between the switch lever for the shower, as in a two-valve mixer, which tends to wear out over time. This explains why water is flowing at the shower switch point. In this case, you need to change the worn seal, which can be paronite or rubber.When purchasing a new gasket, you need to know that its diameter should be ½ inch.
To change the gasket between the switch lever from the mixer to the shower, you must:
- Turn off the water entering the apartment by turning off the valves.
- The first step is to disconnect the lever with which the shower is switched.
- Unscrew the fixing bolt at the lever.
- Remove lever.
- Replace gasket.
- Where the lever is placed on the thread, any sealant must be wound, for example, FUM tape.
- A lever is put on over the thread and seal.
If the problem is that the lever simply does not attach well to the pipeline, and flows under the tap for this very reason, then you need to check the compatibility of the threads of all connected parts, disassemble and reassemble. But such cases are quite rare.
Possible breakdowns of single-lever bathroom taps and their causes
Faucets are subject to constant use, so they sometimes break. Damage is different and occurs for any reason.
cracked hull
Water flowing out from under the faucet may result from a crack in the faucet body. Its appearance is due to mechanical action. For repairs, as a temporary measure, sealant is used. Subsequently, the body of the product must be replaced.
Gasket wear
A tap leak from below in the absence of cracks indicates wear on the gaskets. Troubleshooting necessary:
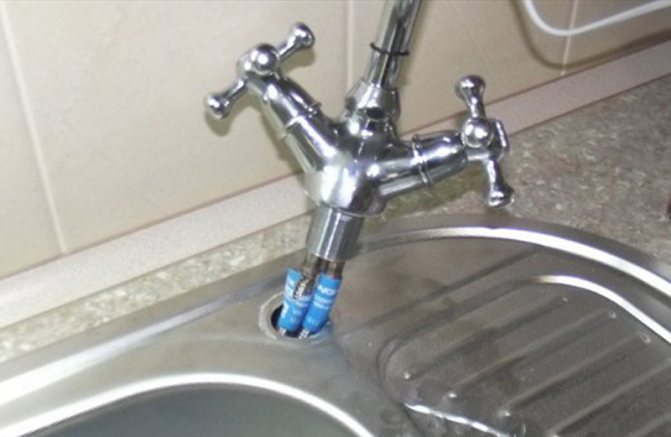
- Shut off the water supply to the mixer.
- Open the faucet, drain the remaining liquid.
- Unscrew the inlets from the mixer, drain the liquid.
- Unscrew the fixing nut, which is located under the sink.
- Replace the worn gasket with a new one.
- Clean the installation site from contamination.
- Reassemble the system.
Reference! The gasket can be bought at the store or cut out of rubber yourself.
Clogged faucet aerator
The nozzle on the faucet spout is clogged due to impurities contained in tap water. As a result, the pressure is reduced. To fix the problem, you need to unscrew the aerator and rinse it, removing all contaminants.


Blockage in a hose or pipe
If the aerator is clean and tap water pressure weak, it means that the hose or pipes are clogged. Rust blocks the lumen and pressure drops. Cleaning the hose and pipes with a thin cable solves the problem.
Bath/Shower Switch Malfunction
Water does not enter the shower. The lever-switch lowers itself, and water comes out only from the tap. The cause of the malfunction is the wear of the spool gaskets. It is worth replacing the top gasket first, for this you need:
- Unscrew the hose nut, remove it.
- Remove the gasket with an awl.
- Install a new one, after wetting it with water.
- Collect product.
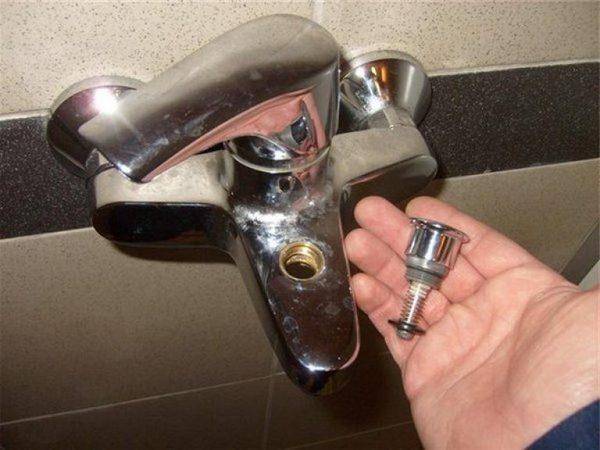
Photo 1. Lever-switch "bath-shower". Replacing is not difficult, the main thing is to know the basic rules for replacing.
If the problem is not solved, it is necessary to change the bottom gasket, namely:
- Shut off the water.
- Unscrew the nut, remove the hose.
- Remove spout and adapter.
- Remove switch and eccentric.
- Remove gold plate.
- Remove the bottom gasket with a screwdriver.
- Install a new one, return the spool to its place.
- Assemble the faucet.
Important! Gaskets for the spool in stores are sold only with mixers. But you can make them yourself by cutting out hard rubber.
Causes of the problem
Why is tap water dripping?
There are several reasons for this:
Bad faucet.if you save money and buy a completely low-quality cheap Chinese fake for brands, then very quickly all the flaws come out and the water tap starts to flow. This is due to the fact that its constituent parts are poorly fitted to each other, and extremely cheap materials are used as gaskets, which quickly wear out under the action of water.
Wrong installation. often the reason that water drips in the kitchen is improper installation. In this case, a quite expensive faucet can also start to flow.
That is why it is very important to properly install the faucet. And if this is beyond your power and there is no experience in such work, then it is better to trust a professional.
 Buying low-quality plumbing equipment can cause its early failure.
 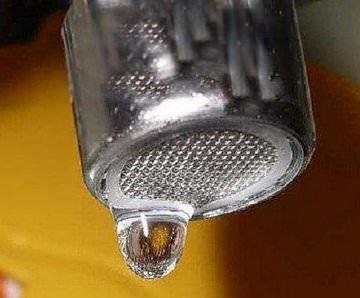 Failure to comply with the rules for installing the crane during its installation or its inept operation leads to its leakage
- Operating errors. the axle box faucet may leak due to the fact that it was used incorrectly. While everyone seems to know how to use a faucet, the current faucet clearly shows that this is not the case. If you press the faucet too hard during operation, if you turn the valve at the wrong angle, if you press on the faucet spout, then soon the faucet will leak in the kitchen. By the way, improper operation most often leads to leaks, much more often than marriage.
- Natural wear of mechanisms. nothing lasts forever under the moon, and over time, the mechanisms wear out, and the gaskets are erased.
Of course, leaks in the kitchen can be prevented by doing regular preventive inspections of the faucet and systematically changing gaskets and replacing mechanisms. But as a rule, no one remembers the faucet until it leaks and the time comes to fix it.
Cartridge faucet repair
Repairing a faucet with a built-in cartridge, depending on its malfunction, requires a different approach. If the tap does not close well or constantly flows, in most cases the cartridge needs to be replaced. When the shell or ebb is damaged, you will have to remove the mixing device and purchase a new faucet with subsequent installation.
What may need repair
The main components that most often fail during operation are the adjustment unit and spout. The control assembly can be damaged as a result of long-term operation with poor quality or from the ingress of contaminated water with sand into the plumbing system. The main reason for its malfunction is the breakdown of the built-in plastic parts and the stem on which the handle is attached.
The ebb most often fails as a result of clogging of the filter nozzles at its outlet - in this case, the water pressure breaks its thin-walled tube and a leak forms.
Spout filter repair
How to disassemble
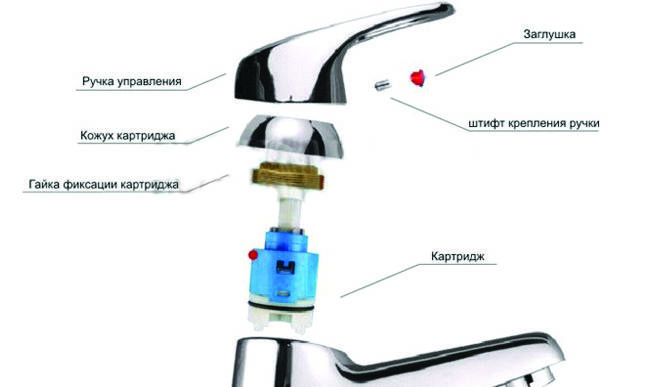
When carrying out repair work, it is often necessary to disassemble a single-lever mixer, the process consists of the following steps:
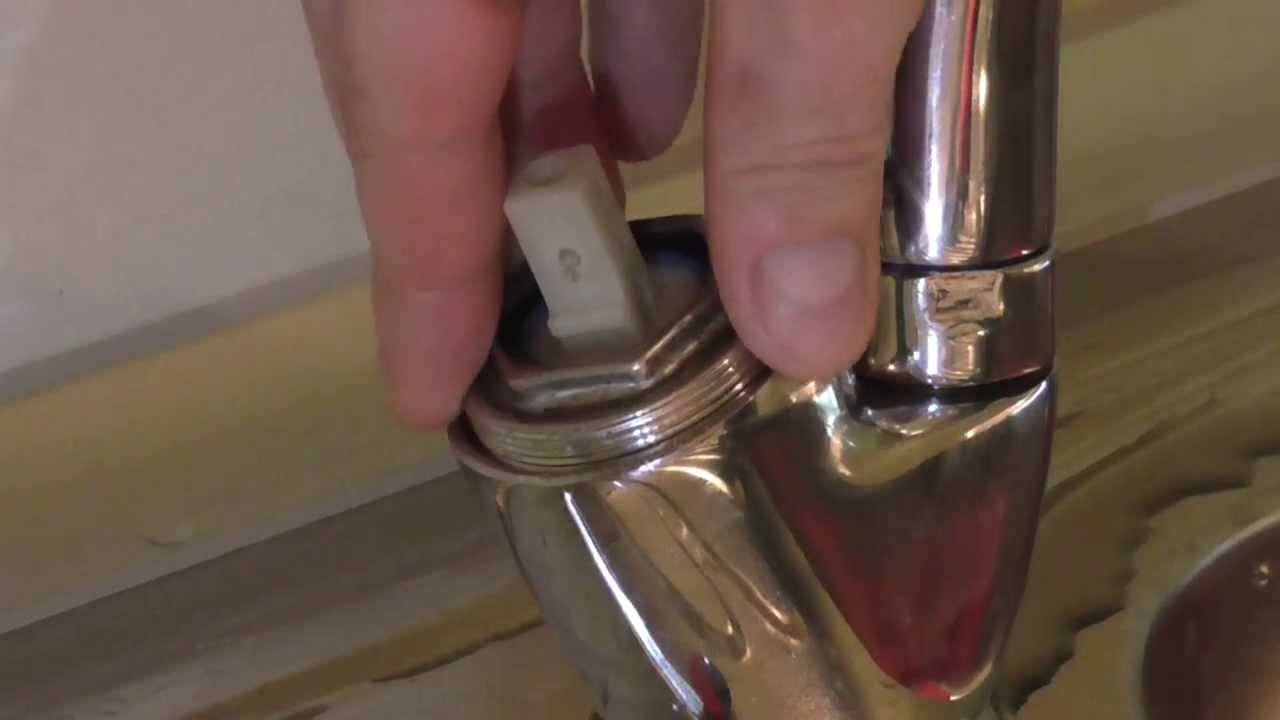
- Using a knife or a flat screwdriver, remove the plastic plug in the side of the handle, the fixing screw can have a head for a Phillips screwdriver or a hex key. Unscrew the fixing screw with a suitable tool; before work, it may be necessary to pre-treat it with household chemicals against limescale and rust.
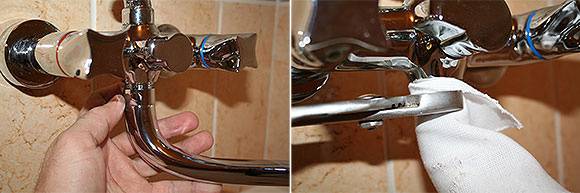
- After removing the handle, unscrew the decorative nozzle.It is designed for manual removal, but in the process of long work, water gets into the thread and plaque prevents twisting. To facilitate removal, you can use an adjustable wrench, after placing a soft cloth under its lips to prevent scratches on the chrome surface. When carrying out work on dismantling the cap, excessive efforts should be avoided - this can lead to deformation of the thin-walled lining.
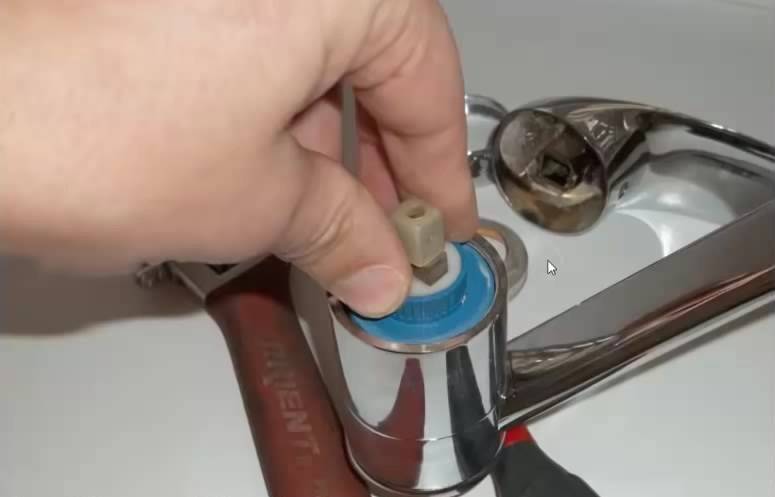
- Under the cap is a clamping nut with a hex ring in the upper part - it is simply unscrewed counterclockwise with an adjustable wrench. Removing the cartridge is easy - it is removed from the mounting slot with your fingers by the lever.
Dismantling a faucet with a ceramic cartridge
How to replace the cartridge
Before how to change the cartridge in the mixer, the internal parts of the mixer body are cleaned of plaque and dirt with a rag and household chemicals. Replacing the cartridge with a new one is quite simple - during installation, the body protrusions are combined with the recesses in the mounting socket.
Mistakes that can be made
It often happens that after a seemingly correct assembly, the cartridge does not work correctly. This happens due to the fact that the protruding rubber gasket in the lower part during installation prevents the two fixing protrusions on its body from getting into the mounting sockets. The crane will have to be completely dismantled again, set the block in the correct position and press down harder with your hand when tightening the clamping nut.
During installation, it is important not to pinch the clamping nut - this can lead to a stiff joystick and compression of the body shell, causing rapid wear of internal parts and, in extreme cases, their cracking - if the joystick moves tightly, you should immediately loosen the clamp
How to disassemble a faucet in a ball-type kitchen
General Troubleshooting
A puddle is leaking under the sink - the first thing to do is to inspect the spout. If it is completely dry, then the problem lies in the violation of the tightness of the water supply. We'll have to crawl under the sink and look for a leak. To make it easier to do this, you need to dry the nozzles with a cloth, and then see where the water oozes. Most often, the problem is eliminated by tightening the nut.


If tightening the nut does not help, turn off the water, remove the pipe, inspect it, inspect the thread on the pipe itself and the internal thread on the mixer
If the thread on the nozzle is damaged, the part must be replaced. With damaged internal threads in the faucet body, the problem becomes much more serious. You can try to fix the leak by wrapping the thread of the pipe with sealing tape or tow with sealant, but this is a temporary solution, most likely, you will have to change the mixer entirely.
Dripping from the spout even though the lever is fully closed - the cause may be damage to the locking mechanism, because. abrasion of sealing parts has practically no effect on the operation of single-lever devices. If there are cracks in the body, the mixer needs to be changed - it will not be possible to fix it.
A puddle of water on the sink near the base of the faucet body. The reason is a crack in the body or wear of the gasket in the rotary part of the spout.
We figured out the gaskets of the single-lever mixer. It remains to assemble the device and install it on the workplace:
About what to do if the tap is flowing is described in detail in the article we proposed.
Two-valve faucet repair
Gasket replacement
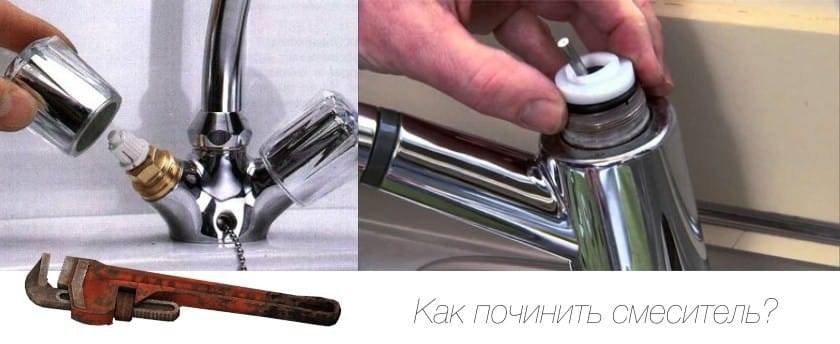
The answer to the question: why does the tap flow, no matter how tightly it is twisted, most likely sounds like this: the problem is in the worn gasket. Replacing it is not difficult, for this you need:
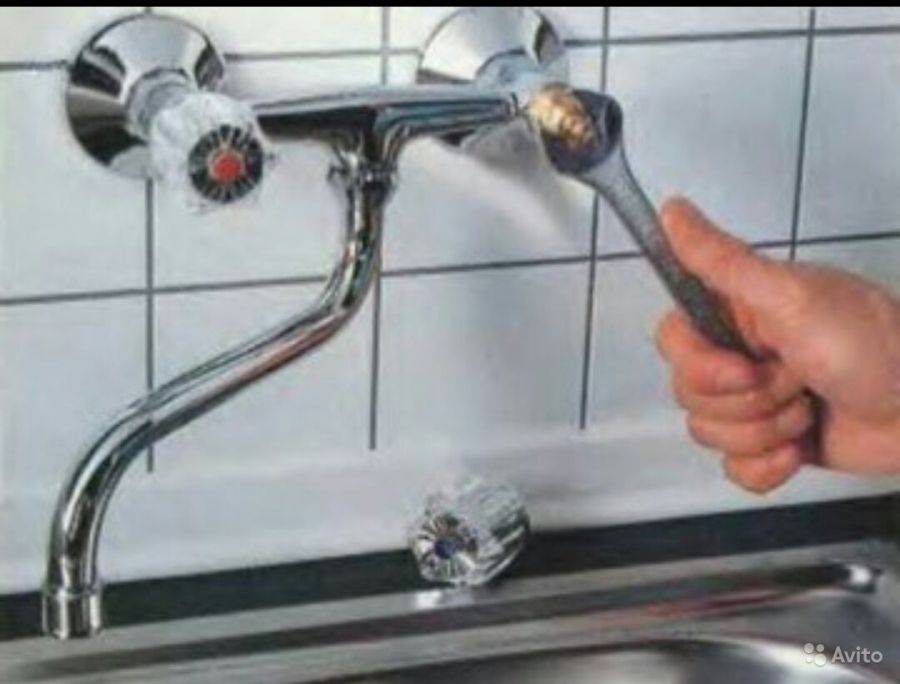
- Unscrew the valve body (it is simply rotated counterclockwise).
- Remove damaged or worn gasket.
- Make a new gasket from a piece of thick leather or rubber. For the sample, of course, they take the old gasket.
- Install a new gasket.
- Wind the seal around the stop edge.
- Reinstall the valve body by turning it clockwise.
- Using a wrench, tighten the installed valve tightly.
In order not to bother with the manufacture of the gasket, you can buy a new one in the plumbing store. However, if for some reason this is not possible, a home-made part is quite suitable for an urgent crane repair.
The diagram shows in detail how to properly replace the ceramic gasket in a traditional two-valve mixer. You will need a Phillips screwdriver and wrench
Replacing the sealing insert of the stuffing box
Worn gland packing insert can also cause leakage. In this case, leakage is observed when the valve is open: water enters between the gland nut and the valve stem. To correct the situation, you must:
- Loosen the gland nut using a screwdriver.
- Make a sealing insert from PTFE sealing tape.
- Remove worn bushing.
- Wrap the new insert tightly around the valve stem.
- Tighten the nut.
If everything is done correctly, the valve will turn smoothly, and the flow will stop.
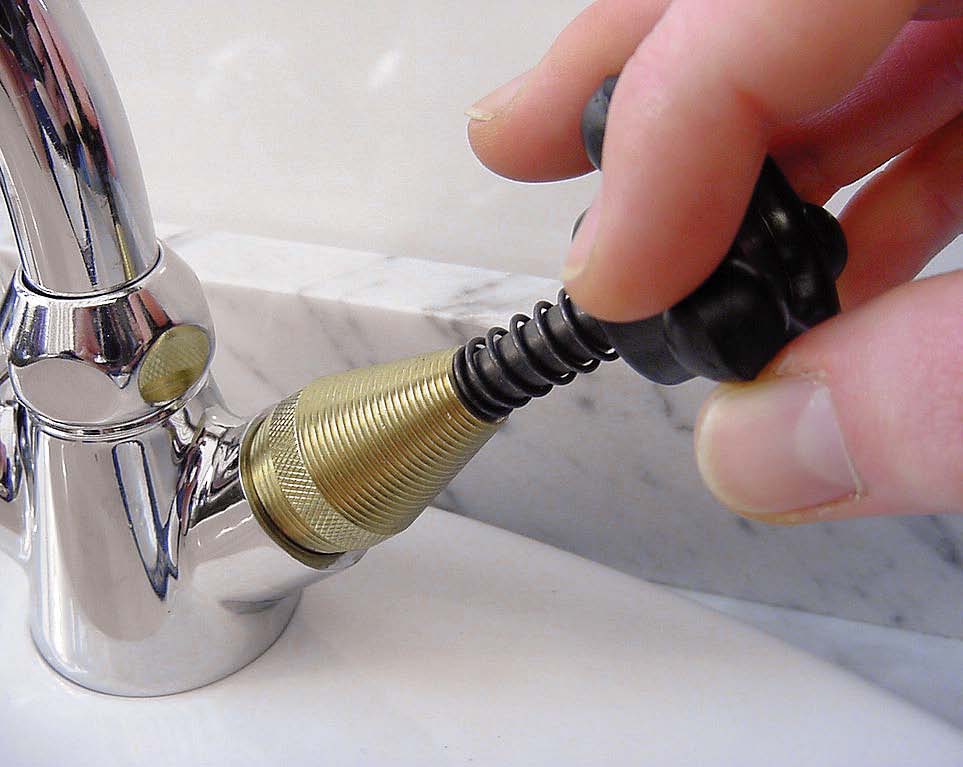
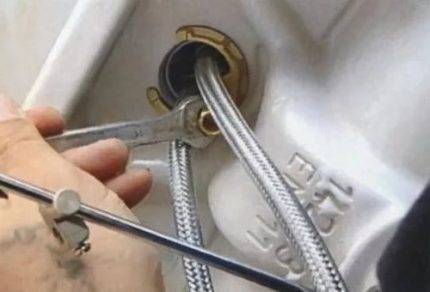
Shower hose O-ring replacement
When a leak occurs where the faucet and shower hose connect, it is usually a worn O-ring that causes problems. To replace it, you must:
- Using a wrench, unscrew the shower hose. This must be done carefully, otherwise the hose threads can be easily damaged.
- Remove worn seal.
- Install new O-ring.
- Reinstall the shower hose.
If possible, it is best to use an O-ring made of silicone. Rubber parts are less resistant to wear and therefore not as durable.
Most often to fix a leak the crane has to replace the rubber gasket or part of the locking mechanism - the crane box. These parts can be purchased at a plumbing store.
When, when transferring the water supply to the shower hose, a small amount of water continues to flow from the tap, the locking elements located in the mixer handles should be changed, they are called crane boxes. They can be ceramic or equipped with a rubber gasket, you need to choose the right model in a plumbing store.
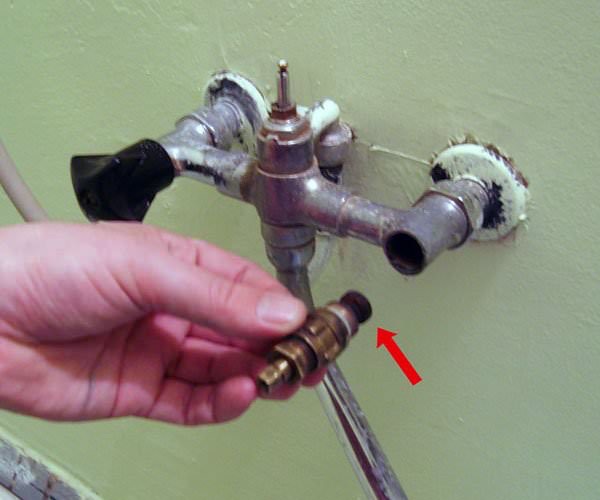
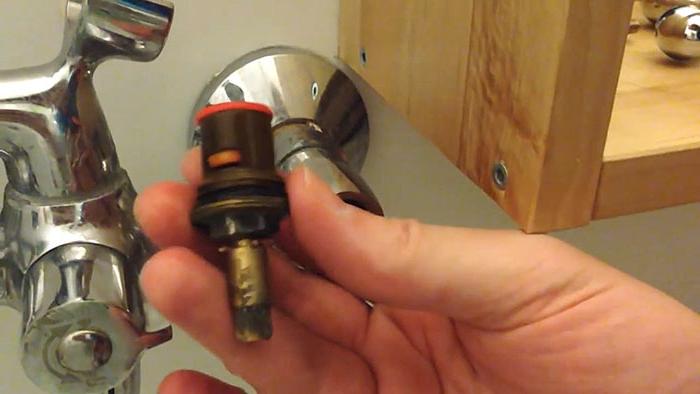
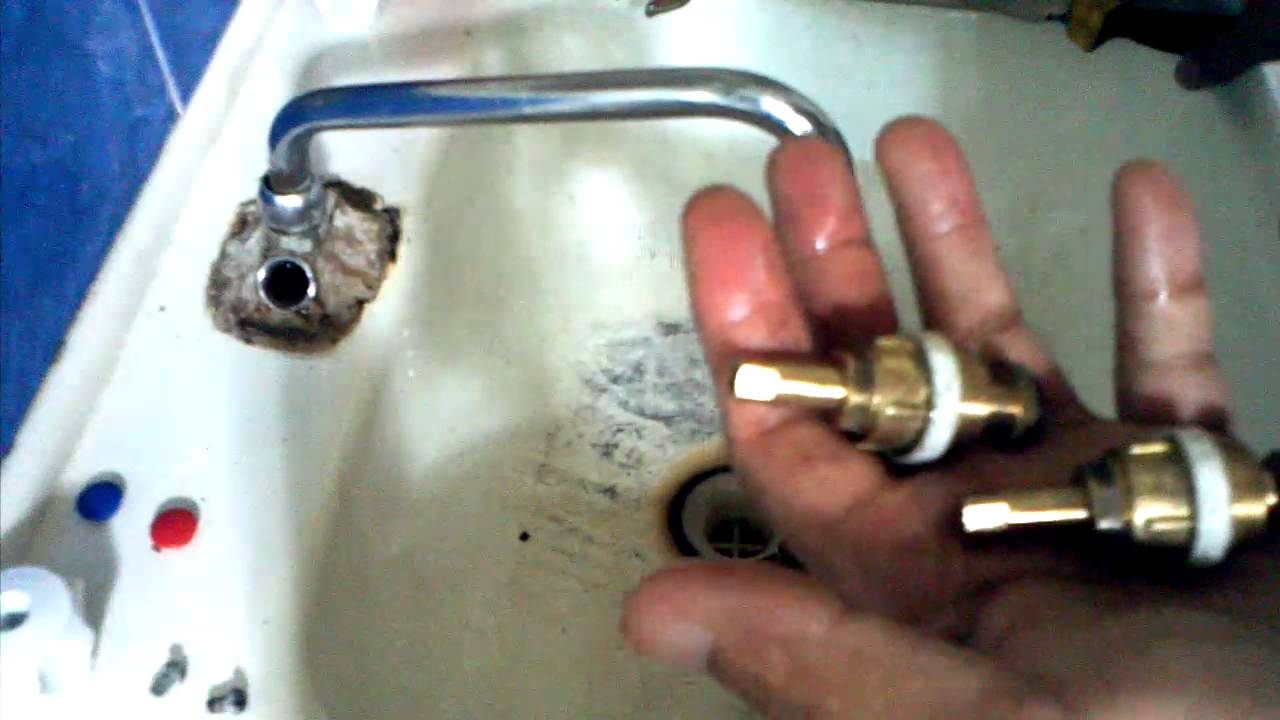
Self-repair of a valve valve
Valve taps can be called classics of water supply. And, although they are gradually being replaced by new designs, there are still plenty of them. Their internal structure has not changed over the decades. Only the design has changed - it has become more diverse and refined. Today you can find both the most common models and very exotic ones.
The structure of valve valves
Water taps of this type are still in use, as they are simple and reliable, they serve not for years, but for decades. If all the “stuffing” is of good quality, all that can fail during this time is gaskets.Replacing them is the main way to repair a valve valve.
Replacing the rubber gasket
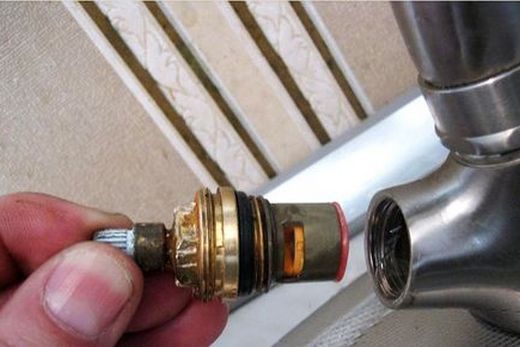
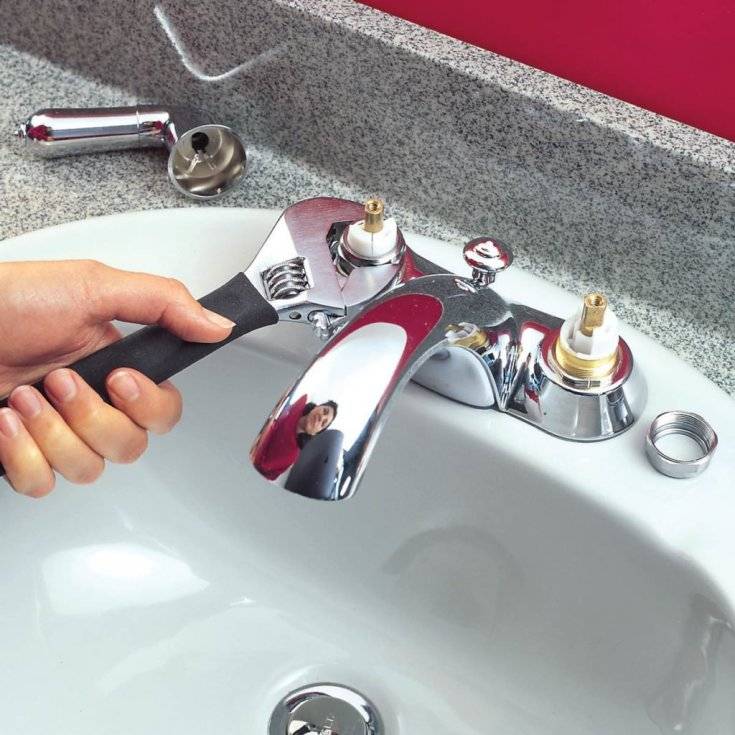
If, with the valve completely closed, the faucet in the kitchen or bathroom continues to drip, most likely the reason is the gasket on the valve that has lost its elasticity (see photo in the next paragraph). She no longer clings tightly to the saddle, which is why the water continues to flow and sometimes the tap does not just drip, but even flows. Repair the faucet in this case - replace the gasket. To do this, you need a wrench, or better - an adjustable wrench and a set of gaskets.
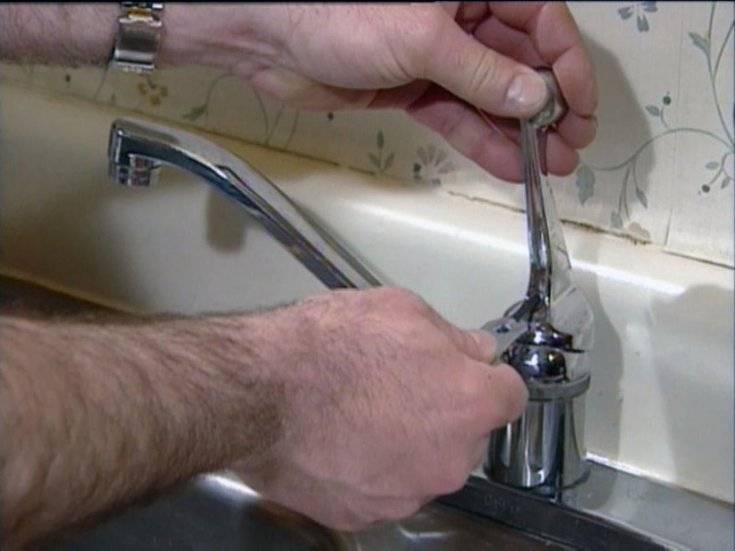
Before you fix a dripping faucet, turn off the water supply (you can completely, you can only in this branch, if possible). Next, it is useful to make sure that the water is still blocked. Water does not flow - we begin repairs. Would need wrench or wrench. They will need to unscrew the head housing (the upper part of the housing).
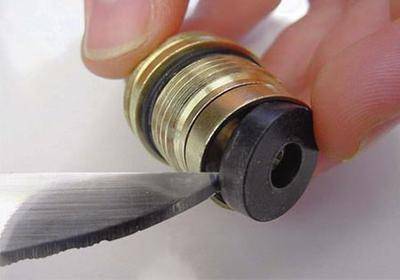
It is better to work with a wrench. In order not to damage the surface during the operation, wrap it with a soft cloth, and then apply the key. Unscrew the head, remove the valve. Now you can replace the gasket or install a new valve. You pry the old one with something sharp - you can use a screwdriver with a flat blade, you can - with an awl, etc.
When choosing a gasket, please note that its edges must be beveled at about 45 °, otherwise the plumbing will make noise during operation. If this is not in your arsenal, you can trim the edge with something sharp - a knife or scissors
Replacing the gasket in the tap in pictures
If there is no suitable gasket, it can be cut from a sheet of dense rubber (porous is not suitable).The thickness of the rubber sheet or gasket is 3.5 mm, the inner diameter is slightly less than the diameter of the rod, the outer one should not protrude. Don't forget the 45° beveled edges.


After installing the gasket, put the valve in place, twist the head. The new models do not require a winding on the thread. Moreover, winding is contraindicated - it can cause a crack in the body. If an old crane from the times of the USSR is being repaired, tow is placed on the thread, lubricated with packing paste, then twisted. After that, you can gradually turn on the water.
Sometimes the opposite story happens with this gasket on the valve - water does not flow or barely oozes. In this case, the gasket flew off the stem and blocked the flow of water. First, you can try to open / close the tap a couple of times, and if it doesn’t help, you need to repeat the operation described above, that is, repair the tap by replacing the gasket. Just remember to remove the old one stuck to the saddle.
Water oozing from under the stem
If water drips from under the valve, the seals are most likely worn out. There are two ways to fix a faucet with a leak from under the stem. To begin with, you can try to twist the head housing more tightly. They do it again with a wrench. It is undesirable to use pliers, as traces remain after them. Tighten the head as far as possible (just don't overdo it).
The structure of the valve
If the thread is tightened to the maximum, and water continues to ooze, it is necessary to replace the gaskets on the stuffing box. To do this, first tighten the tap to the limit, then remove the tap head again, pry something sharp and remove both rubber rings, replacing them with new ones.
Water does not shut off
If the gasket is changed, and the water does not shut off, when the tap is rotated, the thread is torn off, it is necessary to change the stem - the thread on it has worn off. There are two options here - replace the stem itself or completely the entire valve head.
There may be a hole in the saddle
If the threads are not worn, the gasket is new, but the faucet is leaking, inspect the seat. It may have a hole in it. It is formed gradually - it is washed out by water supplied with high pressure. If the gasket is not pressed tightly in some place, a sink will form in this place. Sometimes water undermines the entire circumference, forming sharp edges, which quickly damage the gasket. The gully and sharp edge must be removed. Take a regular screwdriver and run it along the edge to dull the sharp edge. The same operation can be done with a nut file or a piece of fine-grained sandpaper. The main thing is to achieve a smooth (as far as possible) and non-sharp edge.
"Narrow" places of taps and mixers
As in any mechanism, in plumbing, first of all, problems arise at the junctions of individual parts. Since the main purpose of a tap or faucet is to supply water at the right time and stop its supply outside the moments of use, all major equipment breakdowns can be divided into two groups.
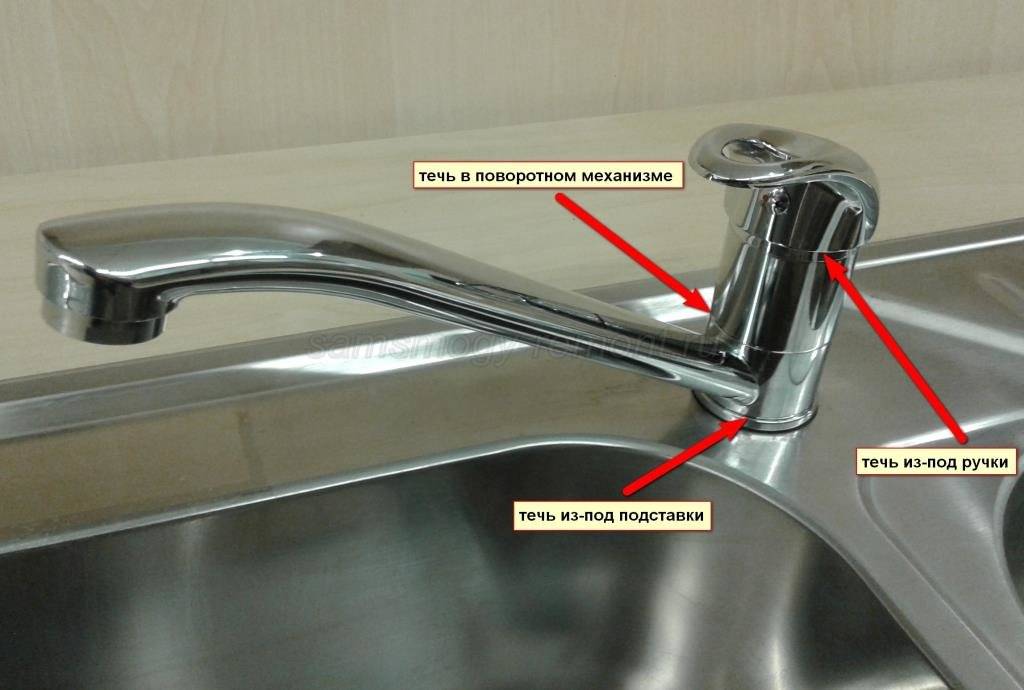
- There is water where it shouldn't be. This includes leakage of seals, malfunction of locking elements. Liquid may drip from the spout, from the joints between the spout and the housing, from under the control elements, from the connection of the device to the water pipe(s).
- There is no water when it is needed. This group includes insufficient jet pressure when the passage holes are clogged or the mechanism malfunctions, lack of supply, improper mixing.
If it becomes necessary to repair the current mixer, you must first find out the cause of the breakdown and solve the problem in accordance with the recommendations of the masters.
We will deal separately with violations of the equipment, characteristic of all types of taps and mixers, and separately by type.
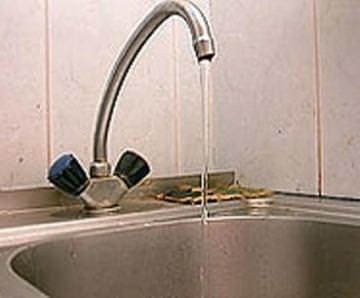
Reducing the water pressure from the spout
If, with sufficient supply in the pipes, the jet from the spout comes out with extraneous sounds (hissing, whistling, wheezing), thin streams hitting the sides appear, the pressure does not change when the position of the regulator is changed, most likely the problem is in the aerator.
This detail is a wire or plastic mesh (a disk with holes) through which water passes. In the process of seeping through small holes, the whole jet breaks into many thin streams, softening the pressure and increasing the content of air bubbles in the water. That is why the part is called an aerator - from the Greek ἀήρ - "air".
If the aerator is built into the spout, it should be removed and washed, cleaned of lime deposits. This can be done in a slightly acidic solution of vinegar or specialized plaque removers. Screw-on heads with an aerator are removed from the spout, disassembled and washed.
After installing a cleaned - or a new, if sufficient cleaning is not possible - aerator in place, the water supply usually enters normal mode.
The process is discussed in more detail in the video. for single lever compact mixer.
faucet leaking
With constant leakage of water from the spout (without leaks in other places), we can talk about a violation of the locking mechanism. This usually occurs when a foreign object enters or plaque (deposits) accumulates.It may also be due to the fact that the locking mechanism does not completely block the water supply hole.
In any case of failure, it is necessary to remove the locking device, check for foreign objects and the condition of the mechanism as a whole.
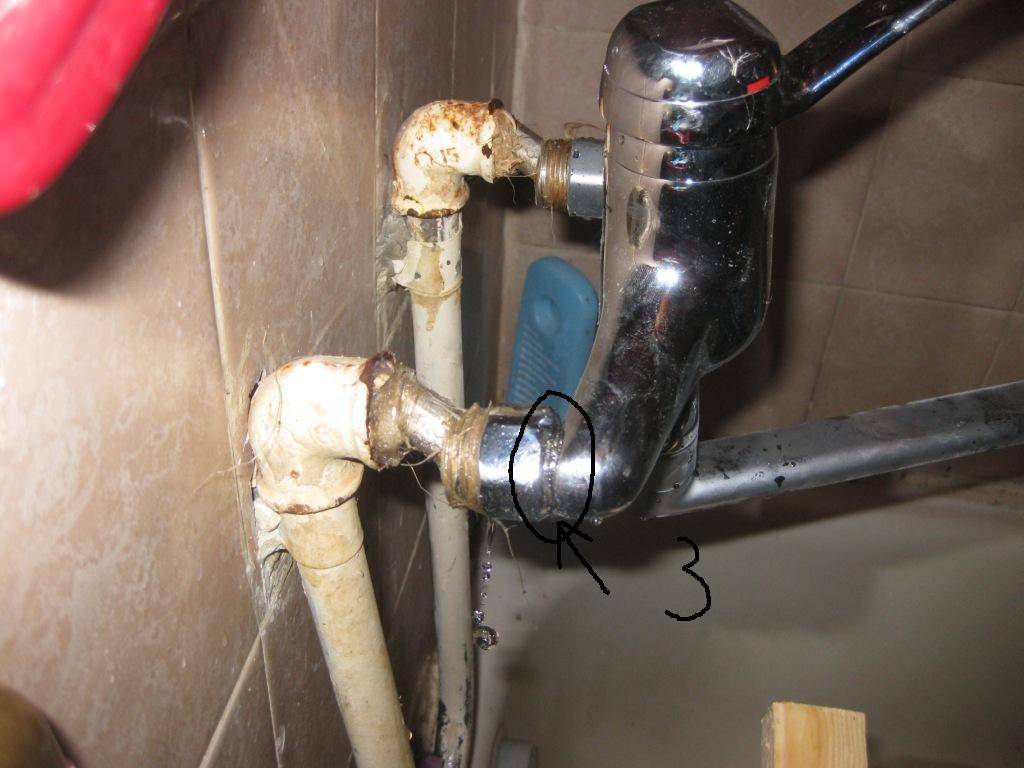
Leakage at the point of connection of the water pipe (hose) to the faucet or faucet
This problem occurs when the connection of the mixer nozzles with hoses or pipes is not tight enough. It is necessary to check whether the thread is sufficiently tightened, whether the sealing elements are in order. With frequent vibration (for example, the sink is installed above the washing machine), the threaded connection becomes loose, with poor water quality or unsuccessful initial installation, the seal must be replaced.
Similarly, the tightness of the connection for a wall tap or mixer is checked.
If the hose itself is leaking, there is only one repair option - replacing the hose.
How to fix a faucet in the bathroom if the junction of the spout and body is leaking
Such a breakdown is typical for all taps and mixers with a swivel spout. Since a seal is installed at the junction of the spout and the body, it inevitably wears out and / or breaks with constant turns.


The solution to the problem is to replace the gasket at the junction. If there are burrs, protrusions, other metal defects at the installation site of the seal, it is advisable to eliminate them. If the thread of the clamping nut is damaged, it must be replaced, the same applies to the expandable plastic ring that is present in this assembly.
How to fix a kitchen faucet with a flexible spout
In the case of installing a flexible spout, a problem may arise both at the place of its attachment to the body (the repair of the breakdown is discussed above), and in the hose itself.Most often, the flexible tube located inside the corrugated metal hose is damaged. It cannot be repaired, you can only replace the element. If the corrugated hose itself is damaged, either the entire flexible spout or the hose together with the inner tube must be replaced.


