- The toilet cistern is leaking: the reasons why water is on the floor
- A leak in the toilet is the result of a breakdown of the overflow system or the damper pear
- Trigger malfunctions
- The reason is the unfitness of the bolts holding the saddle
- Faults
- First option
- Second option
- Third option
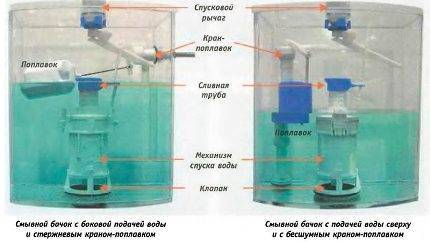
- Types of breakdowns
The toilet cistern is leaking: the reasons why water is on the floor
There are two weak points through which liquid can seep out of the toilet bowl and cause a lot of trouble to the owners and neighbors - it can flow through the gasket installed between the tank and the toilet itself or through the screw holes that connect the two parts of the compact. In both cases, the cause is almost always either the design features of the toilet bowl (the tank does not fit tightly on the bowl and over time it loosens, which leads to a leak), or improper installation of the gasket.
The toilet cistern is leaking: troubleshooting options
There are other options - for example, a dry gasket that comes with the toilet bowl. Installing it, the master lays a time bomb. But let's start in order and consider each of the possible places where leaks occur separately.
Gasket between cistern and toilet bowl.In this case, the question of why the toilet bowl is leaking can only be answered by making a certain visual inspection.
Immediately you need to pay attention to the distance between the tank and the toilet - if it is, then, most likely, the point is in the design features of this plumbing fixture. It will not work for a long time to fix a leak with such a toilet - time will still pass, and the leak will reappear
By the way, it can appear with equal success both in a month and after a few years. No, this is not a lottery, but the scrupulousness with which you will treat this problem. In a good way, such a repair of the toilet cistern is performed as follows. First, turn off the water supply, drain the water from the tank, remove it. To do this, you will have to unscrew the two screws that pass through the bottom of the tank and go out from the bottom of the toilet bowl - if they are not rusted, then the tank will be removed easily. After separating the two parts of the toilet bowl, the gasket responsible for the tightness of this joint should remain either on the tank or on the toilet bowl - we remove it and look at its condition - if it is solid and does not squeeze with our hands, then we go to the store for a new one. If it is soft, then the matter is most likely in the wrong installation. In both cases, it is better to replace it. Before going to the store, we wipe dry the junctions of the gasket with the tank and the toilet, thus thoroughly removing all dirt and debris. While you walk, it will dry out, and immediately after returning, it will be possible to continue repairing the toilet bowl.The new gasket is installed quite simply, and so that during the assembly process it does not change its position and the leak does not recur, it can be glued to the tank or toilet bowl with silicone (it is better both there and there). Then we insert the screws into place and tighten them well - just do not overdo it, otherwise the faience may burst. After the tank is installed and the nuts are tightened, it is better to wait a couple of hours for the silicone to dry up, and only then use this plumbing fixture.
Leakage through connecting screws. In most cases, they occur as a result of poor-quality installation of the toilet bowl or due to dry seals. As in the previous case, unscrew the screws, but do not remove the tank. We pay attention to the gaskets, or rather to their shape - if we are talking about flat rubber washers, then we throw them away and go to the store for a new kit for connecting the tank to the toilet. When buying it, make sure that it is equipped with cone gaskets, as they provide a more reliable sealing of the holes. We install a new mounting kit in accordance with the following diagram. Closer to the screw head, we first put on a metal washer - followed by a conical gasket with a narrow part from the screw head. We insert the screw into the hole (from inside the tank) and from below, under the toilet bowl, put on a flat rubber band, then a washer and screw on the nut. You need to tighten the bolts one by one - first tighten one, then the other, then return to the first again and go to the second again. In general, you need to make sure that the cistern falls onto the toilet evenly - skew can lead to a crack on the toilet or cistern.
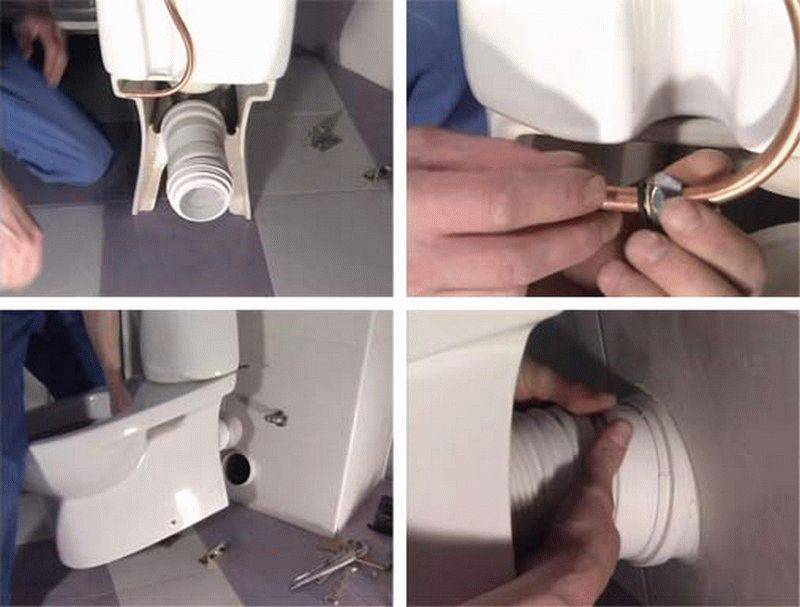
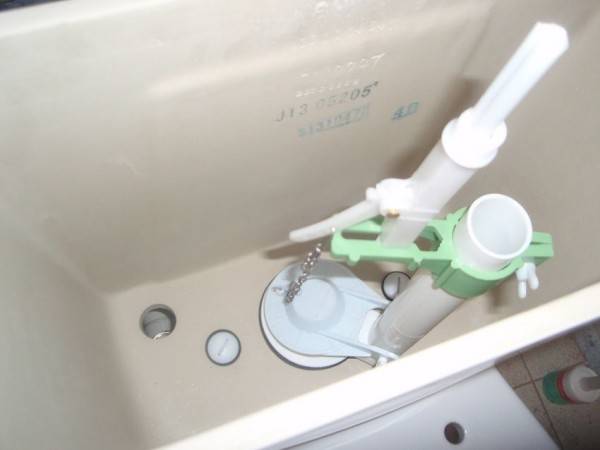
Toilet cistern repair photo
Here, in principle, are all the places where a leak can occur between the tank and the toilet. As you can see, eliminating it is not so difficult, the main thing is to understand what you are doing.
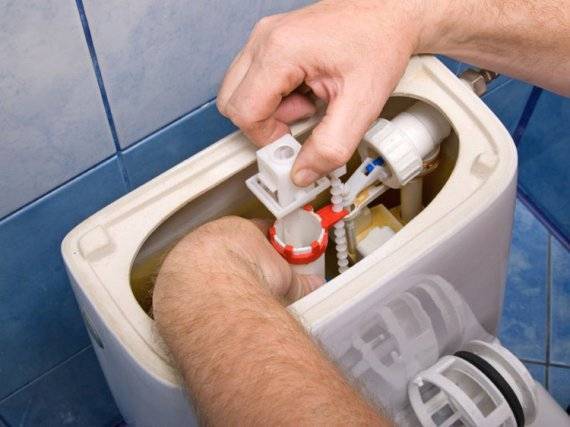
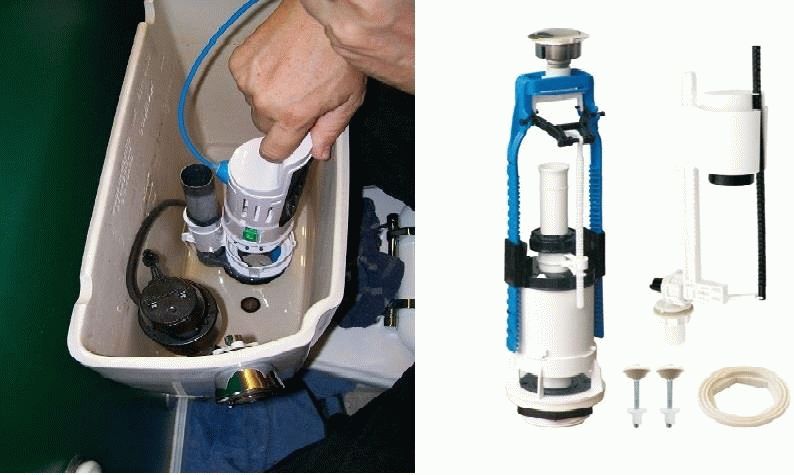
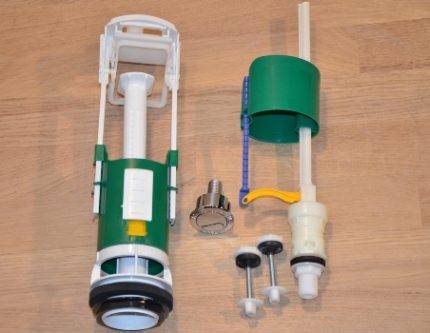
It is for this reason that when repairing a toilet bowl with a button, pay special attention to disassembly - when disassembling something, we study the design and purpose of the device parts. So it will be easier to understand the principle of operation of the tank and determine its malfunction.
The video clearly shows how to repair the toilet cistern if it is leaking.


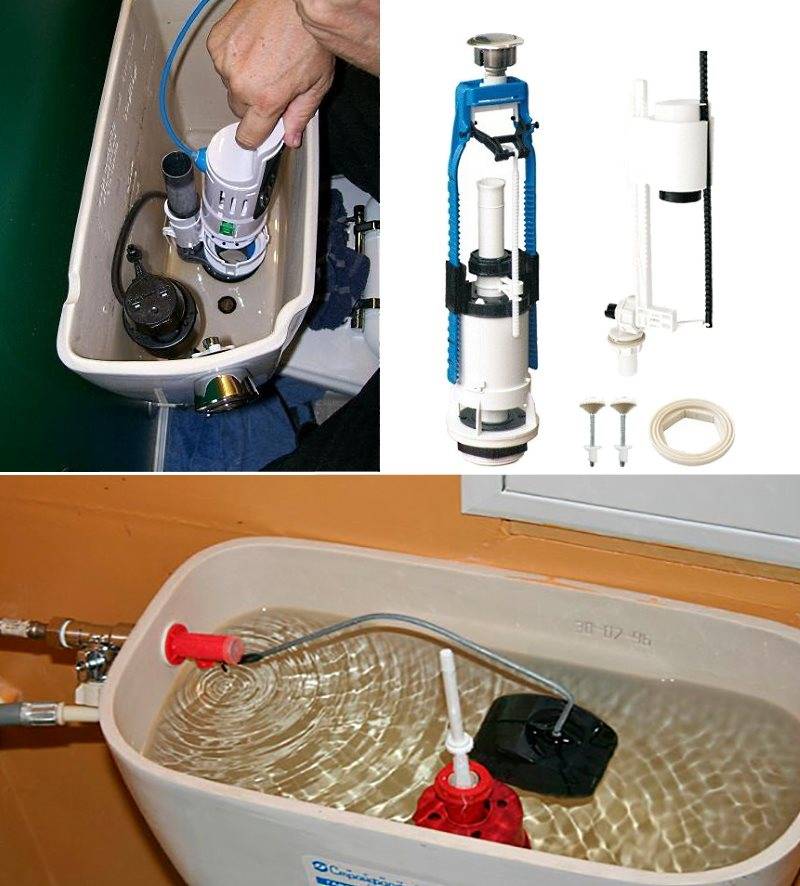
A leak in the toilet is the result of a breakdown of the overflow system or the damper pear
After checking the float mechanism, many people wonder what to do next, since the leak has not been eliminated. In this case, you need to go and check all the other systems, which, to tell the truth, fail much less often.
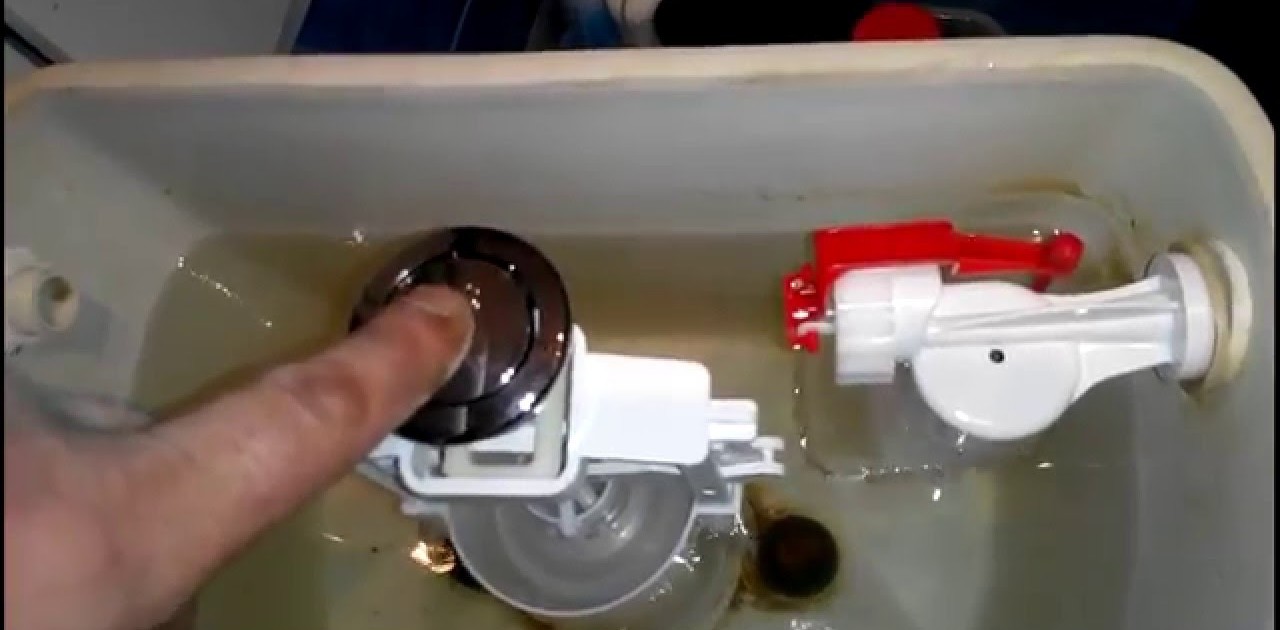
Next on the list, you need to check the rubber pear that blocks the drain hole from the tank. To do this, you must first perform a number of actions:
- shut off the water supply to the toilet tank using a special valve;
- drain all the water in the container, as it will interfere with us;
- manually raise and lower the damper itself into its place. She must sit exactly in her seat;
- if this does not happen, then you need to adjust its position.
It often happens that due to poor water quality, either a rust or lime deposit forms on the valve itself or on its seat. As a result, he simply cannot normally sit down in his place and completely block the water.In this case, if all parts are intact and undamaged, you should simply clean. At the same time, it must be remembered that in order to achieve the best result, it will be necessary to clean two components - this is the valve itself and its seat.
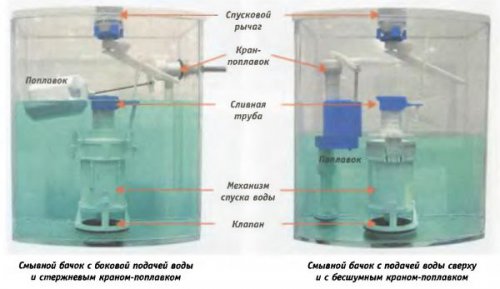
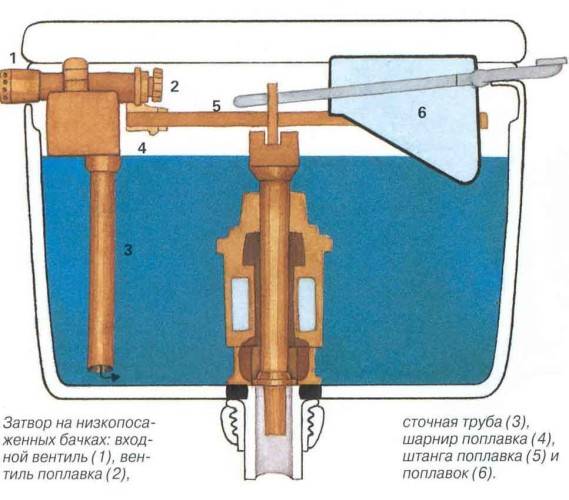
Despite all this, the reason for the constant leakage of water in the toilet can also be a breakdown of the overflow mechanism itself, made in the form of a plastic pipe, which stretches from the very bottom, and exits slightly above the water level. It is constantly in the water and at the same time has a mount, under which there is a rubber gasket. In this case, most often the water starts to run due to the fact that the gasket is out of order. To solve this problem, you just need to replace the unusable gasket.
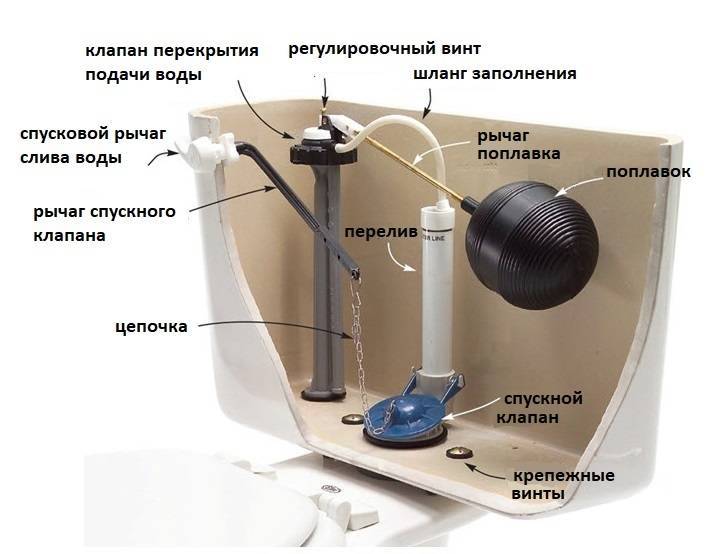
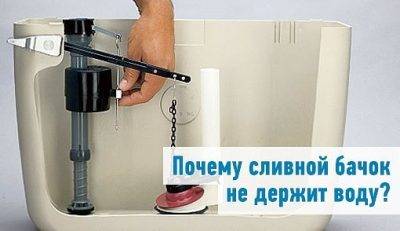
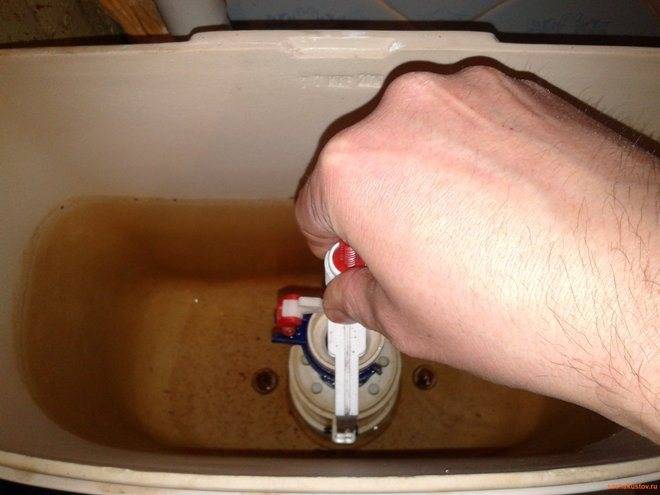
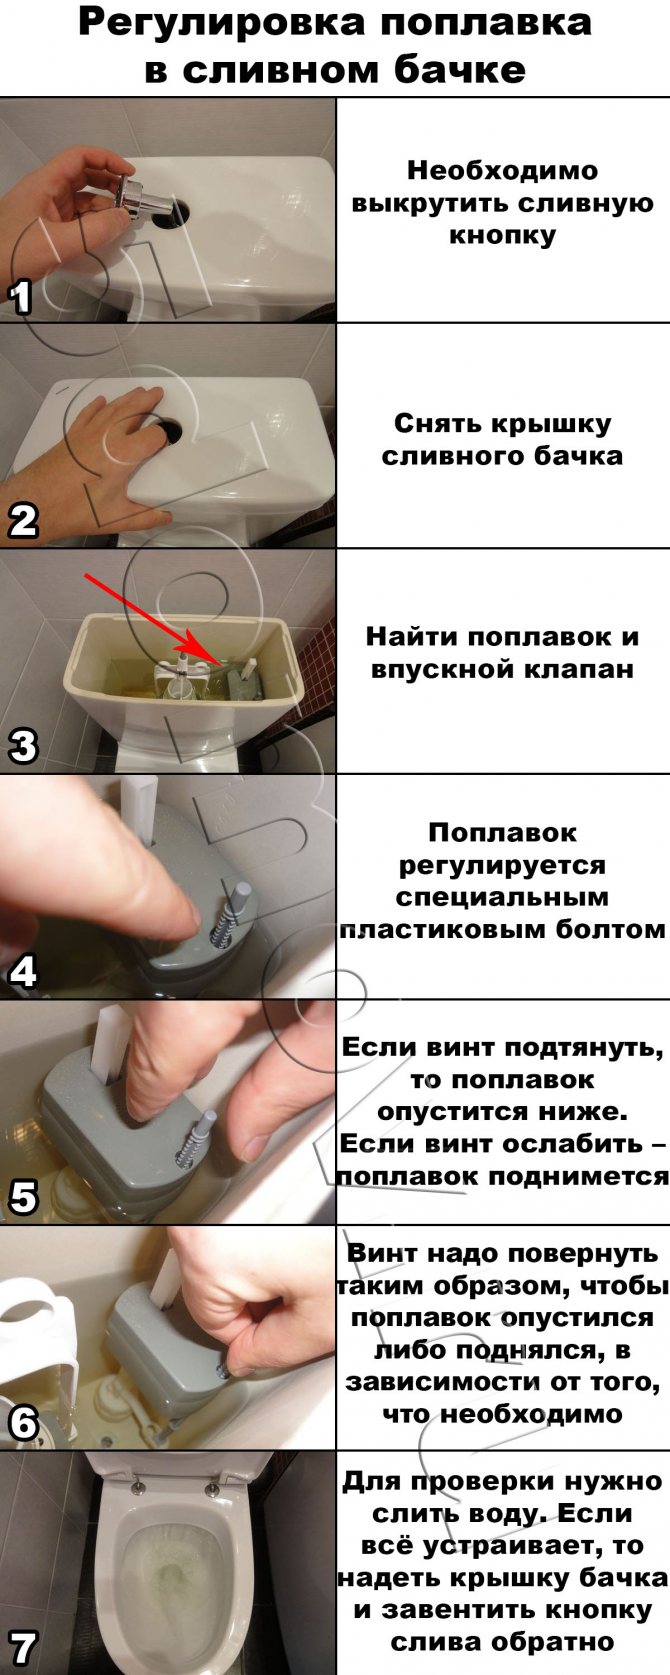
Trigger malfunctions
The most common failure in the trigger mechanism is an unadjusted overflow. In the case when its tube is installed low, and the float allows you to draw water above this level, you can fix the problem by simply adjusting the filling level of the tank.
So, the drain tank does not hold water. What to do? The scheme is simple. It is necessary to lift the overflow tube (it easily pulls up). There are two possible scenarios for the development of events.
The first. If the water stops flowing, but leaves through the overflow tube, then we raise the tube, and the problem is solved. And the second. If the overflow tube is at the maximum level (which threatens to overflow water), then lower the float slightly.
Our ancestors slept differently than we do. What are we doing wrong? It's hard to believe, but scientists and many historians are inclined to believe that modern man sleeps in a completely different way from his ancient ancestors. Initially.


What does the shape of your nose say about your personality? Many experts believe that by looking at the nose, you can tell a lot about a person's personality.
Therefore, at the first meeting, pay attention to the nose of an unfamiliar
Never do this in a church! If you're not sure if you're doing the right thing in church or not, then you're probably not doing the right thing. Here is a list of the terrible ones.
11 Weird Signs That You're Good in Bed Do you also want to believe that you're giving your romantic partner pleasure in bed? At least you don't want to blush and apologize.
Top 10 Broken Stars It turns out that sometimes even the loudest glory ends in failure, as is the case with these celebrities.
20 photos of cats taken at the right moment Cats are amazing creatures, and perhaps everyone knows about it. They are also incredibly photogenic and always know how to be at the right time in the rules.


The reason is the unfitness of the bolts holding the saddle
If it is for this reason that the drain tank does not hold water, the repair is carried out according to the following scheme. First, the water is completely removed. Then, between the flexible hose and the float valve, the union nut is unscrewed, behind it the bolts that fasten the toilet bowl to the tank are dismantled. Further, by slightly bending the tank, the corrugation connecting it to the toilet is released.
Now the bolts are being dismantled: both are required, even if one has become unusable. New ones (brass or stainless steel) are mounted in their place. You need to tighten it carefully, without applying much effort and avoiding shifts and distortions. Now you can assemble the structure and use it.
Faults
Usually, all possible malfunctions with a toilet bowl have the following symptoms:
- water constantly flows into the bowl;
- liquid continuously flows from the plumbing system into the tank;
- the toilet itself is leaking;
- flush button broken
- repeated pressing of the button is required in order for the drain to occur or the liquid to stop flowing into the tank.
To eliminate the breakdown, it is very important to determine its cause.
First option
Overflowing the tank is the likely reason why water is constantly flowing. All "extra" water goes into the bowl through the overflow.
Let's highlight a few reasons for this problem:
- valve crack (found only in plastic products);
- problems with the pin holding the float lever;
- low gasket pressure;
- its wear.
Understanding the reasons, you can roughly figure out how to act.
How to solve:
- We remove the cover.
- Raise the float a little. The flow must end. If this happens, it will only be necessary to slightly bend the lever in order to ensure that the water supply is shut off.
- If it doesn't help, you will have to inspect the valve. Instead of a broken stud, you can use a piece of copper wire. If the hole in which it is attached has become large, the entire valve will need to be replaced. To do this, you should take a sample of the old one with you to the store in order to find exactly the same one.
- If the gasket is worn out, then the entire valve will still need to be replaced, since they are not sold separately.
Second option
Consider the option in which water flows, and its level in the tank is less than the overflow. A common cause is a broken bolt that tightens the toilet and shelf. A similar problem existed especially acutely in older models, where there was a pair of steel bolts.Naturally, under the influence of water, they quickly became unusable. In this case, they need to be replaced. Moreover, it is desirable to choose products from corrosion-resistant materials.


You can solve the problem by disassembling and assembling the tank:
- turn off the cold water supply;
- remove the tank cover;
- empty it;
- disconnect the flexible hose;
- we unscrew the bolts that fix the shelf on the toilet: if it doesn’t work, you can use a hacksaw;
- tilt the tank back to get the shelf out of the cuff;
- drain the remaining liquid, lay the tank on a flat surface.
Replacing the bolts with new ones, you should assemble everything
At the same time, it is important to replace the rubber elements so as not to return to repair in the near future.
When tightening the bolts, be careful not to over tighten. The toilet material breaks quite easily.
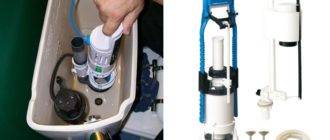
Third option
What to do if the bolts are intact, there is a lot of space before overflow, and the liquid flows. When there is water in the tank, it does not flow into the bowl as long as the rubber bulb holds it. By pressing the button, the pear rises, the liquid flows out. Over time, the material from which it is made loses its qualities, which means that there is every chance that the pear will begin to let water through.
It is necessary to change the pear. It is fixed on the stem with a thread. You can unscrew it by turning it counterclockwise. You need to go to the store with a sample of the old product in order to pick up an identical one.
A temporary solution could be some kind of weight hung on the stem to press down the rubber, preventing the liquid from constantly flowing out.
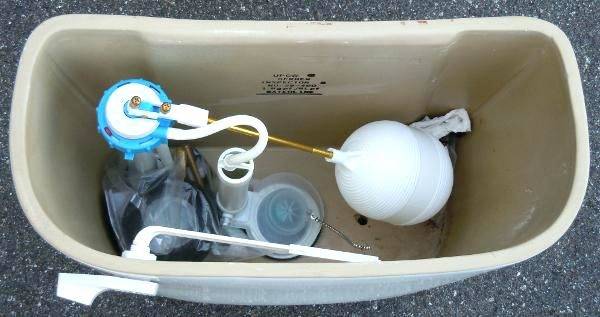
Types of breakdowns
So, the drain stopped working and you have a reasonable question “why doesn’t water enter the tank?”. Still not knowing the source of the problem, it’s better to stock up on universal tools just in case: an adjustable wrench and any sharp object (a nail is fine).
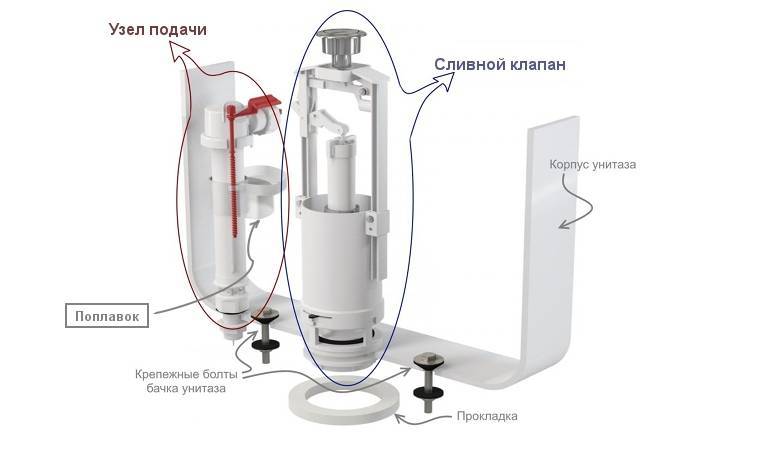
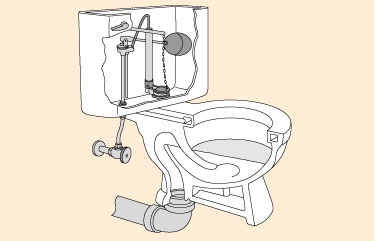
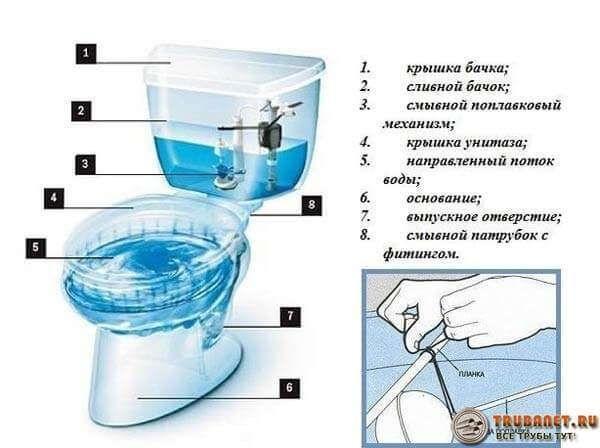
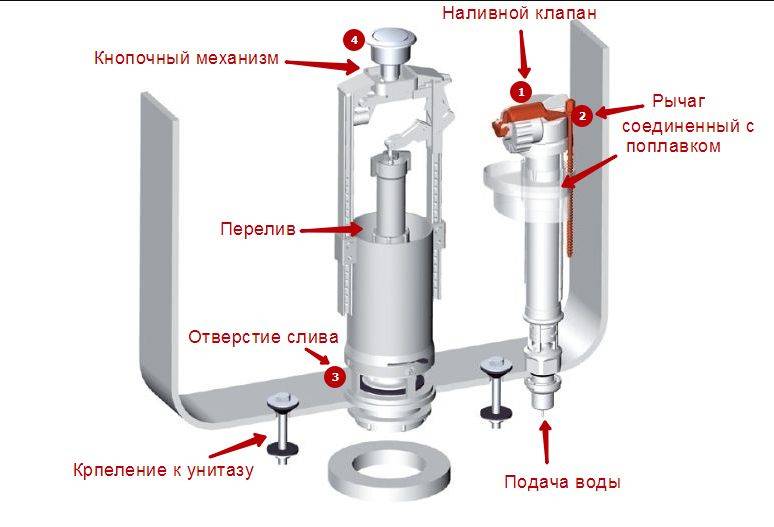
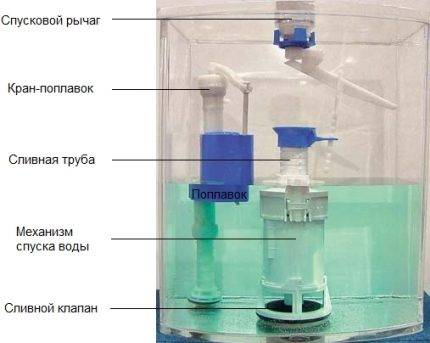
Toilet bowl design
Here are the main reasons why water does not fill the toilet bowl:
-
- Lack of water supply. Yes, no matter how trite it is - first of all, just in case, you should check the presence of water in the whole house, perhaps the tap is turned off and the tank mechanism has nothing to do with it.
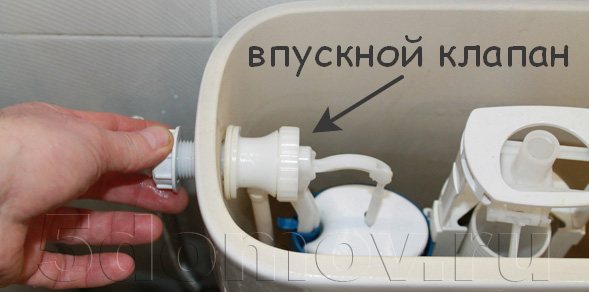
- Float tilt. The simplest action is to check the correct position of the float or valve. Here you just need to slightly adjust the float so that it falls into its original place. If that doesn't help, then it's not the float valve.
- Blockage in the pipe. A blockage occurs in the event of a pipeline change and a temporary shutdown of water - then its composition changes significantly and you can notice the presence of rust with the naked eye. In order to check whether the junction with the tank is clogged, first you need to turn off the water supply to the tank, and then release the hose connecting the tank and the water supply system. The next step is to check the water supply through this hose. If it is absent, the reason is a blockage and with the help of a long sharp object, you need to carefully clean the junction. Then we connect the hose back and check if water is being collected.
- Rust in the filter. Sometimes water stops flowing because scale gets under the hose nut and over time the pressure weakens, and then the tank stops filling at all. In this case, you need to remove, rinse and clean the filter, if any.
- Float contamination.When the inlet valve belongs to the “economy” category sample, the float rising along the guide becomes overgrown with mucus and plaque over time and ceases to perform its main function. Here you should remove the float mechanism and clean all rubbing surfaces well.
- Exhaust valve wear. If your tank has been installed for a long time, the float mechanism could simply wear out. In this case, the exhaust valve will need to be replaced, and you can do it yourself - it's up to you.
- Leak. Sometimes water simply does not have time to fill the tank, because it immediately flows into the toilet itself, without holding it in the tank. For the same reason, ugly rusty smudges form on the inside of the bowl, and the displacement is consumed at a rapid pace, which entails additional costs. In this case, it will be necessary to replace the siphon membrane, which, when worn, loses its ability to hermetically close the hole. You need to flush the water from the tank, remove the siphon, change the membrane to a working one and fix the siphon in its original place by screwing the fasteners.
- Inlet tract setting. Sometimes, when the system is too tightly assembled, water is drawn extremely slowly. Then you will have to weaken a certain element, which one - only a plumber can say so that the pressure returns to normal.
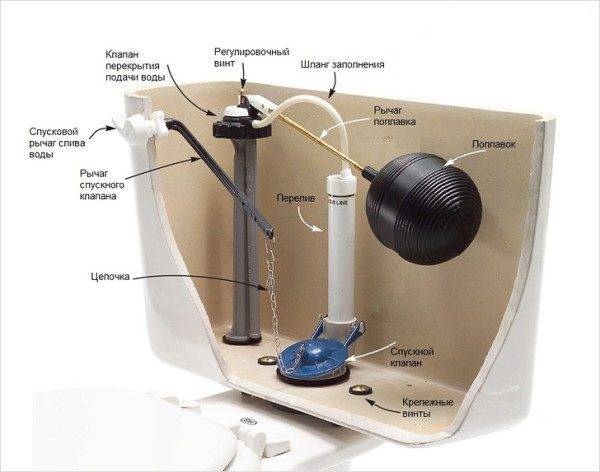
If you are not sure about the performance of any individual parts of the mechanism, it is better not to try to repair them, but rather change them to new ones as soon as possible, especially since the valves cost mere pennies. In the event that a partial repair did not bring the desired result, you need to do a more global repair, namely, a complete replacement of the entire drain mechanism.It’s not difficult to do it yourself, provided that you have a detailed diagram of the tank device, detailed instructions, and preferably an understandable video lesson.


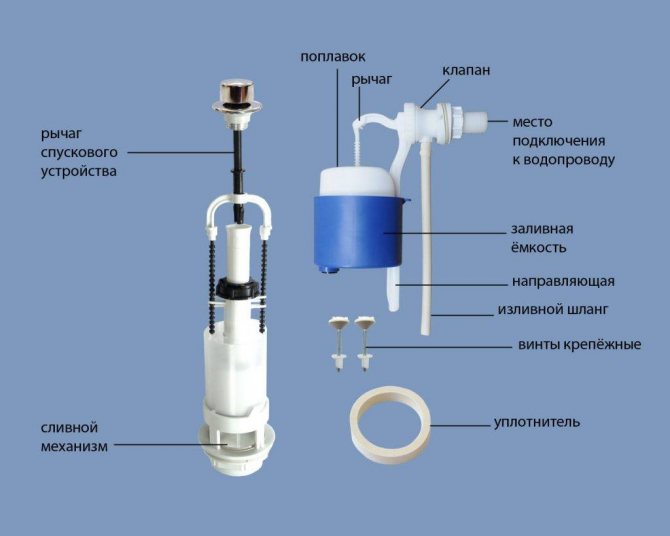

Replacing broken parts is easy enough


