- Where to place a country toilet: placement standards on the land
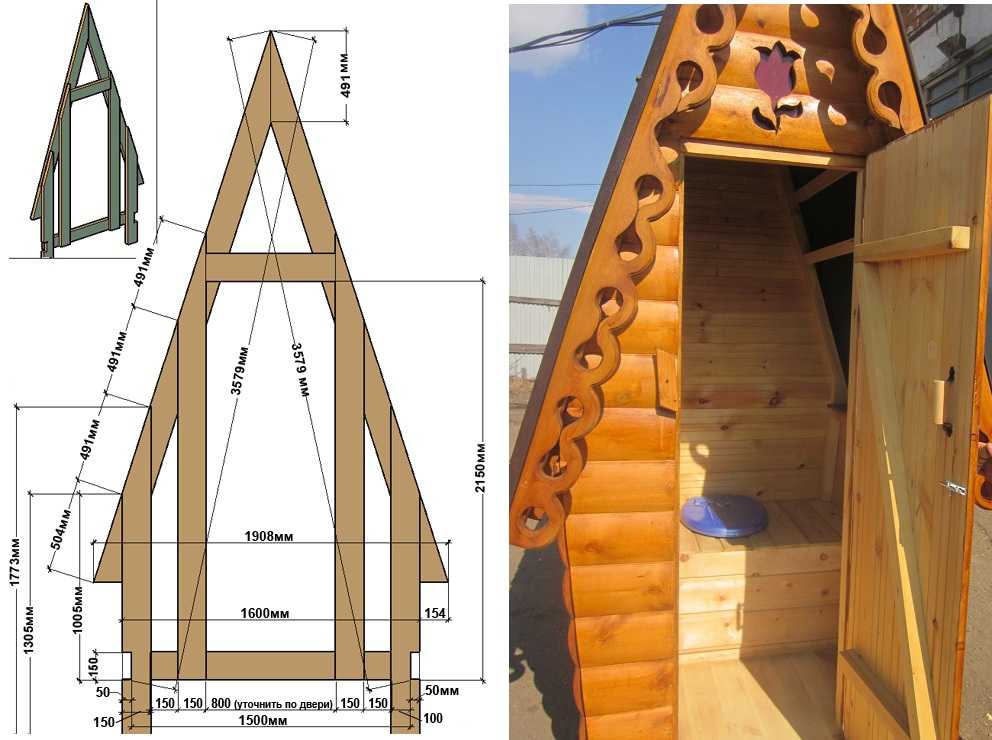
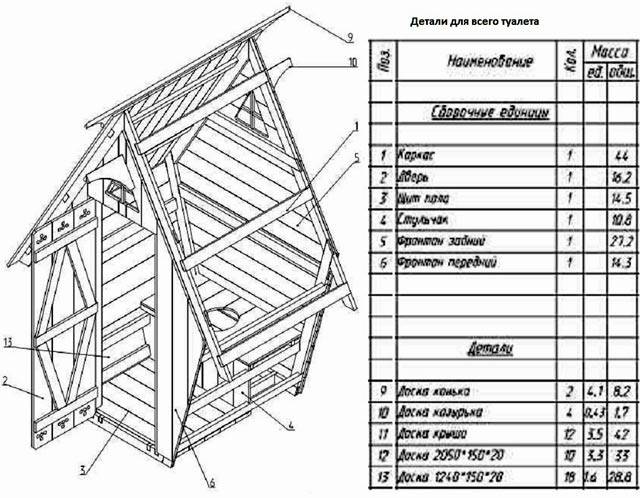
- Dry closet in the form of a house
- Frame Assembly Instructions
- Hull lining and trim
- Step-by-step instructions for building a country toilet
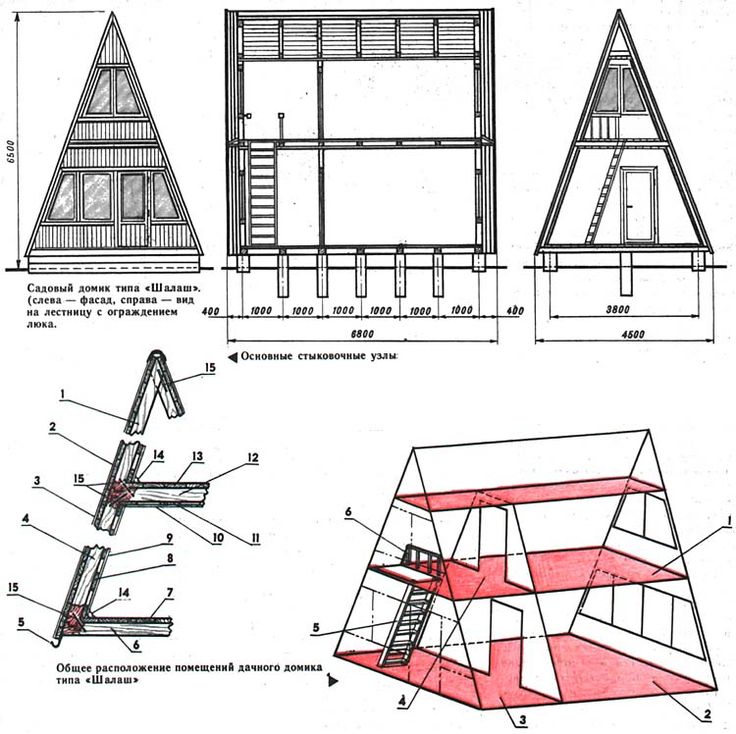
- "Hut"
- Designs of pits for sewage at the country toilet
- Choosing a place: accommodation standards in a summer cottage
Where to place a country toilet: placement standards on the land
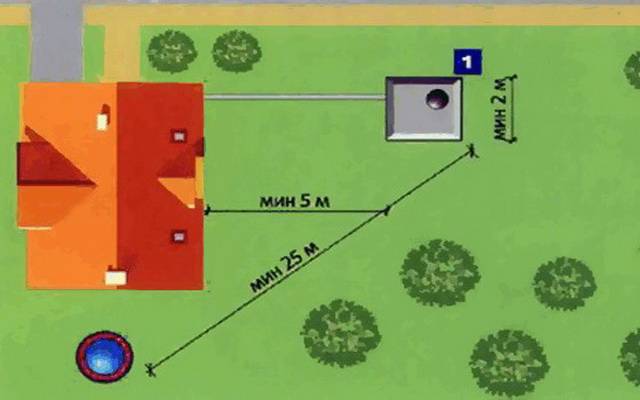
When placing a toilet on the site, there are certain sanitary norms and rules that must be followed when building a toilet in the country. When choosing the optimal location for the construction of a pit latrine, several rules should be followed. The distance from the well to the toilet must be at least 25 m. Otherwise, the quality of well water used for domestic purposes cannot be guaranteed. The toilet is not recommended to be built in the center of the suburban area. It is best to choose a place at some distance from the country house.
When the site is located at an angle, the toilet should be built in the lowest place. According to the rules, the well should be located on a slope higher than the toilet. This is necessary to prevent sewage from the cesspool from entering the well, but on an elevated part, the well can sometimes give too little water.
In addition, the toilet cesspool located below the slope may be in the zone of groundwater occurrence, therefore, with a difficult terrain of the summer cottage, it is necessary to choose places for the installation of a well and a toilet with a cesspool with extreme caution.
When choosing a place for a toilet in the country, you should also take into account the wind rose, which will eliminate unpleasant odors. It is recommended to build a toilet from the side of a blank wall of the building, if any. In no case should a pit toilet be located next to a terrace or veranda, as a strong smell can spread from it in the summer.
It is necessary to consider a method for cleaning the cesspool. If possible, when placing a toilet on a land plot, it is recommended to organize an entrance for a sewage truck that pumps waste from septic tanks, drains and cesspools. This machine is quite large. It should be borne in mind that a 7 m long hose is used for pumping, of which 3 m are lowered into the pit, and 4 m of the hose are unwound around the site.
According to the norms for placing a cesspool toilet on the site, it must be removed from residential buildings at a distance of at least 12 m.
The cesspool should be located at a sufficient distance from drinking water wells, areas with fruit plants and from places where domestic animals or birds are kept. Even a dry-type toilet should not be closer than 5 m from a residential building. A cesspool-type toilet should be at least 1-1.5 m away from the border with a neighboring site. Drainage from a cesspool should not pollute groundwater and nearby water bodies, so such pits should be carefully isolated.


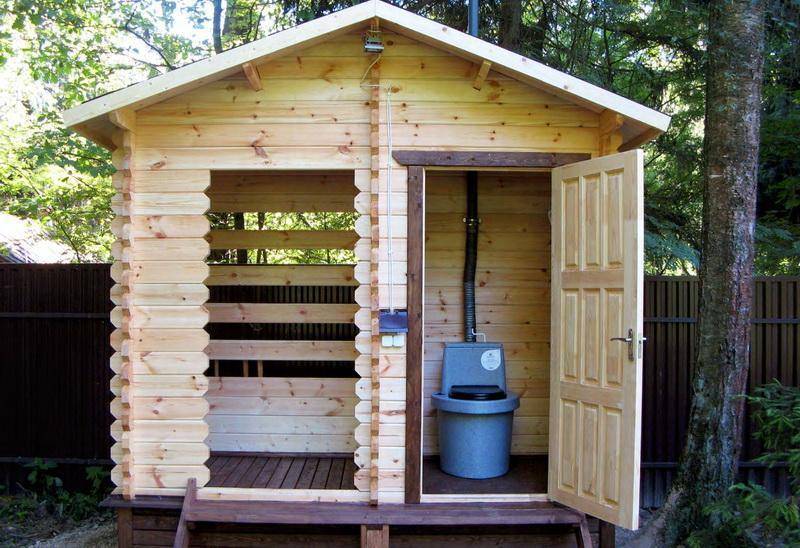
Dry closet in the form of a house
For a summer cottage, the best choice is a dry closet.This construction option will not only make it possible to equip the life of summer residents with an essential building, but will also provide lovers of growing vegetables and fruits with good quality fertilizers. The construction of a dry closet does not require significant physical strength.
When arranging a country toilet like a hut, land owners often choose drawings for dry closets for themselves. This option is considered as the most rational for personal plots.
The dry closet is characterized by increased functionality - it opens the way to the production of fertilizers.
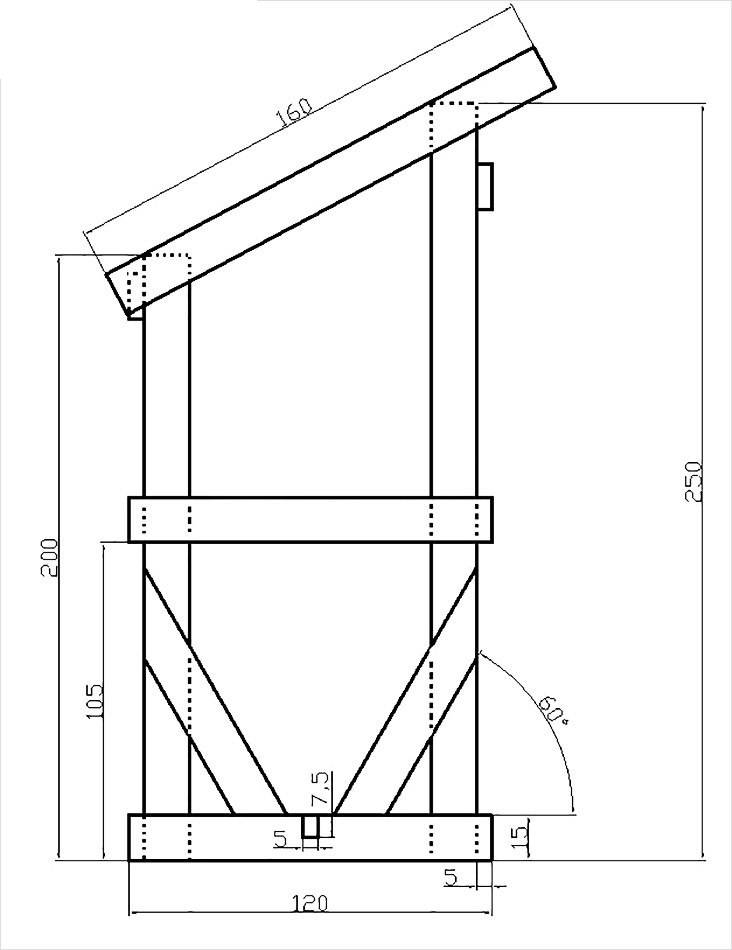
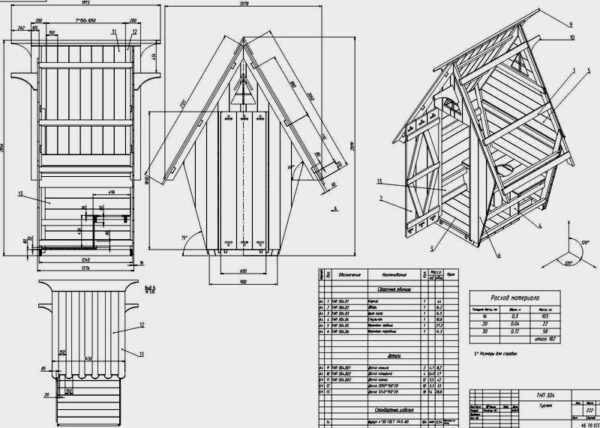
Frame Assembly Instructions
If possible, it is recommended to use planed lumber for the construction of the hut structure itself and directly for the details of the country dry closet. In extreme cases, if the boards and bars have a rough surface, you need to process them with a planer. In practice, it has been observed that planed lumber is much less likely to be attacked by various kinds of insects.
Sequence of builder steps:
- Along the perimeter of the base (1.2 x 1.0 m), make a small (100-150 mm) penetration into the ground.
- Cover the bottom of the recess with crushed stone (backfill height 50-70 mm), tamp well.
- Cover the compacted surface with roofing material (waterproofing).
- Pour a layer of sand (20-30 mm), spread evenly on the surface.
- Put a second layer of roofing material with some margin along the perimeter.
- At the boundaries of the perimeter, lay a bar (150 x 150 mm) over the roofing material.
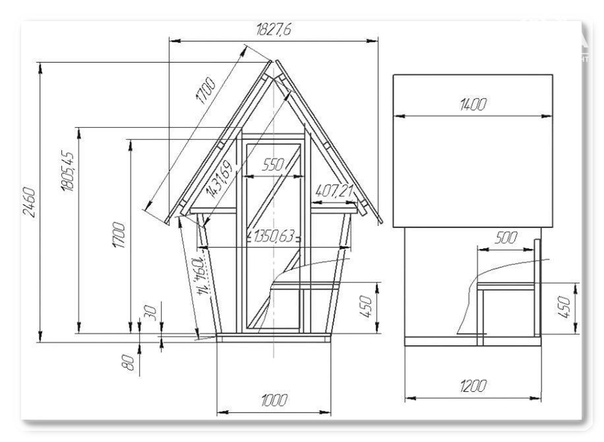
After completing these works, the foundation is ready for the construction of a hut for a country toilet according to the drawing.Next, you need to assemble the floor of the toilet from grooved boards and fasten it around the edges with bars located around the perimeter. This can be done, for example, using metal corners cut to size.
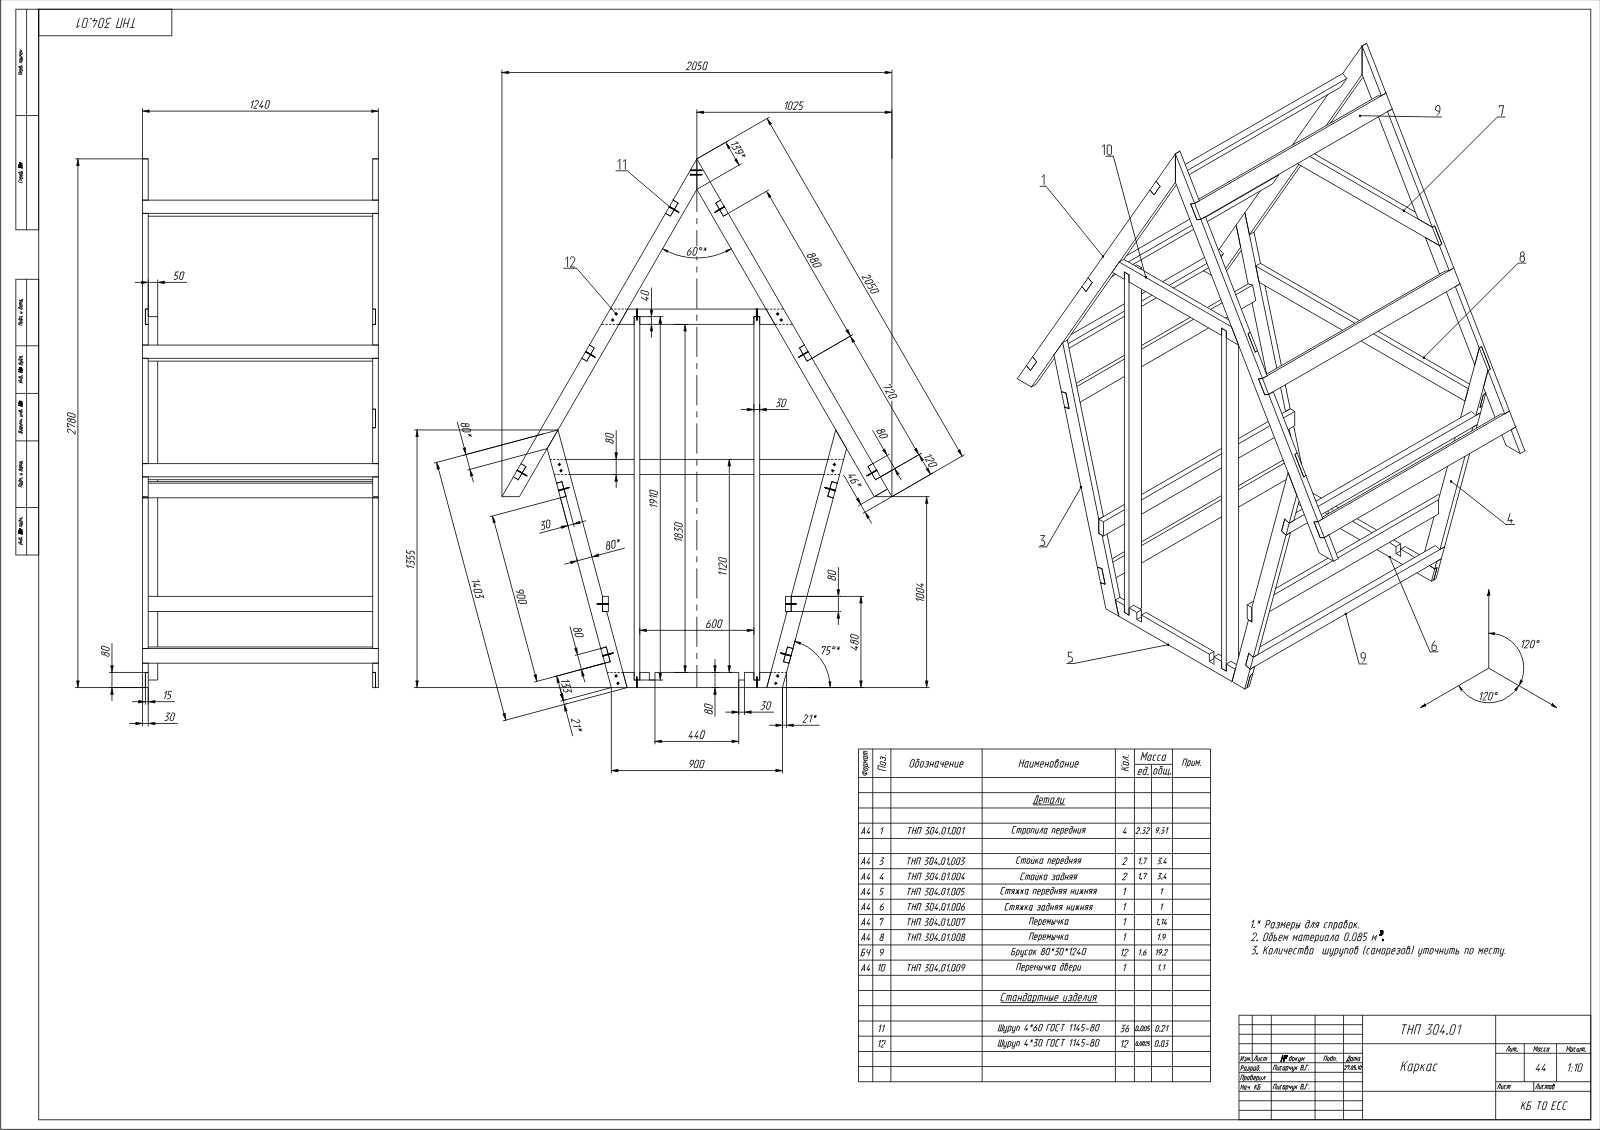
The construction of a hut toilet usually begins with the construction of a common frame and floor assembly. Of course, a different sequence of work production is not excluded.
The main task is to build a reliable, durable structure, especially when a permanent building is being built.
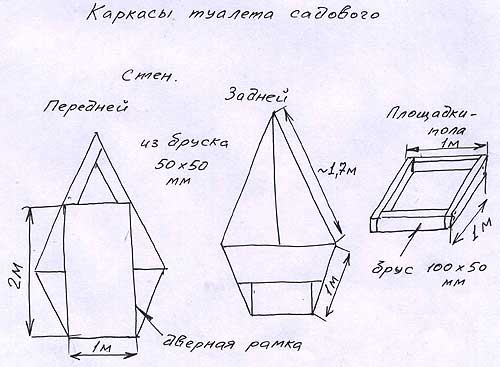
The next step is to assemble the frame of the hut of the country toilet, as indicated in the drawing. Take two bars 50 x 50 mm, install them vertically and perpendicular to the base. The lower ends of the small bars are attached to the base bars, and their upper ends are combined with cuts one with the other and also fastened.


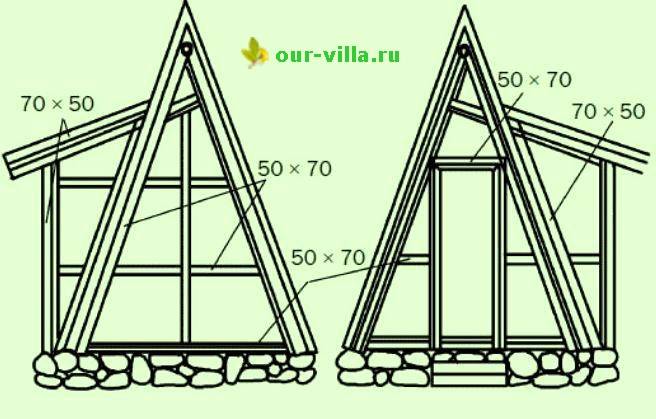
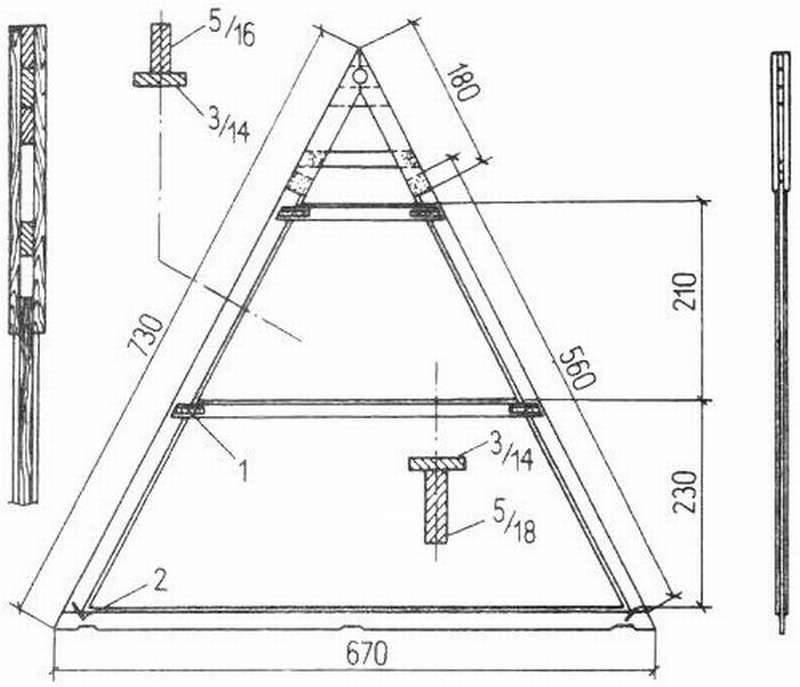

Thus, several truss elements are formed every 200 mm. The ridge part is additionally reinforced by inserting a beam passed from below. They also put reinforcing jumpers between the rafters in different places, both along the short side and along the long side. The frame of the future summer cottage is ready.
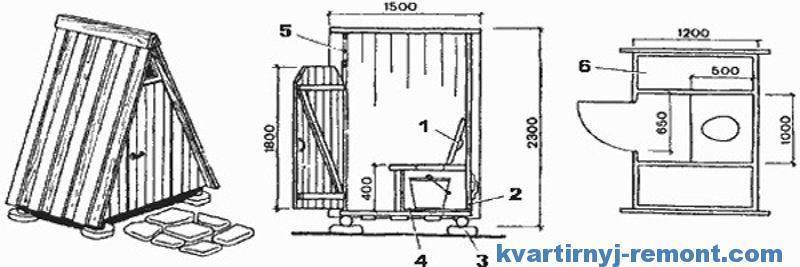
Hull lining and trim
Having completed the assembly of the frame of the hut, proceed to the assembly of the base of the dry closet. At the level of 350-400 mm from the floor, a jumper is attached between the two rear rafters of the hut. Having made an indent from it by 400-450 mm to the front part, a second jumper is attached at the same level. Below the second jumper, at the floor level, place the third jumper. These will be the base beams of the dry closet, on which the skin will lie.
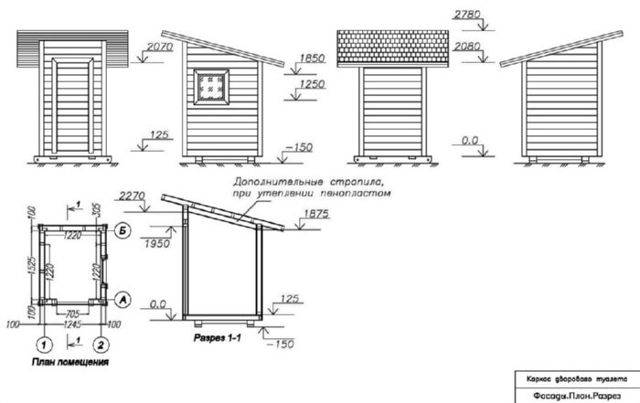
Further, the upper jumpers are reinforced with uprights-stops and sheathe all the voids with boards, cutting them to size. They make sections for the toilet tank and for peat storage.They are equipped with covers (for the toilet section + a seat with a hole). Roofing material is laid on the pitched roof of the hut. Make a door in the plane of the front wall. On this assembly can be considered complete.
Options for the device doors of a country toilet type hut. View from the outside as well as from the inside. The technology for assembling the canvases is simple - a set of tongue-and-groove boards fastened with a Z-type lath. Door hinges usually put overhead
This, approximately, seems to be the simplest design of a toilet for a summer residence, made like a hut. It is small-sized, somewhat inconvenient due to the limited space inside. But, at the same time, it occupies a small part of the territory of the summer cottage, where every square meter is usually registered.
For better stability and reliability of the structure, at the corners of the base made of timber (150 x 150), close to it, metal pipes are driven into the ground and the supporting part of the building is attached to them. Gutters are arranged under the roof slopes to collect and drain water. It is also advisable to put a blind area around the outer perimeter.
Step-by-step instructions for building a country toilet
The following methods are used to construct a latrine cesspool:
- installation of reinforced concrete rings;
- laying out brick walls;
- installation of special polymer tanks;
- concreting with the use of lathing.
Phased construction of the toilet:
- Having prepared the project, you should decide on the place for the construction of the restroom, which should not interfere with the neighbors, so it will have to be installed with an indent from the fence of one to one and a half meters. If you decide to make a cesspool, provide an entrance for a sewage truck. Do not build a toilet in the lowlands, which can be flooded with spring floods.
-
The construction of a backlash closet begins with digging a hole, which can be drained or sealed. The first option is less time consuming, and the second is indispensable with a high level of groundwater, spreading sewage throughout the site.
- The pit is dug in accordance with the dimensions in the drawing, compacted, covered with sand and cemented. After that, the walls are blocked with a crate and filled with mortar or lined with bricks (as an option: concrete rings). Next, the surface is plastered and treated together with the bottom with bituminous mastic. Do not forget that the walls should rise above the ground by at least sixteen centimeters.
-
A capital pit can be built with a filtering bottom, filling it with broken bricks or rubble. Thus, liquid waste will go into the ground, so you will need to clean the pit much less frequently. Installation of a plastic container can be carried out at any site, observing sanitary and hygienic standards, since in this case the fecal matter does not fall into the ground.
-
The next step is to set the foundation. For a toilet, it is enough to dig pillars or blocks of concrete around the perimeter. The frame, which provides for four vertical bases, is constructed from a wooden beam or shaped metal pipes. The longitudinal rafters of the roof trim should protrude no less than thirty centimeters beyond the perimeter of the building.
-
The base is fastened by four planks at the level of the toilet seat corresponding to height for ease of use (usually forty centimeters are enough from the finish flooring). After that, the braces of the side and rear walls are mounted diagonally and the vertical supports for the door, fastened with a jumper at the top, no more than one hundred and ninety centimeters in height.
-
The finished frame is sheathed with clapboard, board, OSB, etc.
-
A door is made on the back wall for convenient waste disposal. It is better to seal the cover with roofing felt or other moisture-proof material. It is desirable to install a ventilation pipe in the slots of the toilet seat and the roof.
-
Next, a door with a window for lighting is hung, equipped with a hook and a latch.
-
At the final stage, the roof is fixed.
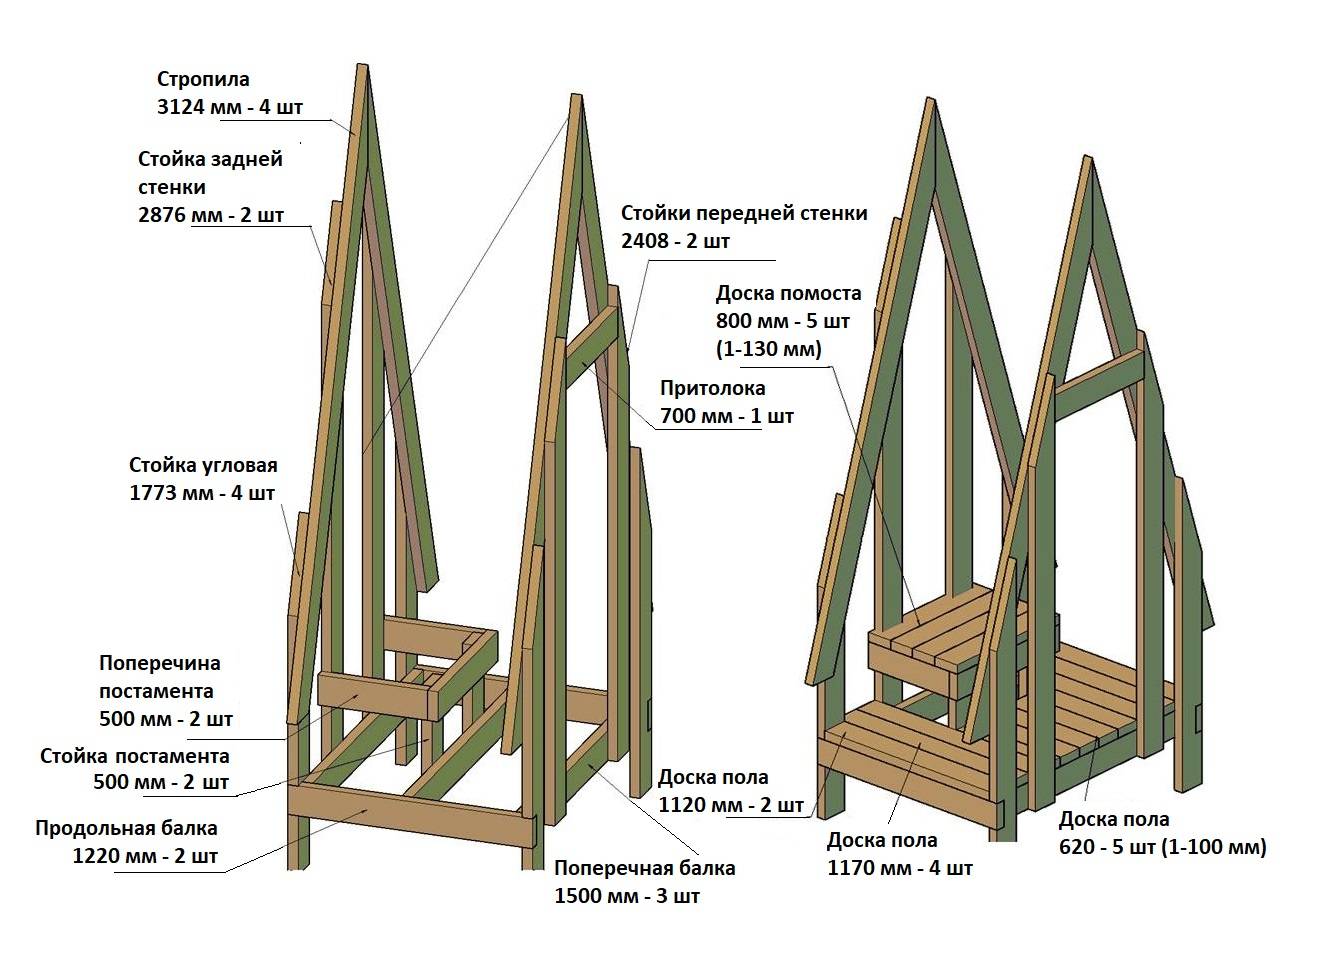
It is better to make a frame for a parallelepiped structure from larch beams, and pine is more suitable for floors, walls, ceilings and doors. To make the toilet neat, it is necessary to take careful measurements in accordance with the drawing.


The Hut model is being built very quickly. Work begins with the installation of the front and rear walls of edged pine boards with a thickness of at least thirty millimeters. The material can be fixed both on nails and on self-tapping screws. Next, the longitudinal and transverse beams are installed according to the drawing, and the base of the pedestal is mounted on the back wall and spacer.
After assembling the frame, the platform and floor are sheathed. For the latter, it is better to take a hardwood board measuring 20x100 millimeters. Ventilation in the "hut" is mounted on the rear wall. The door, as always, is attached at the final stage.
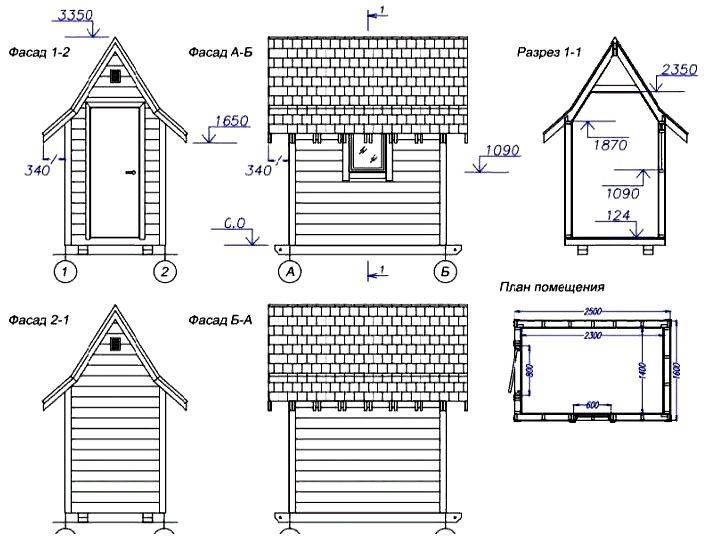
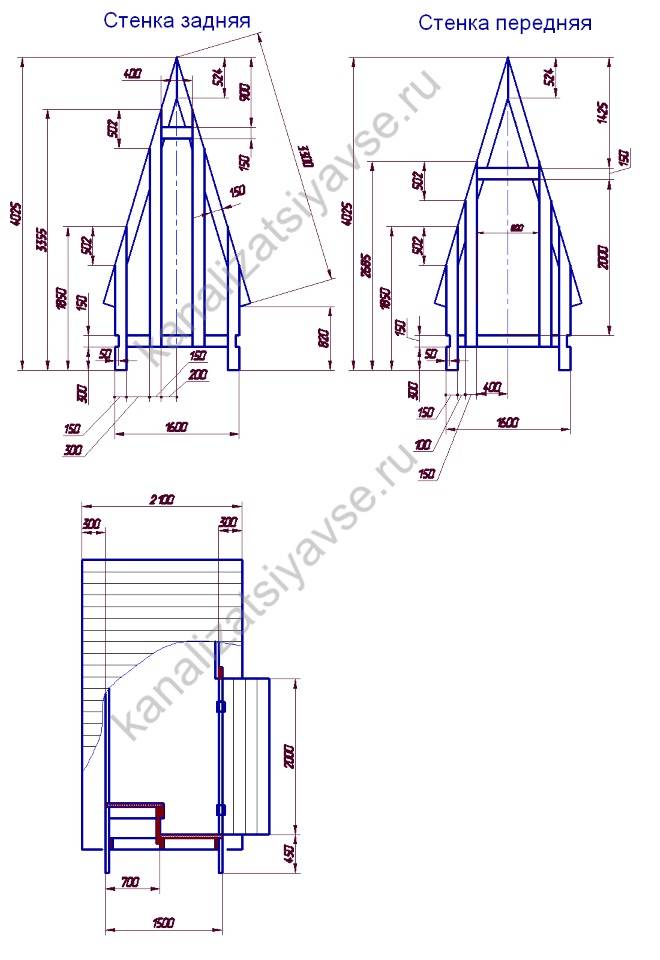
"Hut"
When groundwater comes close to the surface, the only option to equip a latrine is a powder closet. There is no cesspool in such a toilet, and a container (tank) is hidden under the toilet seat, which must be emptied periodically. So that the smells from the toilet do not spread throughout the site, a reservoir with sawdust, ash or peat is placed next to the toilet seat.After visiting the toilet, the feces are “powdered”, and as the container is filled, they are taken out to the compost heap.
For powder closets, cabins in the form of a hut are often placed. You can make a similar toilet design with your own hands in a couple of days, and, frankly, the cost of materials is inspiring.
The cabin is installed in the following order:
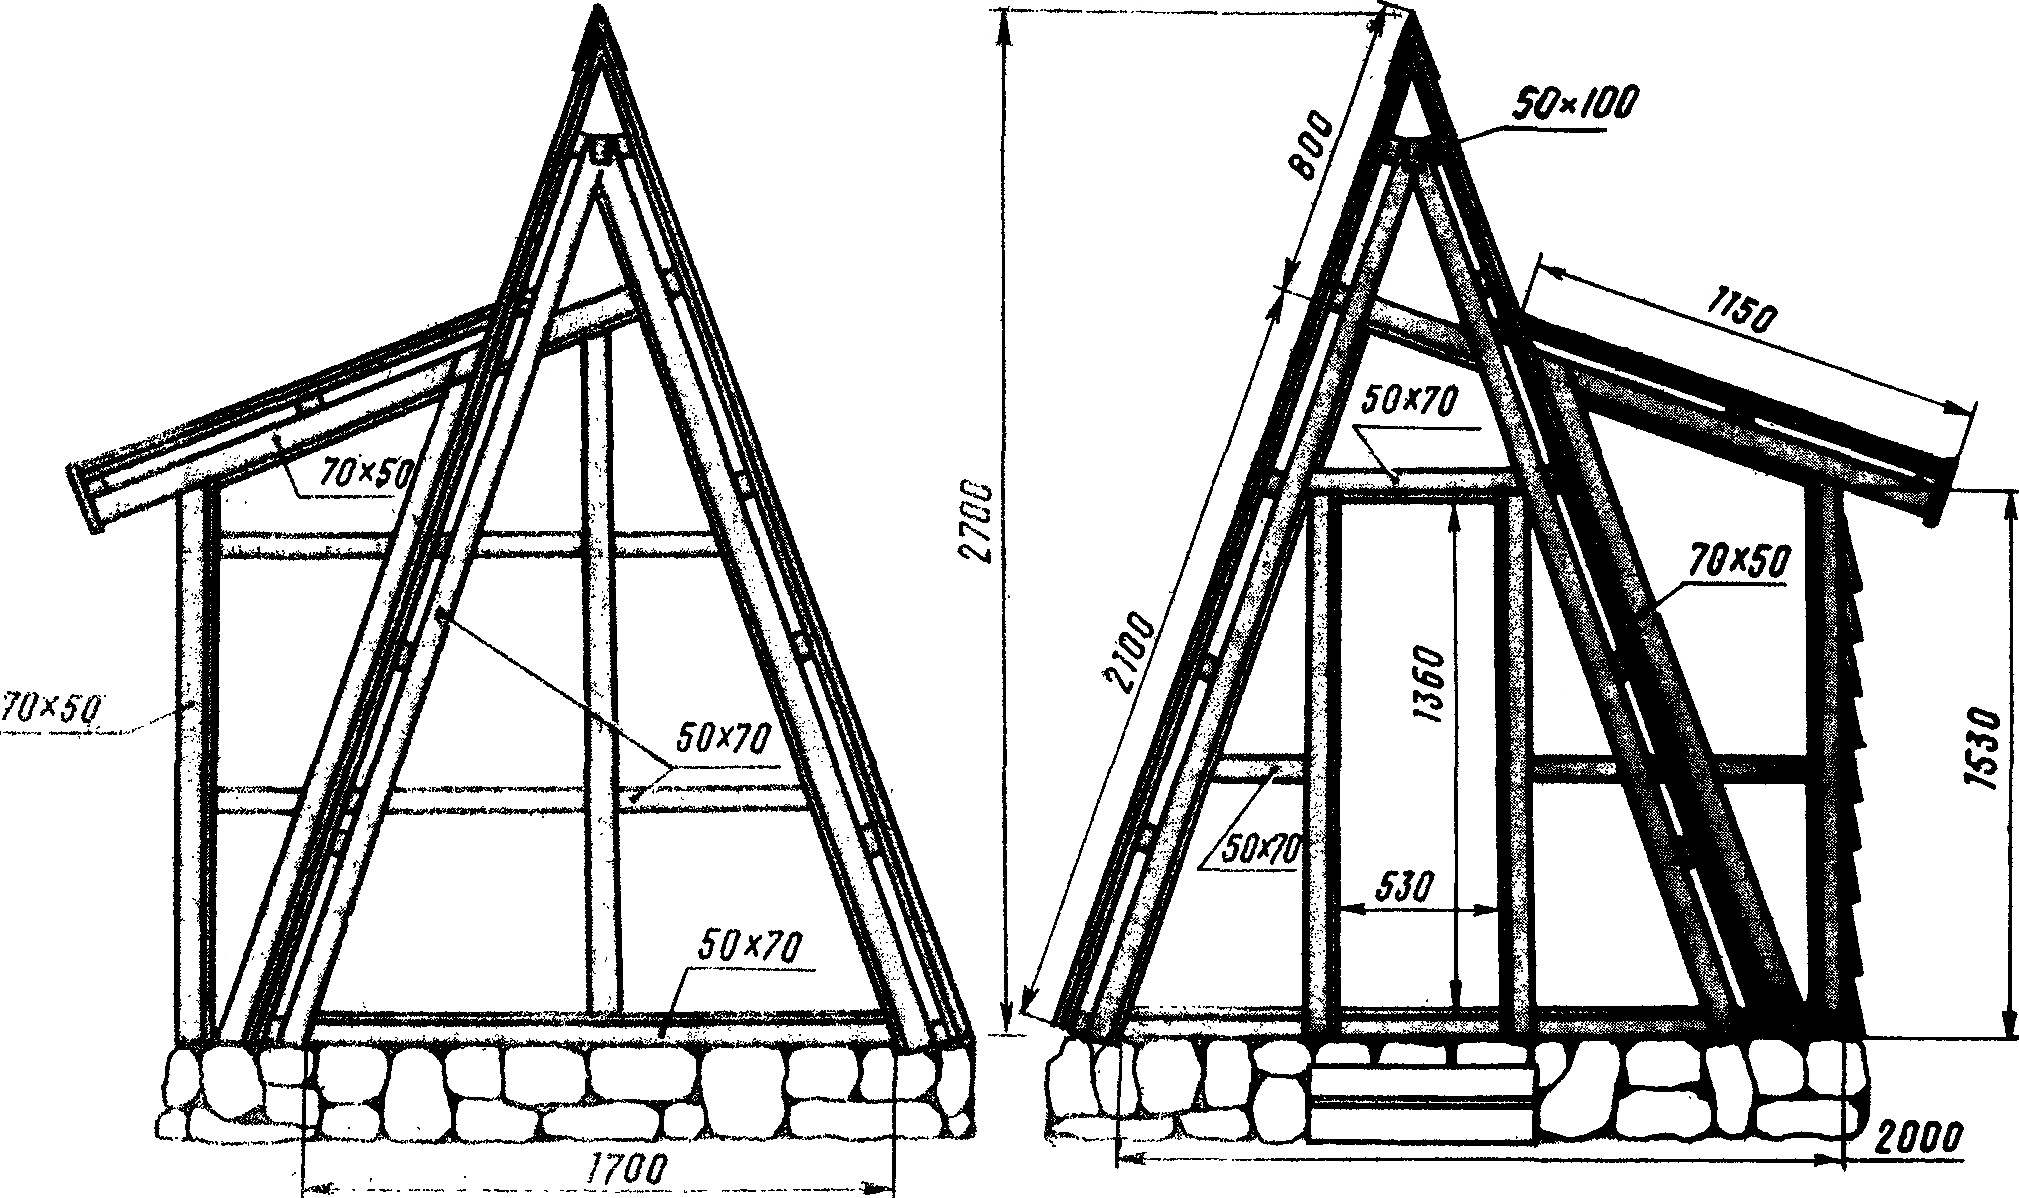
- For the foundation, you can use sand-cement blocks or lay out a strip of red brick around the perimeter of the base of the hut. The foundation is covered with ruberoid.
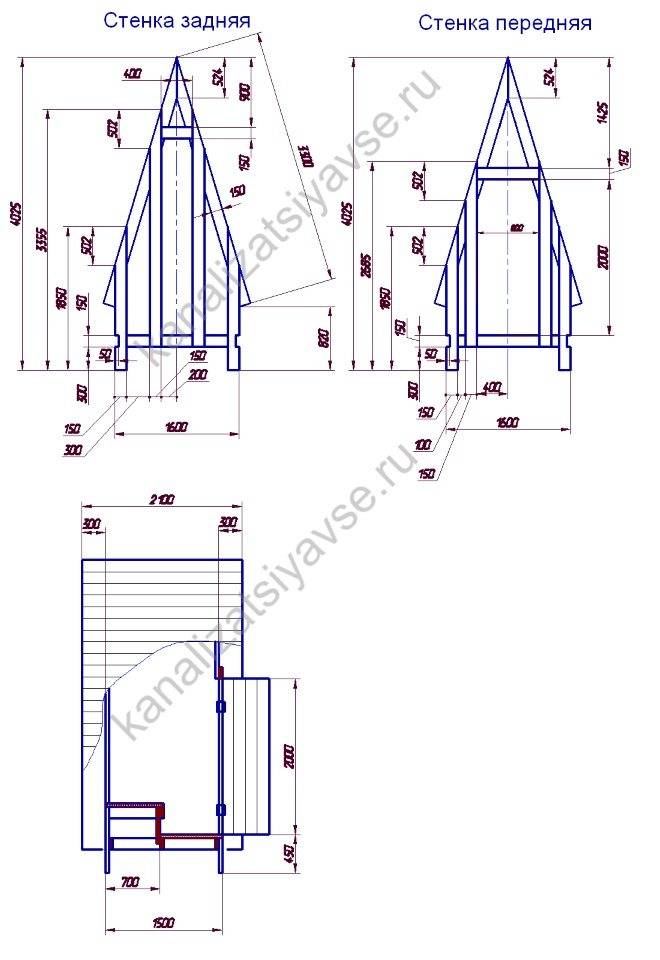
- The drawing of the toilet "hut" is shown below. First of all, the front and rear walls of the booth are made. They are connected to each other with a beam of 100 x 100 mm and an edged board, which will play the role of a roof sheathing. The frame of the toilet seat is assembled from the timber and attached to the back wall.
- The toilet is sheathed from the inside with clapboard. A “point” hole is cut out in the flooring of the toilet seat. Install the cabin on the foundation.
- The roof can be made of metal tiles or corrugated board, screwing it with self-tapping screws to the boards of the crate. The building will look like a real forest hut if the roof is sheathed with boards 2.0-2.1 meters long, which must be pre-treated with an antiseptic. They are nailed to the crate with nails, starting from the lower edge of the roof, so that each upper board overlaps half of the lower one (overlap). A shingle roof is made in a similar way.
- The ridge is reinforced with a galvanized sheet, as shown in the drawing of the "teremok" toilet. The boards of the toilet seat are polished, all wooden surfaces are stained and varnished.
The roof in such a booth reaches almost to the ground, so the walls and floor inside remain dry even in the heaviest rain.
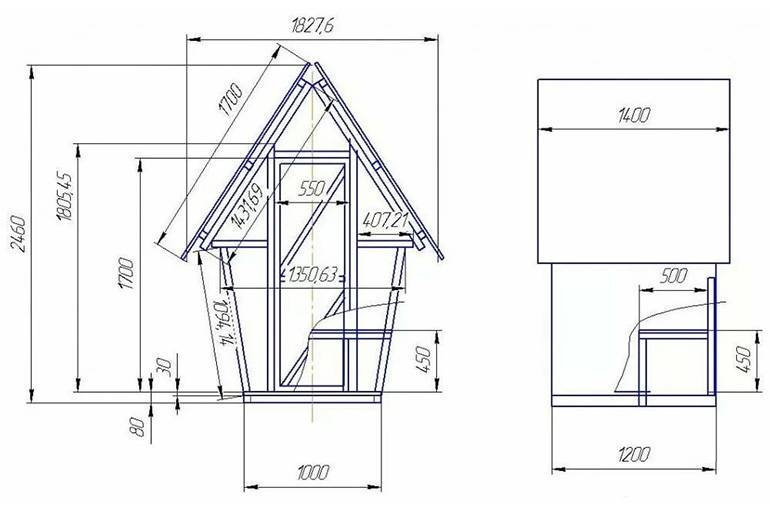
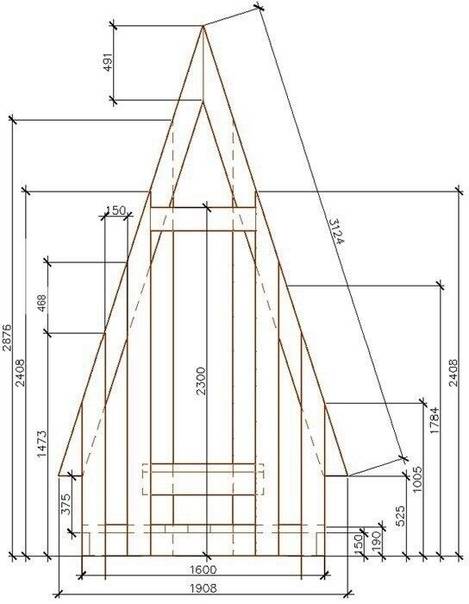
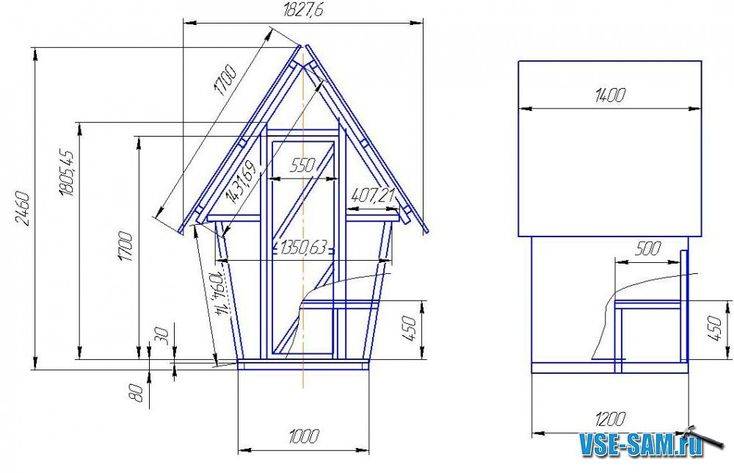
 Dimensions of the toilet for giving Hut
Designs of pits for sewage at the country toilet
All pit latrines are divided into two types: pits with drainage and sealed. The first type is much simpler and cheaper, but with a high location of groundwater, it can pollute them and is therefore prohibited by current regulations.


Sealed pits have no installation restrictions.
You can build a sewage pit in one of the following ways:
- Brickwork.
- Polymer tanks.
- Reinforced concrete rings.
- Concrete, filled with crates.
To build a country toilet with a sealed pit made of brickwork, reinforced concrete rings or with concrete walls, they dig a pit with dimensions corresponding to those applied by making drawings with their own hands. After that, the bottom of the pit is compacted and covered with a layer of sand.
Next, concrete is poured, and after it hardens, depending on the type of walls, they are laid out of brick, reinforced concrete rings are installed or a crate is installed and it is poured with concrete. Next, the walls need to be plastered and treated together with the bottom with bituminous mastic. Please note that the walls should rise above the surface of the site by at least 16 cm.
The same pit with any of the main walls described above can be built with a filter bottom. To do this, it is not concreted, but covered with a 30 cm layer of rubble or broken bricks. It should be noted that the walls of such a pit do not need to be plastered and treated with bitumen. This design contributes to the absorption of the liquid fraction into the soil, so it will be necessary to clean such a pit much less frequently.
Installing a plastic container in the pit prevents fecal matter from entering the ground, therefore it is allowed by sanitary and hygienic standards for use in any territory.
Choosing a place: accommodation standards in a summer cottage
The location of the outdoor toilet plays an important role. Its determination is based on many factors. If no more than two people live in a country house, you can get by with a dry closet, backlash closet. For a full-fledged family visiting a summer cottage on the weekends, living there seasonally, one cannot do without a cesspool. When constructing such buildings, the following rules should be observed:
- SNiP 30-02-97. Clause 6.8: latrines should be located at a distance of at least 12 m from a residential building, cellar. The distance from the well must exceed 8 m. At the same time, these norms are taken into account for objects located in the neighboring area.
- SanPiN 42-128-4690-88. The document contains the requirements for the construction, arrangement of a cesspool. Its bottom is located above the groundwater level, the depth should not exceed 3 m, the walls of the well are laid out from bricks, blocks, or equipped with concrete rings. The shaft has a bottom, waterproofing, for example, in the form of a layer of plaster. The ground part of the building is made of brick, wood, gas, foam block.
- SP 42.13330.2011. Clause 7.1 stipulates that in the absence of a centralized sewage system, the distance from the latrine to the neighboring private house and the source of water supply is at least 12 m and 25 m, respectively.