- Advantages and disadvantages of home-made fireboxes for testing
- The principle of operation of the device
- The principle of operation of the potbelly stove
- 3 Versatile options
- Types of homemade stoves in development
- The device and disadvantages of an open-type potbelly stove
- Pros and cons of a dropper
- How to make a waste oil boiler with your own hands
- Tools and materials
- Manufacturing process
- Construction of a more powerful boiler
- Advantages of heating boilers in development
- Economy
- autonomy
- Simplicity of the device
- Affordability
- Wide range of applications
- Environmental friendliness
- Usage efficiency
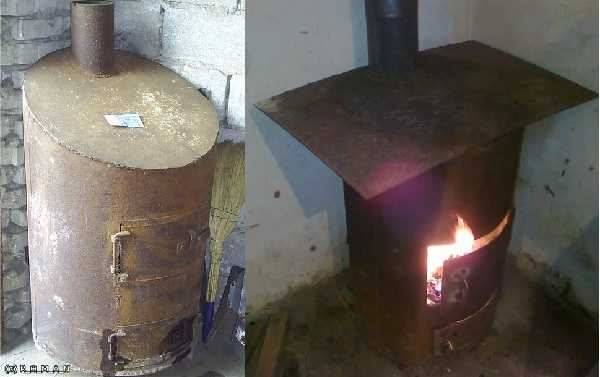
- Potbelly stove from two barrels
- Installation and trial ignition
- Waste oil furnace installation
- What is required for work
- Preparation and assembly of the furnace (drawing)
- Creating a waste oil furnace with your own hands - video lesson
- Types of homemade stoves in development
- The device and disadvantages of an open-type potbelly stove
- Pros and cons of a dropper
Advantages and disadvantages of home-made fireboxes for testing
Before searching the Internet for tutorials "how to make an oven working out in the garage”, you need to decide whether it is worth messing with its manufacture or, perhaps, it is better to use another method of heating.
It will help you answer this question by studying information about the advantages and disadvantages of potbelly stoves in engine oil. The advantages of such devices:
- high-quality heating;
- no dependence on electricity;
- ease of maintenance and use;
- compact dimensions;
- ease of transportation;
- low cost of fuel;
- the ability to cook food;
- no open flame present.

The disadvantages include:
- fuel needs to be filtered;
- the chimney must be cleaned regularly, and its dimensions are very significant;
- the surface of the stove, heating up, becomes dangerous;
- working off has an unpleasant smell;
- the fire cannot be extinguished, it will burn until the fuel is completely burned out;
- high degree of fire hazard with illiterate use;
- noise at work.
The principle of operation of the device
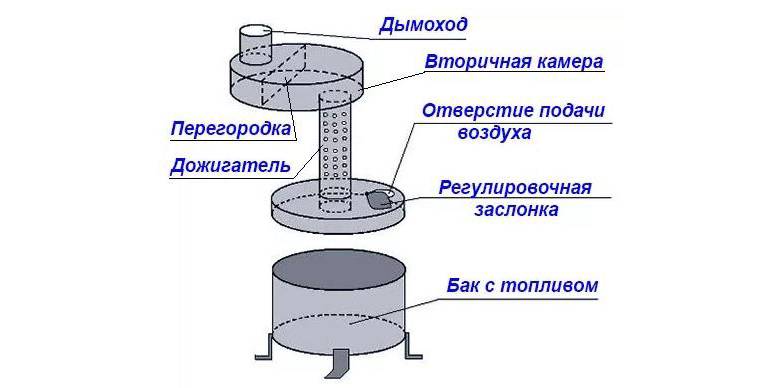
Combustion of fuel in a potbelly stove during processing occurs in two main stages. Initially, the filled oil burns in the tank, after which the gases are mixed with air, enter the second chamber, where they are burned and provide the maximum possible heating efficiency of the room. At the same time, fuel consumption is significantly reduced, and the need to constantly refuel the unit disappears.
A properly assembled potbelly stove in oil will consist of two separate compartments. The first chamber is a small tank where used oil is poured. Combustion of fuel occurs at a relatively low temperature. Above is an afterburner, where the resulting gas is mixed with air and burns at a temperature of about 800 degrees. The metal walls of the potbelly stove heat up, and thick metal effectively retains heat, quickly heating a small room.
In this video you will learn useful information in the manufacture of potbelly stoves:
The principle of operation of the potbelly stove
The work of the potbelly stove is based on the phenomenon of pyrolysis.Such a furnace, where oil is used as fuel, has 2 main compartments: a tank and a combustion chamber located at different levels. The first is intended for pouring mining and its combustion.
In another compartment, located above, the afterburning of the combustion products of mining, mixed with air, takes place. At the first stage, the temperature is relatively moderate, and at the second stage it is much higher - up to 800⁰.
In the manufacture of such a furnace, the main task is to make sure that air enters both compartments. It enters the first chamber through an opening designed to load liquid fuel. The hole is equipped with a special damper, through which the volume of air supply is regulated.
Despite the fact that the design of the furnace is very simple, increased requirements are placed on the chimney of the potbelly stove. For effective removal of combustion products, it is necessary to prepare a straight pipe with a diameter of more than 10 cm and a length of more than 400 cm. Bends and horizontal sections are highly undesirable. In addition to its intended purpose, the pipe also acts as a residual heat exchanger
Air access to the second tank is provided by holes with a diameter of about 9 mm. The efficiency of a properly assembled potbelly stove reaches 90%. Visually, different potbelly stoves can differ from each other in both shape and size, but the principle of operation is the same.
The power of the potbelly stove is proportional to the volume of the lower tank. The larger it is, the less often you have to add mining. Sometimes this container is made very massive, containing about 30 liters of used oil.
The improvement of the simple design of the stove at work out made it possible to invent a unit for arranging a garage, in which it would be nice to wash your hands with hot water, or a small private bathhouse:
Image gallery
Photo from
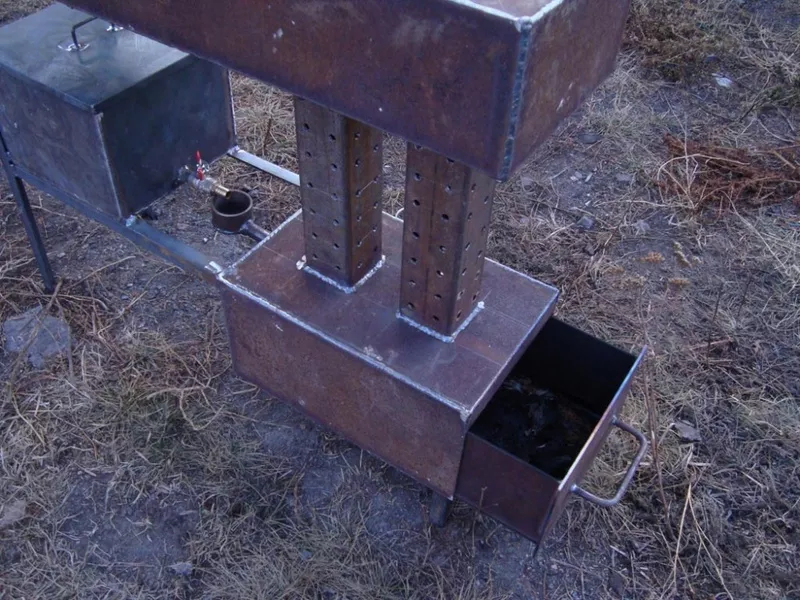
Enlarged mining afterburner chamber
Lower chamber in the form of a drawer
Convenient scheme for pouring mining
Practical hot water tank
3 Versatile options
It is not difficult to make such a device and anyone can understand how to make it. The lower tank of the unit is a classic form of a wood-burning potbelly stove and consists of a container for loading firewood from the grate and a compartment for collecting ash (ash pan). Of course, one cannot do without a chimney, so it also needs to be installed. From above, the capacity of the primary combustion chamber is installed, where mining is located, and a view with a damper is mounted.


The modified lower chamber is connected to the secondary one using a pipe with holes that can be closed if necessary. A chimney is installed on top. When using a potbelly stove in the classic version on wood, the oil container must be pulled out, and the damper and holes on the pipe must be closed. In such a stove you can burn wood, coal and sawdust. To use the oil, the steps must be done in reverse order, that is, open the dampers and install the chamber where mining is stored.
In order for the unit to work safely, it must be constantly cleaned. To do this, the secondary chamber is removed, and residues of combustion products are eliminated in accessible places. The chimney is also tapped to remove soot accumulated during operation. The container where the oil is stored must be cleaned of dirt.
Types of homemade stoves in development
Engine oil contaminated with impurities does not itself ignite. Therefore, the principle of operation of any oil potbelly stove is based on the thermal decomposition of fuel - pyrolysis.Simply put, to obtain heat, mining must be heated, evaporated and burned in the furnace furnace, supplying excess air. There are 3 types of devices where this principle is implemented in various ways:
- The simplest and most popular design of direct combustion with afterburning of oil vapors in an open-type perforated pipe (the so-called miracle stove).
- Waste oil drip furnace with closed afterburner;
- Babington burner. How it works and how to make it yourself is described in detail in our other publication.
The efficiency of heating stoves is low and amounts to a maximum of 70%. Note that the heating costs indicated at the beginning of the article are calculated based on factory heat generators with an efficiency of 85% (for a complete picture and comparison of oil with firewood, you can go here). Accordingly, fuel consumption in home-made heaters is much higher - from 0.8 to 1.5 liters per hour versus 0.7 liters for diesel boilers per 100 m² of area. Consider this fact, taking up the manufacture of the furnace for testing.
The device and disadvantages of an open-type potbelly stove
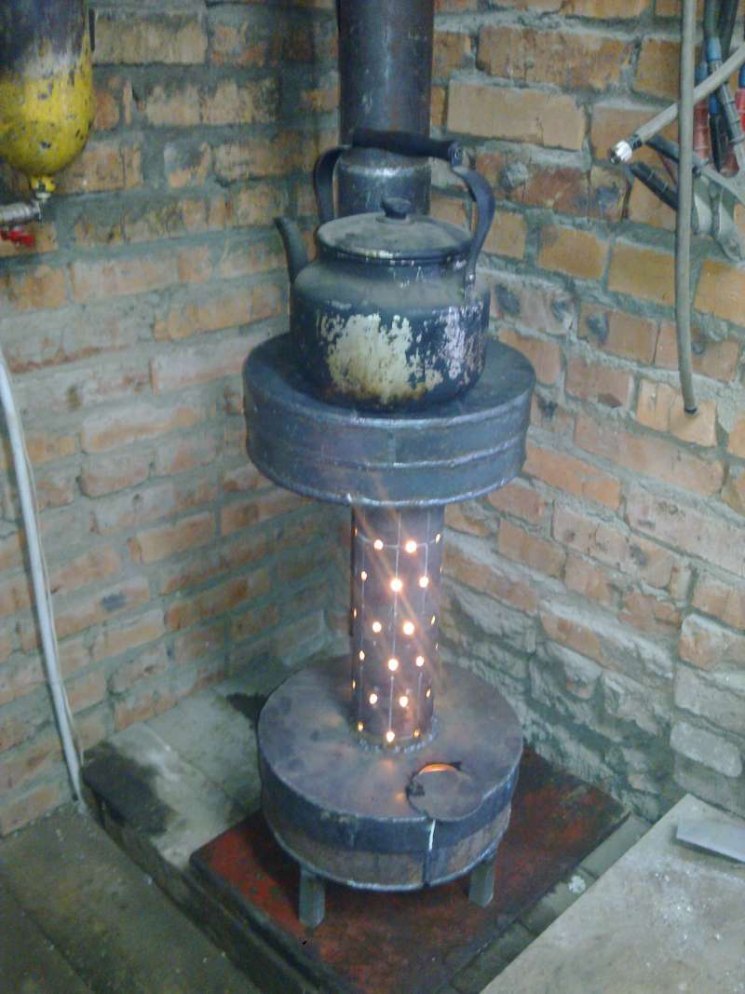
The pyrolysis stove shown in the photo is a cylindrical or square container, a quarter filled with used oil or diesel fuel and equipped with an air damper. A pipe with holes is welded on top, through which secondary air is sucked in due to the chimney draft. Even higher is the afterburning chamber with a baffle to remove the heat of combustion products.
The principle of operation is as follows: the fuel must be ignited using a flammable liquid, after which the evaporation of mining and its primary combustion will begin, causing pyrolysis.Combustible gases, getting into a perforated pipe, flare up from contact with an oxygen stream and are completely burned. The intensity of the flame in the firebox is regulated by an air damper.
This mining stove has only two advantages: simplicity with low cost and independence from electricity. The rest are solid cons:
- stable natural draft is required for operation, without it the unit begins to smoke into the room and fade;
- water or antifreeze that gets into the oil causes mini-explosions in the firebox, which causes fire drops from the afterburner to splash in all directions and the owner has to put out the fire;
- high fuel consumption - up to 2 l / h with poor heat transfer (the lion's share of energy flies into the pipe);
- one-piece housing is difficult to clean from soot.
Although outwardly the potbelly stoves differ, but they operate according to the same principle, in the right photo, fuel vapors burn out inside a wood-burning stove
Some of these shortcomings can be leveled with the help of successful technical solutions, which will be discussed below. During operation, fire safety rules should be followed and used oil should be prepared - defended and filtered.
Pros and cons of a dropper
The cardinal difference of this furnace is as follows:
- the perforated pipe is placed inside a steel case from a gas cylinder or pipe;
- fuel enters the combustion zone in the form of droplets falling to the bottom of the bowl located under the afterburner;
- To increase efficiency, the unit is equipped with forced air by means of a fan, as shown in the diagram.
Scheme of a dropper with a bottom supply of fuel from a fuel tank by gravity
The real disadvantage of a drip stove is the difficulty for a beginner. The fact is that you cannot rely entirely on other people's drawings and calculations, the heater must be manufactured and adjusted to suit your operating conditions and properly organize the fuel supply. That is, it will require repeated improvements.
The flame heats up the body of the heating unit in one zone around the burner
The second negative point is typical for supercharged stoves. In them, a jet of flame constantly hits one place of the body, which is why the latter will burn out pretty quickly if it is not made of thick metal or stainless steel. But the listed disadvantages are more than offset by the advantages:
- The unit is safe in operation, since the combustion zone is completely covered with an iron case.
- Acceptable waste oil consumption. In practice, a well-tuned potbelly stove with a water circuit burns up to 1.5 liters in 1 hour to heat 100 m² of area.
- It is possible to wrap the body with a water jacket and remake the furnace for working out into a boiler.
- The fuel supply and power of the unit can be adjusted.
- Undemanding to the height of the chimney and ease of cleaning.
Pressurized air boiler burning used engine oil and diesel fuel
How to make a waste oil boiler with your own hands
The simplicity of the design of such heaters allows you to make them yourself. In this case, it is necessary to have locksmith and welding skills.
Tools and materials
To make a boiler with your own hands, the following devices are required:
- Bulgarian;
- welding machine;
- a hammer.
To make a waste oil boiler with your own hands, do not forget the grinder
As a material for the heating structure, you must purchase:
- refractory asbestos cloth;
- heat-resistant sealant;
- steel sheet 4 mm thick;
- metal pipe with a cross section of 20 and 50 centimeters;
- compressor;
- ventilation pipe;
- drives;
- bolts;
- steel adapters;
- half-inch corners;
- tees;
- reinforcement with a cross section of 8 millimeters;
- pump;
- expansion tank.
The body of the boiler for heating small rooms can be made from a pipe; for a device with a higher power, it is best to use steel sheets.
Manufacturing process
The waste oil unit can be built in any shape. To heat a garage or small agricultural buildings, it is best to make a small boiler out of pipes.


The manufacture of such a heating device consists of the following steps:
- A metal pipe with a large cross section is cut so that its size corresponds to one meter. Two circles corresponding to a diameter of 50 centimeters are prepared from steel.
- The second pipe with a smaller diameter is shortened to 20 centimeters.
- In the prepared round plate, which will serve as a cover, a hole is cut corresponding to the size of the chimney.
- In the second metal circle, intended for the bottom of the structure, an opening is made, to which the end of a pipe of a smaller diameter is joined by welding.
- We cut out a cover for a pipe with a cross section of 20 centimeters. All prepared circles are welded as intended.
- Legs are constructed from reinforcement, which are attached to the bottom of the case.
- Small holes are drilled in the pipe for ventilation. A small container is installed below.
- In the lower part of the case, with the help of a grinder, an opening for the door is cut out.
- A chimney is attached to the top of the structure.
To operate such a simple boiler in mining, you just need to pour oil into the tank from below and set it on fire with a wick. Before this, the new design should be checked for tightness and integrity of all seams.
Construction of a more powerful boiler
Two boxes are made of strong sheet steel, which are connected using a perforated pipe. In the design, it is used as an air vent.
The subsequent manufacturing process of the heater has some features:
- A hole is made in the lower body of the boiler to supply oil to the evaporation tank. A damper is fixed opposite this container.
- The box located in the upper part is complemented by a special hole for the chimney pipe.
- The design is equipped with an air compressor, an oil supply pump and a container into which fuel is poured.
Do-it-yourself waste oil boiler
If water heating is required, then an additional circuit is connected, which requires the installation of a burner. You can build it yourself:
- half-inch corners are connected by spurs and tees;
- a fitting is fixed to the oil pipeline using adapters;
- all connections are pre-treated with a sealant;
- a burner cover is cut out of sheet steel, corresponding to the nests on the manufactured boiler;
- two different sizes of steel plates are used to install the burner;
- the inside of the tube adapter is tightly covered with an asbestos sheet, which is fastened with sealant and fixed with wire;
- the burner is inserted into the housing intended for it;
- after that, a smaller plate is fixed in the nest and covered with four layers of asbestos;
- a large plate is mounted as a mounting plate;
- holes are drilled in it for fastenings, and an asbestos sheet is applied on top;
- two prepared plates are connected with bolts.
To prevent the burner from disintegrating during the operation of the boiler, all parts should be carefully and tightly fastened. The device is ignited by a glow plug.
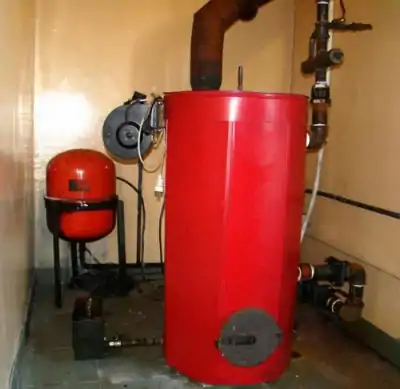
Waste oil boilers are considered economical and practical appliances. They can be purchased at a specialized store or built independently. When using such heating devices, it is necessary to remember the safety rules, which include the mandatory installation of a chimney, the presence of a ventilation system and the proper storage of liquid fuel.
Advantages of heating boilers in development
Waste oil boilers have many advantages.
Economy
The boiler operates on already primary waste oil. A properly configured device burns it completely.
More often, such devices are purchased by people who have access to fuel in unlimited quantities.
For example, depot workers or machine-building plants. But even if you have to buy the used liquid, you will still remain in the black.
The cost of oil is minimal, and it is consumed economically. The oil burns out completely, which means that every penny spent on it will be worked out.
autonomy
Such a boiler operates autonomously, without being connected to a stationary heating system. The buyer independently, regardless of the centralized heat supply, decides where the device will be installed. This is true in private homes, where autonomous heating is essential in the cold season.
Simplicity of the device
The device is so easy to assemble and operate that some craftsmen attempt to assemble it themselves. The principle of operation of a home-made and purchased unit is similar, and the resources spent on manufacturing or purchasing are almost the same.
Affordability
It is no coincidence that such heating devices are very popular. Despite the fact that there are few manufacturers of such devices on the market, they do not overestimate the cost, as they are well aware that such a device can be assembled at home. Together with the low price of fuel, the consumer can recoup his purchase already in the first heating season.

Photo 1. Two boilers (yellow and red) running on waste oil. Manufacturer: Thermobile.


Wide range of applications
Waste oil boilers are used not only for heating residential premises. Often they can be found in offices, institutions, and even industrial and warehouse areas. It is these factors that have influenced the fact that such devices have received a wide range of applications.
Environmental friendliness
The fuel burns out completely. At the same time, toxic wastes and harmful substances are not emitted into the surrounding atmosphere. The operation of the device is absolutely harmless to people and the environment. Many models of manufacturers are marked with the eco-friendly label from various environmental organizations.
Usage efficiency

The device quickly heats the air and the room around, maintains the set temperature. Warmth is felt almost immediately after turning on the device.
It not only remains in the room and does not disappear over time, but also spreads to other rooms.
Potbelly stove from two barrels
Even more different homemade bourgeoisie. There are a lot of structures. From the most elementary to quite complex designs.
The most common heaters for garages and cottages are potbelly stoves
A very interesting version of this potbelly stove from two barrels of different diameters nested one inside the other. How to make it: you need two barrels of different diameters, bricks instead of legs (you can weld metal if you wish), doors and hinges, metal for making a grate and a lid. Pebbles, clay and sand will be needed to make backfill.
Potbelly stove from two barrels
- Let's start with the manufacture of backfill: mix pebbles, sand and clay and ignite on fire.
- We cut the same holes in both barrels for the blower and fuel filling. But you need to do it with an offset. We start with a smaller barrel. We cut out the blower door 2-3 cm above the bottom, above it 10-15 cm above the door for laying fuel. We also do it in a larger barrel, but the bottom hole is already at a distance of 10-15 cm from the bottom, respectively, the second door is also higher (the distance between the doors is exactly like on a smaller barrel).
- In a smaller barrel above the hole for the blower door, weld a grate circle in which holes are cut.
- At the bottom of the larger barrel, pour the prepared backfill. We select the level so that the holes for the doors coincide. Moreover, the barrels are in contact with the front sides, and a decent distance remains behind. Fill this entire distance with the same backfill, compacting it well.
- Aligning the holes, weld them around the perimeter, weld hinges and doors, install locks.
- Next, you need to install the stove cover, cutting a hole in it for the chimney, and weld it well.
- The last step is to install the chimney.
Everything, the potbelly stove from the barrel is ready. The uniqueness of this design is that it gives softer heat: most of the hard radiation is absorbed by the backfill. This structure can probably even be filled with stones, having finalized the lid so that it is possible to serve the stones (change the destroyed ones).
Whichever design you choose, there are some rules that you should follow in order to comply with fire safety:
- The stove of any design must be placed on a base made of fireproof materials, such as heat-resistant tiles, bricks or asbestos board sheets.
- The dimensions of the oven must be such that the space in front of the oven to the wall is at least 1.2 m.
- Do not place a metal furnace closer than 1 m from the wall. If the bath wall is upholstered with metal or plastered with a layer of at least 2.5 cm, this distance can be reduced to 80 cm.
- Sufficient insulation of the chimney is also very important. It is safest to make it from a sandwich pipe.
Follow these simple rules, and your homemade metal sauna stove will delight you with excellent work and strong heat for a long time. You can read more about how to install a stove in the article "How to install a metal stove for a bath".
Installation and trial ignition
The place for installing the stove should be chosen as far as possible from objects and materials that are sensitive to heat. The device gets really hot. If handled carelessly, it can damage property and even cause a serious fire.
There must be a non-flammable base under the device.Do not place such a device in places of active movement of air currents. Under the influence of a draft, the flame can be knocked out, and this is dangerous. Ready and installed in a suitable place, the furnace is connected to a vertical chimney.
Then a test firing is performed. To do this, oil is poured into the fuel tank, and about 100 ml of liquid for fireplaces or another similar composition is added on top. At first, this liquid will burn, but soon the oil will boil, the device will begin to make noise. This means that the oven is made correctly, it can be used for its intended purpose.
All welding work must be done carefully, a tight and even seam is required so that the device is safe and easy to clean
Oil before pouring into the tank must be defended for some time so that unnecessary impurities settle down and do not get inside. Only two-thirds of the capacity should be filled, then the primary combustion process will be more efficient and safer.
From time to time it is necessary to clean the inside of the fuel tank from accumulated contaminants. The cover is removed and the remaining oil is simply drained, deposits are removed, etc. From time to time, you need to tap the perforated pipe and chimney to remove the collected soot and soot.


Waste oil furnace installation
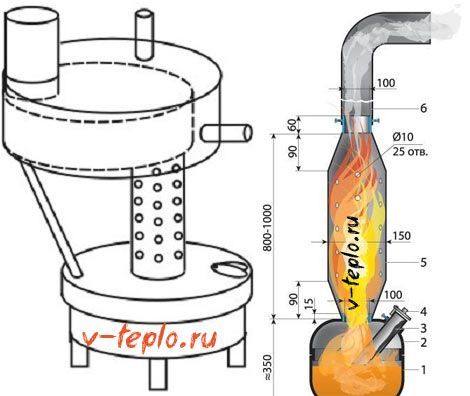
The foundation for such a furnace is not required, since the structure is very light, but the surface on which the furnace is installed must be strictly horizontal. Install the stove in such a way that it is convenient to pour fuel. For the convenience of pouring fuel, a funnel (watering can) is used. If the floors are wooden, then before installing the stove, a metal sheet is laid on the floor.
Among the important aspects regarding the design are the following:
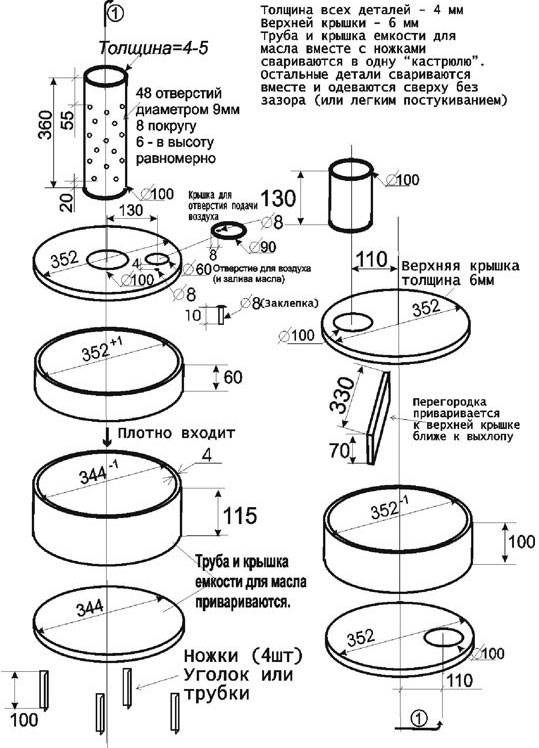
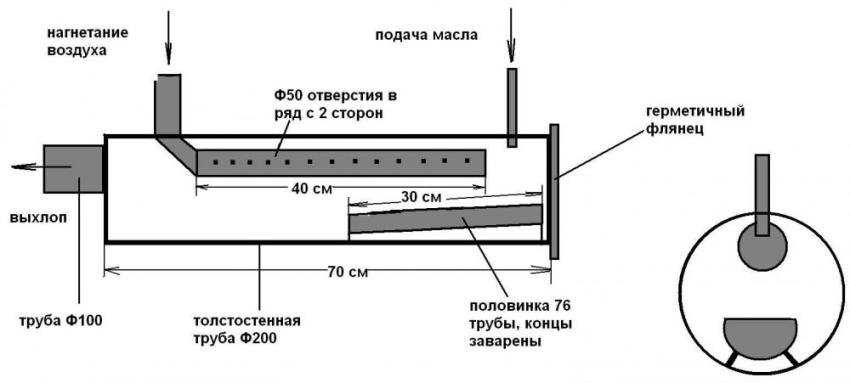
- the inner diameter of the chimney must be at least 10 cm, the wall thickness must be at least 1 mm;
- steel thickness for tanks - 4 mm, for the bottom of the firebox and the cover of the upper tank - 6 mm;
- the length of the burner must be greater than the value of its diameter;
- the optimal volume of the tank intended for fuel is from 8 to 15 liters;
- pipes are selected from such materials as: stainless steel, copper, painted tin;
- the chimney must be able to be dismantled for ease of maintenance of the furnace;
- the inclined position of the parts of the chimney located in the room is allowed (to improve the heating of the room), however, outside the room, the pipe must be strictly vertical (to prevent wind blowing).
What is required for work
- drawing;
- welding machine and electrodes;
- grinder, cutting wheels for metal, file, sandpaper;
- steel corners or fittings;
- a set of drills and a drill;
- steel sheets 4 and 6 mm thick;
- chimney and burner pipes;
- a hammer;
- tape measure and level.
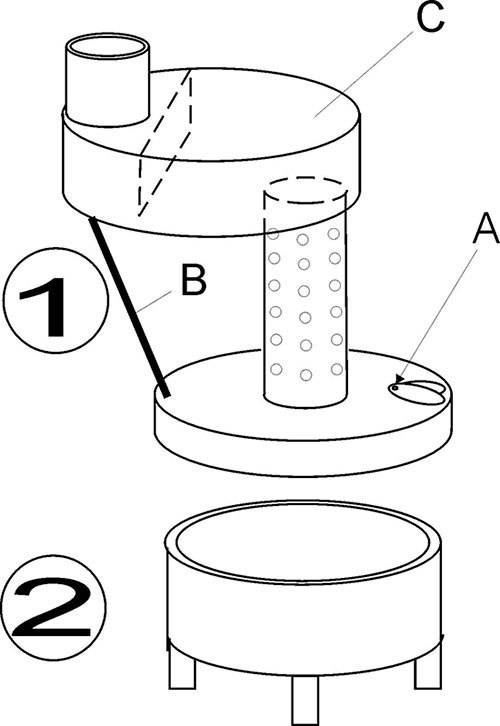
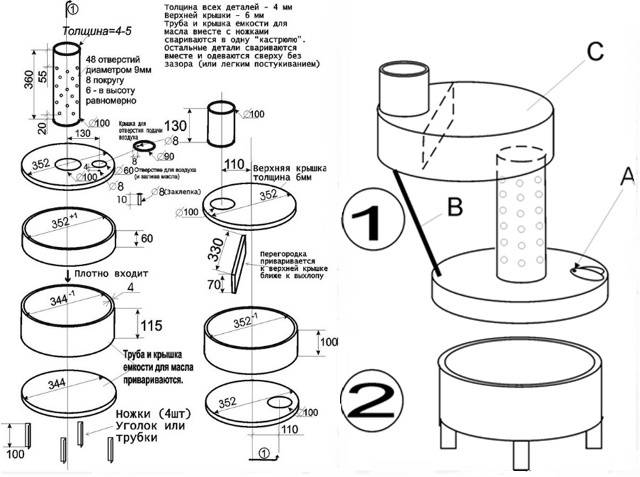
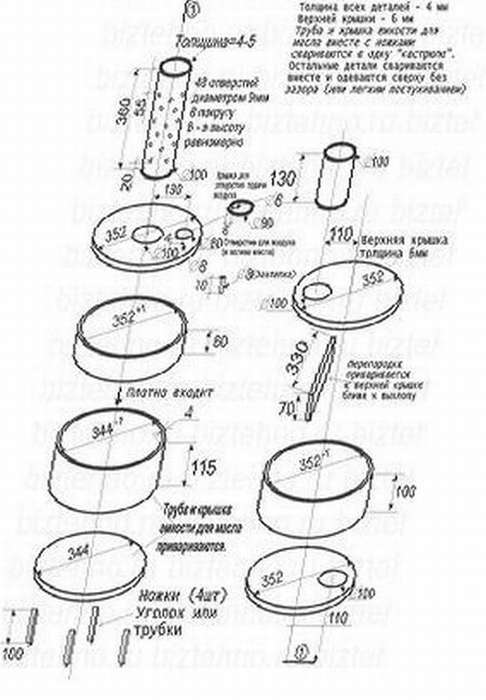
Preparation and assembly of the furnace (drawing)
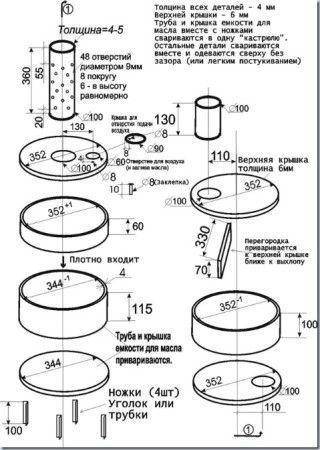
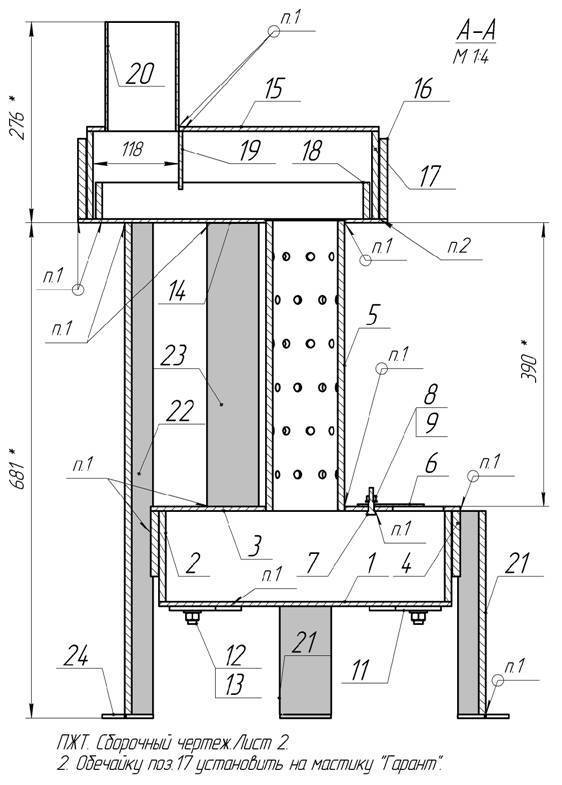
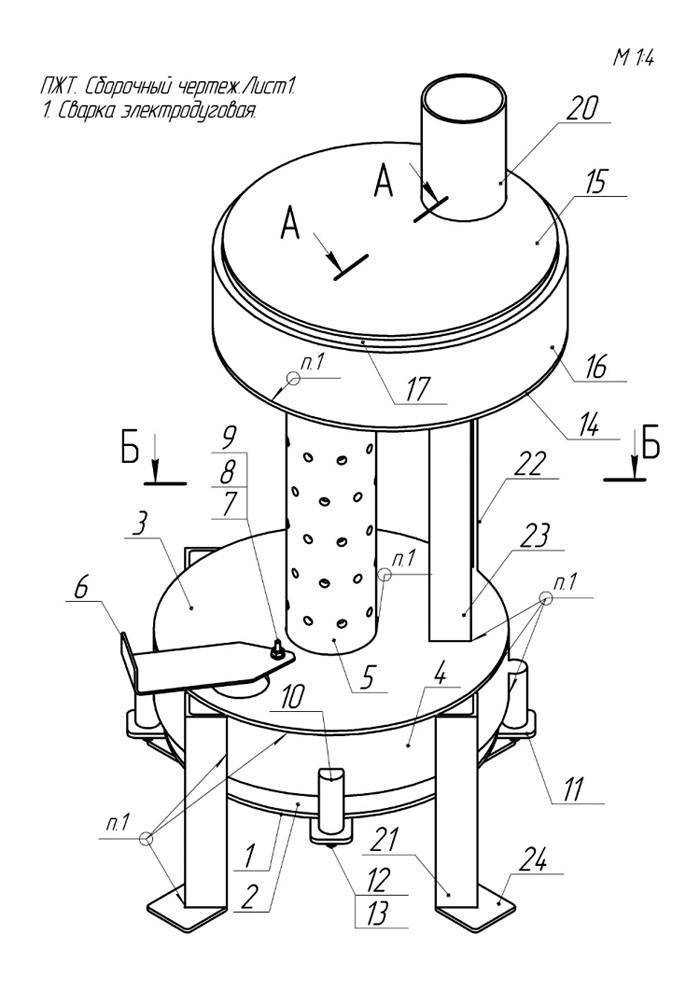
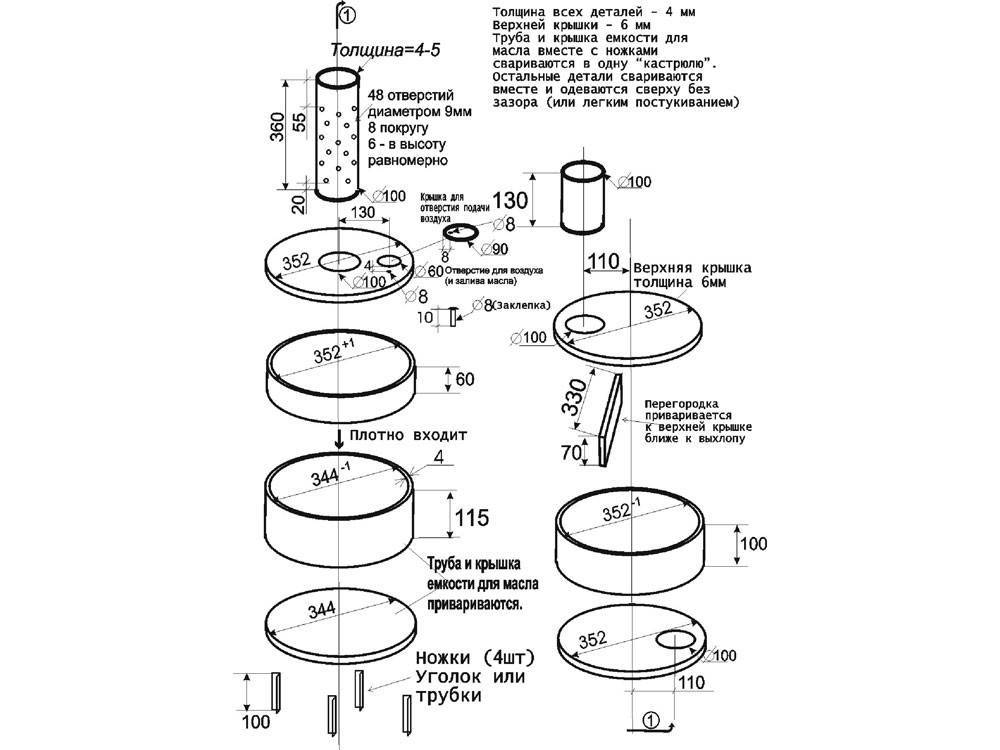
- We print the drawing and start preparing for assembly. We connect all parts with a welding machine. An exception is tank elements marked on the drawing as "tightly fitting". We make them collapsible. All welds are carefully checked for tightness. We clean the scale with a grinder or a file.
- We lay out sheet steel on a flat surface, make markings and cut parts with a grinder. We perform bending on a bending machine, preparing the details - the walls of the tanks.We check the tightness of the parts.
- On the left in the photo is the finished cover of the lower tank, on the right is its lower part. We do not weld them together, the parts should remain collapsible, but fit snugly against each other. The hole for pouring fuel into the furnace is about 5 cm in diameter.
- We assemble the upper tank (we weld the walls to the bottom).
- We weld a baffle baffle in the upper tank (closer to the hole for the burner). Attach the exhaust pipe. We will subsequently connect a chimney to it.
- On the pipe intended for the burner, we drill 48 holes with a diameter of 9 mm each. We connect the upper chamber and the burner by welding.
- We check the dimensions of the parts. Install the sealing ring.
- We weld a tank designed to fill the oil. We equip it with an overflow pipe.
- We cut out three legs 20 cm long from a metal corner and connect them to the bottom of the furnace.
Creating a waste oil furnace with your own hands - video lesson
Some details of this furnace can be cut from a thick-walled pipe, a used gas cylinder. But if there were no cylinders, there is no possibility or desire to bend the metal into a radius, you can mount a similar furnace, but square section. Cutting out the details of this design is much easier. In the absence of a grinder, we use guillotine shears for metal.
- Prepare the bottom of the oven. To do this, we connect together the legs, bottom and side walls of the fuel tank.
- The upper part of the firebox must be hermetically put on the lower one. We carefully check the dimensions of the walls before cutting metal. We attach the fuel tank cap to a screw or steel riveting to make it possible to turn the cap if necessary.
- We install a partition in the upper tank.
- We weld the pipe, which we will connect to the chimney.
Since the chimney will have several sections with a slope of 45 degrees, we install special bends at the junctions of the pipes. In the place where the pipe passes through the ceilings, we additionally sheathe it with non-combustible materials (mineral wool) and a layer of metal (a special “pass through the roof” element is sold in hardware stores for this, which facilitates installation). In addition to the bends, clamps and a metal fungus are useful, which prevents rain and snow from entering the pipe.
This is where we end, we advise you to read an article about how to build - a furnace do-it-yourself bubafonyu, because its design resembles what we reviewed yours.
Types of homemade stoves in development
Engine oil contaminated with impurities does not itself ignite. Therefore, the principle of operation of any oil potbelly stove is based on the thermal decomposition of fuel - pyrolysis. Simply put, to obtain heat, mining must be heated, evaporated and burned in the furnace furnace, supplying excess air. There are 3 types of devices where this principle is implemented in various ways:
- The simplest and most popular design of direct combustion with afterburning of oil vapors in an open-type perforated pipe (the so-called miracle stove).
- Waste oil drip furnace with closed afterburner;
- Babington burner. How it works and how to make it yourself is described in detail in our other publication.
The efficiency of heating stoves is low and amounts to a maximum of 70%.Note that the heating costs indicated at the beginning of the article are calculated based on factory heat generators with an efficiency of 85% (for a complete picture and comparison of oil with firewood, you can go here). Accordingly, fuel consumption in home-made heaters is much higher - from 0.8 to 1.5 liters per hour versus 0.7 liters for diesel boilers per 100 m² of area. Consider this fact, taking up the manufacture of the furnace for testing.
The device and disadvantages of an open-type potbelly stove
The pyrolysis stove shown in the photo is a cylindrical or square container, a quarter filled with used oil or diesel fuel and equipped with an air damper. A pipe with holes is welded on top, through which secondary air is sucked in due to the chimney draft. Even higher is the afterburning chamber with a baffle to remove the heat of combustion products.
The principle of operation is as follows: the fuel must be ignited using a flammable liquid, after which the evaporation of mining and its primary combustion will begin, causing pyrolysis. Combustible gases, getting into a perforated pipe, flare up from contact with an oxygen stream and are completely burned. The intensity of the flame in the firebox is regulated by an air damper.
This mining stove has only two advantages: simplicity with low cost and independence from electricity. The rest are solid cons:
- stable natural draft is required for operation, without it the unit begins to smoke into the room and fade;
- water or antifreeze that gets into the oil causes mini-explosions in the firebox, which causes fire drops from the afterburner to splash in all directions and the owner has to put out the fire;
- high fuel consumption - up to 2 l / h with poor heat transfer (the lion's share of energy flies into the pipe);
- one-piece housing is difficult to clean from soot.
Although outwardly the potbelly stoves differ, but they operate according to the same principle, in the right photo, fuel vapors burn out inside a wood-burning stove
Some of these shortcomings can be leveled with the help of successful technical solutions, which will be discussed below. During operation, fire safety rules should be followed and used oil should be prepared - defended and filtered.
Pros and cons of a dropper
The cardinal difference of this furnace is as follows:
- the perforated pipe is placed inside a steel case from a gas cylinder or pipe;
- fuel enters the combustion zone in the form of droplets falling to the bottom of the bowl located under the afterburner;
- To increase efficiency, the unit is equipped with forced air by means of a fan, as shown in the diagram.
Scheme of a dropper with a bottom supply of fuel from a fuel tank by gravity
The real disadvantage of a drip stove is the difficulty for a beginner. The fact is that you cannot rely entirely on other people's drawings and calculations, the heater must be manufactured and adjusted to suit your operating conditions and properly organize the fuel supply. That is, it will require repeated improvements.


The flame heats up the body of the heating unit in one zone around the burner
The second negative point is typical for supercharged stoves. In them, a jet of flame constantly hits one place of the body, which is why the latter will burn out pretty quickly if it is not made of thick metal or stainless steel. But the listed disadvantages are more than offset by the advantages:
- The unit is safe in operation, since the combustion zone is completely covered with an iron case.
- Acceptable waste oil consumption. In practice, a well-tuned potbelly stove with a water circuit burns up to 1.5 liters in 1 hour to heat 100 m² of area.
- It is possible to wrap the body with a water jacket and remake the furnace for working out into a boiler.
- The fuel supply and power of the unit can be adjusted.
- Undemanding to the height of the chimney and ease of cleaning.
Pressurized air boiler burning used engine oil and diesel fuel


