- Types of homemade stoves in development
- The device and disadvantages of an open-type potbelly stove
- Pros and cons of a dropper
- Solar ovens for the garage
- How does a waste oil furnace work?
- Connecting the structure in the bath
- Disadvantages of the furnace in mining
- Heat exchanger assembly
- Necessary materials and tools
- Pressurized furnace design
- Types of furnaces for the garage
- From a gas cylinder or pipe
- Long burning wood burning design
- Oil on mining and diesel stoves
- The principle of operation of the device
- How to make a potbelly stove from steel
- Manufacturing sequence
- Helpful Hints
- Case manufacturing
- 4 Helpful Hints
- warm brick
- How to make a drip oven from a cylinder
Types of homemade stoves in development
Engine oil contaminated with impurities does not itself ignite. Therefore, the principle of operation of any oil potbelly stove is based on the thermal decomposition of fuel - pyrolysis. Simply put, to obtain heat, mining must be heated, evaporated and burned in the furnace furnace, supplying excess air. There are 3 types of devices where this principle is implemented in various ways:
- The simplest and most popular design of direct combustion with afterburning of oil vapors in an open-type perforated pipe (the so-called miracle stove).
- Waste oil drip furnace with closed afterburner;
- Babington burner. How it works and how to make it yourself is described in detail in our other publication.
The efficiency of heating stoves is low and amounts to a maximum of 70%. Note that the heating costs indicated at the beginning of the article are calculated based on factory heat generators with an efficiency of 85% (for a complete picture and comparison of oil with firewood, you can go here). Accordingly, fuel consumption in home-made heaters is much higher - from 0.8 to 1.5 liters per hour versus 0.7 liters for diesel boilers per 100 m² of area. Consider this fact, taking up the manufacture of the furnace for testing.
The device and disadvantages of an open-type potbelly stove
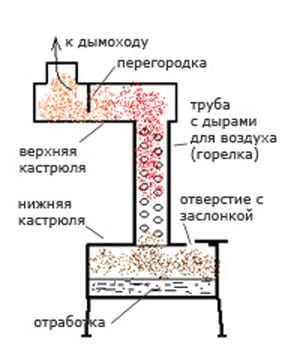
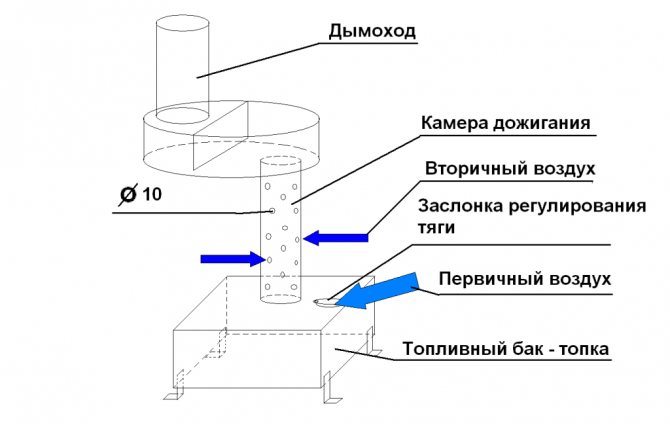
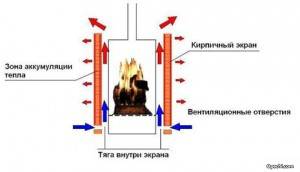
The pyrolysis stove shown in the photo is a cylindrical or square container, a quarter filled with used oil or diesel fuel and equipped with an air damper. A pipe with holes is welded on top, through which secondary air is sucked in due to the chimney draft. Even higher is the afterburning chamber with a baffle to remove the heat of combustion products.
The principle of operation is as follows: the fuel must be ignited using a flammable liquid, after which the evaporation of mining and its primary combustion will begin, causing pyrolysis. Combustible gases, getting into a perforated pipe, flare up from contact with an oxygen stream and are completely burned. The intensity of the flame in the firebox is regulated by an air damper.
This mining stove has only two advantages: simplicity with low cost and independence from electricity. The rest are solid cons:
- stable natural draft is required for operation, without it the unit begins to smoke into the room and fade;
- water or antifreeze that gets into the oil causes mini-explosions in the firebox, which causes fire drops from the afterburner to splash in all directions and the owner has to put out the fire;
- high fuel consumption - up to 2 l / h with poor heat transfer (the lion's share of energy flies into the pipe);
- one-piece housing is difficult to clean from soot.
Although outwardly the potbelly stoves differ, but they operate according to the same principle, in the right photo, fuel vapors burn out inside a wood-burning stove
Some of these shortcomings can be leveled with the help of successful technical solutions, which will be discussed below. During operation, fire safety rules should be followed and used oil should be prepared - defended and filtered.
Pros and cons of a dropper
The cardinal difference of this furnace is as follows:
- the perforated pipe is placed inside a steel case from a gas cylinder or pipe;
- fuel enters the combustion zone in the form of droplets falling to the bottom of the bowl located under the afterburner;
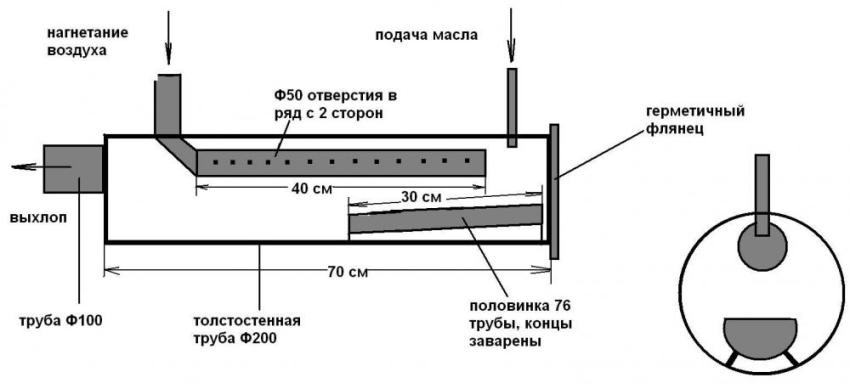
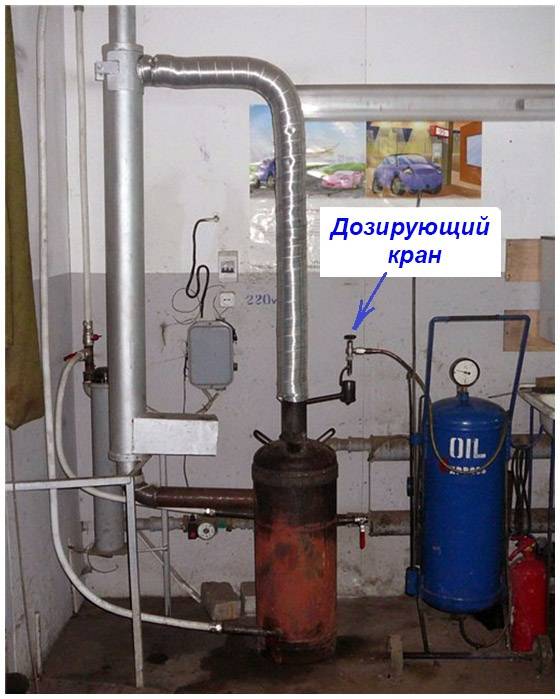
- To increase efficiency, the unit is equipped with forced air by means of a fan, as shown in the diagram.
Scheme of a dropper with a lower fuel supply from the fuel tank by gravity
The real disadvantage of a drip stove is the difficulty for a beginner. The fact is that you cannot rely entirely on other people's drawings and calculations, the heater must be manufactured and adjusted to suit your operating conditions and properly organize the fuel supply. That is, it will require repeated improvements.
The flame heats up the body of the heating unit in one zone around the burner
The second negative point is typical for supercharged stoves.In them, a jet of flame constantly hits one place of the body, which is why the latter will burn out pretty quickly if it is not made of thick metal or stainless steel. But the listed disadvantages are more than offset by the advantages:
- The unit is safe in operation, since the combustion zone is completely covered with an iron case.
- Acceptable waste oil consumption. In practice, a well-tuned potbelly stove with a water circuit burns up to 1.5 liters in 1 hour to heat 100 m² of area.
- It is possible to wrap the body with a water jacket and remake the furnace for working out into a boiler.
- The fuel supply and power of the unit can be adjusted.
- Undemanding to the height of the chimney and ease of cleaning.
Pressurized air boiler burning used engine oil and diesel fuel
Solar ovens for the garage
In order to make an inexpensive oven for garage heating with high efficiency, we need:
- Fuel tank with a capacity of 7-15 liters;
- Seamless cylinder with thin metal walls (15 cm or less);
- Pipes with a diameter of 10 cm and a wall thickness of up to 2 mm. Their length must be at least 4 meters;
- Copper pipes for the burner.
As for the tools - diesel fuel stoves for the garage are made using a grinder, drill and files, drills, level. You will also need to find a tape measure, steel corners (20 cm) and electrodes. Once all this is in your hands, you can start assembling a diesel oven with your own hands. This process consists of the following steps - wizard:
- Drains condensate from the cylinder and rinses it several times with water (removing odorant residues);
- Fills the container with water and digs it into the ground (to give it stability);
- Makes an incision on the cylinder, waits for the water to drain completely, after which it finally separates the upper part of the container from the lower part;
- Welds to the bottom of the legs from the corners.
The next step is to reproduce the above diagram of the garage oven. You can perform actions in any order
It is only important to accurately reproduce this drawing, everything else is secondary.
How does a waste oil furnace work?
 Looking at the drawings of a potbelly stove for a garage, few people will immediately understand what exactly the “work” of this unit is. In fact, physics is at the head here, there are no moving parts or complex design solutions in the design of the potbelly stove. This is both a plus and a minus. Assembling it with your own hands is quite simple, but making any drastic changes is extremely difficult.
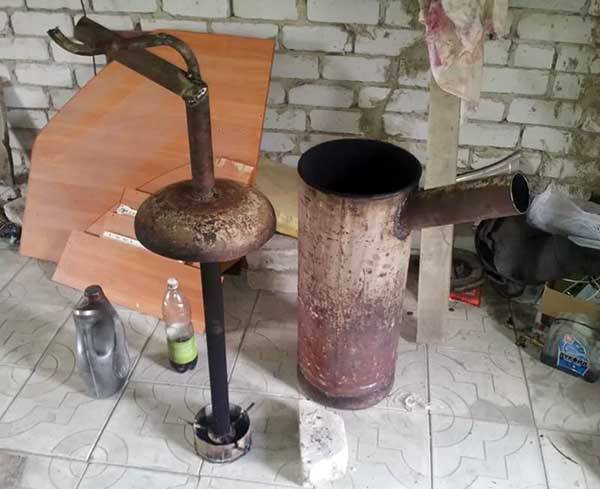
In fact, everything is extremely simple. There are two tanks that are connected by a pipe. It has many holes (quite large), which are located at a distance of 2-3 cm from each other. In the lower element is "working out". Oil is poured in there, and then kindled (you can see the details on the video). Firstly, heat is being generated already at this stage, but the next one is much more important. Vapors of heated oil rise through the connecting pipe, where they begin to burn, but this process is especially active in the upper tank.
The stove itself is quite compact - it will not be difficult to move it from one place to another with your own hands, but the chimney must be very long. Everyone advises making it at least 4 meters in length. Such requirements are due to the following: the longer the pipe, the stronger the thrust. This means that the vapors will burn more actively, releasing a lot of heat.
A small potbelly stove is able to heat a room with an area of at least 50 meters, if you do everything right and assemble a larger stove with your own hands, then it is quite possible to hope for heating a fairly large area (up to 100 "squares"). The only requirement is that the room must be free from partitions, as an example - a garage, warehouse, workshop.


Cost and sources of oil
As we said earlier, the main reason why potbelly stoves are used is cheap fuel. Some are sure that you can use oil that has just been drained from the car. In fact, this is dangerous - such fuel contains a lot of foreign impurities, which, at best, will make the furnace less efficient. At worst, it can explode, splashing everything around with burning oil. Sometimes you are lucky and the explosion turns out to be weak - the structure is simply “disassembled”, while the oil goes out.
We advise you to buy quality fuel from those suppliers who refine the recycled oil and sell it further. In this form, it is inexpensive - only 10-20 rubles per liter. The price varies greatly depending on the region where you purchase fuel, as well as the season. In winter, they buy it much more actively just for heating workshops, workshops and garages.
Connecting the structure in the bath
The design of the stove includes a part of the chimney with many holes (usually up to 50). This part of the unit is called the burner. In such a burner, oil vapors are mixed with oxygen entering the chimney under the influence of draft.As a result of their mixing, the combustion process begins to be much cleaner and more intense with the release of a huge amount of heat.
The pallet was made from a cast-iron automobile brake disc. Cast iron has good heat resistance, so I decided to take it.
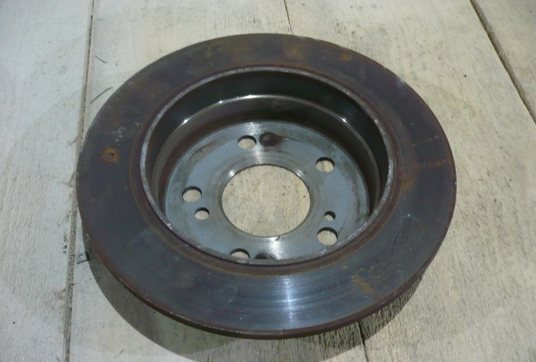
It is from this disk that I will make a pallet
Bottom welded the bottom.
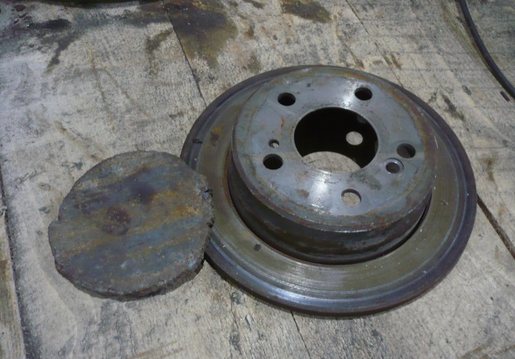
The steel circle is the bottom
I welded a lid on top. In it you can see the counterpart of the burner and the opening. Air enters the stove through the opening. I made it wide - it's better that way. With a narrow opening, the air draft may not be strong enough to prevent oil from entering the sump.
Next I made a clutch. She connects the pan and the burner in my stove. With a clutch, servicing the stove will be much easier. If necessary, I can take out the pan and clean the burner from below.
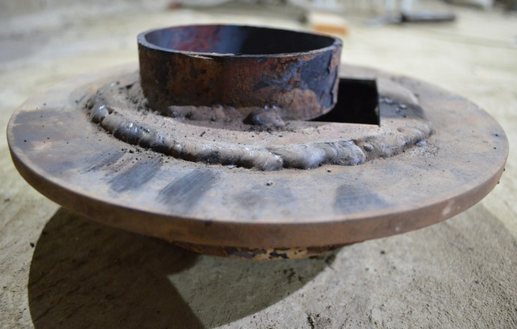
Next I made a clutch
The coupling was made from a 10-centimeter pipe, simply cutting it along the longitudinal edge. I did not weld the opening in the coupling - there is no need for this.
The progenitor of such stoves was known to the older generation of kerogas. It differed significantly from other designs in its safety and efficiency. Since the fuel vapors were burned in a special chamber, the entire volume did not heat up and did not create a danger of ignition and fire.
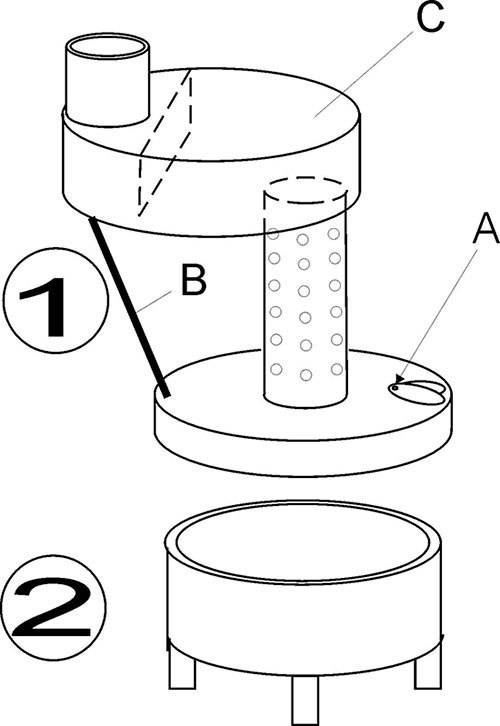
The principle of operation of the furnace on waste oil is about the same. It consists of two containers located one above the other, between which there is a combustion chamber with holes for air intake. Mining is poured into the lower tank, the vapors of which actively burn in the middle chamber, and combustion products, smoke and other substances enter the upper chamber connected to the chimney, from where they are removed naturally.
The hot water boiler is located at the top of the furnace. It is fixed, has taps for taking water in the bath and for starting the heating circuit. The steam room is heated from a brick wall that goes inside. In order for the effect of it to be maximum, it is necessary to make the distance from the furnace to the brick box rather small to reduce heat loss, but also sufficient for air to penetrate.
There is another option for manufacturing a structure for mining, combined with a brick oven. Only the bottom tank is made. The combustion chamber has the shape of a knee, smoothly curved at 90°. A vertical plate is welded to the end, which will communicate with the internal (furnace) part of a conventional brick oven. The incandescent gases formed during the combustion of mining enter the brick oven and heat it.
The further design is no different from the usual one: a water boiler is installed, a heating circuit with natural or forced circulation, shutoff valves, and so on are connected. Such a compact option is optimal for those who already have a finished furnace and only want to adapt it for burning mining.
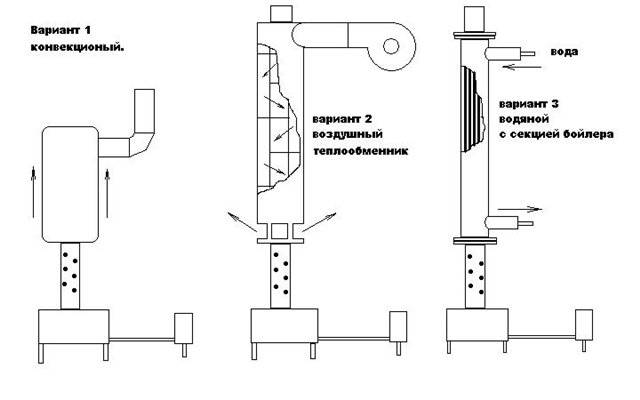
The best option: creating a closed heating circuit with a hot water mixing unit. The heat carrier is heated in a heat exchanger installed inside the boiler or, alternatively, on the chimney. Such a system allows you to cut off the media from the water for household needs, provide a more uniform temperature in the system and makes it possible to fairly accurately adjust the temperature in the premises.
The opportunity to save money on the most costly area is very attractive to any homeowner, and the integration of all elements into a single system contributes to more convenient and efficient management of home heating. In addition, the process of recycling waste oil is difficult, and the ability to burn it with maximum benefit will be the best option for processing unnecessary substances.
Disadvantages of the furnace in mining

Furnaces in development
Of course, the advantage of such structures is significant - the cheapness of fuel. But there are also many disadvantages:
- to ensure uninterrupted combustion of the furnace, a constant and sufficiently strong draft is required
- high fire hazard (we will discuss the rules for operating the furnace during mining below)
- frequent cleaning of soot: if you make the body one-piece, after a couple of months you simply won’t be able to use the oven - it will start to smoke mercilessly
- high fuel consumption - you will need at least 2 l / hour
- the heat transfer of devices is not so great, most of the energy, unfortunately, flies into the pipe
Most of these shortcomings can be smoothed out by improving the design - installing a fan to increase the combustion temperature, an expansion tank, etc. But because of the listed shortcomings, furnaces are used mainly for temporary heating of utility rooms.


Even if you are making a stove according to proven drawings, in any case, you will have to bring it “to mind” yourself: adjust the traction force, fan speed and fuel dosing. It’s also not worth making all the holes in the afterburner pipe right away - first do the first two lower ones, and drill the rest after the full setup.
Heat exchanger assembly
Did the stove for garage heating. I don’t have water batteries in my garage, so I decided that it’s better to immediately heat up and circulate the air. If you have water batteries, then you can abandon the air heat exchanger and simply run 4-5 water coils through the upper chamber, connecting them in parallel. In this case, the design must be supplemented with a circulation pump and a fan. Such equipment will allow you to heat at least the whole house with a stove, you just need to allocate a room for installing the stove.
Heat exchanger assembly
Let's go back to my heat exchanger. I installed it between the chimney and the burner of the stove - here the heat is the most. An iron plate was welded to the heat exchanger. Thanks to it, the flame will be better kept. It will also contribute to the distribution of fire inside the stove body.
I installed an air swirler inside the heat exchanger. There are no engineering frills in such a swirler, but it copes with its task one hundred percent. When working at maximum power, the metal of the case is heated to a scarlet color, and the heated exhaust air pierces even through a glove. You can see the swirl itself in the photo.
I make a swirlerI make a swirlerI make a swirlerI put a swirler
Then I took a duct fan and put it on one side of the heat exchanger. By the way, a thermostat can be connected to the fan for automation. This will allow you to independently set the temperature and save resources. For example, I decided to use a thermal relay from Autonics - I just had it lying around idle. But you can take some budget model, for example, Vemer KLIMA. I also tried it, it works great.
Made a superchargedHere's what happens
Heat is concentrated in the firebox compartment.
Necessary materials and tools
To make a potbelly stove with your own hands you will need:
- welding inventory (or any other welding machine if you have relevant experience);
- chisel;
- soft cloth (you can use rags);
- a hammer;
- sandpaper (fine-grained).
The list of materials depends on what capacity the potbelly stove will be made from. It can be a gas cylinder or a milk flask. If you have some experience with metal, then a potbelly stove can be made from sheet material. However, you definitely need to take care of the availability:
- refractory bricks;
- steel pipes;
- metal wire;
- grate (in some cases, you can do without them);
- branch pipe with a wind vane;
- door hinges.
Pressurized furnace design

Structural drawing of a pressurized furnace
Such a unit is considered safer - after all, the combustion zone in it is completely closed. The pressurization method helps to reduce fuel consumption - it will take not two, but one and a half liters per hour. Plus, the power in such a furnace can be easily adjusted. The device is also less demanding on the height of the chimney. And yes, you don't have to clean it as often.
As a fan, you can use the old VAZ 2108 car from the oven. A Chinese analogue is also suitable. You can adjust the fan speed with an inexpensive PWM controller.
Perhaps the only drawback of the supercharged mining furnace is the strong burnout of the metal in the place where the flame jet deviates
But for a collapsible structure, this is not so important - a burnt sheet of metal can be easily replaced
Projects of country houses for 6-10 acres: 120 photos, description and requirements | The most interesting ideas
Types of furnaces for the garage
On sale you can find gas and electric appliances, they are effective, but expensive, require regular refueling and careful handling. The most popular options use the energy of burning wood, diesel fuel or waste oil.
From a gas cylinder or pipe
The option is attractive for its ease of manufacture. Arranged vertically, these ovens are very compact. A gas cylinder can be found at a landfill or a metal collection point, after which it easily turns into a stove.
The design of the furnace can be vertical and horizontal. The first option is more compact, in the second case it is more convenient to stack long firewood. Wall thickness - not less than 3 mm, best - 5-6 mm.
The chimney should also not be too thin. Such a stove will serve for a very long time, and it can be heated with wood waste, chipboard, sawdust, pellets, coal.


You can use a system of two barrels located one inside the other, the gap between them is filled with pebbles or sand. The structure heats up longer, but it radiates even heat and does not cool down for a long time. In general, there is no standard for the manufacture of a conventional wood-burning stove.
The main thing is to follow simple rules: use a thick steel wall, a firebox and a blower, grates to improve combustion and an exhaust pipe with a diameter of at least 10 centimeters.
Advantages of wood stoves:
- ease of operation;
- low cost of the device itself and fuel for it;
- installed without a foundation in any suitable place;
- high efficiency and very fast heating of the garage;
- can be used for cooking.
Long burning wood burning design
In order not to often throw firewood into the firebox, stoves with limited air access to the combustion zone were invented, such devices can work up to 12 hours at one gas station. The same gas cylinder is used as the body.
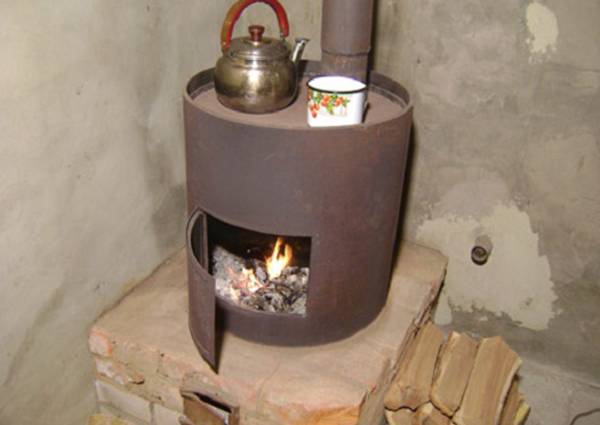
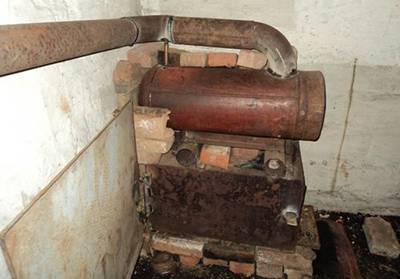
Photo 1. Homemade stove in the garage, working on wood, on which it is convenient to heat dishes, for example, a kettle.
Combustion goes from top to bottom under the action of the load, resulting in the combustion of the firewood itself and the pyrolysis gases formed during heating. The efficiency of such a stove is high, and the firewood in it burns almost without residue.
Oil on mining and diesel stoves
The idea to use old motor oil led to the development of a device capable of burning it with the release of a large amount of heat.
Lower the container of the device serves as a reservoir for fuel, and the main combustion process occurs in the upper half, so its wall thickness should be higher. The heating temperature can reach 850–900 °C.
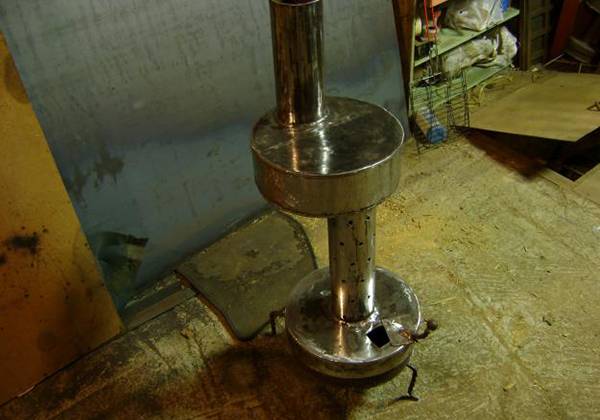
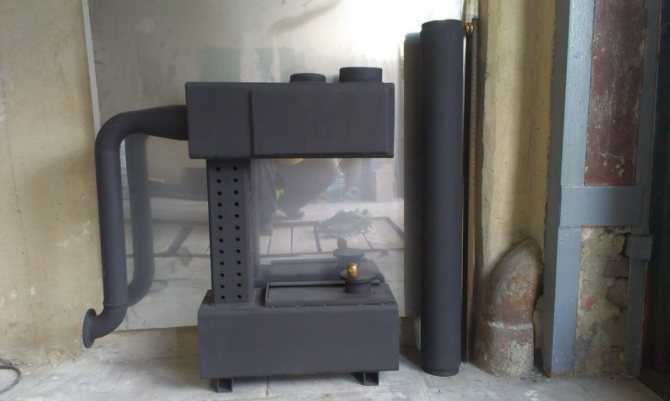
Photo 2. Oil oven in the garage. The device is small in size, with good heat dissipation properties and no soot.
Advantages of using mining:
- fuel availability;
- absence of smoke and soot in the combustion process;
- safety and environmental friendliness, only oil vapors burn;
- compactness;
- good heat dissipation.
Important! The chimney must be up to 4 meters high to ensure good draft and stable operation. The design of the diesel-fueled furnace is similar to the unit operating in mining. The design of the furnace for diesel fuel is similar to the unit operating in mining
The design of the diesel-fueled furnace is similar to the unit operating in mining.

To increase efficiency, simple nozzles can be used at the bottom of the burner.
Such ovens are used:
- diesel or heating oil;
- fuel oil;
- kerosene;
- transformer, machine oil.
The principle of operation of the device
Combustion of fuel in a potbelly stove during processing occurs in two main stages. Initially, the filled oil burns in the tank, after which the gases are mixed with air, enter the second chamber, where they are burned and provide the maximum possible heating efficiency of the room. At the same time, fuel consumption is significantly reduced, and the need to constantly refuel the unit disappears.
A properly assembled potbelly stove in oil will consist of two separate compartments. The first chamber is a small tank where used oil is poured. Combustion of fuel occurs at a relatively low temperature. Above is an afterburner, where the resulting gas is mixed with air and burns at a temperature of about 800 degrees. The metal walls of the potbelly stove heat up, and thick metal effectively retains heat, quickly heating a small room.
In that video you will know useful information in the manufacture of potbelly stoves:
How to make a potbelly stove from steel
Stove potbelly stove convection type.
If you need to heat a house in the country and cook food, you should definitely know how to weld a potbelly stove yourself from sheet steel. This design will not require a lot of fuel. This is achieved through the installation of partitions in the furnace, reliable fastening of the doors and the ability to adjust the air flow.To make such a device with your own hands, you will need to prepare the following elements:


- metal sheet with a thickness of 4 mm or more;
- metal with a thickness of 8-12 mm, from which partitions will be made;
- lattice;
- chimney;
- corners from which the legs will be built;
- welding device.
Manufacturing sequence
From the steel sheet, the first step is to cut out the elements for the body and several partitions that will be mounted on the top of the firebox. They will be able to make a labyrinth for the smoke, as a result of which the efficiency of the stove will increase. In the upper part, you can make a recess for the chimney structure. The recommended recess diameter is 100 mm. Next, you will need to make a recess for the hob with a diameter of 140 mm.
Stove potbelly stove made of sheet steel.
Using a welding device, you need to attach the side elements to the bottom of the structure. To the side walls you will need to attach strips of metal of great thickness. As a result, it will be possible to attach the grate. It can be a sheet of metal with recesses with a diameter of about 20 mm. The lattice can be made of reinforcing bars. At the next stage, supporting elements from a metal strip must be attached to the side walls. After that, the installation of partitions is carried out.
Doors for the firebox and ash pan should be cut out of metal. They can be installed on ordinary hinges. However, a more reliable option is use of curtains made of steel pipes and rods. They can be fixed on wedge hecks. Elements are cut from stainless steel sheetand then secured with bolts.In order to be able to adjust the intensity of fuel combustion, on the door that closes the ash pan, it is necessary to make a recess for mounting the damper.
To the recess for the chimney structure, you need to attach a sleeve 200 mm high, on which the pipe will be mounted. A damper in the tube will help keep the heat in. For her, it will be necessary to cut a circle from a metal sheet. One extreme part of the steel rod must be bent. After that, several parallel holes will need to be made in the tube. Next, a rod is mounted, after which a round damper is welded to it.
Diagram of a brick fence for a potbelly stove.
The flue pipe must be installed at an angle of 45°. If it passes through a recess in the wall, in this place the part must be wrapped with fiberglass, and then fixed with a cement mixture.
To prevent the occurrence of burns from touching a red-hot stove, it will be necessary to build a steel protection screen from several sides and place it at a distance of 50 mm. If there is a desire to increase the heat transfer coefficient, the structure can be overlaid with bricks. After the firebox is finished, the brick will heat the house for some time. Laying should be carried out at a distance of 12 cm from the metal body.
The air cushion can become heat protection.
For its implementation, holes for ventilation must be made in the masonry above and below.
Helpful Hints
The potbelly stove will be easy to use if you follow the recommendations of experts:
- To check the quality of welded joints, the first ignition is carried out on the street.
- To ensure tightness, the chimney passing inside the garage is made of an all-welded pipe without horizontal sections.
- Next to the stove should be a box of sand and a fire extinguisher.
- The places where the chimney pipe passes through the wall or ceiling are insulated with refractory material.
- A brick screen laid out on 3 sides of the stove will protect against accidental burns and retain heat after the fuel burns out. The distance from it to the walls of the potbelly stove should be 5 - 7 cm.
Despite the simple device, a potbelly stove is considered the most reliable and cheapest way to heat a garage. In such a furnace, even garbage can be burned. When choosing, keep in mind that horizontal structures last longer than vertical ones.
Case manufacturing
From this balloon I will make a stove
I used a used bottle. There was no more gas in it, but just in case, I opened the valve and left the cylinder like that on the street for the night.
Then I carefully and slowly drilled a hole in the bottom of the cylinder. To prevent sparks, I pre-moistened the drill with oil
Hole
Then I filled the bottle with water and drained it - this removed the remaining gas. Work carefully, try not to spill gas condensate, because. it stinks very strongly and for a very long time.
Then I cut a couple of openings. In the upper opening I will make a combustion chamber and put a heat exchanger, in the lower there will be a burner with a tray. The chamber at the top is specially made so large that, if necessary, it can be heated with firewood, pressed briquettes, etc.
Showing how I cut a balloon Showing how I cut a balloon Showing how I cut a balloon Showing how I cut a balloon In the end, this is what happened
Then I once again washed the opened gas cylinder from gas condensate.
4 Helpful Hints
In the independent manufacture of potbelly stoves for development, drawings play an important role. With their help, even an inexperienced master will be able to make a really high-quality installation that will last for many years.
In addition to the visible advantages of an oil potbelly stove, users are faced with a lot of problems that can be solved, given some tips. For example, the following nuances were noticed in the work:
- uneven heating of the room;
- oil spills out of the container during operation;
- the smell of burning and smoke in the room;
- high fuel consumption.

The uneven distribution of heat in the room (when it is hot near the potbelly stove and cold at the other end of the room) is solved by installing special tubes in the secondary chamber. Thanks to this, the flow of hot air can be directed in any direction and even out the heating of the building. At an outside air temperature of -30-35 °C, it is possible to achieve heating of the room up to +20-25 °C.


Often, the high-quality operation of a waste oil stove depends on a properly tuned thrust. In this regard, the production of potbelly stoves on do-it-yourself work according to the drawings is the basis for the correct functioning of the installation. Do not make the unit "by eye".
To prevent the oil from hissing, it should not be poured into a container immediately after draining from the machine. It is necessary to let it settle for several days and only then use it as fuel. There are also recommendations for filling the tank. You need to fill it up to 2/3 of the total volume.
warm brick
A potbelly stove on wood, coal and other types of fuel can significantly increase its efficiency. To do this, it is enough to build a screen of baked clay bricks around it with your own hands.If you look closely at the drawings of such a mini-building, you can see that the bricks are laid at a short distance from the walls of the stove (about 10-15 cm), and if desired, around the chimney.
Bricks need a foundation. Do you want the masonry to last a long time? Then pour the base at a time to form a monolith. The material for the foundation is better to take concrete, which should be reinforced with steel reinforcement with your own hands. It is desirable to make a reinforcement layer at a distance of approximately 5 cm from the surface of the concrete pad.
Ventilation holes are made at the bottom and top of the brickwork, which will ensure the movement of air (heated masses will go up, cold air flows from below). Ventilation also prolongs the life of the metal walls of the potbelly stove, postponing the moment of their burnout due to cooling by circulating air.
Bricks laid around the stove accumulate heat, and then give it away for a long time, warming the air in the room even after the potbelly stove goes out. In addition, brickwork additionally protects the objects surrounding the stove from fire.
If desired, the stove can be completely laid out of brick. Such a structure is beneficial in that it will last for many years without additional effort on the part of the owner. However, there are also certain disadvantages. The disadvantages of this option include the following:
- the process of laying out such a stove is quite laborious and is suitable only for those people who have experience in masonry with their own hands;
- a brick potbelly stove is quite expensive, as it requires the use of refractory materials, including fireclay bricks and special clay for mortar.
In order to get a small potbelly stove on wood, it is enough to lay out a cone measuring 2 by 2.5 bricks, 9 bricks high. In the combustion chamber, 2-4 rows are laid out from fireclay bricks. Ordinary clay baked brick is suitable for a chimney, into which you must remember to insert a stainless steel sleeve.
Whatever the method of making a miniature stove or a potbelly stove with your own hands, you make them according to a drawing or by eye, the main thing is that at the output you get an effective heater, and in an expanded configuration also a hob for cooking. Look around for suitable materials (barrels, sheet metal, etc.) and go to your own homemade stove or even a potbelly fireplace!
How to make a wood splitter with your own hands? How to install sandwichdo-it-yourself chimney Build do-it-yourself boiler chimney not difficult Do-it-yourself metal stove How to make a smokehouse yourself at home or in the country
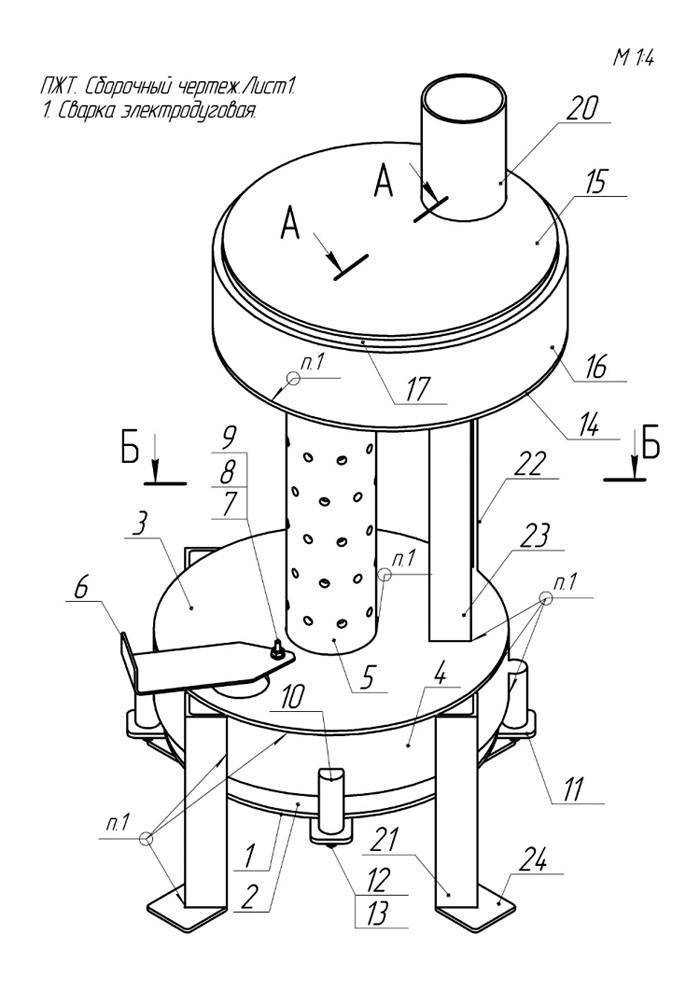
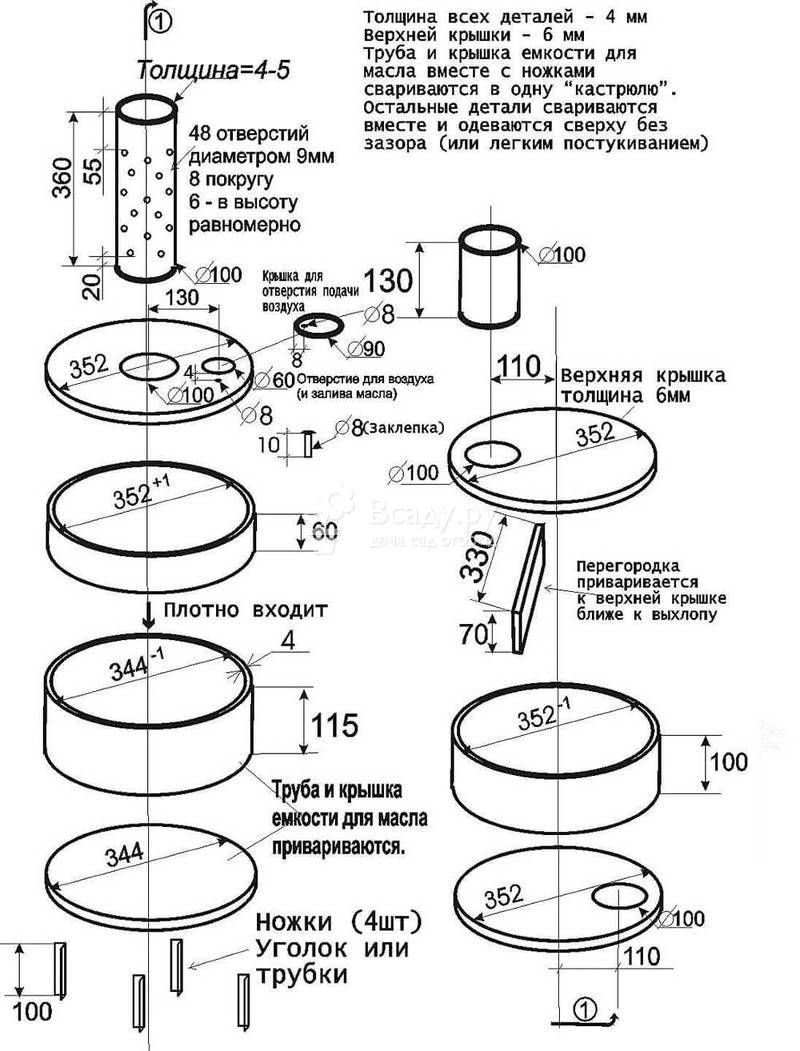
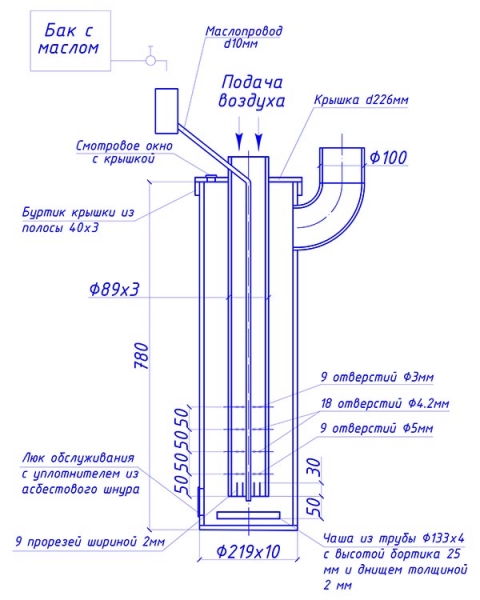
How to make a drip oven from a cylinder
As a rule, a mining stove with a drip oil supply into the bowl is done from a pipe with a diameter of 200 mm or old gas bottle out of propane. The latter is better to take the Soviet sample, where the wall thickness is up to 5 mm.
When making a firebox from a pipe, you will have to make and weld a bottom with a lid to it. In this regard, the gas cylinder is more convenient: you need to unscrew the valve, fill it with water and cut off the upper part with a grinder. After that, follow the instructions:
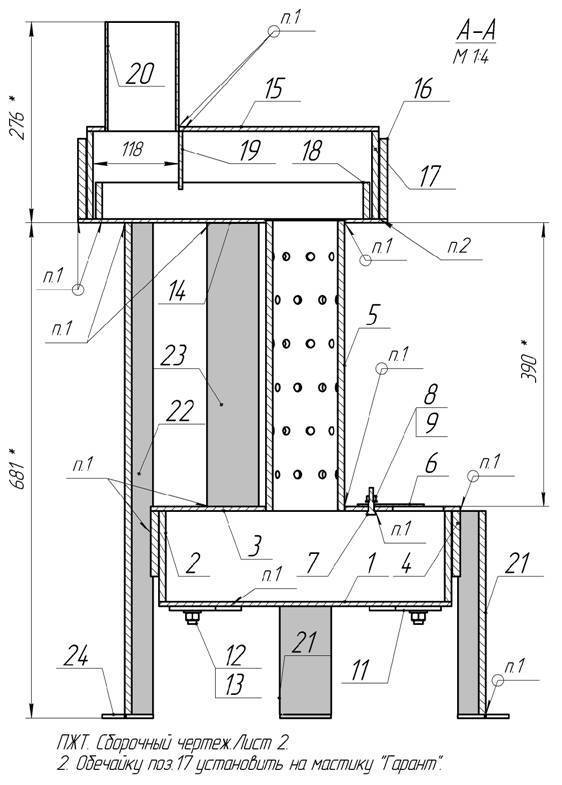
- Make holes in the body for the chimney and in the lid - for mounting the afterburner. In the lower part of the cylinder, an inspection opening can be cut, closed by a bolted lid, as shown in the drawing.
- Make an afterburner pipe by drilling holes according to the drawing. At the bottom end, make 9 grooves with a cutting wheel.
- Make a steel bowl, you can use a car brake disc, as shown in the photo. Place it on the bottom of the firebox, lifting it 3-5 cm.
- Replace the afterburner and put on the cylinder cap. Insert the oil line into the pipe so that its end is above the bowl.
- Make a fuel tank with a fitting (for example, from a heating expansion tank) and hang it on the wall near the stove. It remains only to connect the chimney and you can start igniting.
If you want to make a working furnace with a water circuit, then place a coil from a thick-walled tube inside the firebox, preferably from stainless steel. Place it in the upper zone, and bring the ends of the tubes out through the holes in the walls. Then they can connect to hot water heaters garage, as shown in the photo.
Details about the device of a waste oil drip furnace manufactured by do-it-yourself from a gas cylinderdescribed in the following video:


