- Preparing for assembly, choosing an installation site
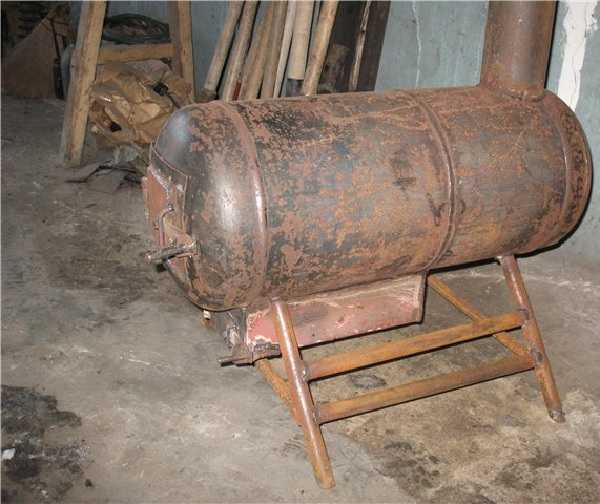
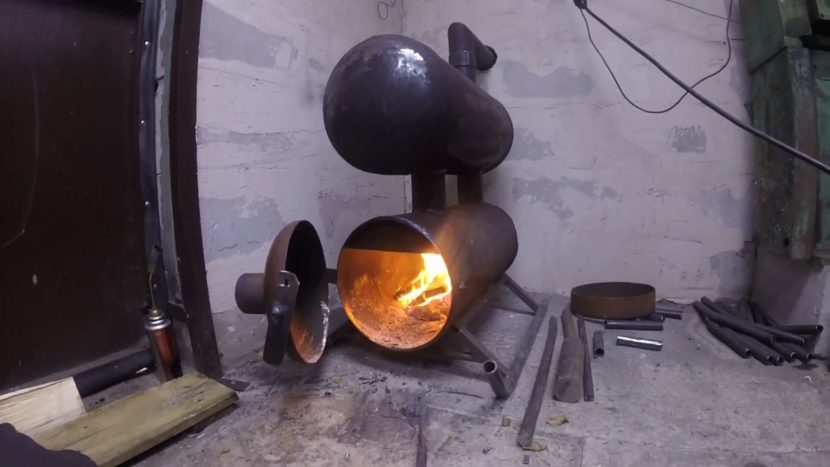
- Potbelly stove from a cylinder installed horizontally
- Making a stove from a gas cylinder with your own hands
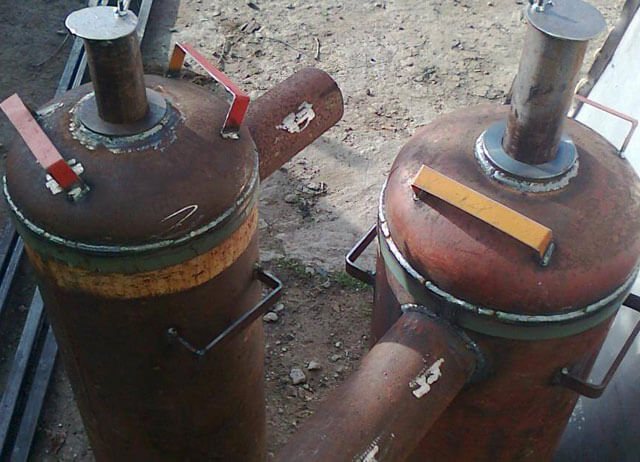
- Next step: connect the balloons together
- What needs to be prepared?
- Balloon preparation
- Types of furnaces
- The basic principle of the work performed
- Self assembly
- Assembling an efficient potbelly stove
- How is the assembly of the structure with a water jacket
- Features and principle of operation
- Advantages and disadvantages
- Operation features
- Furnace modernization
Preparing for assembly, choosing an installation site
Before starting work on assembling the furnace, it is necessary to prepare the place of its installation. After pouring the foundation, it will take time for the concrete to harden. During this period, you can slowly make the oven itself. The foundation can be used no earlier than 7 days after pouring. On top of the concrete base, you need to lay out a platform of refractory bricks.
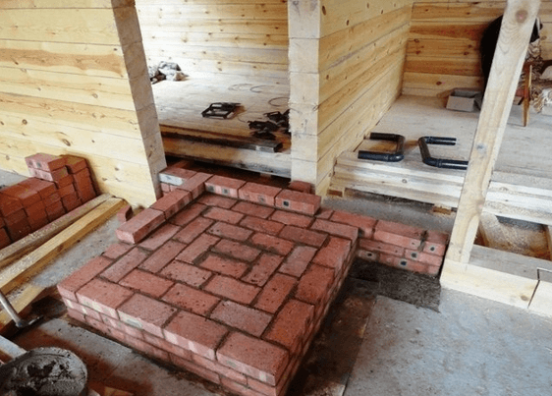
A good foundation is essential for the safe operation of the furnace.
When choosing a place to install the furnace, you need to consider the following circumstances:
- the distance to the nearest walls of combustible material must be more than one meter; if there is no such place, the walls must be additionally protected from heating with an asbestos sheet 8–10 millimeters thick; on top of it, install a sheet of galvanized metal with a thickness of 0.5–0.7 mm;
- the chimney in the vertical part must not fall on the supporting beam;
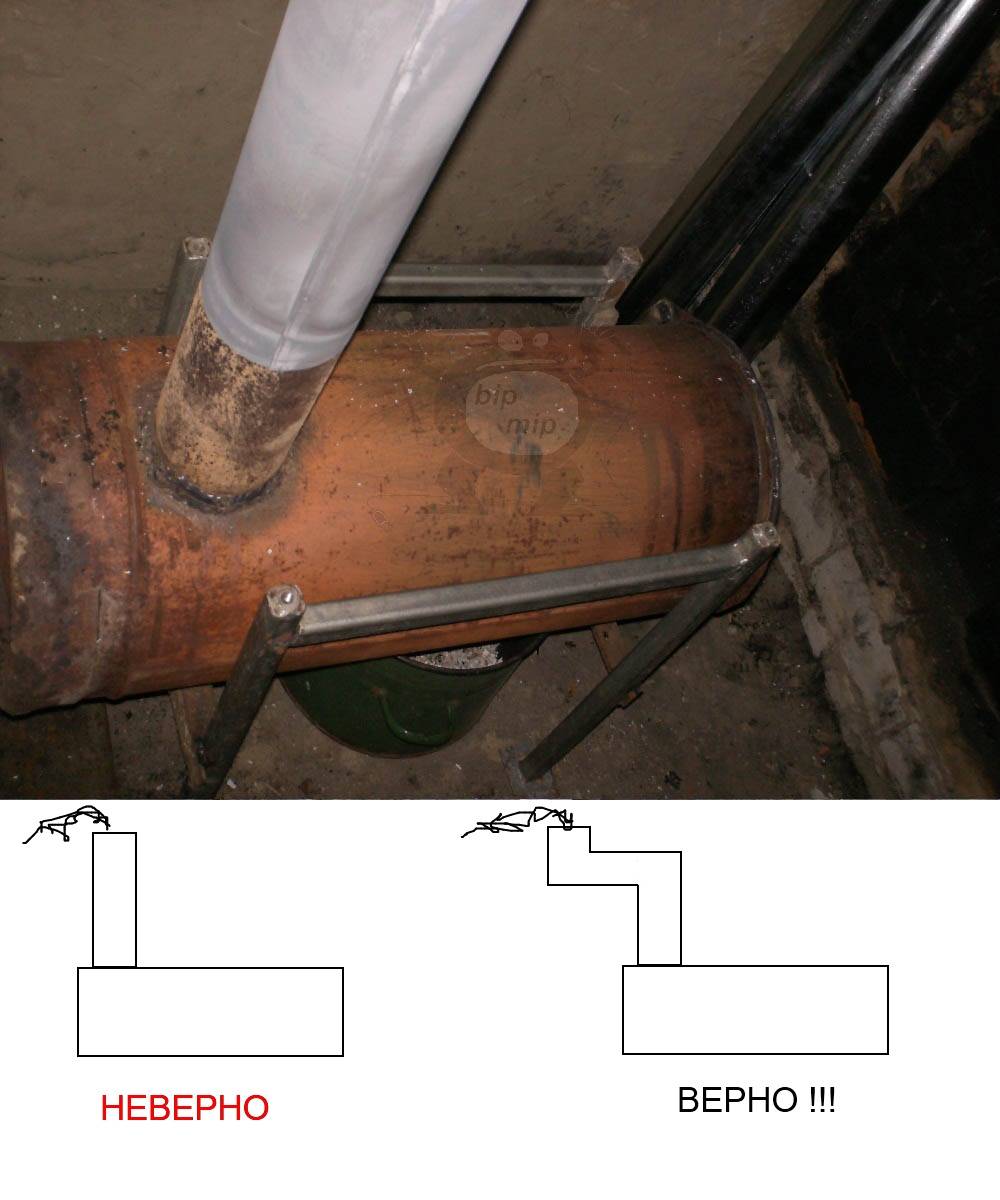
- if an external chimney is used with an outlet through the wall, the length of the horizontal part should not be more than one meter; otherwise, you need to make a chimney with a slope of 45 degrees.
The preparation of parts and assembly of the furnace is best done indoors, for example, in a garage. This will save the neighbors from unnecessary noise when working with a grinder and from the sparkling of an electric arc. The room must be equipped with exhaust ventilation. If welding is carried out in the open air, the place of work must be protected with protective screens.
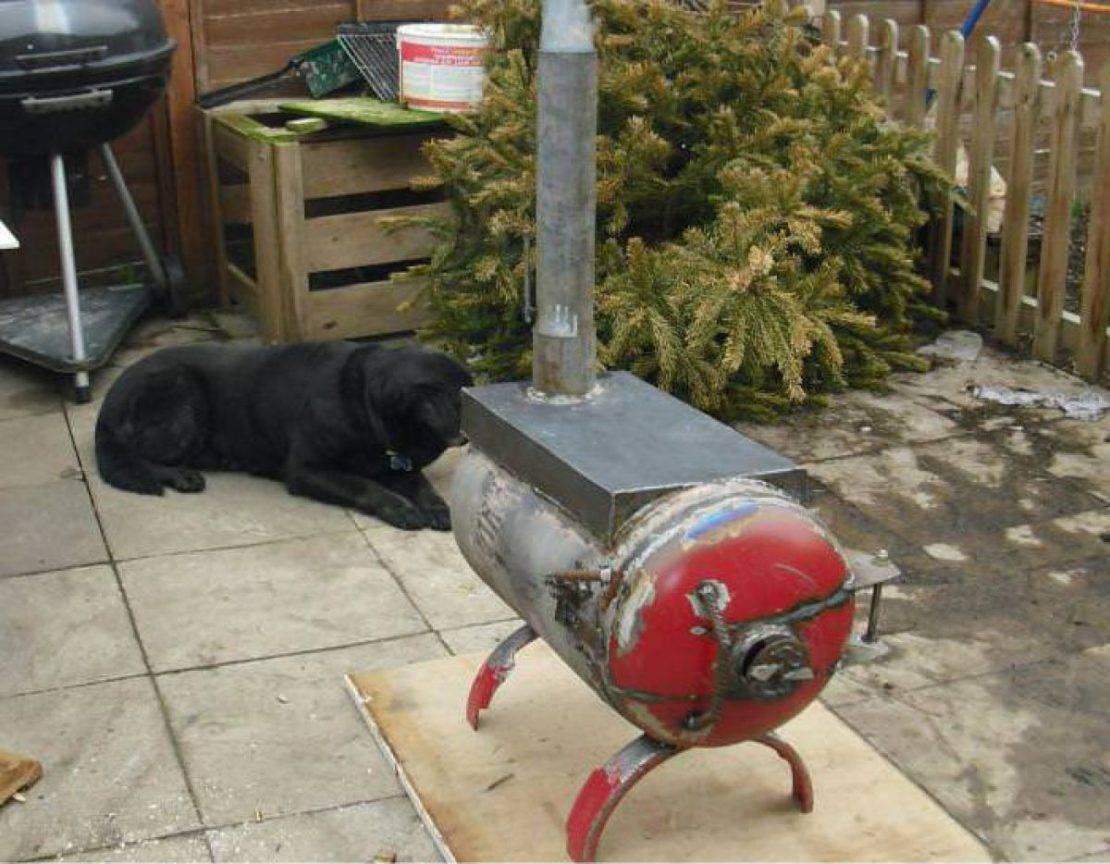
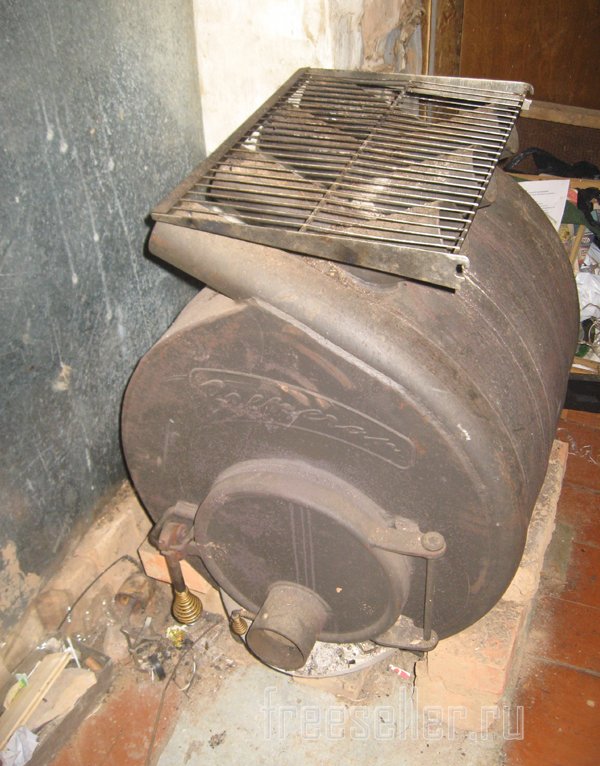
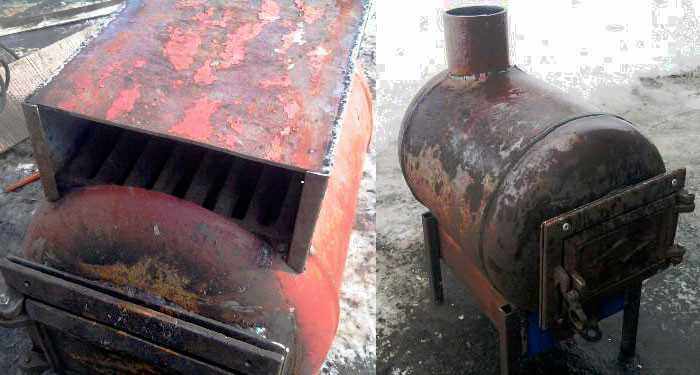
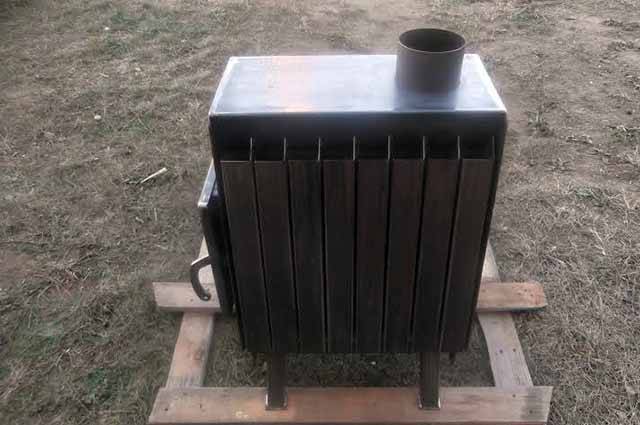
Potbelly stove from a cylinder installed horizontally
The main difference lies in the absence of a vertical "channel" part - instead of it, a pipe is immediately welded to connect the chimney.
This oven can be equipped with a hob. For it, you need to make a rectangular frame by simply bending a rod with a diameter of 5 - 8 mm or welding 4 corners together.
The frame is laid horizontally on the cylinder and welded to it, then a hob (steel sheet) is laid on top of it and welded.
The frame is not the only option for supporting the slab. Instead, it can be welded to the cylinder on both sides (along the length) along a steel strip located vertically. The upper edges of the strips should be flush with the top surface of the cylinder - so that the hob laid on this support is adjacent to it.
The same stove can be placed on a 2-balloon stove.
Making a stove from a gas cylinder with your own hands
At the same time, it is necessary to select the orientation of the position of the stove (horizontal or vertical).
The difference between these options is the purpose of use.
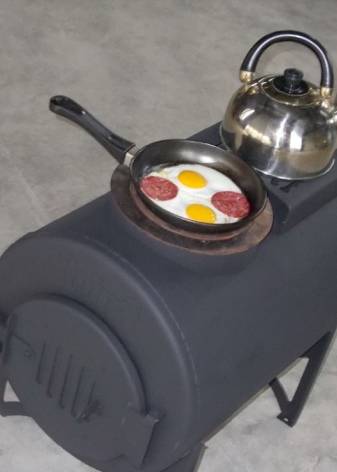
- A horizontally located stove is usually more used for cooking.
- A vertically located stove - for heating due to greater traction and space savings.
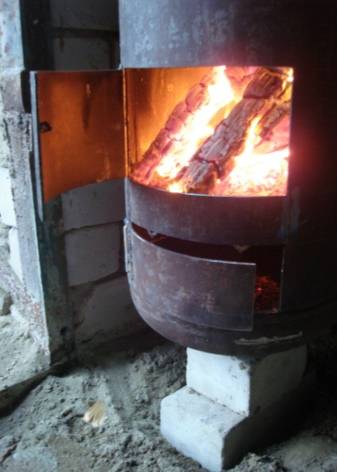
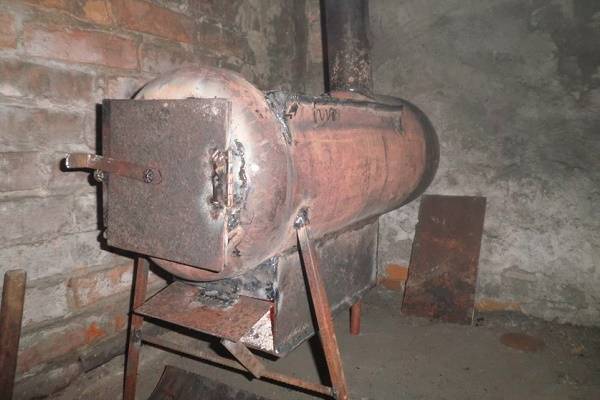
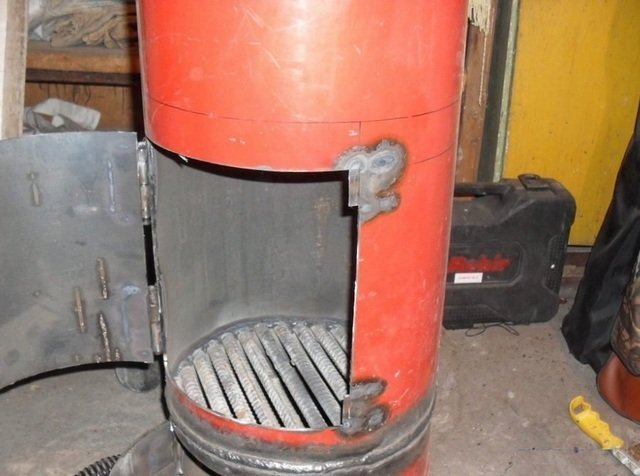
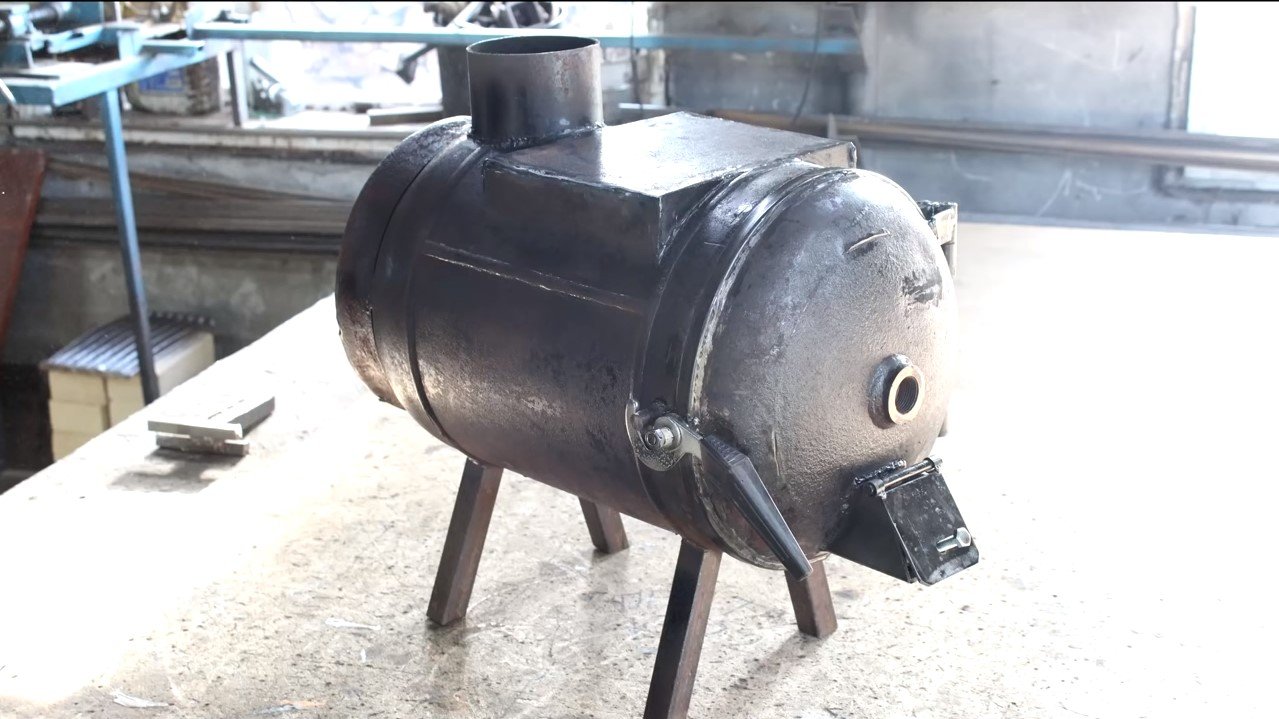
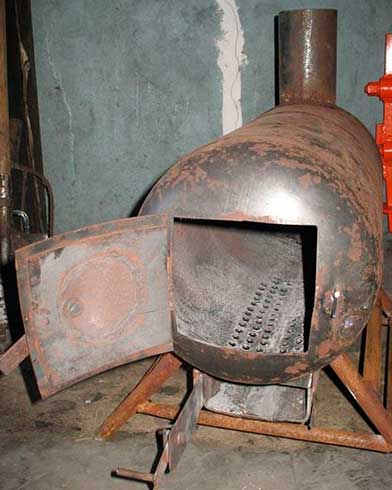
Making a horizontal version:
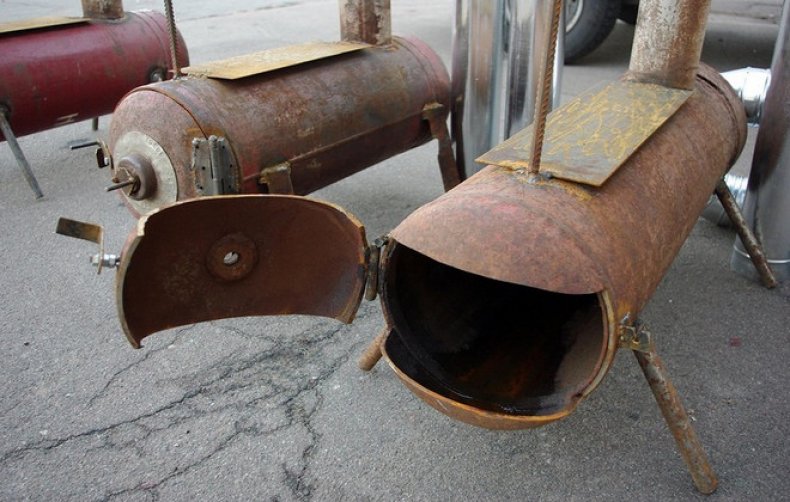
- the upper part, where the valve is located, is cut off from the cylinder to install the door (the photo shows another option, where instead of cutting off the upper part, a finished cast-iron door is used);
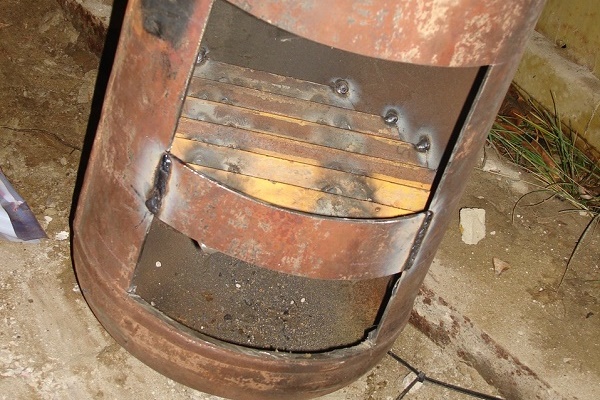
- holes for the grate are drilled in the wall of the cylinder, or fasteners are welded inside to equip a removable grate;
- supports / legs / skids and the like are attached from below;
- if the grate is drilled in the cylinder body, an ash pan made of sheet metal is attached from below;
- in the wall of the cylinder, as close to the bottom as possible, a chimney adapter is welded;
- the chimney pipe must contain the so-called "elbow".
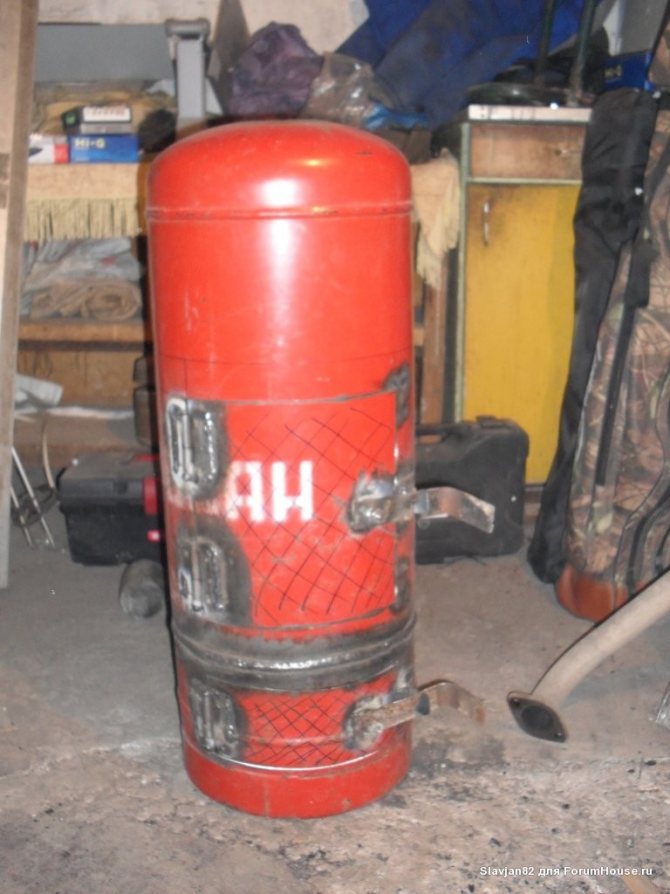
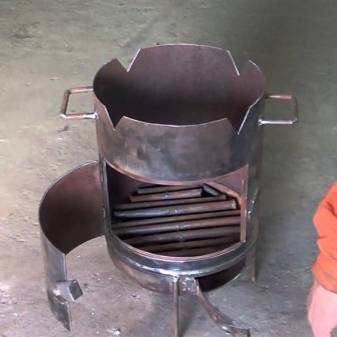
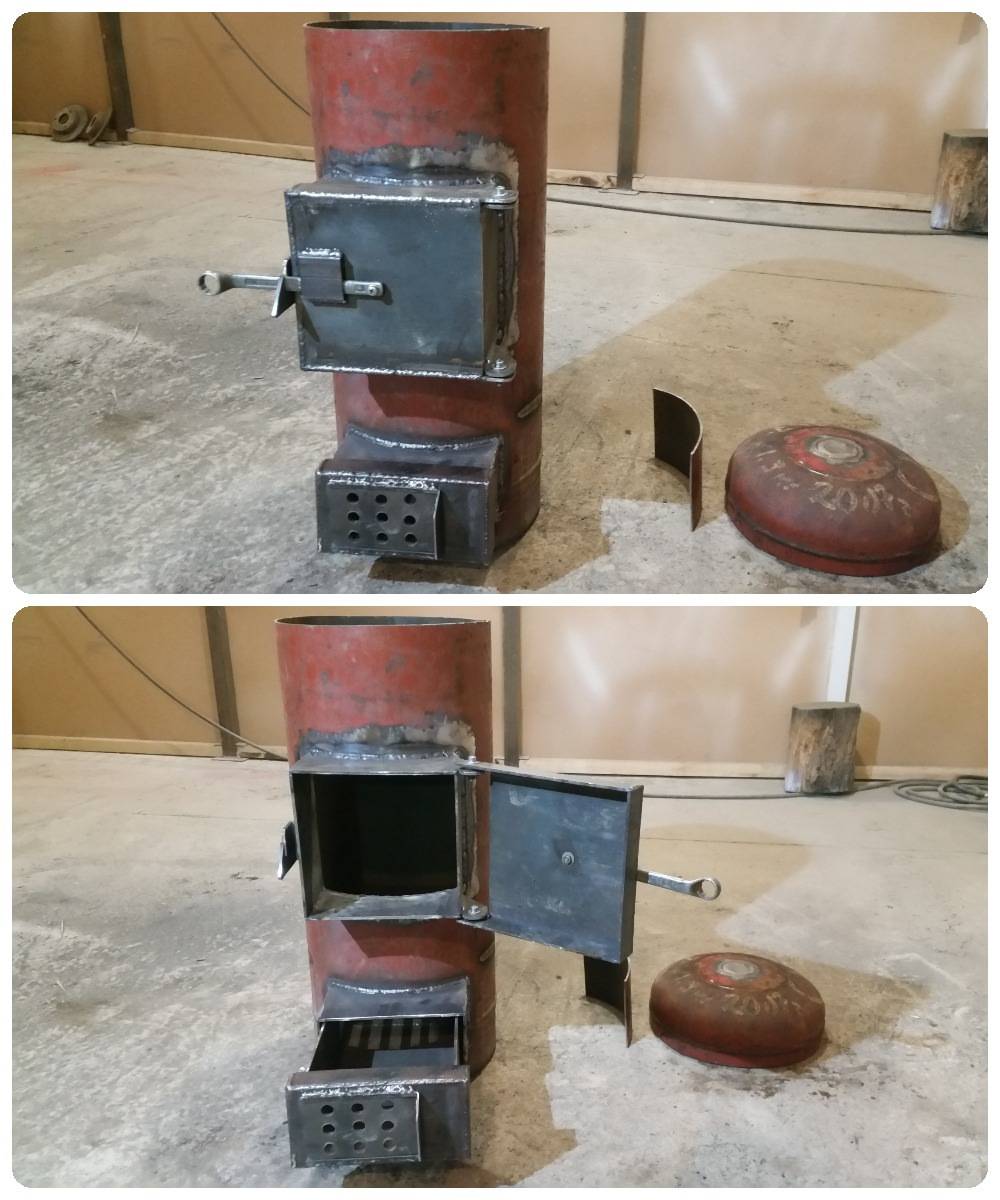
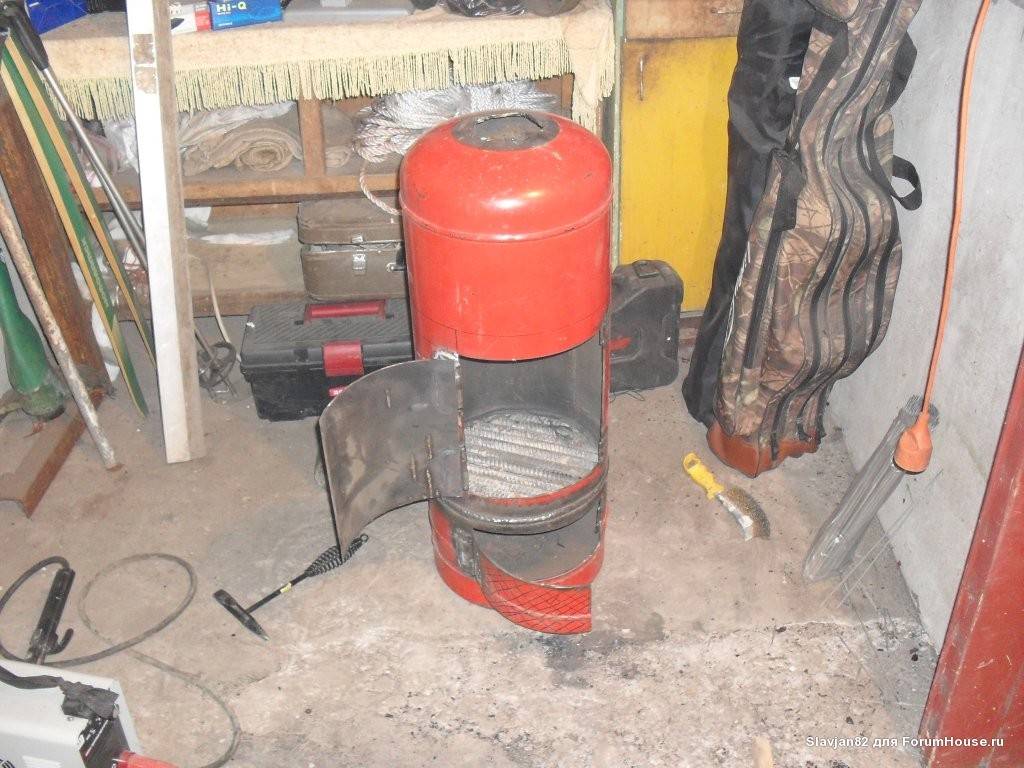
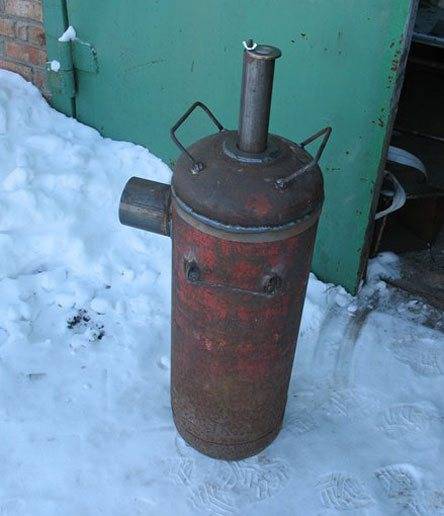
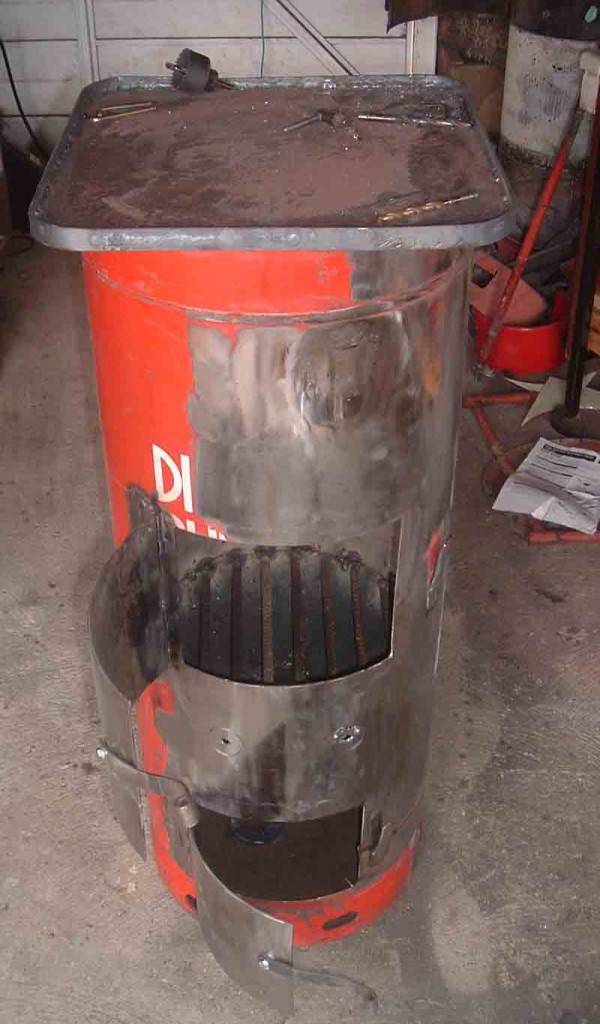
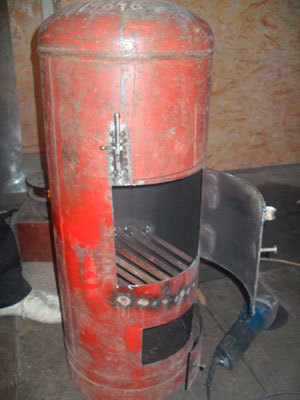
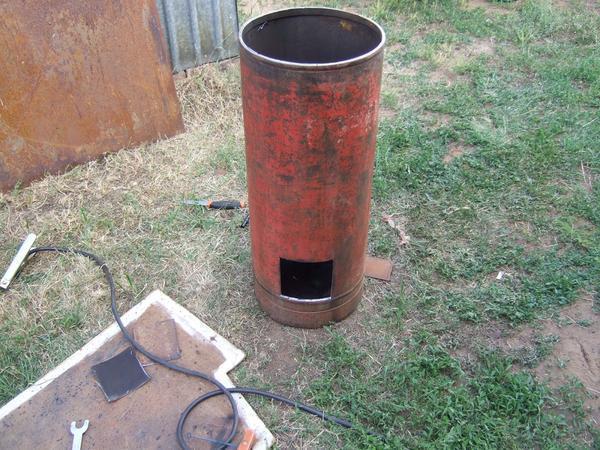
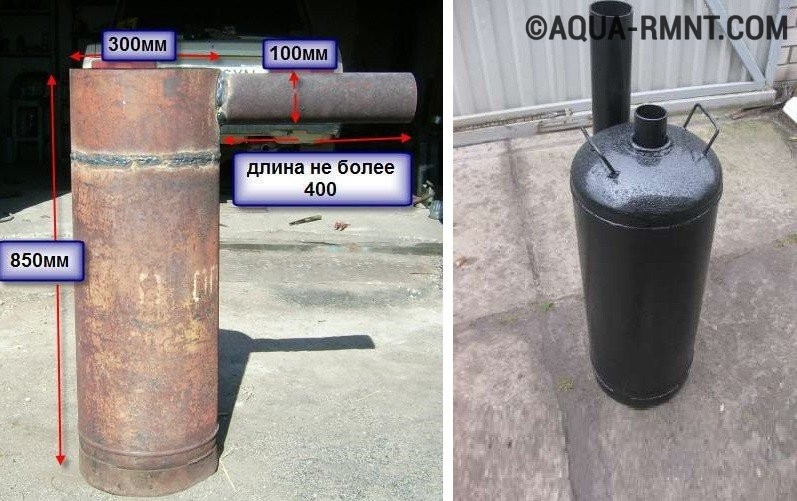
Making a vertical version:
- the valve is cut off, and a 10-15 cm chimney pipe is welded in its place;
- 5-7 cm above the bottom, a hole is made for the blower;
- another 5-7 cm recede from it and cut out an opening for the door;
- inside the container in the opening between them, a grate is inserted, or fasteners for a removable grate are welded;
- install doors with latches and supports / legs / skids.
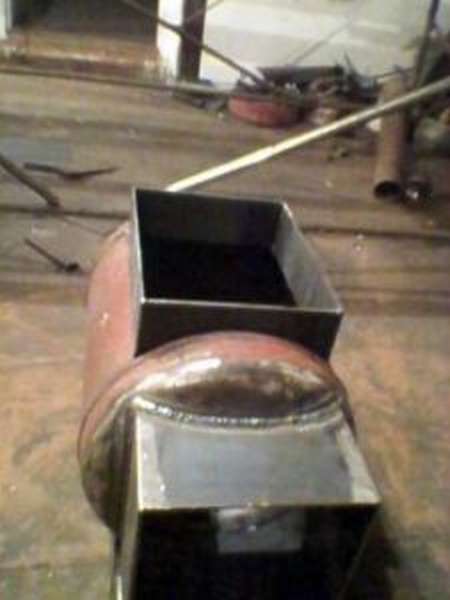
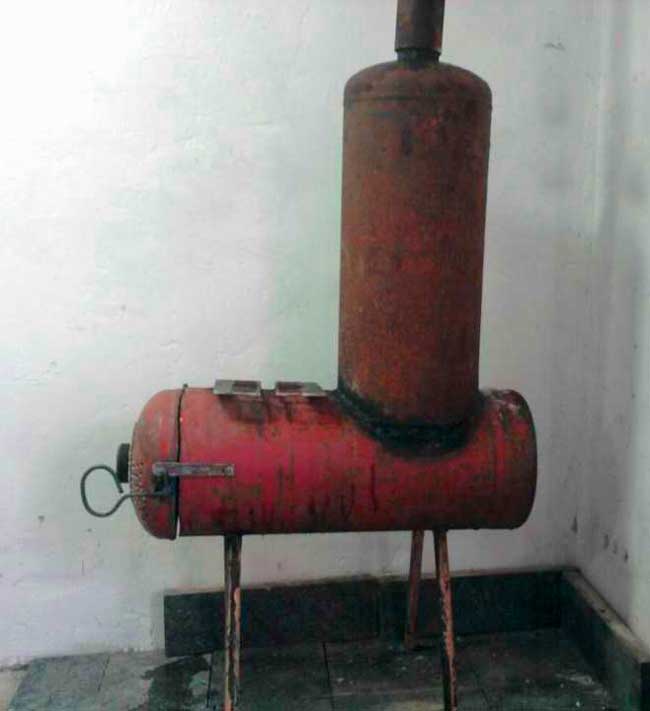
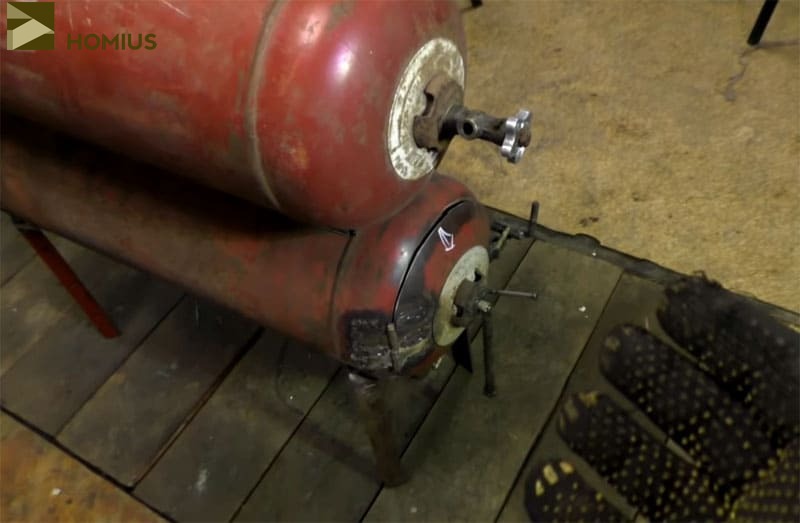
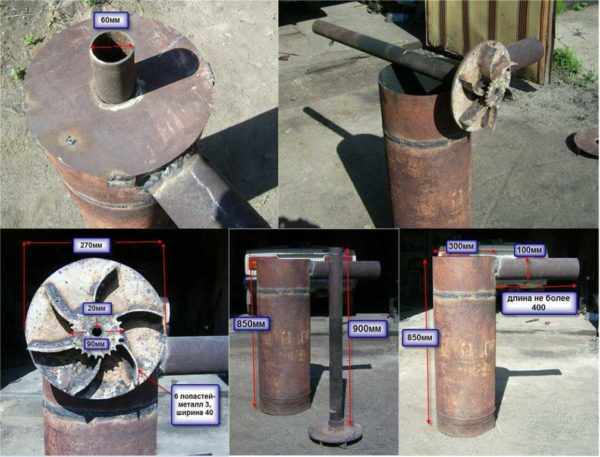
Next step: connect the balloons together
I consider this work to be the most important. Putting the balloon on its side, I, using a marker, marked a rectangle on it, 10 cm wide for the entire length
Of course, it can be made shorter, but it seemed to me that it would be better for the work of the potbelly stove. The marked area was cut out, and the piece of metal recovered after this work was divided into two equal halves in length. It was from them that I made the transition from one cylinder to the second. This is very convenient, and eliminates the need for unnecessary measurements, the search for additional material. A similar cut was made in the second cylinder, but the separated strip was later used for other purposes. It was from it that the plugs were made on the sides of the adapter from one cylinder to the second.


Here such a slot with side walls should turn out
What needs to be prepared?
From the tools you need to collect:
- welding machine (200A);
- grinder - "grinder", preferably with discs with a diameter of at least 180 mm;
- electrodes;
- circles for grinding and cutting metal;
- a hammer that cleans the slag from welding;
- a brush with metal bristles;
- folding meter, tape measure, chalk or marker for marking;
- drill and drills of the required diameters;
- chisel, normal hammer and pliers.
From materials, except for one or two gas cylinders, you must purchase:
- a sheet of metal with a thickness of at least three millimeters - it is useful for installing a hob and an ash pan;
- ready-made cast-iron doors, or they can also be made independently from a metal sheet or a piece of metal cut from a cylinder;
- flue pipe;
- corner or thick reinforcement - they will be required for the manufacture of legs and grate.The latter can be purchased ready-made (made of cast iron) or arranged using holes drilled in the bottom of the cylinder.
It should also be noted here that for the manufacture of such a stove, both a standard gas cylinder and a small cylinder are suitable.
As mentioned above, a cylinder stove can be vertical and horizontal. You can choose the one you need based on the amount of space allotted for installing a potbelly stove and the convenience of its operation.
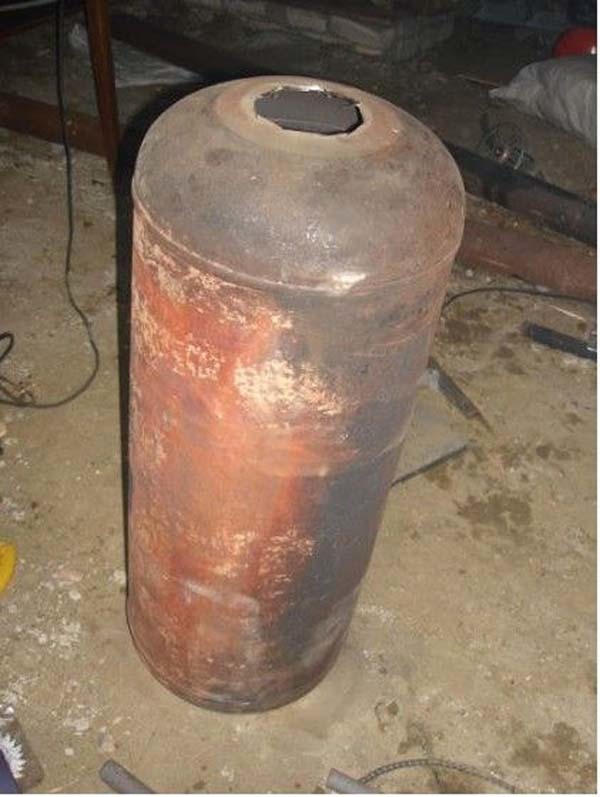
Balloon preparation
Proper preparation of the cylinder is a very important event before starting work, especially if the potbelly stove is made from a container in which gas was not so long ago. Residues of gas may remain inside, and when cutting, which is accompanied by sparks, the cylinder may explode
- Therefore, first you need to unscrew the valve located on top of the cylinder, and free the passage for the exit of residual gas - this procedure will take some time. It is better to leave the container open overnight in the open air or in a well-ventilated non-residential area, or even better, fill it with water to the very top.
- Next, the container is turned over and the resulting condensate is drained. It has a very unpleasant smell, so this process also cannot be carried out in a room where people live.
The washed container no longer harbors any explosive hazard when working with it, and you can safely proceed to the cutting process.
Types of furnaces
The types of stoves that can be made from an empty gas cylinder are determined by its shape. Thus, the cylinder is suitable as a housing for the following heating devices:
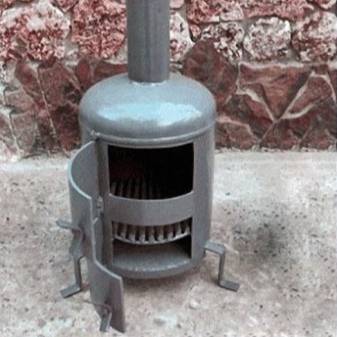
- Potbelly stove. The main advantages of the potbelly stove are small size, mobility and safety, determined by the simplicity of the design.It is ideal for rooms in which heating communications have not yet been carried out and it is possible to bring the stove chimney outside. The potbelly stove quickly kindles and heats up, and its small shape allows it to be used in many situations. Unfortunately, the design of the potbelly stove is such that with frequent and prolonged use, the body of the stove burns out, no matter how thick it is, so it is often not recommended to operate the potbelly stove;
- Working oven. Somewhat more difficult to manufacture than a potbelly stove. Waste oil is used as fuel in such a stove, which is very cheap. And, since the very idea of obtaining a stove from a gas cylinder was caused by the desire to save financial resources through the alternative use of waste material, such a stove will not only save on the shell material, but also constantly save on fuel. Since not only oil is burned, but also its vapors, there is practically no waste from using the furnace. However, due to the high fire hazard and toxicity of the fuel itself, such a stove is not suitable for use in residential areas;
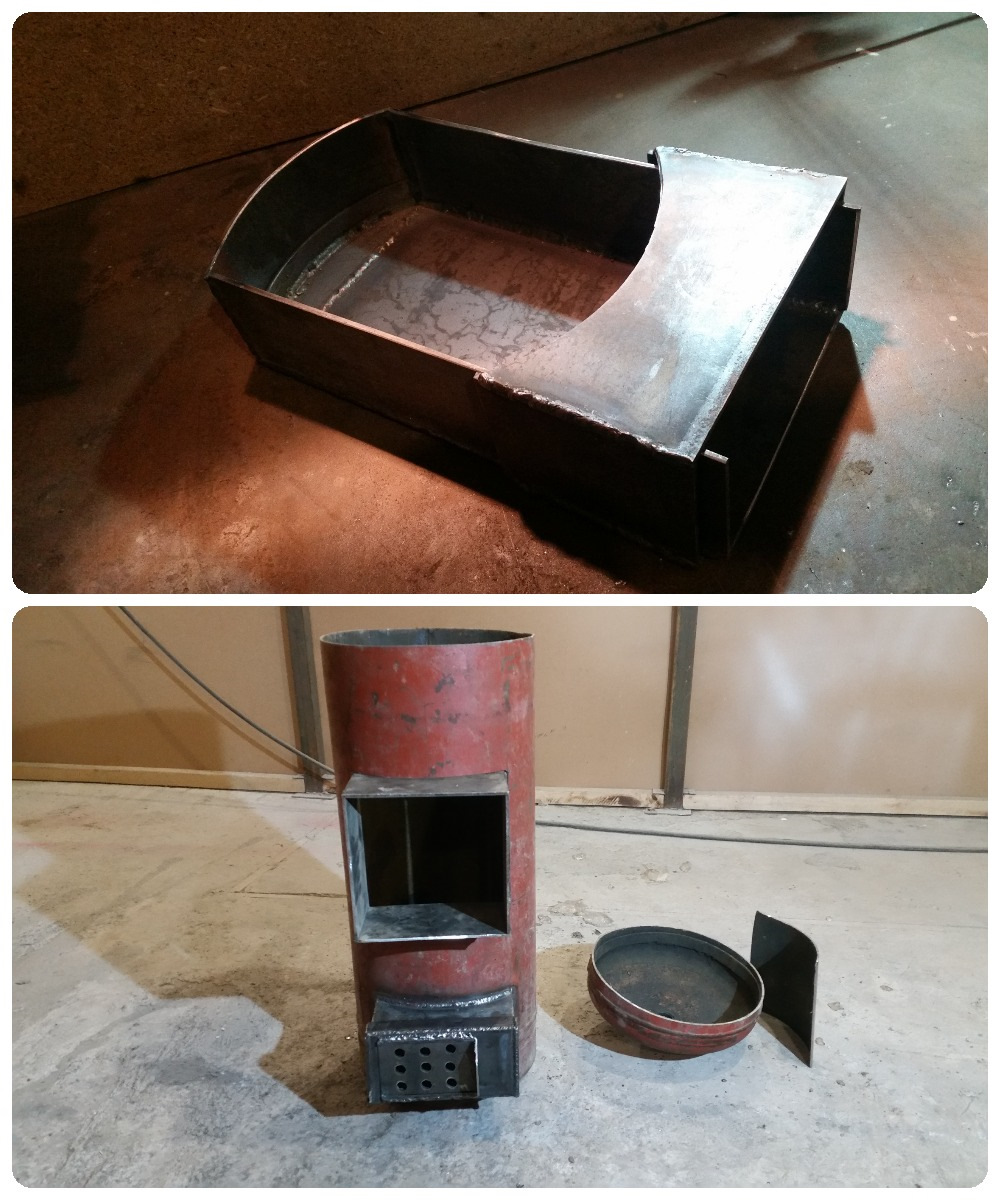
- Rocket oven. Compared to other handicrafts, it is larger and more difficult to manufacture. The advantages include the continuity and duration of burning fuel in it. Does not suffer from long breaks in cold weather. The disadvantages include some inconvenience in regulating the air supply and the difficulty of controlling heat transfer when the furnace is fully heated. A certain complexity of manufacturing such a device can also be considered a disadvantage; in comparison with other home-made stoves, more materials and labor costs will be required here;
- Bubafonya is a long-burning stove.Very simple in execution, in its classic design there are no doors. A certain disadvantage is that before the start of operation it is difficult to determine the optimal size of the gaps through which oxygen is involved in the combustion process; when using certain types of fuel, the pyrolysis gases do not have time to burn out and the stove can begin to smoke heavily. Also, this kind of furnaces, as a rule, have a low initial heat transfer, which is partially offset by the duration of heating after one bookmark.

Waste products are made of durable and high-quality steel, they are often used on the farm as the basis for a variety of fixtures and devices.
The basic principle of the work performed
Do-it-yourself long-burning potbelly stove, like all wood-burning devices, consists of elements such as
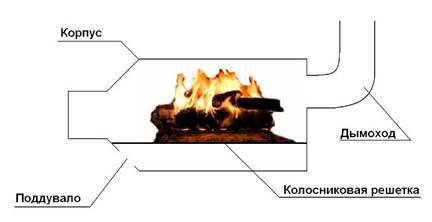
.blowing
2. The furnace, that is, the combustion chamber of the fuel used, located strictly above the blower. This element is part of the channel through which air is supplied. It is separated by special rods, which are known as grates. The firebox must have its own separate door, which is required for fuel loading.

The ignition process, as a rule, is carried out strictly with the door of the furnace part open and with the door of the present blower completely closed. All unburned parts of the fuel usually fall through the grate into the mounted blower. They can also fly out through a special exhaust channel.
3. The chimney is an exhaust duct used to remove combustion products from the furnace.A view is mounted in the body of the chimney, that is, a special wedge-shaped shutter. It is designed initially to completely close the entire exhaust channel. Through it, you can seriously slow down the overall process of efficient fuel combustion, while at the same time increasing the efficiency parameters.
Do-it-yourself stoves made from a gas cylinder usually involve placing two structural elements such as a firebox and a high-quality blower in a metal container case. The flue at this furnace can be mounted separately.
- Such a potbelly stove works based on the following principles:
- The blower supplies air to the furnace part;
- In the firebox, coal or firewood is usually burned;
- Such a part of the furnace as a chimney removes gas and all unburned elements, that is, soot;
- The combustion control process is carried out by means of a throttle valve. It, in turn, is inserted into a short fitting and a special wedge-shaped view, pre-mounted in the body of the chimney;
- Fuel is loaded into a special door embedded in the body of the cylinder.
In fact, everything is relatively simple and clear. It remains just to figure out how to correctly place the furnace part and blower in the cylinder
It is important to understand how to connect a special chimney channel to it. You can find out all this by reading the information below.
Self assembly
Let's see how to make a potbelly stove from a gas cylinder. Our step-by-step instruction will tell you about all the stages of this simple process. First you need to decide on the design - the gas cylinder in the design of the potbelly stove can be located vertically or horizontally.It all depends on the amount of free space you have, but the horizontal arrangement is still more convenient in terms of loading extra-long firewood (and ensuring long-term burning).
Regardless of how the body will be located, the stove itself will consist of three parts:
- The main body - it is also a combustion chamber and a container for ash (the ash pan will be located in the lower part);
- Doors - firewood is loaded through one, and coals and ash are removed through the second;
- Chimney - through it the products of combustion are removed.
Also inside there will be a grate.
A home-made long-burning stove from a gas cylinder is an increased-volume unit. Therefore, you have to find the largest balloon. If the volume is too small, you will have to constantly throw more and more new portions of firewood.
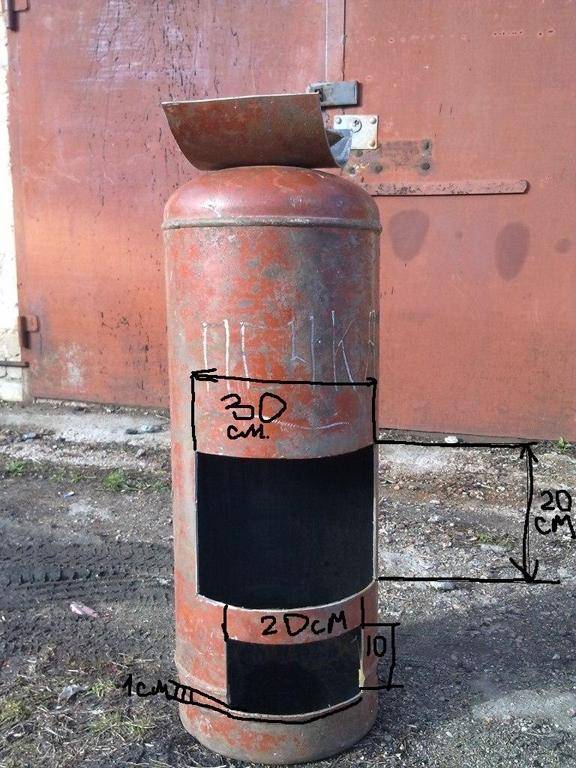
All sizes and indicators are given rather as an example. Depending on your needs, you can make the desired changes based on this drawing.
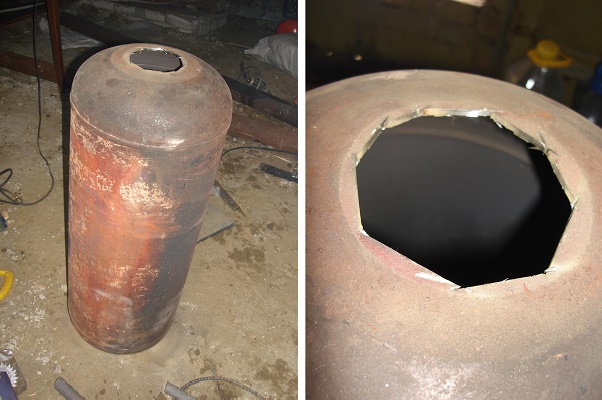
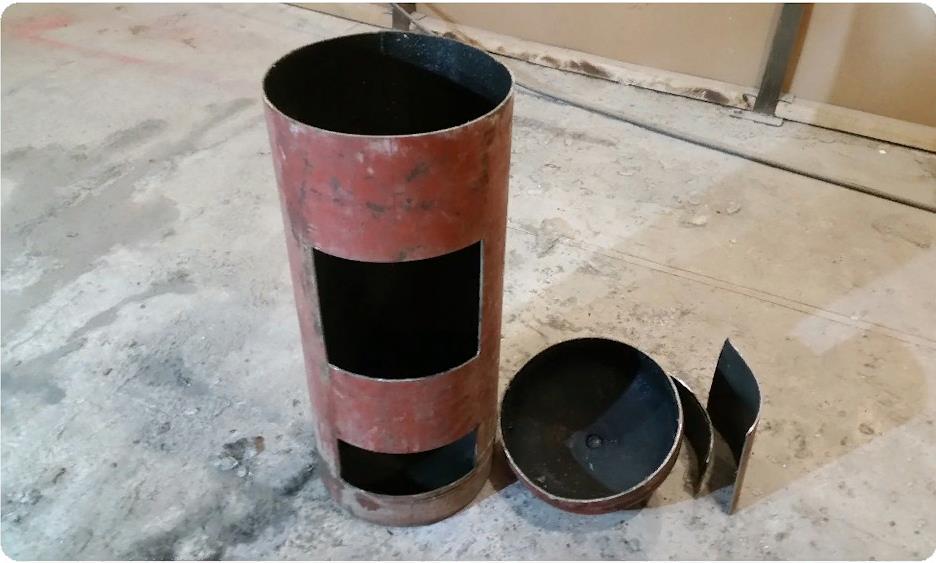
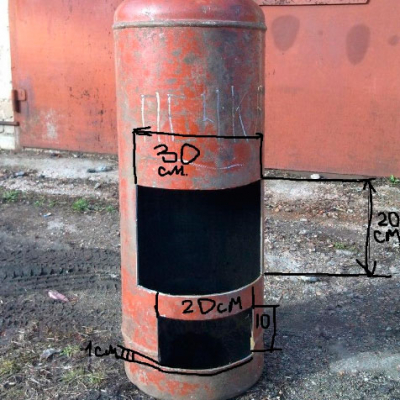
It is possible to make a potbelly stove from a gas cylinder without a drawing - we will use the illustration below as an example. The ash pan door will have dimensions of 20x10 cm, the loading door - 30x20 cm. In order to cut these holes, use an angle grinder (grinder). Cut carefully, as the cut pieces of metal will serve as doors.
Then we carefully cut off the upper part, where the faucet is located - from here the chimney of our potbelly stove will come out. We weld a pipe with a diameter of 70-90 mm and a height of 10 cm here, after which we proceed to weld the grate. The grate itself can be made from pieces of metal or reinforcement. After that, we fix it inside the gas cylinder by welding.
Since you will be working in a confined space inside the gas cylinder, be sure to take safety precautions.
The next step is preparing the legs. For them, the easiest way is to choose a piece of thick reinforcement. We cut the reinforcement into pieces of a suitable length, weld it to the bottom of our potbelly stove. Now we proceed to the installation of doors - simple metal hinges are used for this. Try to weld the doors as carefully as possible to minimize the gaps between them and the body. If necessary, weld pieces of metal around the perimeter for maximum sealing.


Do not forget to weld metal locks to the doors of the potbelly stove from a gas cylinder - it will not be difficult to make them yourself from sheet iron.
Assembling an efficient potbelly stove
It is well known that conventional iron stoves are characterized by low efficiency (about 45%), since a significant part of the heat goes into the chimney along with the flue gases. Our design implements a modern technical solution used in solid fuel boilers - the installation of two partitions on the path of combustion products. Going around them, the gases transfer thermal energy to the walls, which makes the efficiency higher (55-60%), and the potbelly stove is more economical. The principle of operation of the unit reflects the drawing - diagram:
For manufacturing, you will need a sheet of low-carbon steel 4 mm thick, a piece of pipe Ø100 mm and rolled metal for the legs and grate. Now about how to make an economical potbelly stove:
- Cut metal blanks according to the drawing and make openings for the doors of the firebox and ash pan.
- Weld a grate from corners or fittings.
- From the cut parts, make doors with locks.
- Assemble the unit on tacks, and then weld the seams solid. Install the flue pipe and legs.
Advice. The lower partition, strongly heated by the flame, is best made of thicker iron - 5 or 6 mm.
For better heat transfer, craftsmen practice welding additional outer ribs to the body, as is done in the photo.
How is the assembly of the structure with a water jacket
The manufacture of the chimney is carried out in the following sequence of operations:
- Carefully cut the balloon at the top. The lid for the boiler is subsequently made from the resulting cap.
- The bottom of the cylinder is equipped with homemade legs. Before fixing, each of them must be set exactly according to the level.
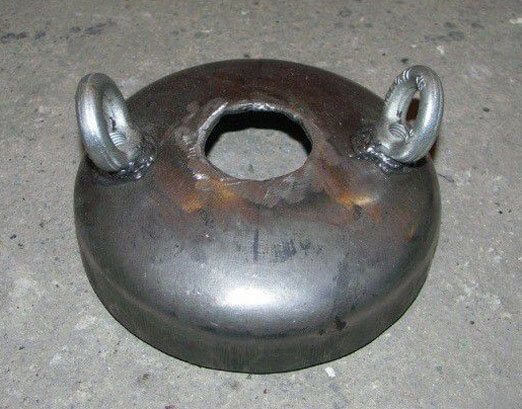
The piston is constructed in three stages:
- A steel circle is cut out: in cross section, it should be inferior to the inner diameter of the cylinder by about 35-45 mm. Thanks to the side gaps, pyrolysis gases will seep into the secondary chamber without interference. In the center of the circle, a hole is made for the air duct: this pipe must be inserted into it tightly enough.
- Next, a metal circle and a pipe are welded to each other.
- A piece of channel is welded over the piston base.
For the manufacture of the furnace cover, you can use the upper cut-off part of the cylinder. On its surface, markings are applied under the duct pipe with a fixed supply piston. In this case, it is necessary to provide a certain margin for the free movement of the pipe. Cutting is carried out along the drawn lines. On the side, a home-made lid is shaped with handles, for which fittings bent in a vice are used.Now you can start installing the chimney at the top of the makeshift pyrolysis oven. With the help of a grinder, a cut is made for the pipe blank: welding is also used to fasten the parts.
On this, the main part of the work on the construction of Bubafoni is considered completed: it can be put into operation. It is desirable to install the furnace on a pre-equipped foundation.
Features and principle of operation
It implements the principle of long-term combustion, based on the physicochemical phenomenon of pyrolysis - the smoldering of fuel with a lack of oxygen and the combustion of the gases released during this. One load of firewood is enough for 4-8 hours of burning.


The pipe has vertical mobility. A massive disk with guides for the gas flow is fixed at its lower end. The chimney is welded to the top of the stove on the side. Firewood is loaded vertically into the oven, the disc presses it against the grate. As the lower layers of the fuel burn, the disc lowers and the combustion air is supplied to the upper layer of the fuel to be pyrolyzed.
Advantages and disadvantages
The advantages of the bubafon top burning stove are as follows:
- High fuel efficiency. Heat does not escape into the chimney.
- Ease of manufacture and operation.
However, the design also has disadvantages:
- It is impossible to replenish the supply of fuel in the stove until it is completely burned.
- It is impossible to interrupt the combustion process.
- When the draft of the sand is reduced, it smokes.
- Not suitable for rapid heating of cold rooms.
Necessary materials for the manufacture of the furnace bubafonya
The necessary materials are the same gas cylinder, grate fittings, a 90-degree branch pipe, a metal pipe a meter and a half long and a heavy disk, slightly smaller in diameter than the inner diameter of the gas cylinder.
Operation features
During operation, it is important to remember the following: Firewood in layers should be of the same length, they should be loaded carefully and evenly, avoiding distortions
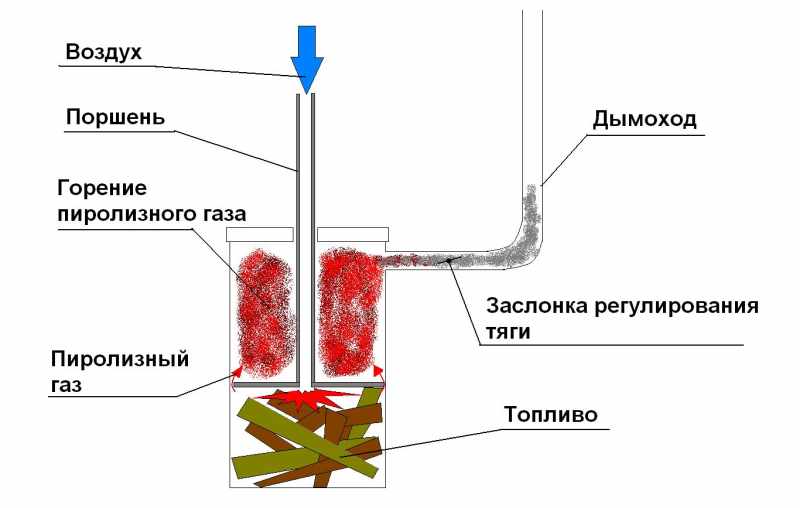
Scheme of a long-burning stove bubafonya
For the initial warm-up and exit to the pyrolysis mode, the stove takes an hour or more, while up to one-fifth of the fuel is consumed
Furnace modernization
Improving the parameters of the furnace is associated with an increase in its heat transfer. For this, additional heat exchange surfaces on the furnace body are used. Such parts can be made from various metal profiles, including strips, angles, profile pipes. The choice of material depends on what is available from the leftovers.
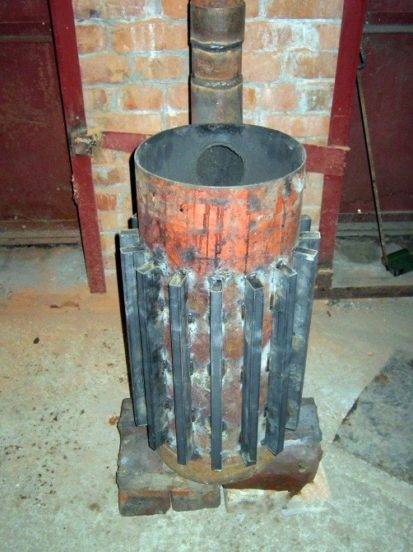
Additional metal profile heat exchangers increase the efficiency of the device
Additional heating surfaces can be installed not only on the outer surface, but also inside the furnace, which allows you to intensively heat the air in the room. The negative result of such a decision will be the burnout of oxygen at high temperatures.