How to make a rotary drilling rig
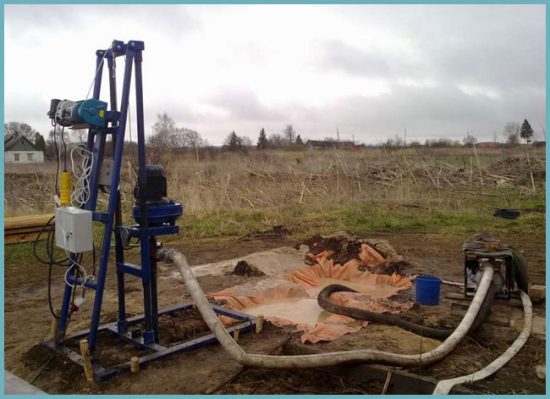
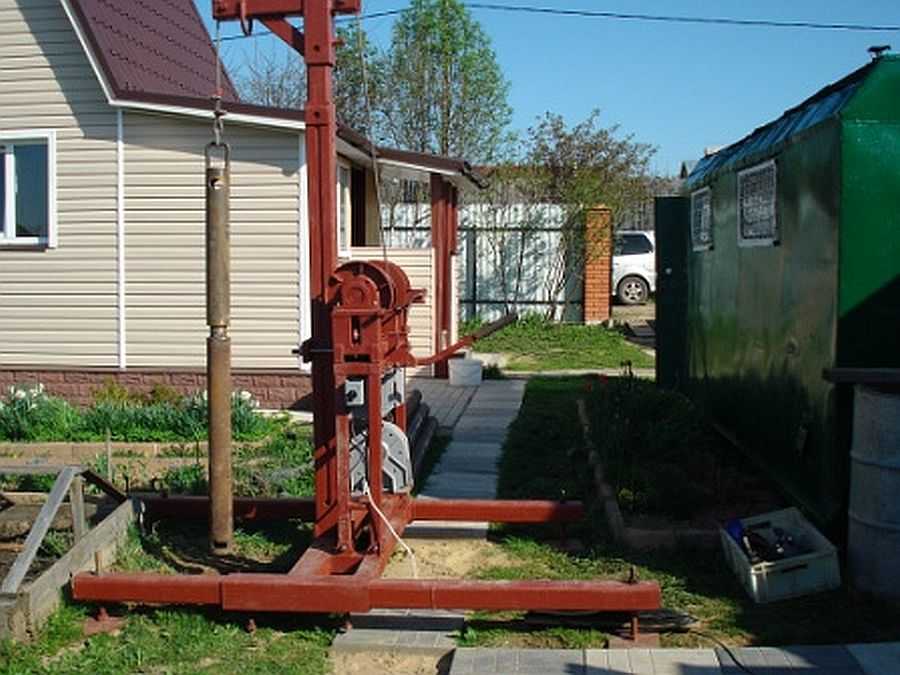
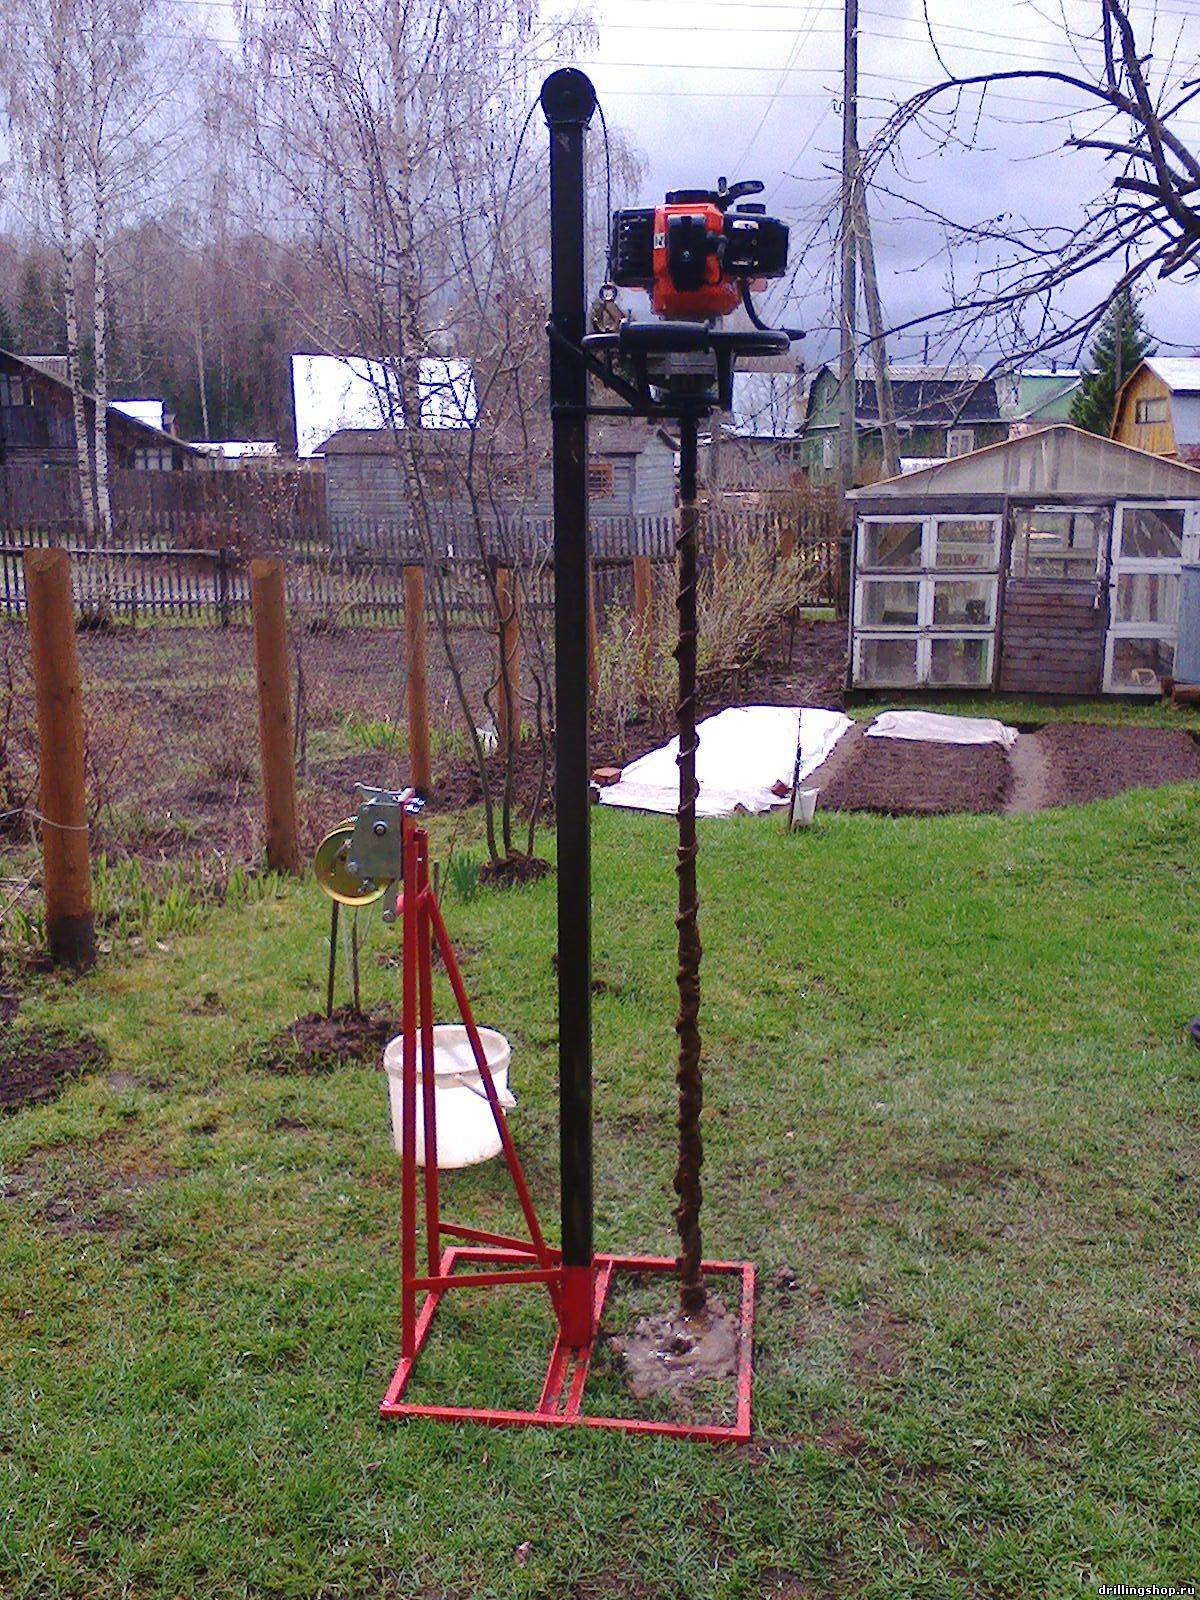
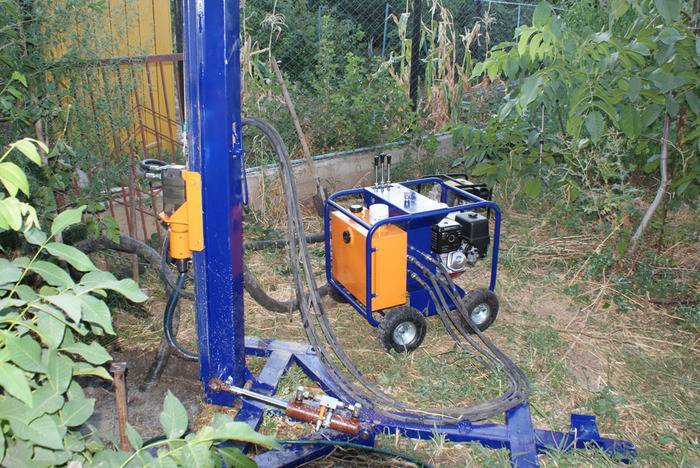
The hydraulic drilling rig must have a frame that allows you to move up / down the motor, to which the drill is connected through a swivel. Water is also supplied through the swivel into the column.
Principles of building a drill
In the manufacture of drilling do-it-yourself installations, the following procedure is recommended:
- First there must be a swivel and rods. If you are not a qualified turner or you do not have one in mind, then these parts are better to buy. In their manufacture, high precision is required, which can be achieved with high qualifications. Moreover, the threads on the swivel and rods must be the same, or an adapter will be required. The thread on the rods is better - a trapezoid, since then few of the turners can make a conical one.
- Buy motor reducer.If the power is from 220 V, then its characteristics are as follows: power 2.2 kW, revolutions - 60-70 per minute (the best: 3MP 31.5 or 3MP 40 or 3MP 50). More powerful ones can only be supplied if there is a power supply of 380 V, and more powerful ones are rarely needed.
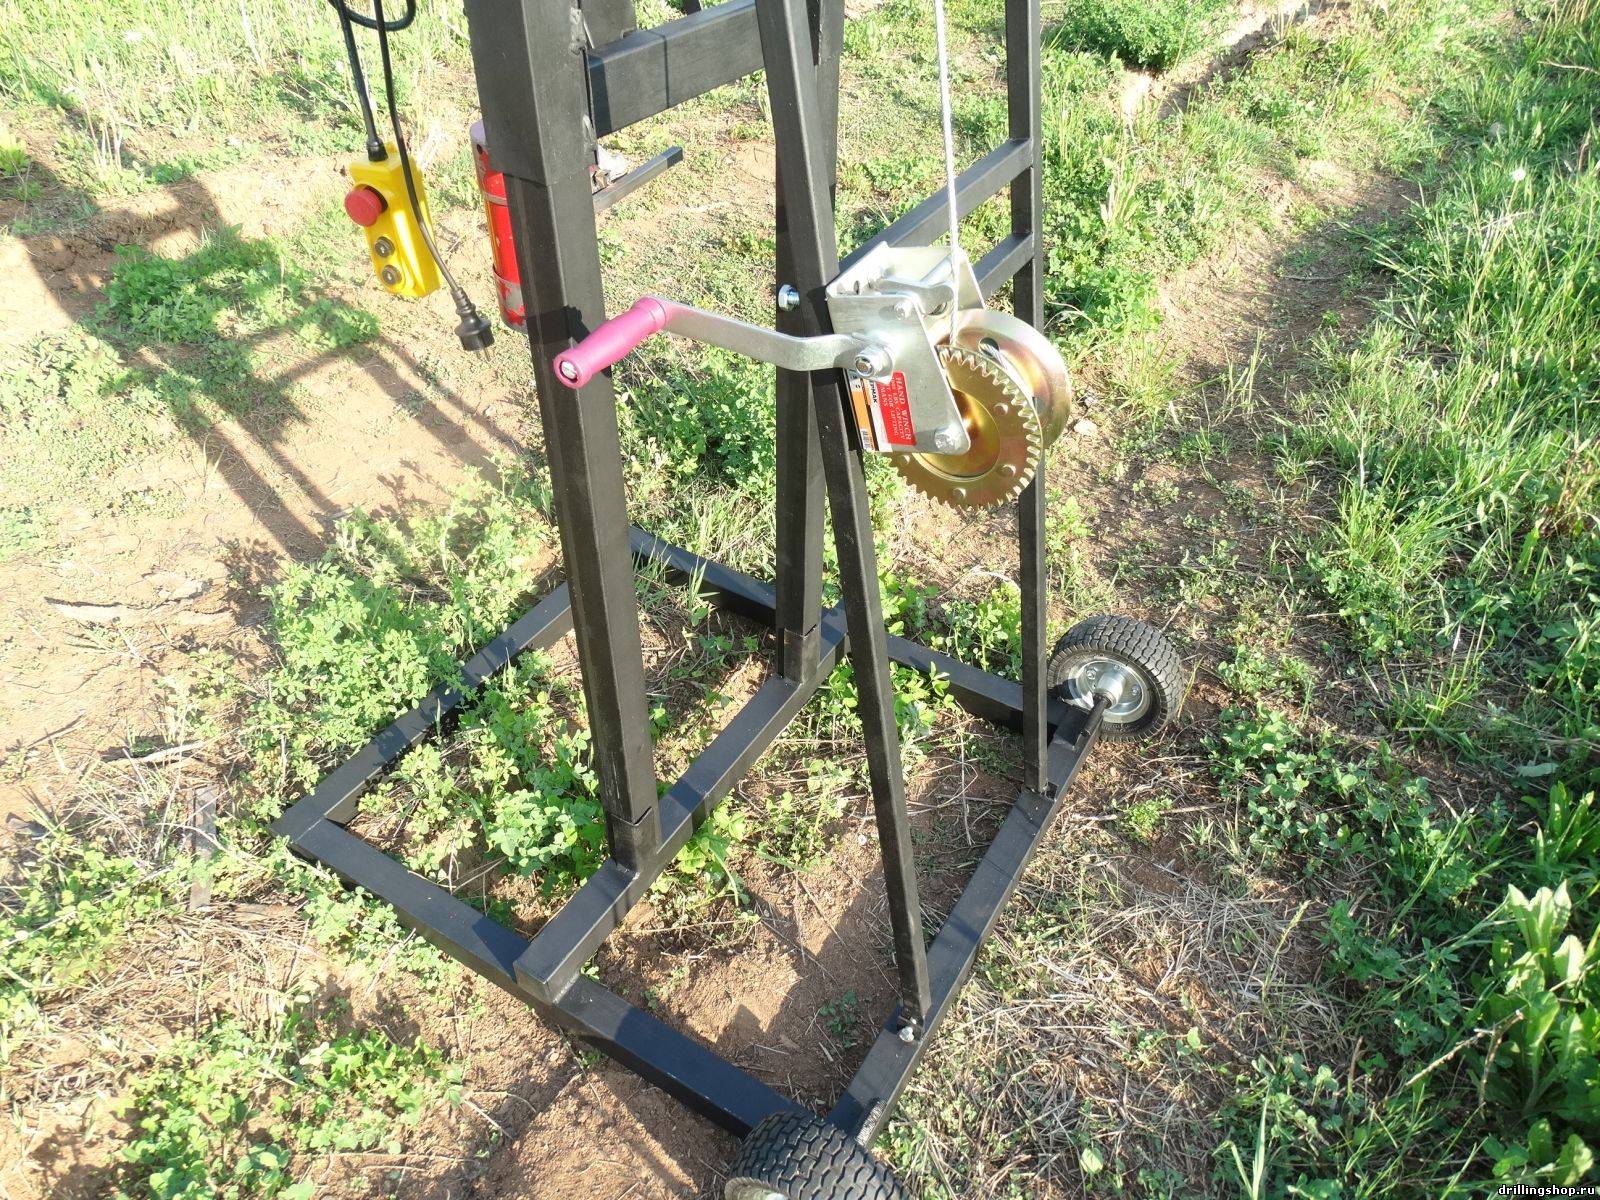
- Buy a winch, it can be manual or electric. The carrying capacity is preferably at least 1 ton (if possible, more is better).
-
When all these components are on hand, you can cook the frame and make a drill. After all, all this equipment is attached to it, and the types of attachment can be different, it is impossible to guess.
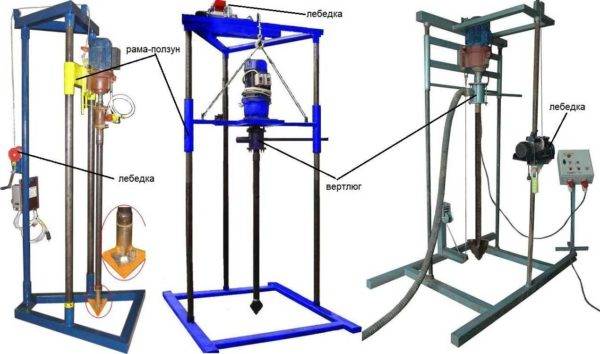
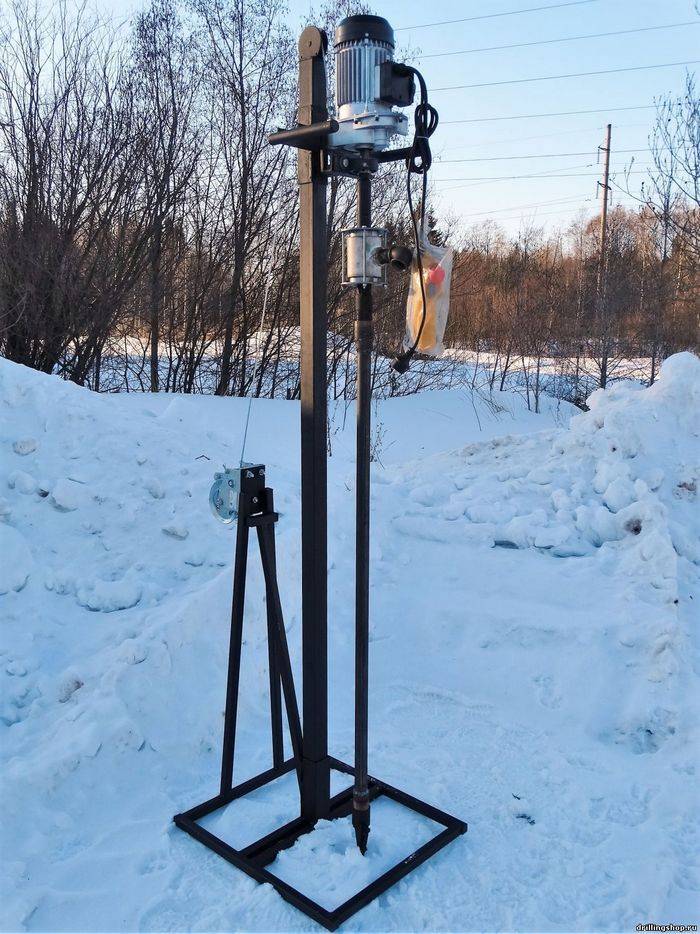
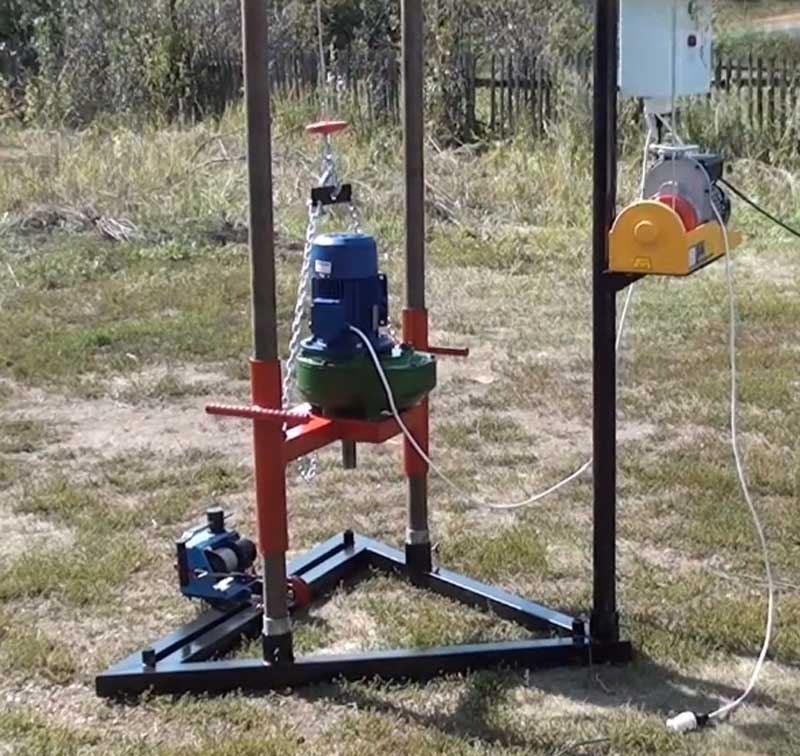
The frame of the mini drilling rig consists of three parts:
- horizontal platform;
- vertical frame;
- movable frame (carriage) on which the motor is fixed.
The base is cooked from a thick-walled pipe - wall thickness 4 mm, minimum - 3.5 mm. Better - from a profiled section of 40 * 40 mm, 50 * 50 mm or so, but a round one is also suitable. In the manufacture of the frame of a small drilling rig, accuracy is not important
It is important to observe the geometry: verticality and horizontality, the same angles of inclination, if necessary. And the sizes are "customized" in fact
First, the lower frame is cooked, measured. Under the available dimensions, a vertical frame is made, and according to its dimensions - a carriage.
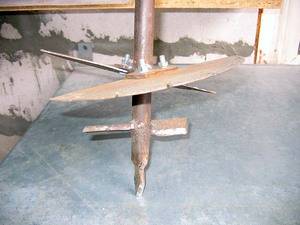
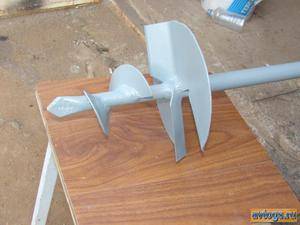
You can make a simple drill fort yourself - they are made from ordinary steel (drawing in the photo below). If you take high-alloy steel, it is difficult to weld it to the rods. For complex and rocky soils, it is better to buy a drill in a specialized campaign - they have a complex shape, there are many different types.
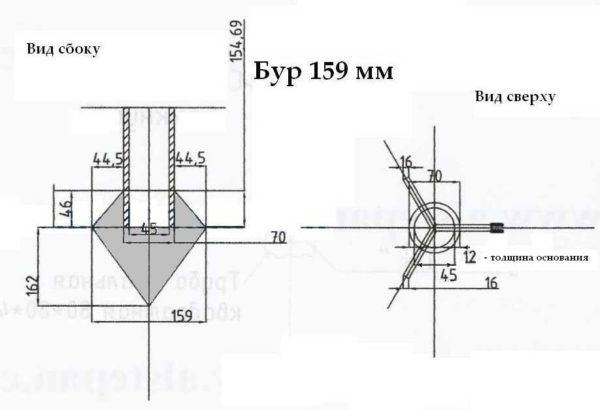
Drill drawing 159 mm
To make it easier to work, connect two remote controls with the possibility of reverse running. One is put on the motor, the second on the winch. That, in fact, is all.
In the design of a drilling rig for rotary or auger drilling, the main thing is a swivel, but it is unrealistic to manufacture it without experience. For those who want do it yourself, lay out a photo and its drawing.
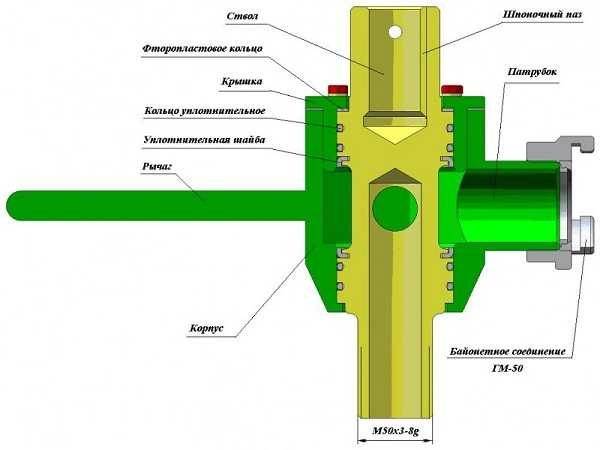
Swivel device for rubble installation
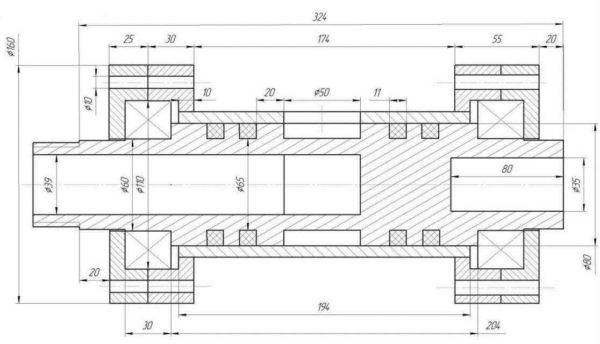
Drawing of a swivel for a small drilling rig


Ways to improve the tool
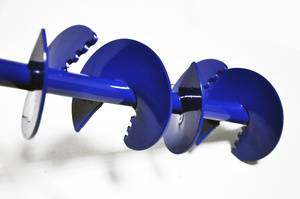
 When drilling holes, the master may encounter a large number of plant rhizomes that are densely embedded in the soil. The sharp edges of the blades make it much easier to work with the drill. For ease of use, you can cut several teeth on the sloping area of \u200b\u200bthe blade or round off its cutting zone.
You can improve the design and make removable cutters for the drill. Thanks to them, it will be possible to drill holes of any diameter. In addition to the manufacture of spare parts, it is necessary to provide for their attachment to the collar. The easiest way is to connect them with two plates of iron, which are fastened by welding.
In the mounting plates, as well as in the blades, you need to drill two holes for the sides. The cutters are fixed with M6 bolts. In order for the bolts not to interfere with work, they must be screwed in with the thread up.
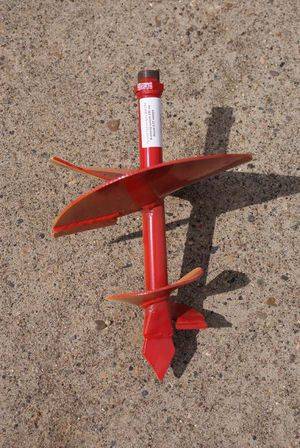
 There is another way to improve a homemade pole drill. You can increase the efficiency of the lower end of the crank. To do this, you need to cut out a narrow metal plate (10 × 2 cm) and grind it in the form of a cone with a grinder, making a kind of point.
It is not necessary to make cuts in the collar; metal turned plates are inserted into its end, fixed by welding and flattened. The end result should be a peak.
There is another method for making pica. A metal plate is cut off about 17 cm long and an auger is made from it, similar to a corkscrew.Further, the algorithm of actions is the same as in the described first option.
 A suitable drill can act as an auger, which can easily cope with wood, as well as metal. Such a tool will enter the ground much easier and will drill a hole to the desired depth without any problems.
Builders who work on dense deep layers of soil will need one piece of advice. Between the peak and the cutter, you need to weld a small flat cutter. Thanks to this design, loosening of the earth and centering during drilling will be possible. For such a part, you will need 2 metal plates 3 × 8 cm. Such a trick will greatly speed up the work with the tool.
Milling cutters can also be made from grinder discs, which are designed to work with stone. Circles need to be cut along the radius and widen the hole in the center, according to the diameter of the collar. The bending of the disc with the dilution of the sides gives a semblance of a corkscrew or screw. It remains only to weld the part in the manner described above.
 The cutter is very easy to make from a circular saw blade. The teeth of this model will very easily cope with the rhizomes of plants and hard soil.
The master can choose the method of upgrading his drill himself. It is worth saying that making a drill for poles with your own hands is not at all a complicated process and requires minimal physical and financial costs from the master. The entire manufacturing process takes about two hours.
Finally, there is one important tip: before the drilling process, it is best to loosen the soil with a shovel, then the device will enter it more easily, and the work will go much faster.The above recommendations will definitely help the master to make a functional and effective tool that will serve him for decades and will become a very good helper.
Varieties of Boers
Homemade drilling rig, depending on the purpose, is equipped with various drills:
- spoon drill;
- coil drill;
- bit.
A spoon drill is used to pass through a layer of plastic soil (a mixture of sand and clay). Usually the drilling tool is made in the form of a spoon. The cutter is placed on the left side, and the transverse protrusion is on the right. Also, the spoon can be made from a conventional steel pipe having a suitable diameter.


The serpentine drill is used to pass dense soils. This tool works on the principle of a corkscrew. The blade of the drill is made in the form of a dovetail. It is formed from hardened steel for increased strength. Making a serpentine drill with your own hands is quite difficult. To do this, you should use the services of professionals.
The chisel is capable of destroying rocky rock
When creating a bit, special attention should be paid to its point angle. From this characteristics depend functionality bura
To resolve stony soils, the angle of sharpening should be 110-125 degrees, soft - 35-70.
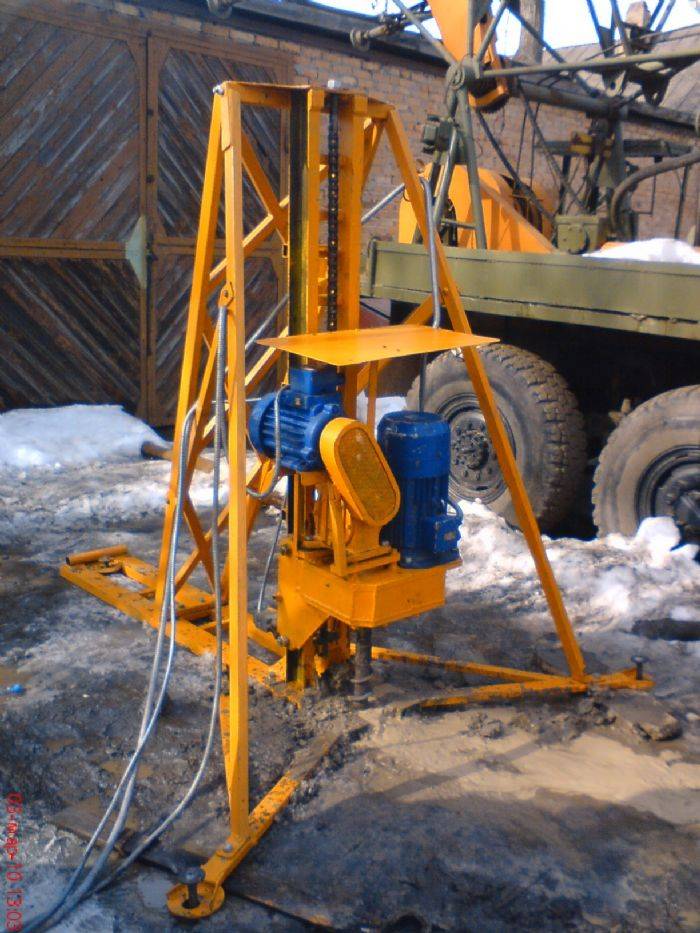
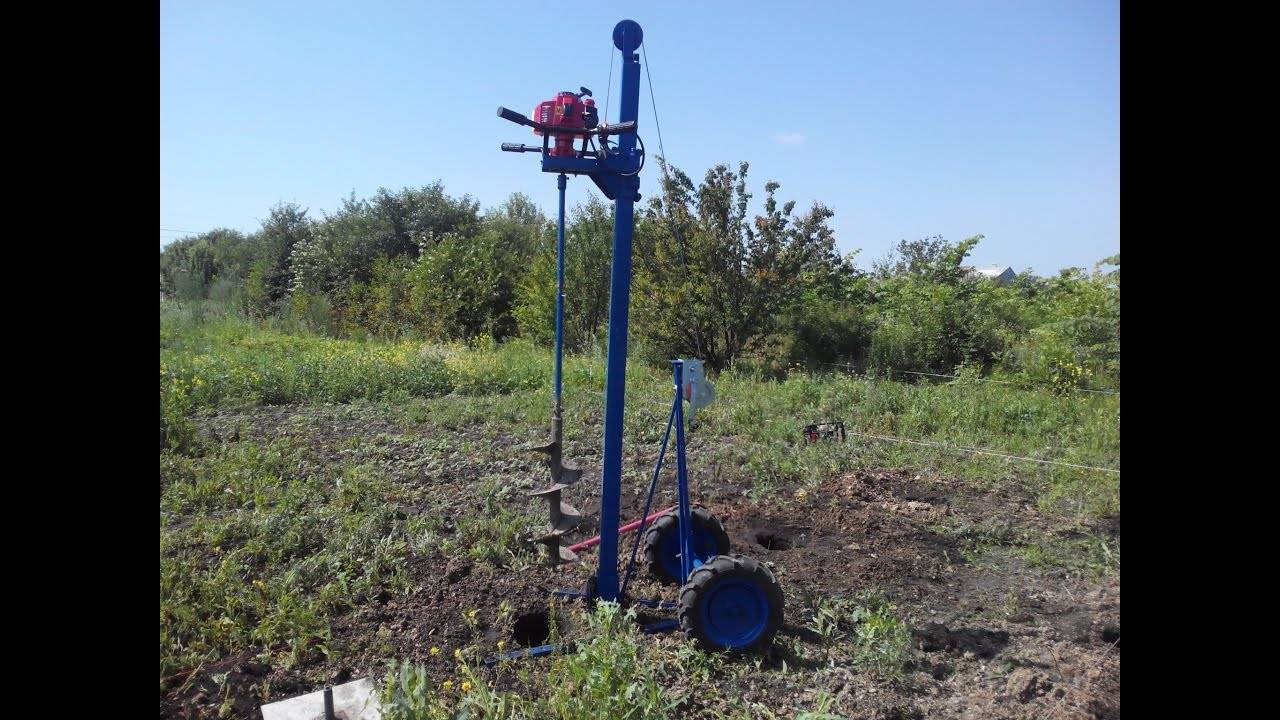
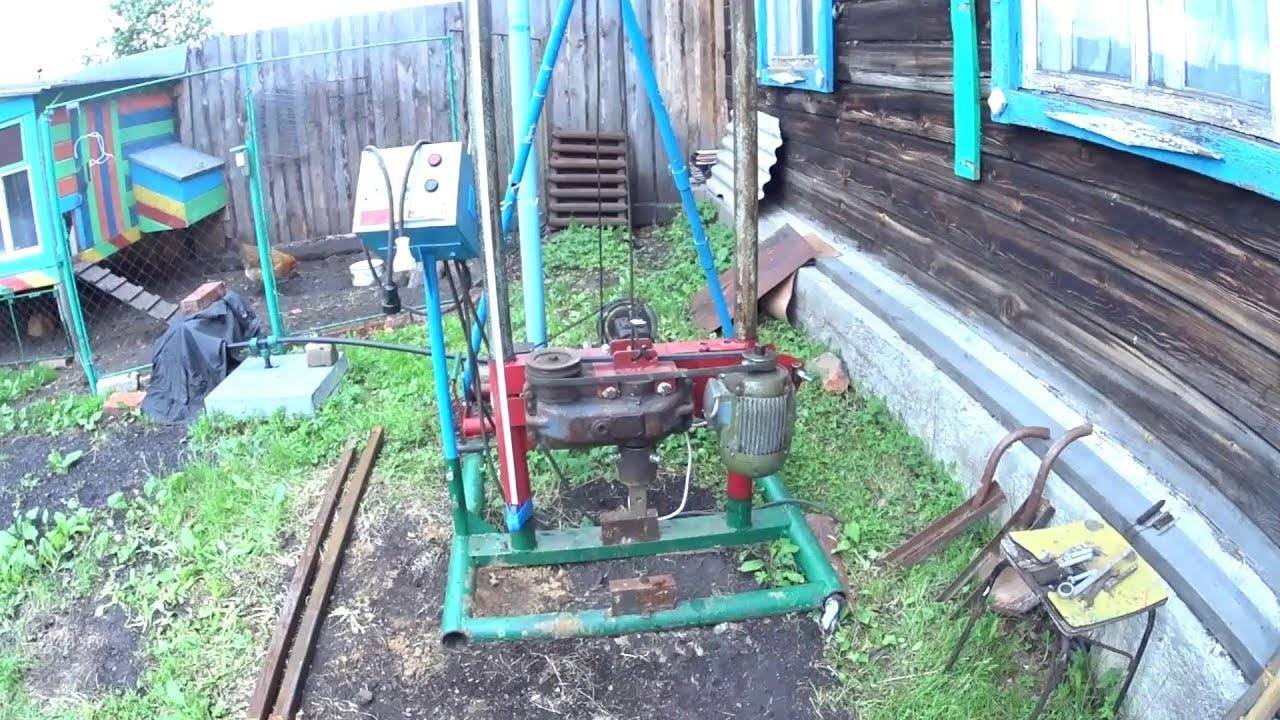
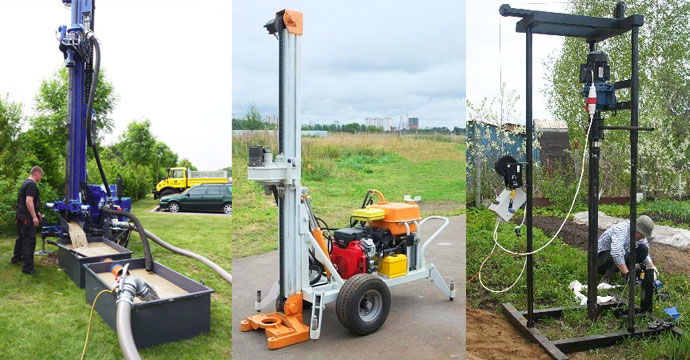
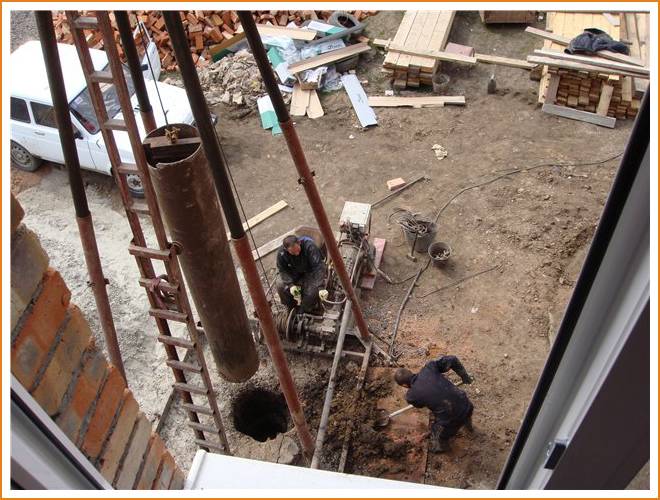
Homemade drilling rig
DIY Drill Rig Assembly Guide
For handwritten drilling rig assembly it is enough to have minimal experience with a welding machine, an electric drill and a grinder.
Prepare the required equipment in advance. You will need:
- tool for creating an external inch thread;
- Bulgarian;
- wrench;
- half an inch galvanized pipe, as well as a squeegee of a similar size;
- plumbing cross.
Prepare everything you need and proceed to do the job in accordance with the step-by-step guide.
First step
Drilling DIY installation
Prepare pipe sections for the manufacture of the main part of the drilling fixture. Pipes will need to be fixed in a spur and a cross. To do this, prepare a two-centimeter thread on the ends of the segments.
Weld pointed metal plates to the ends of several segments. They will act as tips.
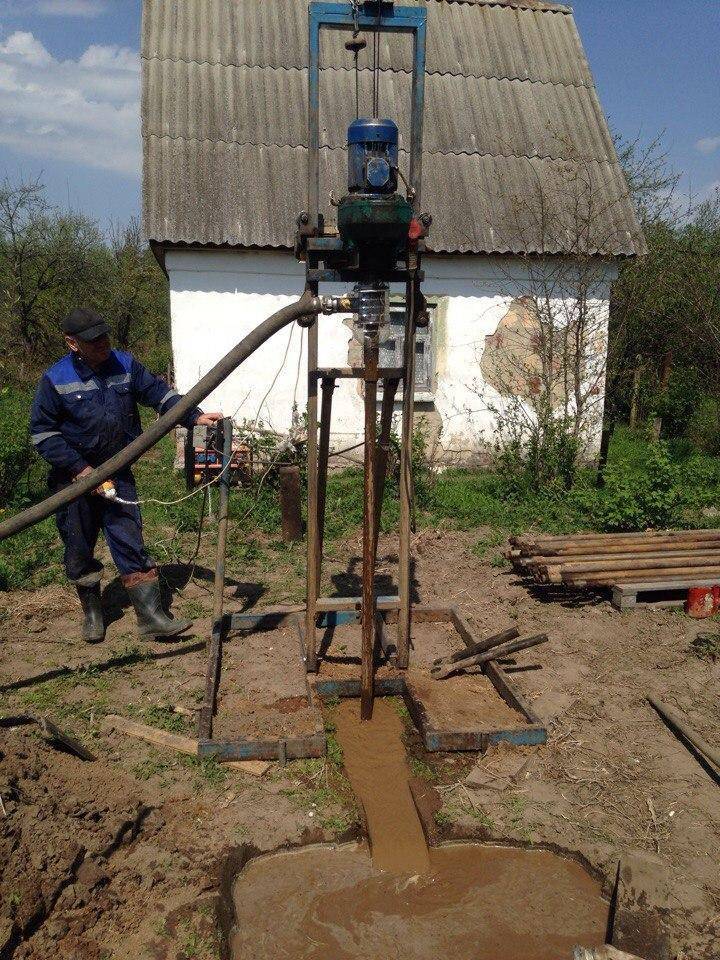
Such an installation involves drilling with a constant supply of water, thanks to which the direct arrangement of the recess and the removal of the soil will be easier.
Do-it-yourself drilling rig
To supply water, connect a water or pump hose to any opening of the cross blank. Connect using a suitable adapter.
Second step
Proceed to connect the structural parts to the threaded connections. Connect a piece of workpiece with an equipped tip to the lower end of your working pipe. Make the connection using a squeegee.
Direct drilling will be carried out by deepening the pointed tip with the rotation of the working installation. Tip blanks should have different lengths. First you use the shortest fixture. After about a meter deep is ready, replace the short tip with a slightly longer one.
Do-it-yourself drilling rig
Third step
Assemble the base of the drilling structure from a square section profile. In this case, the base will be a rack with supporting components of the structure.The supports are connected to the main rack by means of a transition platform by welding.


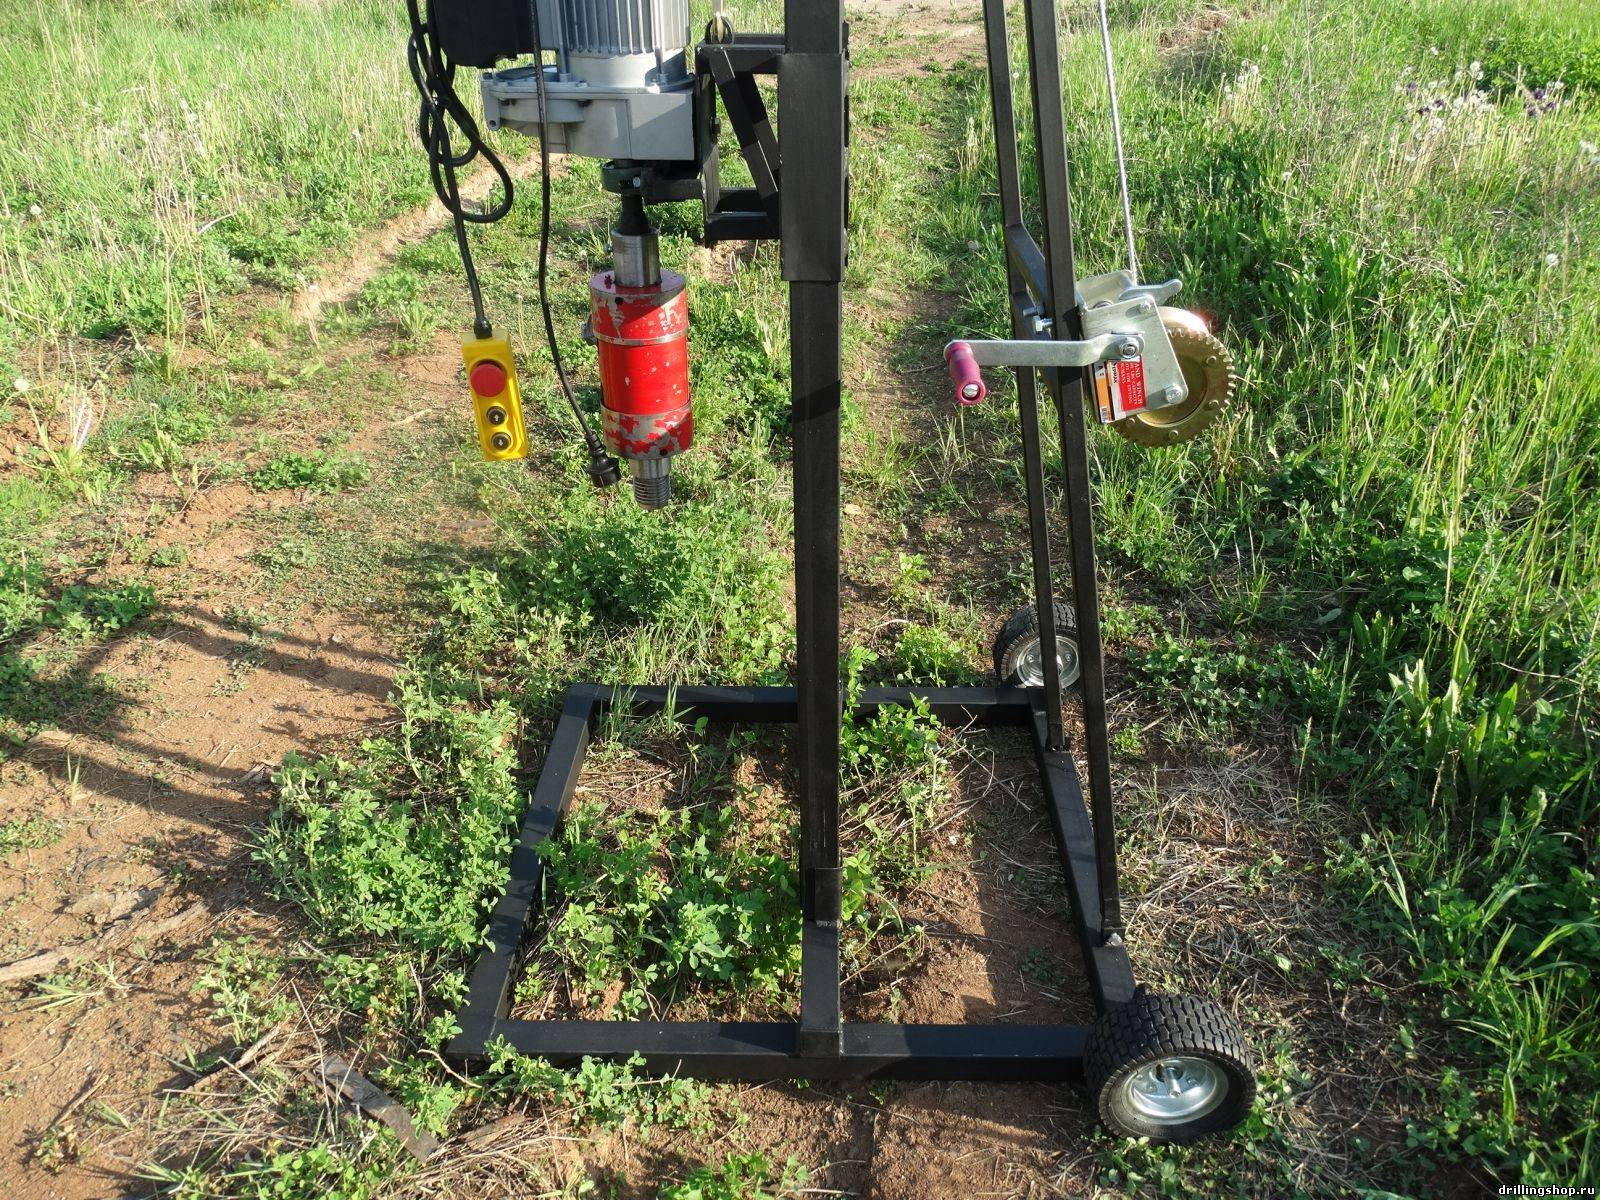
Attach the platform and motor to the square profile. Fix the profile itself to the rack so that it can move along the rack. The dimensions of the profile used should slightly exceed the dimensions of the rack.
Do-it-yourself drilling rig
When choosing an electric motor, be sure to pay attention to its power rating. A 0.5 horsepower motor will suffice to ensure optimal drilling conditions
Do-it-yourself drilling rig
Do-it-yourself drilling rig
Do-it-yourself drilling rig
Do-it-yourself drilling rig
Power regulation is carried out using a gearbox. A flange must be attached to the gearbox shaft. Attach another flange to the flange with bolts. There should be a rubber washer between these two flanges. Thanks to the rubber gasket, shock loads that appear when passing through different types of soil will be smoothed out.
Fourth step
Connect water. Fluid must be continuously supplied to the main working tool by means of a drill. Without a properly organized water supply, the quality of the equipment will decrease.
The problem mentioned above can be solved by installing a special device made of steel pipe below the flanges. Prepare 2 holes in the pipe section with some shift in relation to each other.
Next, you need to make a groove on both end sides of the pipe for arranging ball bearings. You must also prepare an inch thread.At one end, the pipe is connected to the flange, and working elements will be installed at its other end.
In order to create additional moisture insulation of the created device, place it in a special polypropylene tee. Connect an adapter to the middle of this tee to connect the water supply hose.
Advantages of self-drilling
Manual drilling with self-made fixtures has the following advantages over automatic penetration methods using special drilling equipment by individuals and organizations:
Cheapness. Making a drill with your own hands from improvised materials and drilling a well without the involvement of third-party assistants, specialists, organizations is the most profitable option from a financial point of view, if other ways of employment in your free time do not bring cash income.
Versatility. Independent drilling by hand is universal due to the following features:
- Manual drilling in many situations is the only possible option for carrying out work if it is impossible to enter the site of special equipment or the well is located in a built room.
- Narrow borehole channels are laid manually without the use of casing strings of standard diameter, which significantly reduces the cost of organizing and arranging water supply at an individual site.
- Manual drilling is carried out to a depth of 5 to 35 m, which corresponds to the characteristics of the Abyssinian and sand wells.
- The made drill can be used for other economic purposes, if it is necessary to make holes in the ground - when constructing fences, planting garden plants, installing pile foundations and other household work.As unnecessary, the structure can always be disassembled and used on the farm at your discretion.
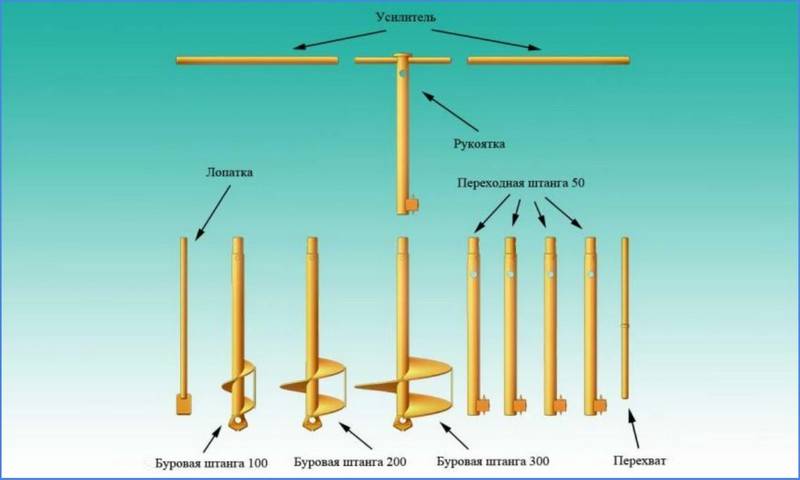 Prefabricated manual twist drill kit


Flexibility of application. Depending on the depth of the water reservoir, the quality of the soil and the dimensional parameters of the borehole channel, various drilling technologies, designs of drilling devices, or combinations thereof are used. With individual production, it is always possible, through experiments, to independently make a drill for a well, the most convenient and effective for specific conditions.
Work can be carried out at any time convenient for the owner, without reference to the season, time of day, weather, hired specialists or organizations. If electricity is not supplied to the area to be equipped, it is possible to drill wells manually mechanically without its presence.
Of course, for the cheapness of the manual method, you will have to pay for the speed of work and intensive physical labor, the latter are to some extent useful in terms of improving health.
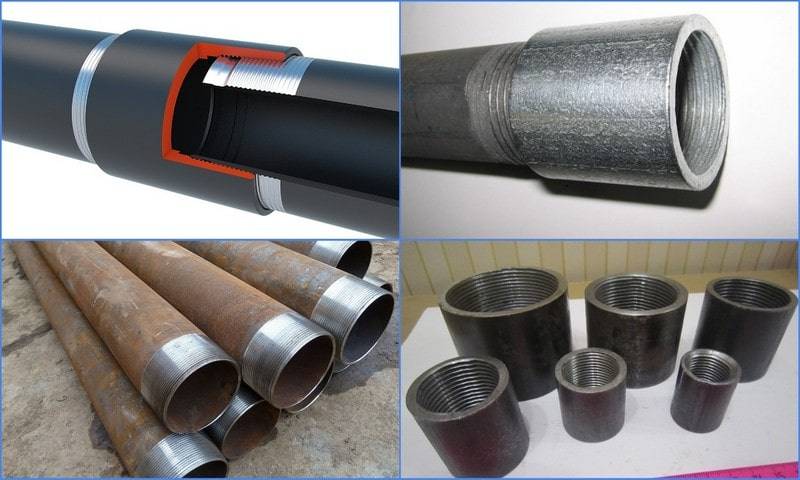 Pipes and couplings for threaded connection
Making an impact drill
Before you make a drill for a well with your own hands, you should carefully familiarize yourself with the principles of impact technology. There are two working options:
- Driving rod with a spear-shaped tip. It is used for the device of the Abyssinian wells.
- Hollow chisel-bailer made from massive pipe cutting.
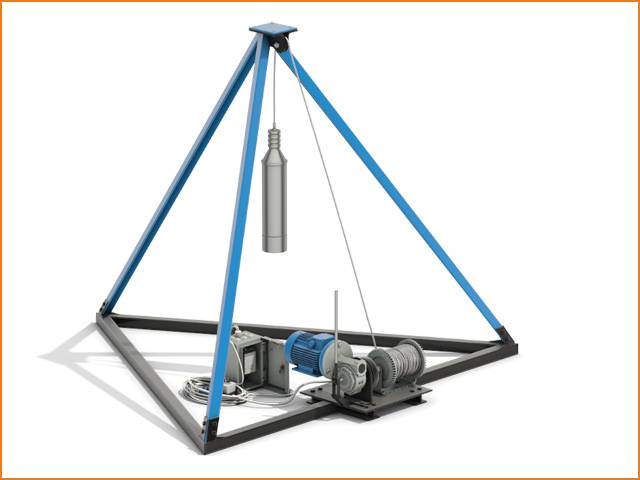
The principle of operation of these devices is also different. The driving rod is deepened into the ground by means of vertical blows on its upper end with a hammer-copra, or simply with a massive sledgehammer. The chisel itself acts as a percussion mechanism.It rises to a certain height, after which it drops down. For ease of use of percussion devices, they are placed on the frame in the form of a tripod or rectangle.
Barbell
The bed is made of metal pipes or corners. The recommended height of the structure should be at least 3-4m so that the hammer or chisel in free fall can gain sufficient speed for deepening. The parts of the frame are fastened by electric welding, or by bolting. The first option is simpler, but after drilling is completed, the structure will have to be cut into pieces.
It does not really matter if you are not going to use this drilling device in the future. If you intend to continue to use this mechanism, then it is better, having spent a little more time and effort, to connect the frame elements with bolts. The collapsible option will allow you to transport the drilling tool, as well as simplify its storage.
At the top of the bed we fix the blocks through which the cables will be thrown. These cables lift up the impact part of the created drilling rig - a hammer-copra or a chisel. Lifting is carried out either directly by hands or with the help of a gate. The latter option is best used when the mass of the impactor is very high and it is difficult to lift it by hand.
Next, we proceed to the manufacture of the percussion element. To drive an Abyssinian well, it can be just a massive piece of metal suspended on a frame using a block system. It acts on the principle of a hammer: falling from a height, it hits the top of the driven rod, deepening it into the soil.The bailer itself acts both as a shock element and as a recessed part of the machine.
Bailer
To make a bailer, you will need a piece of heavy pipe with a diameter of 10-12 cm and a length of up to 1.5 m. The mass of the workpiece should be approximately 50-80kg. Such a weight will allow you to easily lift the chisel with the help of the muscular strength of one or two people. And at the same time, the chisel turns out to be massive enough to sink into the ground when falling from a height of 3-4m.
How to drill wells?
The passage to the aquifer lying in shallow water can be done by hand using one of three types of drilling:
- manual;
- shock-rope;
- shock.
The method of making the well is selected depending on the type of soil and the depth of the passage.
Manual well drilling

If additional equipment, a drilling tripod (tower) and a system of blocks are not used, a “well” can be drilled to a depth of up to 20 m.
Drilling technology:
- A tripod is installed on the selected passage area. The height of the tower should be 1-2 m higher than the length of the drill rod section.
- A shovel makes a recess for one or two bayonets for centering and guiding the passage of the cutting edge of the drill.
- To deepen the drill at a depth of more than one meter, you will need the help of a partner. One person is not able to continue drilling under the piles.
- If there are difficulties with the removal of the drill from the hole, it is necessary to turn it in the opposite direction of drilling by 2 - 3 turns and remove it.
- Every 500 mm of deepening, it is necessary to remove the drill and clean it from the soil.
- The drilling process is repeated until the handle of the drilling rig reaches ground level.
- The drill rod is taken along with the drill and extended with an additional section.
- All operations are repeated until you break through to the aquifer. This is determined by the type of soil being extracted.
- After reaching the reservoir with water, you need to continue drilling to a solid (water-resistant) layer. This will fill the well with the maximum volume of water.
- Pumping of water containing soil can be carried out using a pump of a manual or submersible type.
- After pumping out 3 - 4 buckets of muddy water, clean water should appear. If clear water has not gone, then it is necessary to increase the depth of the working by 1.5 - 2 meters.
Tip: Use the rig's design options to excavate as much soil as possible, as this is a time-consuming operation.


Tools:
- tripod;
- Boer;
- hoses for pumping water;
- composite drill rod;
- pump or pump.
Percussion drilling
A well made by this drilling method has a long service life of 80 years or more, an increased supply and inflow of water. The process of work consists in the destruction and grinding of the rock in a closed cycle with a special impactor.
Drilling process:
- The drilling rig is placed above the point for deepening the driving glass (chute, drill bit).
- A guide recess is made for the passage of the slope.
- The punching of the first meter of the well can be done manually.
- Next, a guide is installed, in the form of a steel pipe of a larger diameter than the diameter of the glass.
- The slope is thrown into the pipe by releasing the winch upon impact, the soil is destroyed and crushed, thereby filling the glass. The presence of a special valve prevents the soil from spilling out of the projectile.
- After that, the glass rises and the broken soil is excavated.
- The cycle repeats again until you reach the aquifer.
This method of drilling is laborious and lasts up to several weeks. Therefore, it is better to use it for drilling wells on the following types of soil:
- clay;
- on loams;
- on soft (watered) soil;
percussive drilling
The principle of shock passage as shock-rope. The difference is that the bits for drilling are in the face and the blow is carried out on them with the help of a striker. In this way, you can go to depths of more than 100 m.
Drilling can be carried out on many types of soils:
- soft ground - a wedge-shaped chisel is used;
- viscous soil - an I-shaped chisel;
- hard rocks - cross shape of the bit;
- boulders - a pyramidal shape of a chisel.
How drilling works:
- a drilling rig is installed;
- a chisel is inserted into the face, selected for a certain soil;
- a projectile descends, weight from 500 to 2500 kg, from a height of 300 to 1000 mm;
- after the impact, the soil splits, the chisel burrows into the soil;
- the projectile rises and the cycle repeats;
- cycle frequency - 45 - 60 beats / min.;
- after passing every 200 - 600 mm, the bit is removed from the face and cleared of the ground.


