- Other models of drilling rigs
- Drilling rig with "cartridge"
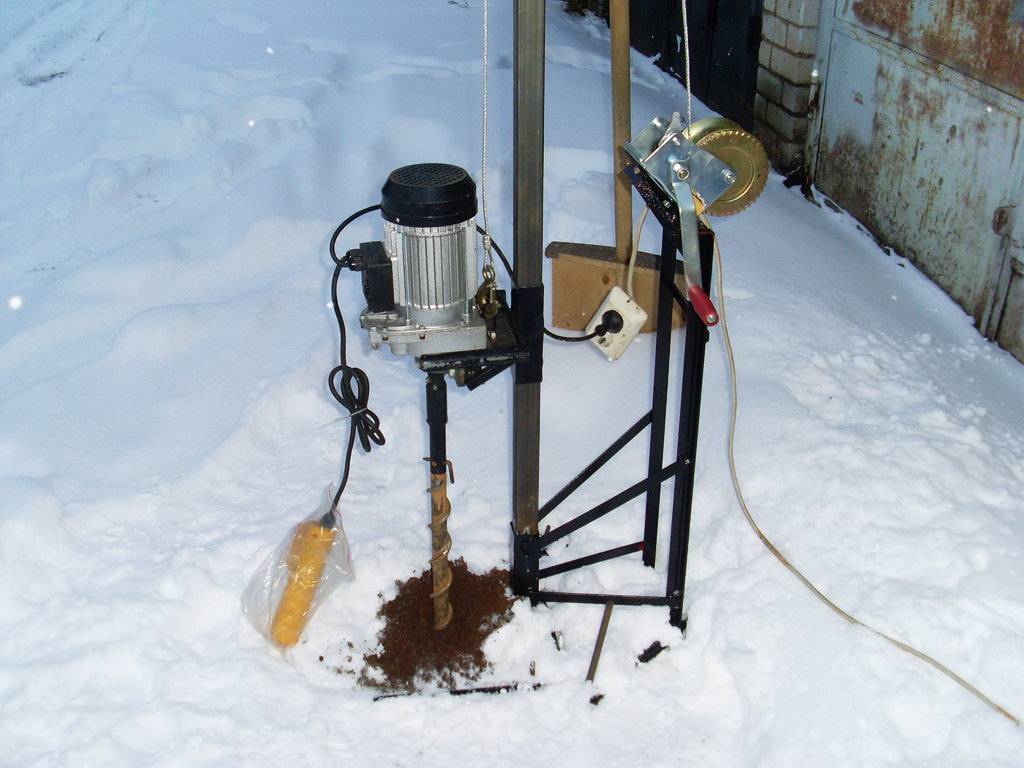
- Simple screw installation
- Making a drill spoon
- Video: How to work with a hand drill
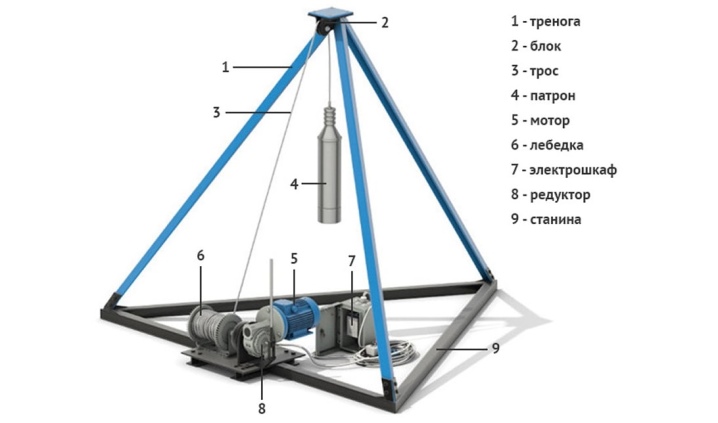
- MGBU for percussion drilling
- Spoon drill
- The process of making a spoon drill
- Other models of drilling rigs
- Drilling rig with "cartridge"
- Simple screw installation
- Drill for shock-rope drilling
- Advantages of a homemade installation
- Let's start drilling
- Abyssinian
- Well on the sand
- Artesian
- The easy way
- "EAST"
- Advantages of the drilling rig:
- Drawing set:
Other models of drilling rigs
In general, the assembly process of most of the existing varieties of drilling rigs remains the same. The frame and other elements of the structure under consideration are prepared in a similar way. Only the main working tool of the mechanism can change.
Read the information on the manufacture of various types of installations, make a suitable working tool, and then attach it to the support frame and connect it to other required elements using the recommendations from the instructions discussed above.
Drilling rig with "cartridge"
Drilling rig with "cartridge"
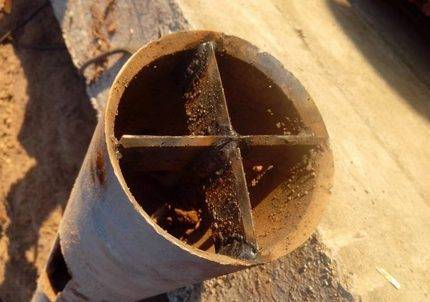
The main working element of such a unit is a cartridge (glass).You can independently make such a cartridge from a thick-walled pipe with a diameter of 100-120 mm. The optimal length of the working tool is 100-200 cm. Otherwise, be guided by the situation. When choosing the dimensions of the support frame, you will have to take into account the dimensions of the cartridge. Think over everything so that in the future it will be convenient for you to use the finished drilling rig.
The working tool should have as much weight as possible. From the bottom of the pipe section, make triangular points. Thanks to them, the soil will loosen more intensively and quickly.

Do-it-yourself drilling rig
If you wish, you can leave the bottom of the workpiece even, but it will need to be sharpened.
Poke some holes in the top of the glass for attaching the rope.
Attach the chuck to the support frame using a strong cable. Choose the length of the cable so that in the future the cartridge can freely rise and fall down. When doing this, be sure to take into account the planned depth of the source.
To increase the efficiency of excavation, you can connect the assembled unit to an electric motor. The cable with the cartridge in such a situation will be wound on the gearbox drum.
It is possible to ensure the cleaning of the bottom from the soil by including a bailer in the structure.
Using such an installation is very simple: you first manually create a recess in the drilling site with a diameter greater than the diameter of the working cartridge, and then begin to alternately raise and lower the cartridge into the hole until the required depth is reached.
Simple screw installation
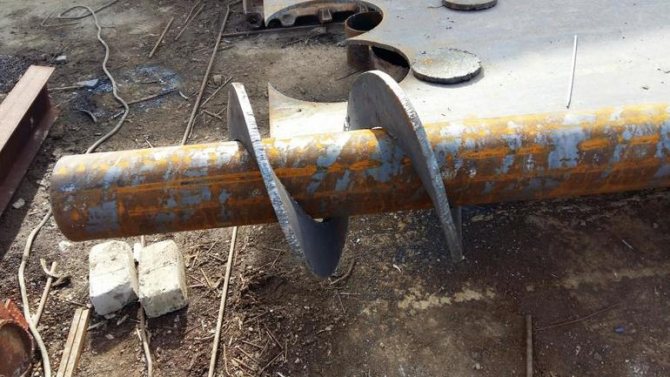
Homemade auger
The main working element of such a mechanism is the drill.
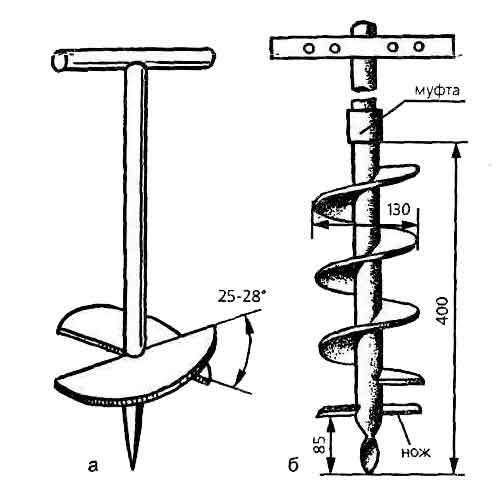
Drilling auger drawing
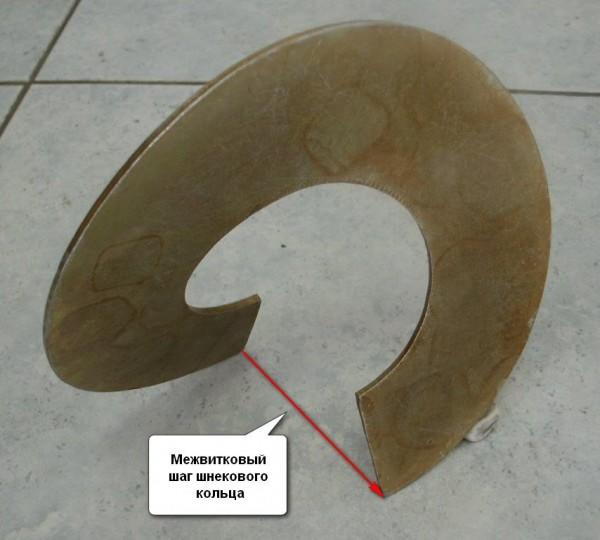
Diagram of an interturn screw ring
Make a drill from a metal pipe with a diameter of 100 mm. Make a screw thread on the top of the workpiece, and equip an auger drill on the opposite side of the pipe. The optimal drill diameter for a homemade unit is about 200 mm. A couple of turns is enough.
Drill disc separation scheme
Attach a pair of metal knives to the ends of the workpiece by welding. You must fix them in such a way that at the time of the vertical placement of the installation, the knives are located at a certain angle to the soil.
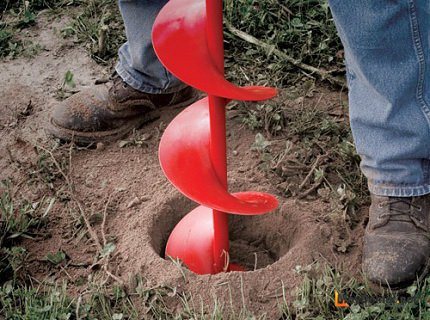
Auger drill
To work with such an installation was most convenient, connect a piece of metal pipe 1.5 m long to the tee. Fix it by welding.
Inside the tee must be equipped with a screw thread. Screw the tee itself onto a piece of a collapsible one and a half meter rod.
It is most convenient to use such an installation together - each worker will be able to take on a one and a half meter pipe.
Drilling is performed in the following order:
- the working tool goes deep into the ground;
- 3 turns are made with a drill;
- loosened soil is removed and removed.
Method of drilling a well for water using an auger
Repeat the cycle until you reach about a meter deepening. After the bar will have to be lengthened with an additional piece of metal pipe. A coupling is used to fasten pipes.


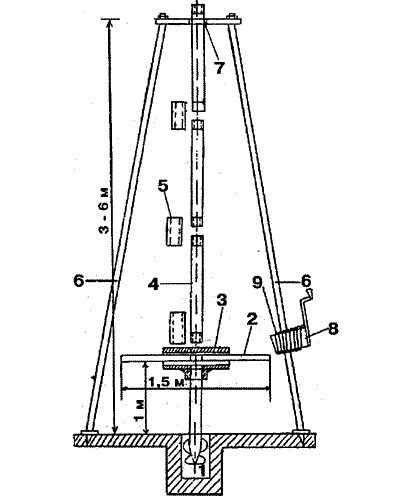
If it is planned to build a well deeper than 800 cm, fix the structure on a tripod. At the top of such a tower there should be a hole large enough for the unhindered movement of the rod.
In the process of drilling, the rod will need to be periodically increased. With an increase in the length of the tool, the mass of the structure will also increase significantly, it will become very difficult to manage it manually.For convenient lifting of the mechanism, use a winch made of metal or durable wood.
Now you know in what order simple drilling rigs are assembled and how to use such units. The knowledge gained will help you significantly save on the services of third-party drillers.
Successful work!
Making a drill spoon
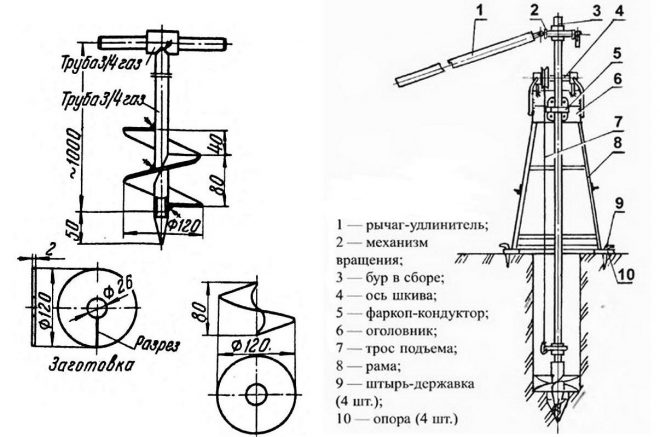
Such a tool is suitable for work on soil resistant to shedding. A hand drill consists of a rod with a handle and a cylindrical spoon with a longitudinal slot in the side.
The length of the small-scale mechanization tool is 70 cm. The diameter of the device depends on the size of the intended recess in the ground. The soil, extracted from a well, enters the cylinder through the slot and lingers there due to sticking and tamping. If the soil is dense, you can make a fairly wide inlet. The looser the earth, the narrower the slot will be.
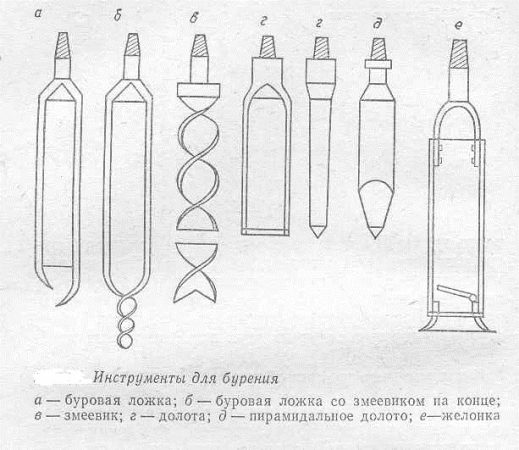
Detailed drill manufacturing
There are three ways to make such a drill with your own hands:
- based on a metal pipe;
- from an old cylinder;
- by rolling and welding steel sheet.
A simplified version of the drill spoon The method with sheet steel is more laborious - it will require skillful welding to create the rod and secure the tip. At one end of the finished cylinder, cuts are made with a grinder, then the metal is bent and the edges are sharpened. Sometimes cutting blades are welded on instead. Then a cut is made in the bottom of the cylinder.
The spoon is welded to the bar at a right angle. For easy entry into the soil, a metal drill tip can be attached to the carrier rod.
In addition to the manufacturing technology of a drill of any kind, you need to know the rules for caring for such a tool.After completing excavation, be sure to clean the knives from adhering earth. Store such devices in dry rooms.
Video: How to work with a hand drill
A selection of questions
- Mikhail, Lipetsk — What discs for metal cutting should be used?
- Ivan, Moscow — What is the GOST of metal-rolled sheet steel?
- Maksim, Tver — What are the best racks for storing rolled metal products?
- Vladimir, Novosibirsk — What does ultrasonic processing of metals mean without the use of abrasive substances?
- Valery, Moscow — How to forge a knife from a bearing with your own hands?
- Stanislav, Voronezh — What equipment is used for the production of galvanized steel air ducts?
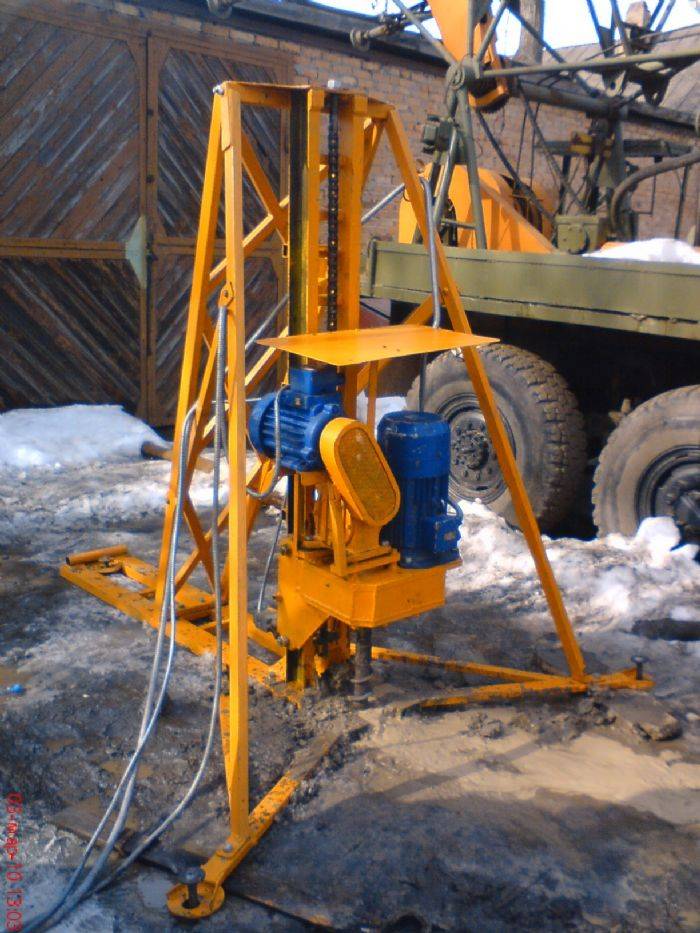
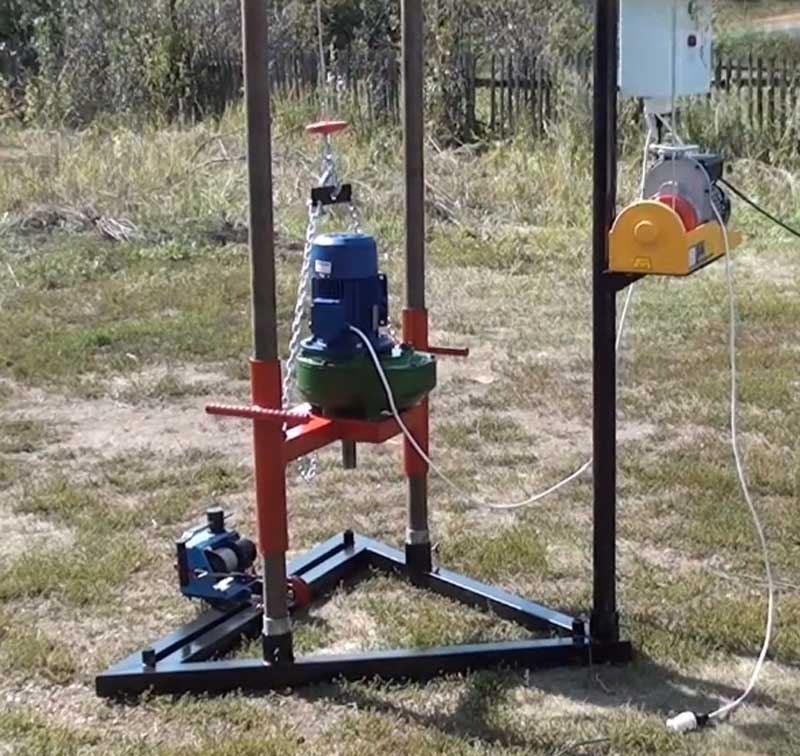
MGBU for percussion drilling
To create such a drilling rig, you will need to use the following devices:
- collapsible bed;
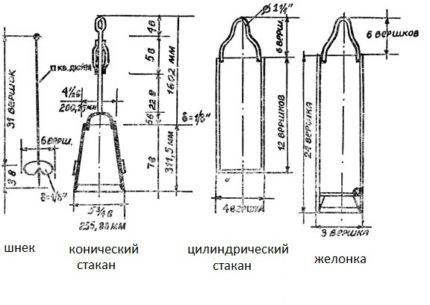
- percussion cartridge ("glass");
- bailer.
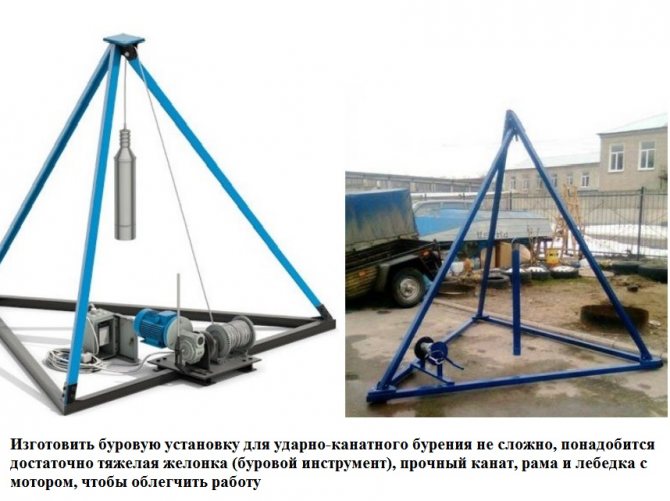
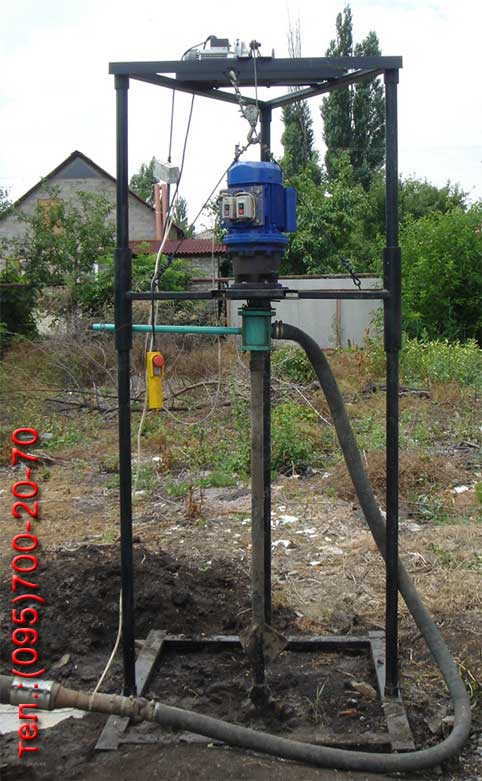
To facilitate drilling operations, a gear motor is connected to the installation, over the drum of which a cable is wound to which a cartridge or bailer is attached. To ensure efficient operation, you will have to use a cartridge weighing approximately 80 kg. The bailer cleans the face from the remnants of the soil. It is also effective to use the bailer in areas with clay soils.
The main working element in such a drilling rig is a part called a cartridge or “glass”. To make it, you will have to use a thick-walled pipe, the diameter of which will be approximately 8-12 cm, the heavier the pipe, the better. In the lower part of the pipe, “teeth” are most often machined, designed to loosen the soil, although in this place the cartridge can be even.In addition, the lower edge in the "glass" is most often sharpened. Holes are drilled in the upper part to securely fasten the rope. The cartridge can be from 1 to 2 m in length.
Before starting work, it is better to drill a hole in the ground into which you will lower the "glass". This hole should have a slightly larger diameter than the cartridge.
Spoon drill
Another type of home-made structures for performing independent rotary drilling wells for water - drill-spoon, or spoon drill. It is used for work on the manufacture of water wells in soil of low density, in particular, in sandy soils and mixed sandy-clayey soils.
Spoon drill
It looks like a cylindrical metal structure with bottom and side cutting edges. The soil cut by them falls into the internal cavity of the steel cylinder of the drill and is held inside due to the internal compaction of the soil and its adhesion to the walls of the cylinder. After each cycle of penetration, the entire structure rises and is cleared of earth on the surface. At one time, you can go deep into the ground to a sufficient depth (up to 40 centimeters).
In order to make a spoon drill for drilling water wells, you need a piece of steel pipe about 70-80 centimeters long. The diameter of the pipe is selected depending on the planned diameter of the future well. A slot is made in the lower part, the width of which depends on the quality of the soil on the site: for loose soil with a predominance of sand, the slot can be 6-8 millimeters, for clay soils - somewhat wider.
There is also an option on how to make a spoon drill yourself of a slightly different design - with a slight (10-20 mm) offset of the axis of the lower bucket relative to the main axis, the so-called eccentricity. The axis of the welded drill must coincide with the axis of rotation, which makes it possible to make the borehole diameter slightly larger than the size of the spoon structure. A larger drilling diameter is convenient because, at the risk of wall collapse due to looseness of the soil, simultaneous casing of the well can be done. The drill itself will pass inside the casing.


In the upper part of the spoon structure, a piece of pipe or a metal rod is welded for attaching a drill with a rod and further with the handle for rotation. The drill string is built up in the same way as when performing auger drilling for water.
The process of making a spoon drill
In order to make a homemade drill spoon, you should prepare a simple set of tools:
- metal pipe of the required diameter;
- metal corners;
- angle grinder;
- metalwork vice;
- roulette.
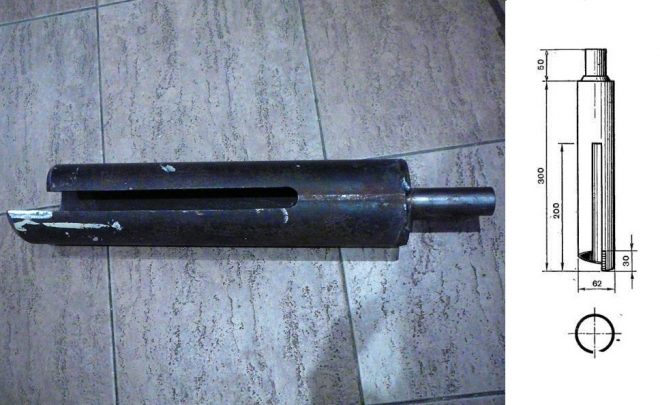
You can even make a spoon drill from an old gas cylinder if its diameter is suitable for making a water well. A lower part about 250 millimeters long is cut off from it, and cuts must be made at the end, which will perform the function of loosening and cutting the soil.
At the next stage, narrow vertical windows are cut out in the walls of the cylinder, through which the soil that fills in during operation is removed. The size of the windows is 50x200 millimeters.
A hole is drilled at the top of the cylinder for welding the future rotation handle, the fastening of which can be strengthened by attaching jumpers welded between the pipe and the upper surface of the cylinder.
At the next stage of work, a working drill is welded from a metal strip 200 mm long and 35 mm wide. The thickness of the metal is 3 mm. The strip is bent in a metalwork vice in the form of a spiral, its lower part is cut off at 45 ° and sharpened. The resulting drill is welded to the drill.
The handles of the drill can be made from fittings, on which short sections of pipes must be fixed for ease of operation.
Other models of drilling rigs
In general, the assembly process of most of the existing varieties of drilling rigs remains the same. The frame and other elements of the structure under consideration are prepared in a similar way. Only the main working tool of the mechanism can change.
Read the information on the manufacture of various types of installations, make a suitable working tool, and then attach it to the support frame and connect it to other required elements using the recommendations from the instructions discussed above.
Drilling rig with "cartridge"
Drilling rig with "cartridge"
The main working element of such a unit is a cartridge (glass). You can independently make such a cartridge from a thick-walled pipe with a diameter of 100-120 mm. The optimal length of the working tool is 100-200 cm. Otherwise, be guided by the situation. When choosing the dimensions of the support frame, you will have to take into account the dimensions of the cartridge. Think over everything so that in the future it will be convenient for you to use the finished drilling rig.
The working tool should have as much weight as possible. From the bottom of the pipe section, make triangular points. Thanks to them, the soil will loosen more intensively and quickly.
Do-it-yourself drilling rig
If you wish, you can leave the bottom of the workpiece even, but it will need to be sharpened.
Poke some holes in the top of the glass for attaching the rope.
Attach the chuck to the support frame using a strong cable. Choose the length of the cable so that in the future the cartridge can freely rise and fall down. When doing this, be sure to take into account the planned depth of the source.
To increase the efficiency of excavation, you can connect the assembled unit to an electric motor. The cable with the cartridge in such a situation will be wound on the gearbox drum.
It is possible to ensure the cleaning of the bottom from the soil by including a bailer in the structure.
Using such an installation is very simple: you first manually create a recess in the drilling site with a diameter greater than the diameter of the working cartridge, and then begin to alternately raise and lower the cartridge into the hole until the required depth is reached.
Simple screw installation
Homemade auger
The main working element of such a mechanism is the drill.
Drilling auger drawingScheme of the interturn auger ring
Make a drill from a metal pipe with a diameter of 100 mm. Make a screw thread on the top of the workpiece, and equip an auger drill on the opposite side of the pipe. The optimal drill diameter for a homemade unit is about 200 mm. A couple of turns is enough.


Drill disc separation scheme
Attach a pair of metal knives to the ends of the workpiece by welding. You must fix them in such a way that at the time of the vertical placement of the installation, the knives are located at a certain angle to the soil.
Auger drill
To work with such an installation was most convenient, connect a piece of metal pipe 1.5 m long to the tee. Fix it by welding.
Inside the tee must be equipped with a screw thread. Screw the tee itself onto a piece of a collapsible one and a half meter rod.
It is most convenient to use such an installation together - each worker will be able to take on a one and a half meter pipe.
Drilling is performed in the following order:
- the working tool goes deep into the ground;
- 3 turns are made with a drill;
- loosened soil is removed and removed.
Repeat the cycle until you reach about a meter deepening. After the bar will have to be lengthened with an additional piece of metal pipe. A coupling is used to fasten pipes.
If it is planned to build a well deeper than 800 cm, fix the structure on a tripod. At the top of such a tower there should be a hole large enough for the unhindered movement of the rod.
In the process of drilling, the rod will need to be periodically increased. With an increase in the length of the tool, the mass of the structure will also increase significantly, it will become very difficult to manage it manually. For convenient lifting of the mechanism, use a winch made of metal or durable wood.
Now you know in what order simple drilling rigs are assembled and how to use such units. The knowledge gained will help you significantly save on the services of third-party drillers.
Successful work!
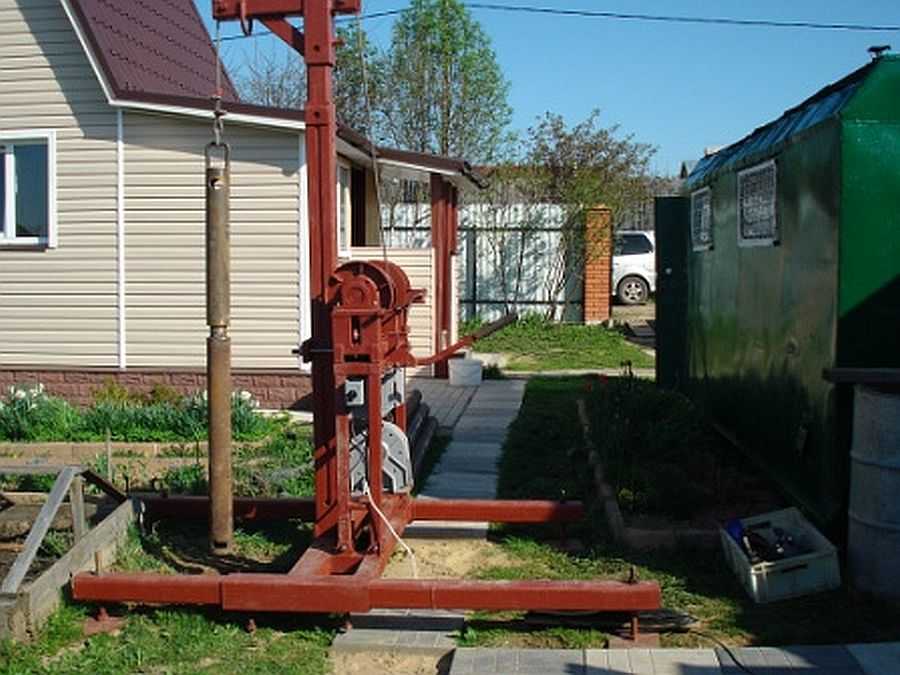
Drill for shock-rope drilling
It is possible to drill a well in the area not only by rotating the drill, but also by the shock-rope method. For this type of work, a special installation is needed, which can also be done independently from improvised materials.
With such equipment, all work can be done without assistants at all, so we will also consider the process of making an impact drill.
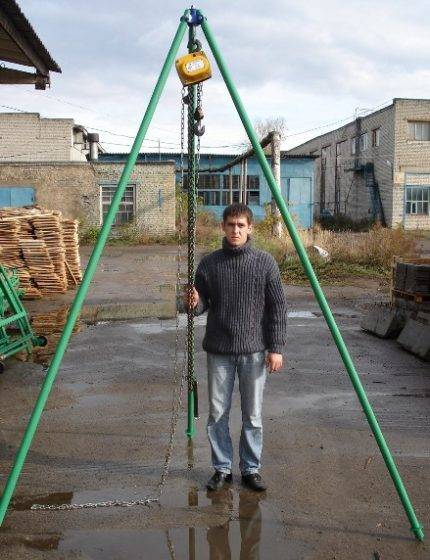
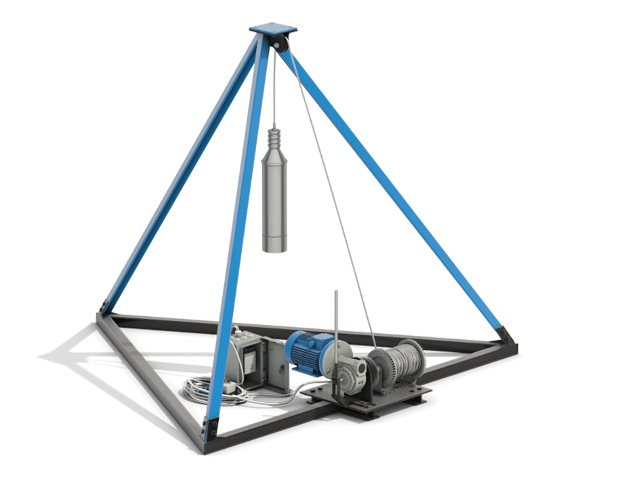
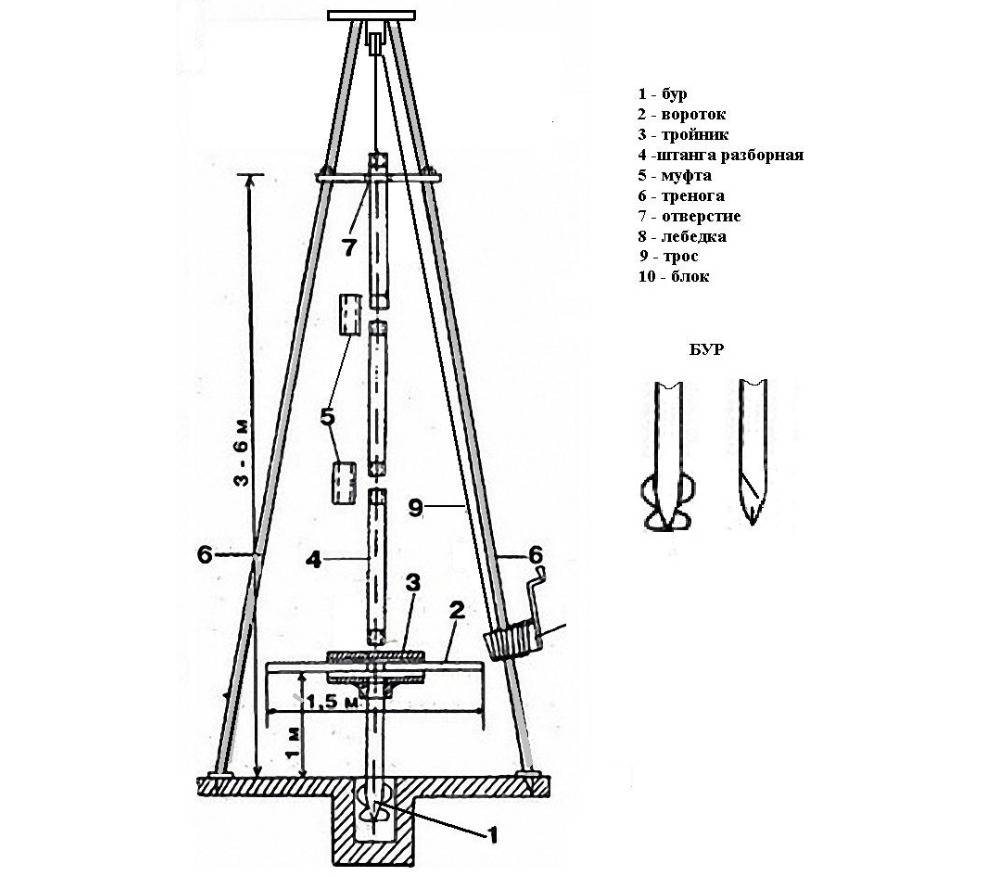
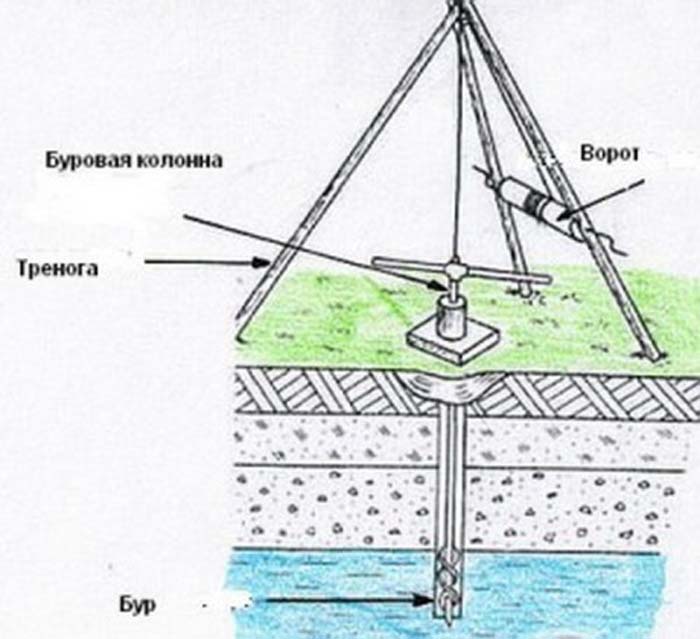
To drill a well with a percussion cable, you don’t need so much: a stable tripod frame, the percussion drill itself, a strong cable and a winch
In order to understand what and how we will make, we will consider in general terms the essence of shock-rope work.
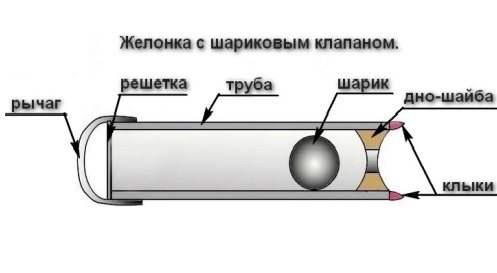
From a great height, a projectile pipe is dropped into the place of the future water intake point marked with a shovel or auger - well bailer. At the top, an eye for a cable is welded to the drill.
A hole is cut on the side in the upper part to extract the drilled rock.
The lower edge is sharpened or equipped with teeth that optimize the loosening of the soil. At 5 - 7 cm above the conditional bottom, a ball or petal valve is arranged inside the pipe to capture and hold the loosened rock.
The bailer is an indispensable tool for driving loose sands, pebbles, gravel deposits. It is often used in combination with other drills. Alternate with an auger or a glass that is not able to extract loose and water-saturated deposits.
Incoherent soil particles are retained inside the bailer thanks to a valve located at the bottom of the body. The screw, bell, glass do not have such advantages.
 Rarely, only one projectile is used to drill a well. Most often they are used in combination: clayey rocks are drilled with augers or cups, loose and water-saturated rocks are bailed
The procedure for dropping the drill is repeated many times. The result of the process is a body filled with soil by a third and a hole in the surface of the earth increasing by 30-40 cm.


The filled bailer is removed from the barrel with a winch, turned down with a hole and cleaned with blows of a heavy hammer.
Then the process of shock-rope drilling resumes and repeats until a well of the depth that was planned to be obtained is formed at the site of the fall of the drill.
It is not necessary to buy a ready-made installation - you can make your own bailer for drilling and cleaning.
If you make such an impact drill heavy enough, then with this bottom it will cut the soil like butter, and will not allow it to spill out of its cavity back.
It makes no sense to create one drill in this case, so we will tell you how to build the entire drilling rig along with the projectile.
- We choose the place where, according to our calculations and assumptions, the well should be located. We outline it by making a small indentation with a conventional shovel.
- We install a tripod 2-3 meters high above the hole. We equip the top of the tripod with a well-fixed block for the rope. You will also need a winch, which we attach to the supports. It's good if you have an electric winch, but a manual one will work too.
- We are preparing the percussion drill itself. For this purpose, we will need a thick-walled pipe, the diameter of which corresponds to the size of the shaft of the future well.
To make a drill, we take a strip of thick metal and weld it to the upper end of the pipe, placing it perpendicular to the longitudinal axis of the projectile.
Along the center line of our pipe in a welded metal strip, we drill a hole corresponding to the thickness of the rope on which the projectile will be fixed.
The lower end of the pipe also needs to be processed: you can make a gear or ring sharpening on it.If you have a muffle furnace, you can harden the drill in it after the sharpening procedure.
A drill for percussion-rope drilling is not so easy to clean from the soil that has accumulated in it. To speed up this routine operation, you can make not a window-hole, but a vertical slot, passing through almost 2/3 at the top of the pipe.
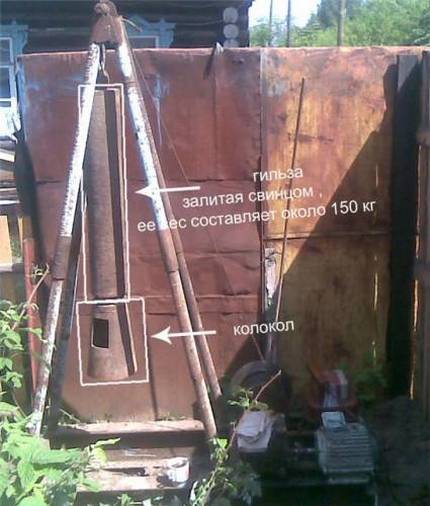
The bell is part of the percussion drill. It is easily cleaned from the soil and can be replaced, for example, with a chisel, if a stone is encountered during the drilling of a well
The heavier the drill, the faster the desired result can be achieved, but it is also necessary to take into account the power of the winch, which will have to pull the drill with soil from the wellbore.
So, if its power still allows, the projectile can be made heavier by placing removable metal weights in the upper part of the pipe.
You may also be interested in information on the arrangement of a well, flushing after drilling and warming for the winter, discussed in our other article.
Advantages of a homemade installation
- Relatively low cost. Ready-made drilling rigs are several times more expensive than their homemade counterparts. At the same time, a home-made mechanism will in no way be inferior to a more expensive factory-assembled installation.
- The technical characteristics of the home-made unit are fully consistent with the factory-made equipment.
- Compact size and relatively light weight.
- Ease of use and maximum mobility. With the help of a small home-made installation, it will be possible to drill even in the most inaccessible areas.
- High assembly and disassembly speed.
- Ease of transportation - a disassembled homemade drilling rig is easily placed and transported in a light trailer.
Let's start drilling
If we talk about step-by-step instructions for drilling a water well with your own hands from A to Z, then it looks like this:
- A pit is digging one and a half meters long and the same width. Depth - from 100 to 200 cm. This is necessary to prevent the collapse of the upper layers of the soil. The walls are lined with plywood sheets in the manner of formwork. The bottom is covered with boards. A wooden shield is mounted on top of the pit, on which you can safely walk without fear that the walls of the pit will collapse.
- Technological holes are made in the bottom and cover for the production of work. A drill rod attached to the drilling rig is threaded through them.
- The drill is driven by a special engine with a gearbox or manually. If we are talking about a puncture, a pin is installed on the pin, which is hit with a sledgehammer.
- If the technology involves the parallel installation of casing pipes, work is also carried out through technological holes in wooden shields.
- The soil removed from the well is selected manually. If it is slurry, you need to install a mud pump that will pump it directly from the casing.
- After drilling is completed and the casing is installed, it is necessary to mount the electrical equipment and start the pump, which should work until the water from the well becomes absolutely clean.
After all stages are completed, a caisson is mounted instead of a protective box. A cap, pumping and filtration equipment is installed, a pipeline is connected. The system is being tested. The equipment depends on the type of well.
Abyssinian
The upper water layers are suitable for irrigation, but are not used for domestic use. This is due to pollution that penetrates the soil with floods. Such a well has a depth of less than 10 meters. Water must pass through a multi-stage filtration system. Only in this case, the liquid turns from technical into drinking.
A hand pump can be used as pumping equipment. It is allowed to use any type of electrical equipment (submersible, surface). The pumping station does not have to have a large capacity, and this makes the well the most inexpensive. It is advisable to equip a storage tank into which the daily supply of water is pumped.
Well on the sand
At a depth of 10-40 meters, there are layers in which water undergoes natural filtration. Passing through the sand, it is cleared of part of the impurities. It does not contain large inclusions, clay and a number of chemical compounds. For domestic purposes and for irrigation of crops, such water can be used, but additional filtration is required to make it suitable for food use.
The best option for electrical equipment is a pump. Also apply surface pumping stations. If the depth is more than 10 meters, the use of an ejector is allowed, which will increase the performance of the pump, accelerating the flow of produced water in the pipeline.
Artesian
These are wells with absolutely pure water, enriched by nature in limestone cut ground plates. The depth can vary from 100 to 350 meters depending on the location of the site, the geological features of the soil and the terrain. Water does not require filtration. The threat is contaminants that can get inside the casing from the outside.The minerals contained in the solution are beneficial to humans.
It is necessary to install a submersible pump for the well. It can be a centrifugal or vibration type device. The latter is preferable, since it breaks less often, and its performance is greater. The main thing is that the pump has a coarse pump that prevents solid particles from entering the working chamber.
The easy way
There is a very easy way to quickly assemble a homemade twin-bladed auger. These elements will perfectly crash into the ground. The only negative is that they can only work at a shallow depth, no more than 10 m.


The screw is manufactured according to the following technology:
- We take a pipe with a length of 100 to 140 cm, it all depends on the height of the worker. In its upper part, we weld an oblong nut that will fit the bolt. Can be replaced with two standard ones. If you take less, then the design will not hold securely.
- In the lower part, we weld a metal sleeve or thick fittings - this element will play the role of an adapter to the drill. We buy a chisel ready-made or we make it ourselves from a steel strip 30 cm long and 3 mm thick. It is first thoroughly calcined, and then cooled in boiling lead or oil. We fix this spiral in the sleeve, and then carefully sharpen it.
- We take two discs from the grinder: one with a smooth edge of 150 mm, the other notched - 180 mm. We saw these discs in half, in which case the central part expands and coincides with the main pipe. We install them one by one: at first the smaller one, and 10 cm higher - the larger one. We make the location of the parts strictly at an angle of 35 degrees to the ground. In this case, the efficiency is increased with minimal effort.
- Next, we make tubular elements for extension. To do this, we take a pipe with the same diameter and length of 100-140 cm. Then we insert a bolt from below and weld it. In the upper part, we install and weld an oblong nut.
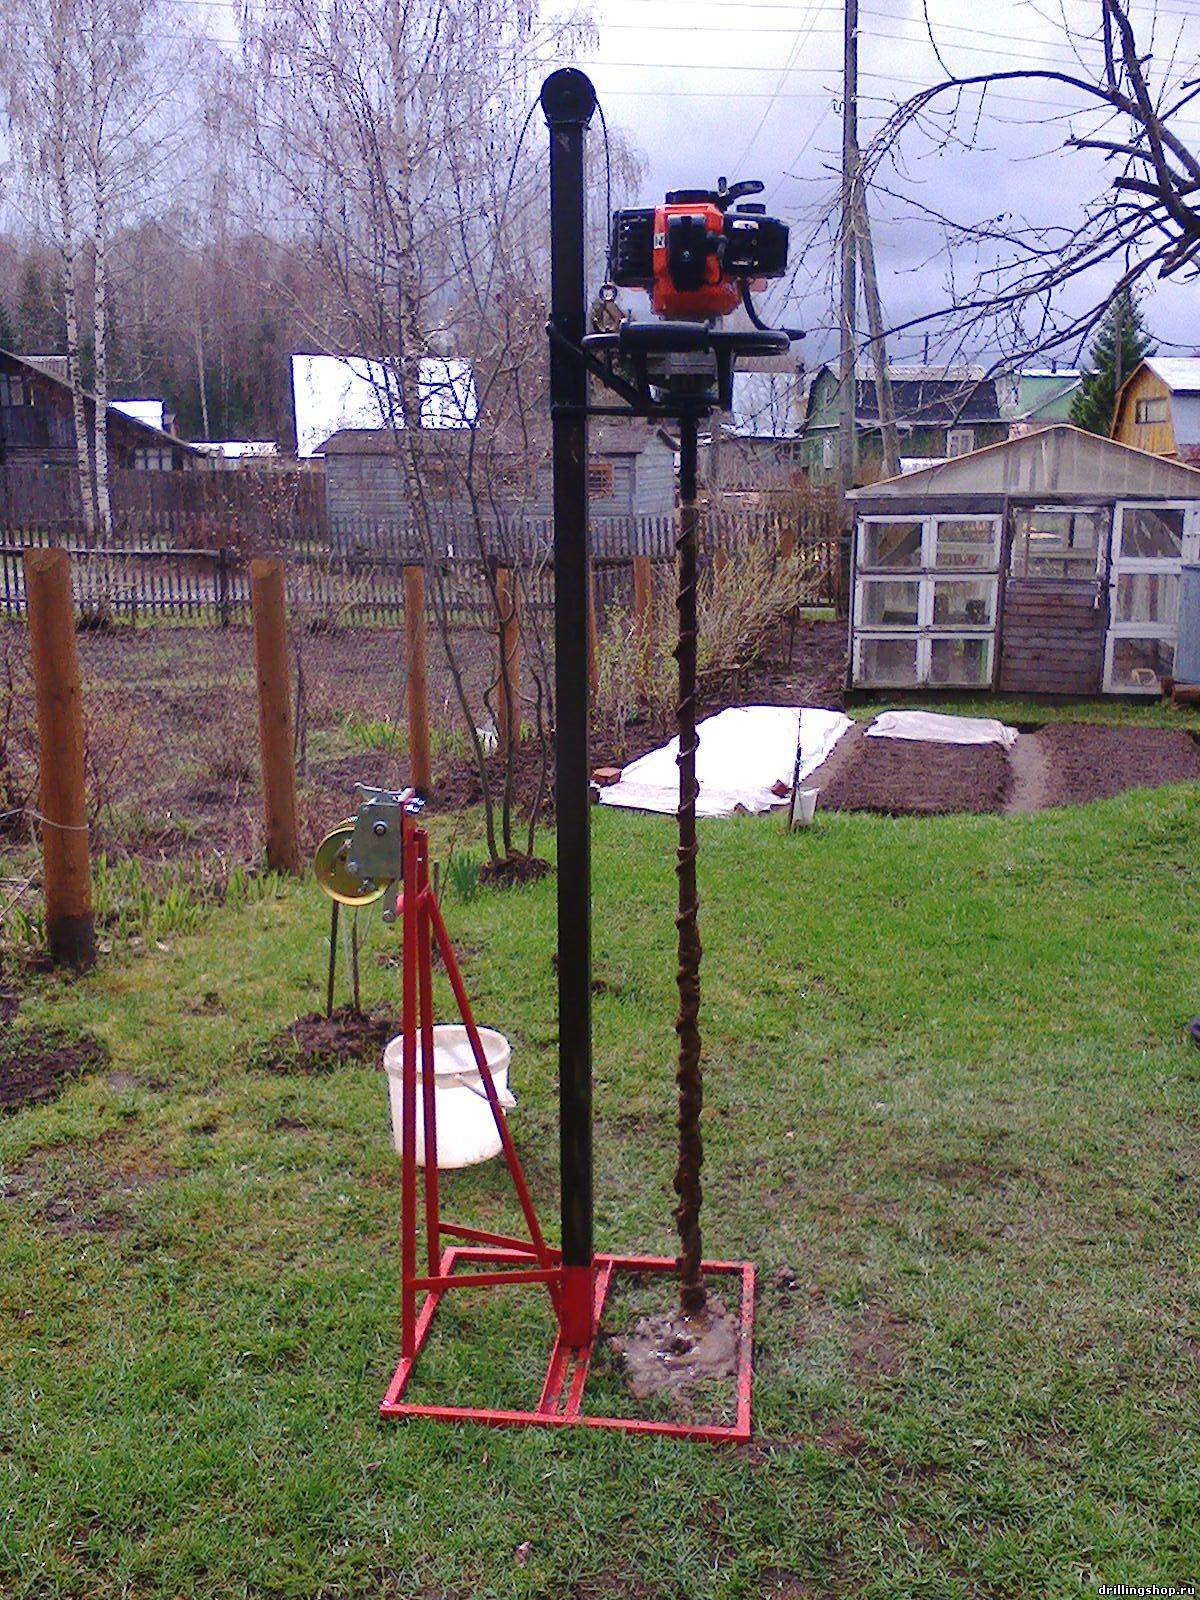
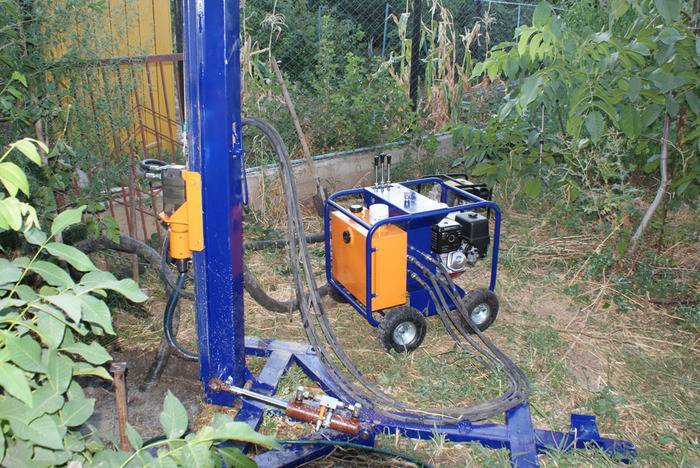
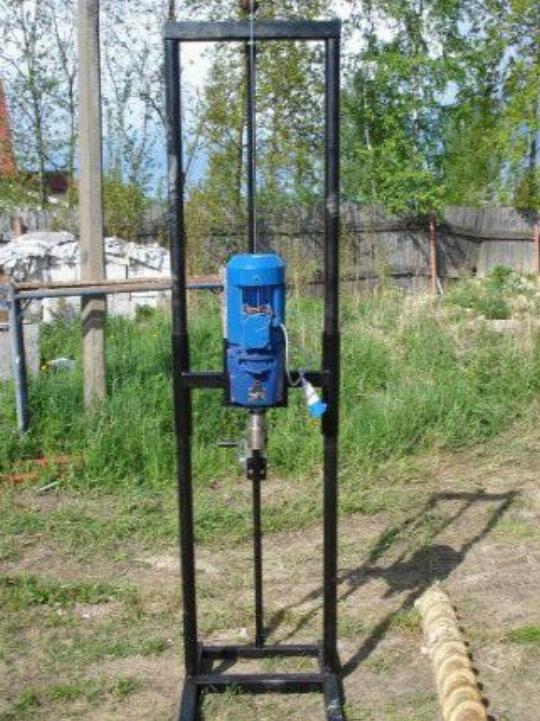
"EAST"
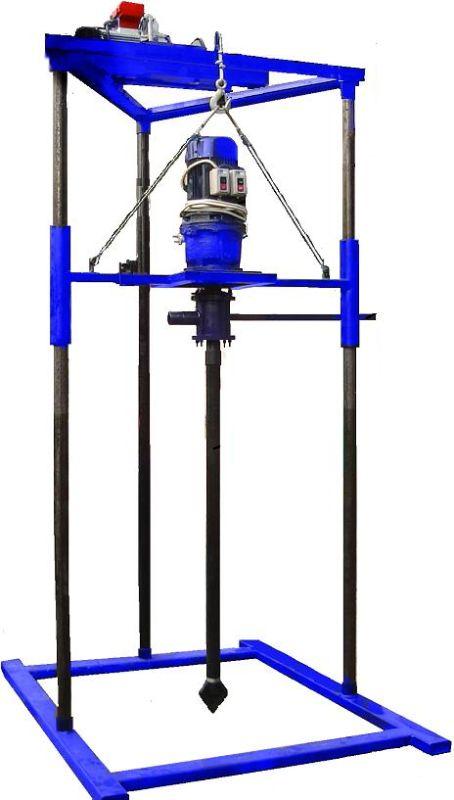
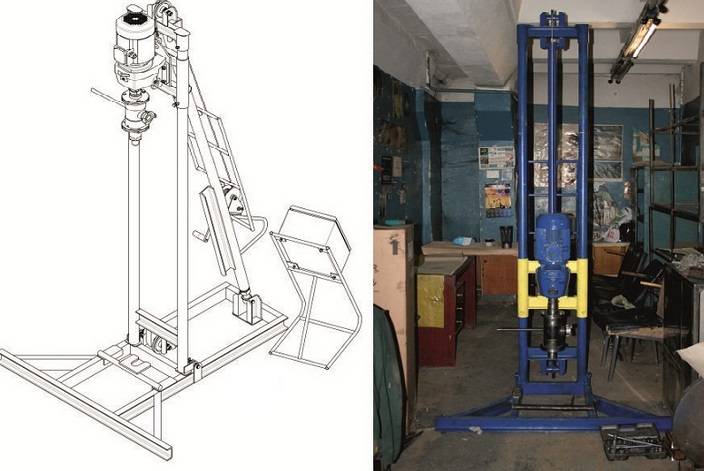
A modernized version of a small-sized drilling rig based on the classical scheme used on the "Minsk", "Vologda" and similar economy-class drilling rigs.
The characteristics of a do-it-yourself drilling rig are in practice absolutely identical to any small-sized drilling rig offered by drilling equipment sellers. The power of the drilling rig and the depth of drilling depend only on the power of the motor. All manufacturers of electric small-sized drilling rigs complete their drills with low-speed motors and a power of 2.2 kW. Some “inventors” also install more powerful electric motors, but such drilling rigs inevitably have a connection problem, since commercially available frequency converters allow you to power a three-phase motor with a power of no more than 2.2 kW from a household network (220 Volts).
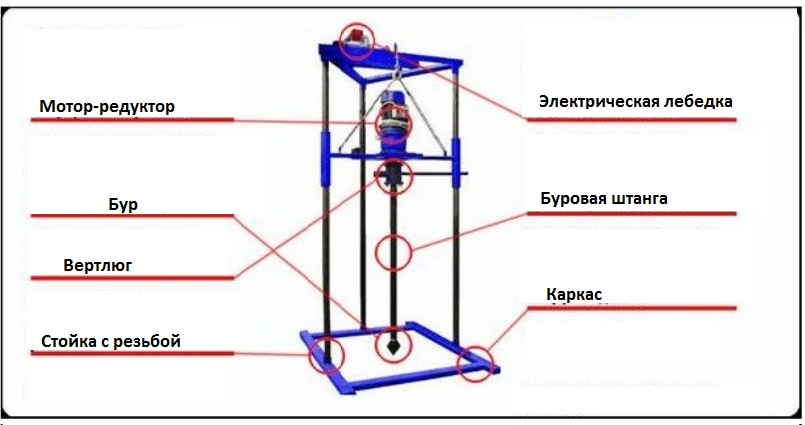
Advantages of the drilling rig:
1. Very low cost due to significant savings in the manufacture of a drilling rig with your own hands.
2. The quality of a homemade drilling rig is almost never lower than the factory one, and often it significantly exceeds the factory one!
3. The absolute similarity of the technical characteristics of home-made drilling and factory drills (motor power, drilling speed and drilling depth).
4. Small weight of the machine (gross weight is about 300 kg) and compactness (can be drilled indoors).
5. Mobility. Drilling in hard-to-reach places (rig can be disassembled and easily carried by hand).
6. Assembly-disassembly of the installation takes no more than 30 minutes.
7. Easy to transport (the machine can be transported in a light trailer).
8. 2 people can work with a small-sized drilling rig.
Drawing set:
1. Detailed guide for the manufacture of the frame of the drilling rig and the carriage.
2. Scheme of a homemade drill.
3. Guide for self-production borax.
4. Drawings of locks for drill rods with trapezoidal and conical threads.
5. Drawing of a swivel.


