- Spoon type making
- How it works
- How to make a spoon drill
- Drill for shock-rope drilling
- Welding and finishing
- Other models of drilling rigs
- Drilling rig with "cartridge"
- Simple screw installation
- DIY spiral drill
- Do-it-yourself drill for wells
- Other types of wells
- Varieties of borax
- Spiral drill
- Spoon drill
- Do-it-yourself drilling of holes for poles
- Manual hole drilling
- Features of the use of automation tools for drilling
- TISE technology
- Types of drills for independent drilling of shallow wells in a summer cottage
- How to make a drill for a well - useful tips
- Making a spoon drill
- How to make a drill underwater
- Drilling a well with an ice drill
- How to make a homemade earth drill with an engine
Spoon type making
 Spoon drill
Unlike the other two, this tool has a compact size. It is needed in order to quickly make a shallow hole in the topsoil.
How it works
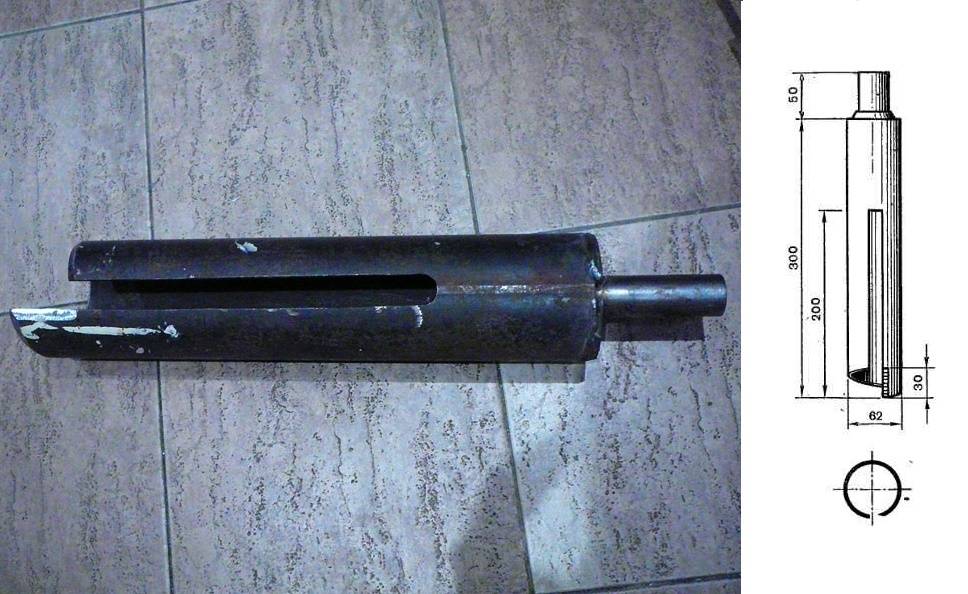
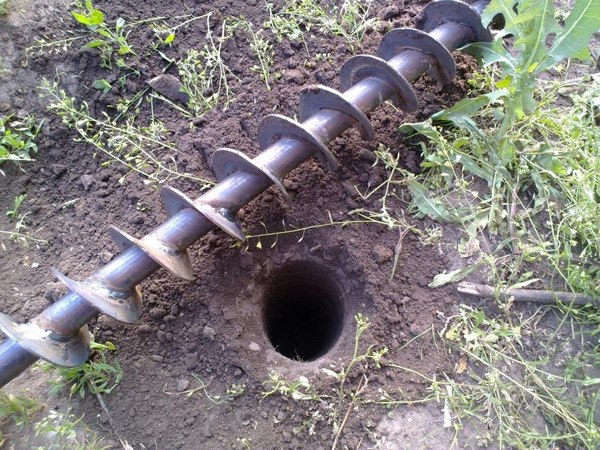
A spoon drill is a device similar to a spoon: it has a length of 10 to 50 cm and the shape of a pipe twisted along its axis, which has a narrow hole on one side along the entire surface. At one end is a holding handle.
To drill a hole in the soil with it, you need to take it firmly in the brush, put it at the required angle to the ground and press while scrolling. As soon as it begins to enter to a depth, excess earth will leave the cavity through a longitudinal cutout located on the side. This method of drilling is not suitable for soil of medium and high hardness, as well as rocks, therefore it is used mainly for horticultural purposes.
How to make a spoon drill
You will need the following tools and materials:
- a short metal tube, preferably with thin walls;
- metal carving machine;
- industrial glue;
- rubber for the handle;
- welding machine;
- a small plate of sheet steel;
- a pair of vices;
- iron rod or large diameter bolt.
Since the pipe is hollow, one edge must be closed with a metal plate by welding, and then an iron handle must be attached to it. It must be coated over the entire surface with glue and wrapped with a layer of rubber so that you can hold the device with your bare hands. For easier entry into the soil, you can sharpen the edges of the pipe with a machine tool, making it sharper.
Drill for shock-rope drilling
It is possible to drill a well in the area not only by rotating the drill, but also by the shock-rope method. For this type of work, a special installation is needed, which can also be done independently from improvised materials.
With such equipment, all work can be done without assistants at all, so we will also consider the process of making an impact drill.
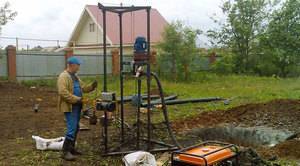
To drill a well with a percussion cable, you don’t need so much: a stable tripod frame, the percussion drill itself, a strong cable and a winch
In order to understand what and how we will make, we will consider in general terms the essence of shock-rope work.
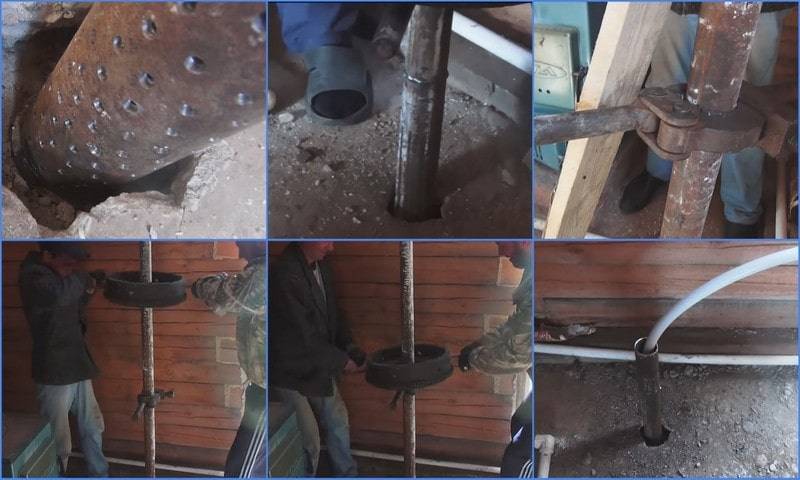
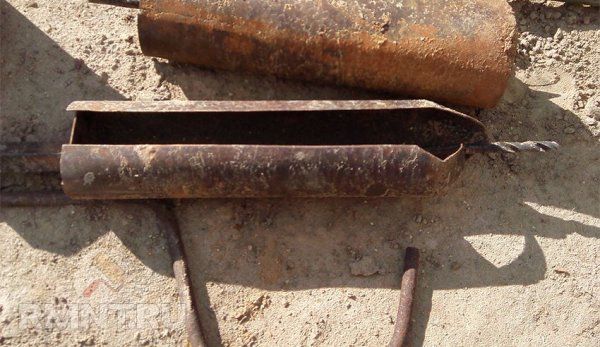
From a great height, a projectile pipe, a bailer for a well, is dropped into the place of the future water intake point indicated with a shovel or auger. At the top, an eye for a cable is welded to the drill.
A hole is cut on the side in the upper part to extract the drilled rock.
The lower edge is sharpened or equipped with teeth that optimize the loosening of the soil. At 5 - 7 cm above the conditional bottom inside the pipe, a ball or reed valve for gripping and holding loosened rock.
The bailer is an indispensable tool for driving loose sands, pebbles, gravel deposits. It is often used in combination with other drills. Alternate with an auger or a glass that is not able to extract loose and water-saturated deposits.
Incoherent soil particles are retained inside the bailer thanks to a valve located at the bottom of the body. The screw, bell, glass do not have such advantages.
Rarely, only one projectile is used to drill a well. Most often they are used in combination: clayey rocks are drilled with augers or cups, loose and water-saturated rocks are bailed
The procedure for dropping the drill is repeated many times. The result of the process is a body filled with soil by a third and a hole in the surface of the earth increasing by 30-40 cm.
The filled bailer is removed from the barrel with a winch, turned down with a hole and cleaned with blows of a heavy hammer.
Then the process of shock-rope drilling resumes and repeats until a well of the depth that was planned to be obtained is formed at the site of the fall of the drill.
It is not necessary to buy a ready-made installation - you can make your own bailer for drilling and cleaning.
If you make such an impact drill heavy enough, then with this bottom it will cut the soil like butter, and will not allow it to spill out of its cavity back.
It makes no sense to create one drill in this case, so we will tell you how to build the entire drilling rig along with the projectile.
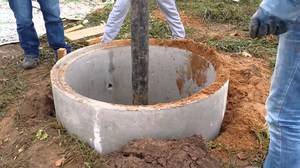
- We choose the place where, according to our calculations and assumptions, the well should be located. We outline it by making a small indentation with a conventional shovel.
- We install a tripod 2-3 meters high above the hole. We equip the top of the tripod with a well-fixed block for the rope. You will also need a winch, which we attach to the supports. It's good if you have an electric winch, but a manual one will work too.
- We are preparing the percussion drill itself. For this purpose, we will need a thick-walled pipe, the diameter of which corresponds to the size of the shaft of the future well.
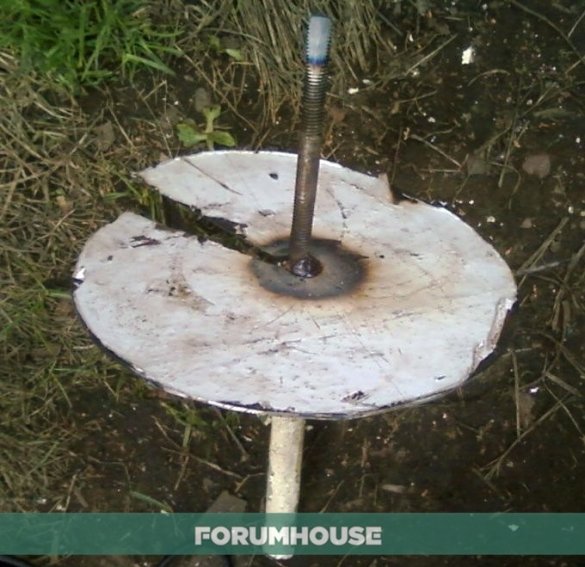
To make a drill, we take a strip of thick metal and weld it to the upper end of the pipe, placing it perpendicular to the longitudinal axis of the projectile.
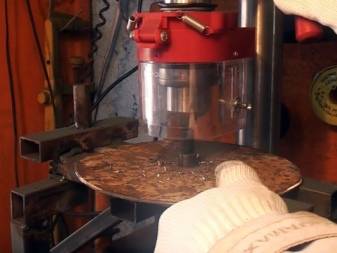
Along the center line of our pipe in a welded metal strip, we drill a hole corresponding to the thickness of the rope on which the projectile will be fixed.
The lower end of the pipe also needs to be processed: you can make a gear or ring sharpening on it. If you have a muffle furnace, you can harden the drill in it after the sharpening procedure.
A drill for percussion-rope drilling is not so easy to clean from the soil that has accumulated in it. To speed up this routine operation, you can make not a window-hole, but a vertical slot, passing through almost 2/3 at the top of the pipe.


The bell is part of the percussion drill. It is easily cleaned from the soil and can be replaced, for example, with a chisel, if a stone is encountered during the drilling of a well
The heavier the drill, the faster the desired result can be achieved, but it is also necessary to take into account the power of the winch, which will have to pull the drill with soil from the wellbore.
So, if its power still allows, the projectile can be made heavier by placing removable metal weights in the upper part of the pipe.
You may also be interested in information on the arrangement of a well, flushing after drilling and warming for the winter, discussed in our other article.
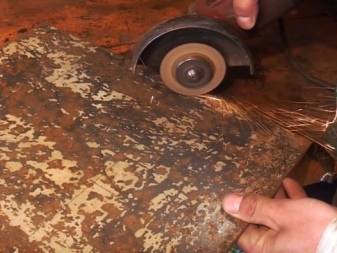
Welding and finishing
The general sequence of steps for the manufacture of a welded drill can be as follows:
- mark pipes and steel sheets according to the drawing (using a construction marker);
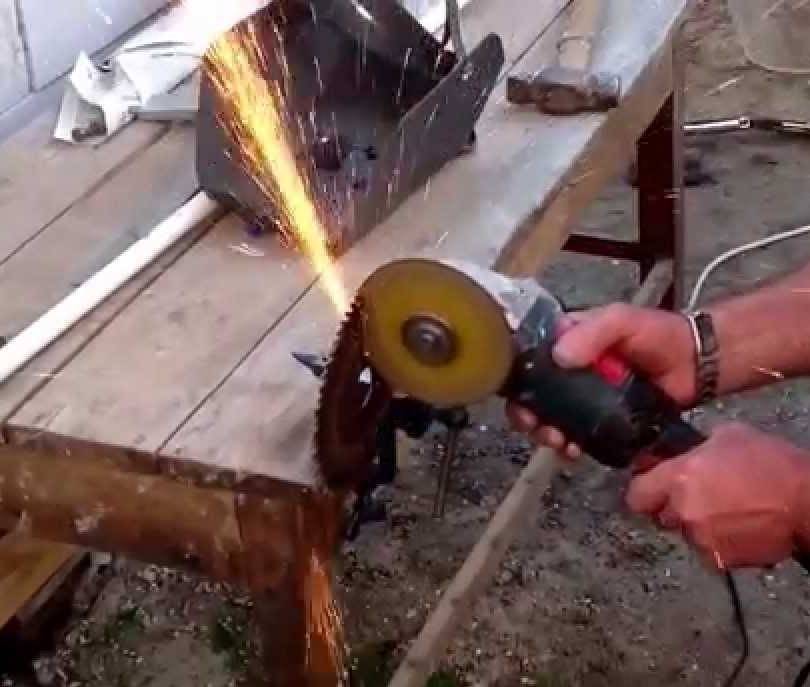
- cut them according to these marks using a grinder;
- make marks at the junctions of the handle, axis and blades (the axis pipe of the future drill should enter the newly cut blades without noticeable effort);
- using a welding machine, weld these parts in the desired sequence, observing the drawing proportions and dimensions.

The final processing of a homemade drill is as follows:
- Grind the drill - rid it of burrs, trim the welds (if the bumps remain). The tool, put in order, is easy to use, does not injure hands and does not cling to overalls.
- Put on the handle (if the drill is manual) pieces of hose. The ends of the horizontal crossbar (gate) must enter the hose with force.
- Sharpen cutting edges. This will allow more efficient drilling of the soil.
- Paint the tool after manufacturing.
Any paint dries up in a maximum of two days. The product is ready to go.
Other models of drilling rigs
In general, the assembly process of most of the existing varieties of drilling rigs remains the same.The frame and other elements of the structure under consideration are prepared in a similar way. Only the main working tool of the mechanism can change.
Read the information on the manufacture of various types of installations, make a suitable working tool, and then attach it to the support frame and connect it to other required elements using the recommendations from the instructions discussed above.
Drilling rig with "cartridge"
Drilling rig with "cartridge"
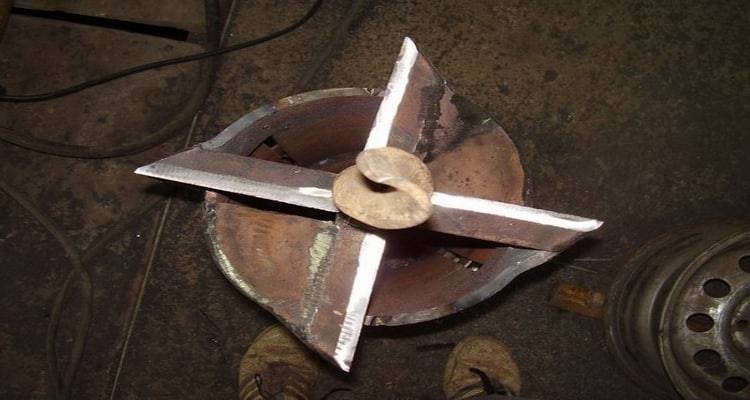
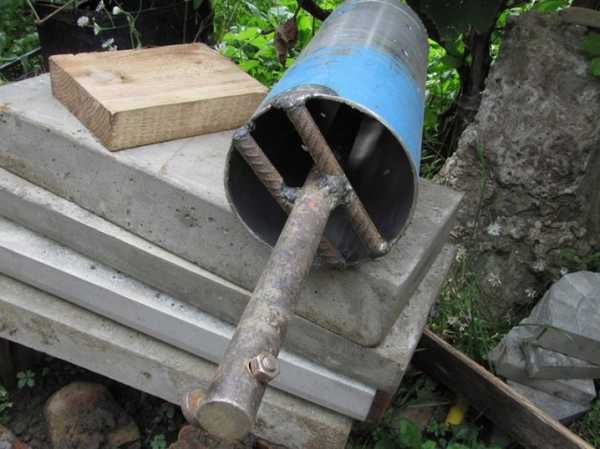
The main working element of such a unit is a cartridge (glass). You can independently make such a cartridge from a thick-walled pipe with a diameter of 100-120 mm. The optimal length of the working tool is 100-200 cm. Otherwise, be guided by the situation. When choosing the dimensions of the support frame, you will have to take into account the dimensions of the cartridge. Think over everything so that in the future it will be convenient for you to use the finished drilling rig.
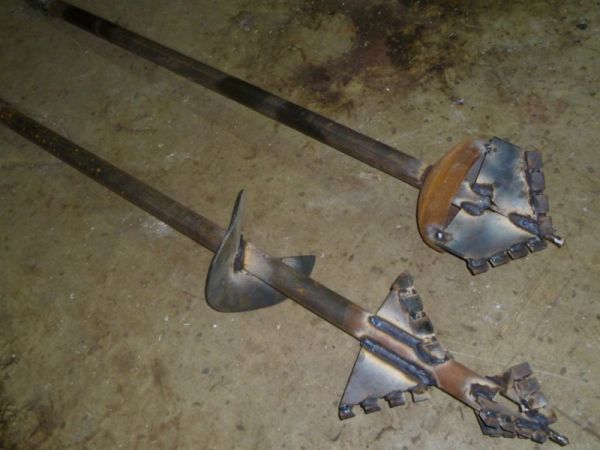
The working tool should have as much weight as possible. From the bottom of the pipe section, make triangular points. Thanks to them, the soil will loosen more intensively and quickly.
Do-it-yourself drilling rig
If you wish, you can leave the bottom of the workpiece even, but it will need to be sharpened.
Poke some holes in the top of the glass for attaching the rope.
Attach the chuck to the support frame using a strong cable. Choose the length of the cable so that in the future the cartridge can freely rise and fall down. When doing this, be sure to take into account the planned depth of the source.
To increase the efficiency of excavation, you can connect the assembled unit to an electric motor.The cable with the cartridge in such a situation will be wound on the gearbox drum.
It is possible to ensure the cleaning of the bottom from the soil by including a bailer in the structure.
Using such an installation is very simple: you first manually create a recess in the drilling site with a diameter greater than the diameter of the working cartridge, and then begin to alternately raise and lower the cartridge into the hole until the required depth is reached.
Simple screw installation
Homemade auger
The main working element of such a mechanism is the drill.
Drilling auger drawingScheme of the interturn auger ring
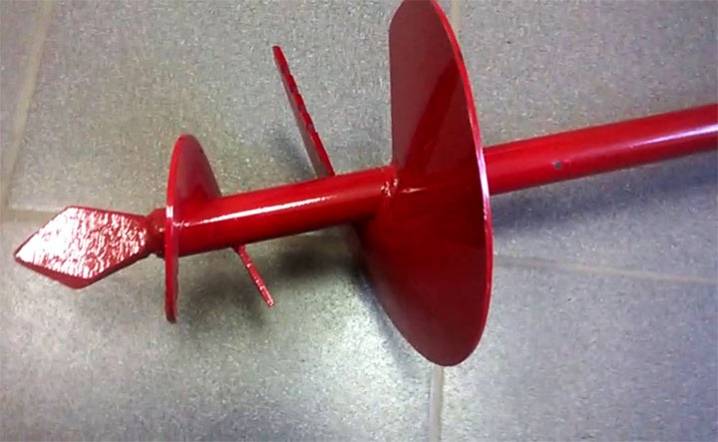
Make a drill from a metal pipe with a diameter of 100 mm. Make a screw thread on the top of the workpiece, and equip an auger drill on the opposite side of the pipe. The optimal drill diameter for a homemade unit is about 200 mm. A couple of turns is enough.


Drill disc separation scheme
Attach a pair of metal knives to the ends of the workpiece by welding. You must fix them in such a way that at the time of the vertical placement of the installation, the knives are located at a certain angle to the soil.
Auger drill
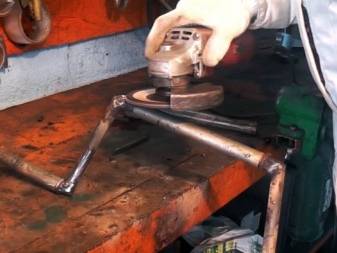
To work with such an installation was most convenient, connect a piece of metal pipe 1.5 m long to the tee. Fix it by welding.
Inside the tee must be equipped with a screw thread. Screw the tee itself onto a piece of a collapsible one and a half meter rod.
It is most convenient to use such an installation together - each worker will be able to take on a one and a half meter pipe.
Drilling is performed in the following order:
- the working tool goes deep into the ground;
- 3 turns are made with a drill;
- loosened soil is removed and removed.
Repeat the cycle until you reach about a meter deepening.After the bar will have to be lengthened with an additional piece of metal pipe. A coupling is used to fasten pipes.
If it is planned to build a well deeper than 800 cm, fix the structure on a tripod. At the top of such a tower there should be a hole large enough for the unhindered movement of the rod.
In the process of drilling, the rod will need to be periodically increased. With an increase in the length of the tool, the mass of the structure will also increase significantly, it will become very difficult to manage it manually. For convenient lifting of the mechanism, use a winch made of metal or durable wood.
Now you know in what order simple drilling rigs are assembled and how to use such units. The knowledge gained will help you significantly save on the services of third-party drillers.
Successful work!
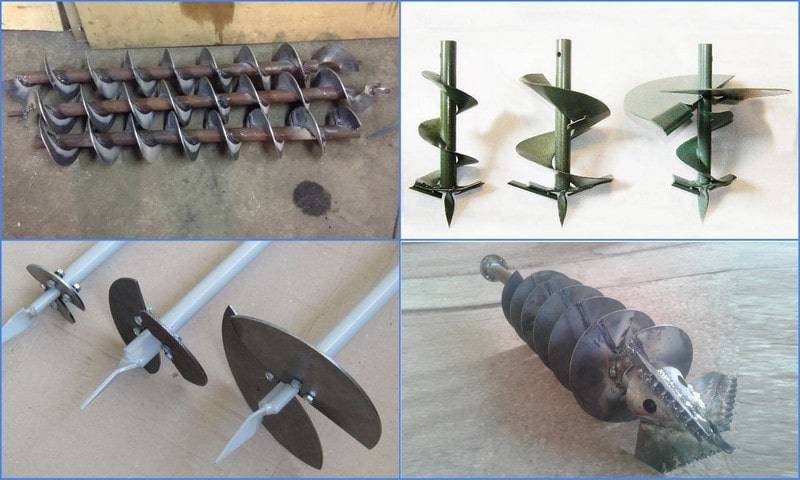
DIY spiral drill
Do-it-yourself spiral drill - scheme Making a similar drill with your own hands is a task for a professional. Correctly welding a steel spiral at home is quite difficult. This process requires heating a strip of tool steel, twisting it into a spiral with the required diameter, hardening the part and welding it to the rod. It is possible to perform such a task qualitatively only in production.
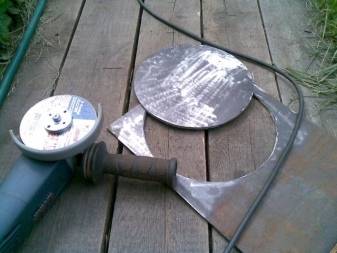
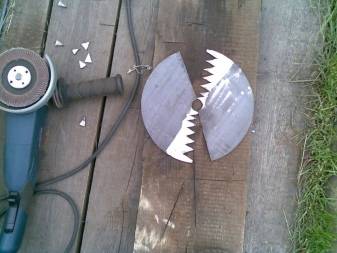
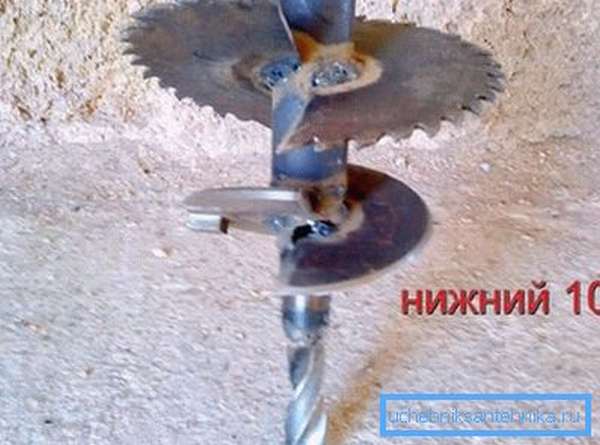
Experienced craftsmen have simplified the technology. The assembly of the drill begins with the creation of blades for crushing rocks. To do this, use several disks of steel 10–15 mm thick into two semicircles. Most often, four disk elements are cut according to the pattern. from steel sheet with a radius of 15 cm, and in them - holes with a radius of 2.5 cm. Radial cuts are made in the metal rings and their edges are displaced so that they overlap each other.The lower edges of the blades - blades - are sharpened and hardened. This will help reduce the time spent on drilling a well.
Further work on creating the tool is as follows:
- A handle is attached to the rod.
- The other end is sharpened and hardened.
- Finished parts from steel rings are welded to the bar.
Spiral drill (auger) - device Attach the blades at a distance of 20 cm from the sharp tip at an angle of 40 ° to each other - first the lower part, then the rest in sequence. Welding bladed elements is required with an overlap along the cut of the rings or butt.
There is also a modified version. Such a drill is equipped with steel plates: they are welded between the turns of the spiral. This helps to cut the roots of the bushes and reduce the risk of collapse of the well walls due to their compaction with additional plates. It is possible to modify in this way not only a hand-made, but also a purchased tool.
Do-it-yourself drill for wells
The drill for wells is made of metal. The drill itself is a structure made of a metal rod with a sharpened end. Knives are attached to the sides of the drill. For knife cavities, halves from a metal disk about 15 cm thick can be used. Then the knives must be welded to the rod with an inclination of approximately 22 degrees. The disk halves are placed opposite each other. Between parallel blades, the slope should be 44 degrees.
You can make a spoon drill for wells. It has the shape of a cylinder with a longitudinal section on the side. The length of this drill is about 800 mm. This drill can be made from sheet steel, which must be rolled to the required size and fixed by welding.
To make it easier to overcome various layers of soil, use the following drills:
- drill spoons are used for sandy soil;
- a drill bit is used for loosening hard rocks;
- a spiral drill (also called a serpentine) is used for clay soils;
- the bailer makes it possible to raise the earth to the surface.
Other types of wells
There are other varieties of these sources of water supply. It is absolutely not necessary to drill to a great depth: for example, you can make a well up to 20 meters if you build an Abyssinian well. It is done in this way.
The earth makes its way to the required depth to the aquifer. For what you can use an inch pipe with a thin tip at the end. A self-priming pump is attached to the driven pipe, it will create a vacuum. If this well does not produce enough water, several Abyssinian wells can be installed on the site.
To punch a well, it is desirable to find a light sandy soil. Do not forget that the Abyssinian well can not be built in any area. For it to work, the water must be no deeper than 7 meters. Naturally, you can dig even more. Also keep in mind that such a well will not work on stony soil. For the Abyssinian well, plastic or metal pipes are usually used. It is best to cut them into two meters. Pipes are brought into the ground gradually and fastened with threads. You can use oil paint to seal joints or plumbing tape.
Couplings can also be used to secure the connection. If the structure is not airtight, then it will simply tear. Do not forget that the diameter of the tip must be larger than the diameter of the pipe. At the end of the pipe, you need to install a filter needle. It is necessary to ensure the supply of clean water and protect the well system from debris.The needle is preferably made of metal or directly from the material of the pipe. To make a filter needle, it is necessary to make holes in the pipe with a diameter of 7 mm. Holes must be in a checkerboard pattern. A stainless steel mesh is attached to the holes. Instead of a lid, a sharp tip is attached to the end of the pipe, which must be slightly wider than the pipe itself. For a spear, it is best to choose tin.
Lead should not be used as it heavily contaminates the water and will simply make it unfit for consumption.
A well-needle can be constructed in different ways: it can be hammered or drilled. To drive the structure into the ground, you will need a driving headstock, and you need to pour water directly into the pipe all the time. Then, when the water abruptly goes into the ground, the structure can be buried in the ground. When it drops another 50 cm, you can connect the pump.


With the driving method, there is a chance to damage the structure on a stone or not get into the aquifer. Drilling is more reliable in this regard, but you will need special equipment.
First you need to determine the location. The well can be located both on the street and in the basement of the room. After you need to dig a hole with a width and depth of one meter. The top layer of soil can be removed with a drill. After that, you can start hammering a pipe into the ground. This will require a load of approximately 35 kg. Suitable pancakes from the bar. The pipe must be directed in the middle of the pit. When the pipe enters the ground, it is necessary to screw the second segment and continue working. Upon reaching the aquifer, you need to rinse the filter. Dirty water must be removed with a pump. The site near the well is concreted.Then you can connect the well to the water supply.
The Abyssinian well is the simplest do-it-yourself water structure in arranging, which does not require significant costs and is quite easy to do indoors or on the site.
Summing up, it must be said that if you need to make a well in the country for some purpose, then you need to prepare all the required materials and tools, determine the soil, analyze the possibilities of the upcoming design, study various types of drills and drilling equipment, and make them yourself.
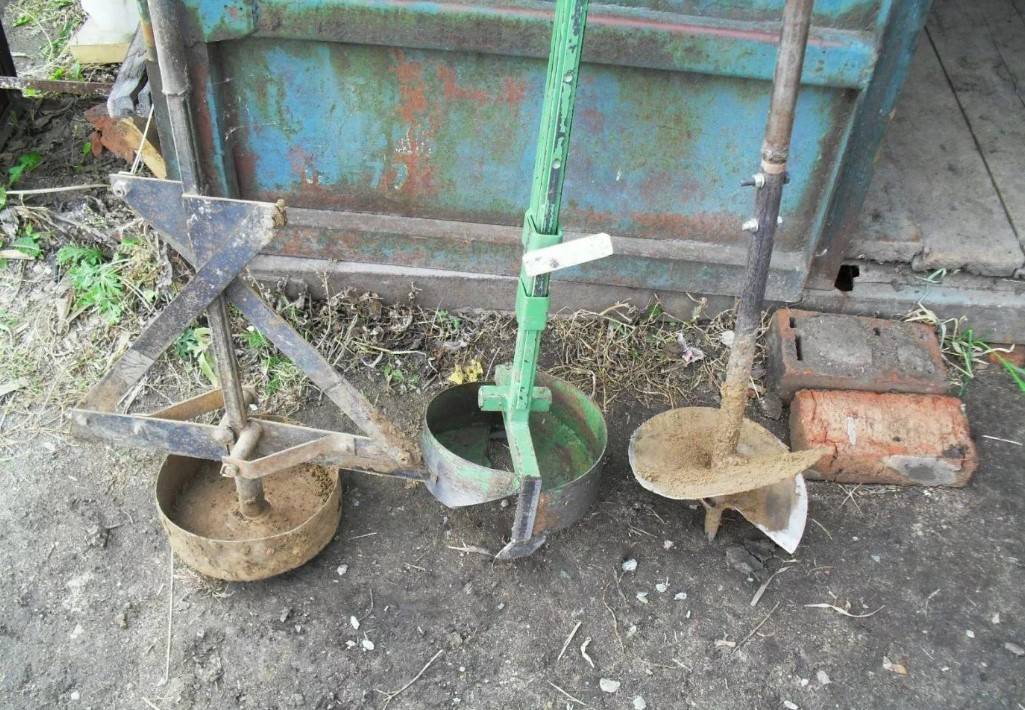
Varieties of borax
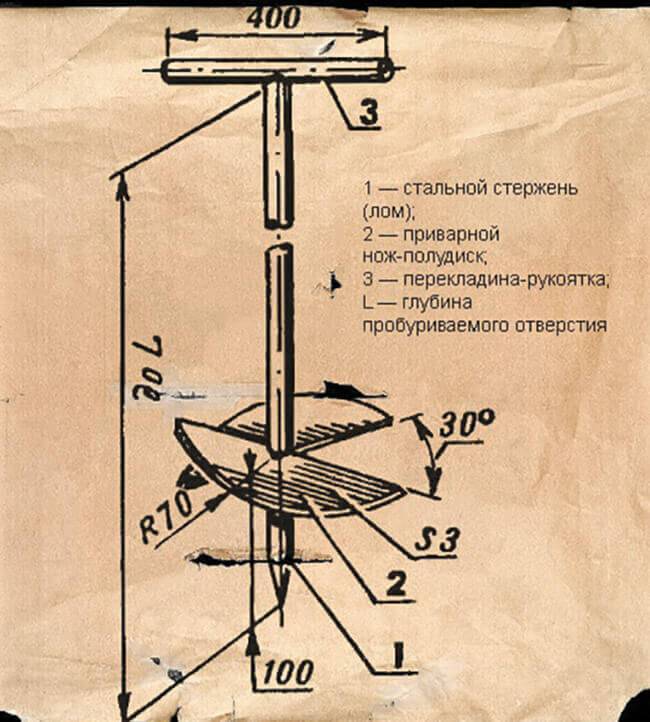
For homemade drilling devices, two main types of cutting device are chosen. These are a spiral drill and a spoon drill.
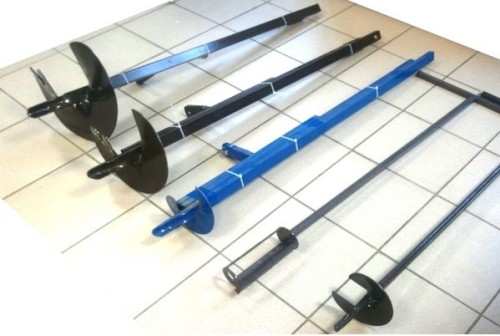
Spiral drill
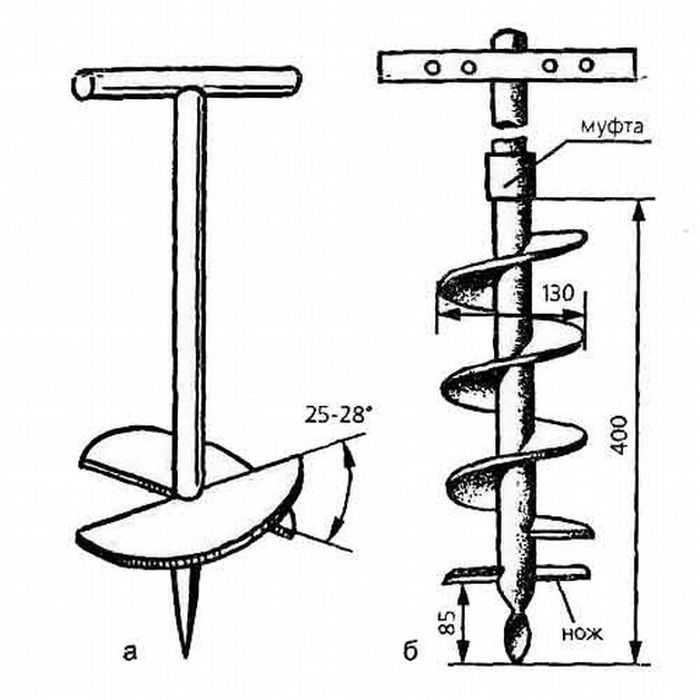
The spiral drill has a second name - auger drill. It is a rod with a diameter of 40-60 mm made of durable metal with a pointed end and two sheet metal knives (discs sawn in half) 1.5-4 mm thick, located at an angle of 20 degrees to the axis of the rod.
This type of drill can later be used for earthen gardening and construction work with a small penetration depth.
Spoon drill
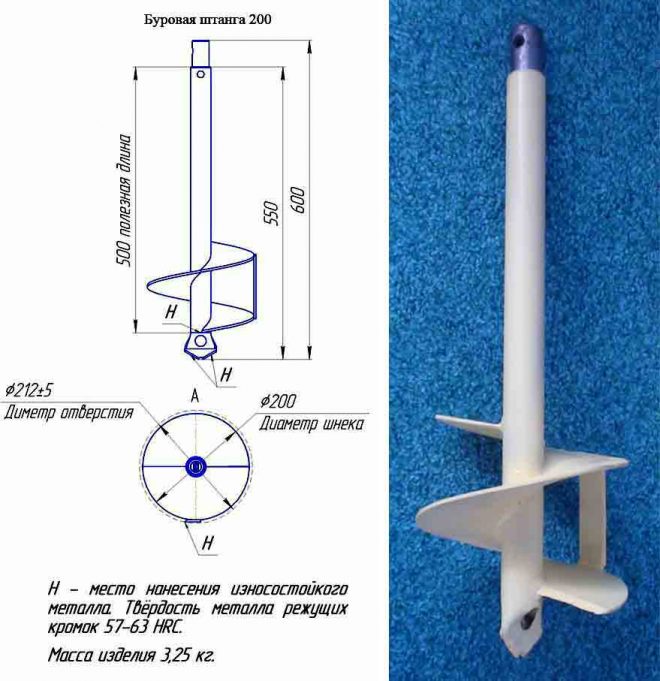
A spoon-type drill or a spoon-type drill is used for drilling deeper wells than a spiral drill, up to a depth of 15-20 m. It is a metal cylinder made of a thick-walled pipe. The cylinder is 60 to 100 cm long, with a vertical (sometimes spiral) slot. The pipe diameter is equal to the diameter of the well and is selected based on the placement of the necessary equipment in the well. A cut in the cylinder is necessary to remove soil from the side walls of the well.A thick drill with a diameter of 16-32 mm or a narrow steel plate 10-15 cm long is welded to the bottom of the cylinder to give and maintain the drilling direction. The drill cylinder is located on a vertical rod with an offset from its axis by 10-15 mm. The offset is designed to make the borehole diameter larger than the diameter of the drill itself. This eccentricity allows you to advance the spoon drill inside the casing pipes and carry out their installation already in the process of drilling, which, in turn, protects the walls of the well from destruction.
Do-it-yourself drilling of holes for poles
Digging holes for the installation of racks involves making preliminary calculations, indicating on the general drawing the location of future supports. The diameter of the cutting edge of the equipment used should be slightly larger than that of the pillar being installed.
Manual hole drilling
Drilling holes begins with marking the site, and in the places of future holes with a bayonet shovel loosen the top layer of soil.
Further, in the prepared place, the drilling tool is installed strictly perpendicular to the soil surface. Now it is necessary to perform twisting movements with pressure, pressure on the tool from top to bottom.
Most likely, after the first 0.4 meters of operation, the device will not be able to calmly continue to move. Then you need to pull out the tool, and pour a bucket of water into the vacated space and leave for about half an hour.
To speed up the process, it is allowed to simultaneously form several recesses at once, maintaining the required distance. That is, dig one hole all the way, fill it with water and go to drill a second one. Continue until the desired result is achieved.
Before installing the pillars, you will need to check the compliance of all holes.
Be sure to maintain a single digging depth, which can be controlled with a tape measure or a bar of wood of the desired length. Or take a small narrow piece of board, make a mark and measure the size of the recess. If there is a shortage, you still need to drill, and when there is a lot, you can simply bury the excess.
Features of the use of automation tools for drilling
Various automated devices are designed to facilitate work, speed up the drilling of holes for poles
But it is important to organize conditions for maximum security and control.
The main goal of automation is to increase the efficiency of the efforts made through the existing mechanism.
It is also necessary to take into account the complexity of compiling the engine: monitor the sufficient level of fuel or the health of the electrically conductive lines, the amount of lubricant on the parts, regularly sharpen the cutting edge, and so on.
TISE technology
TISE special equipment is used for drilling holes for a columnar or pile foundation. The abbreviation stands for technology of individual construction and ecology.
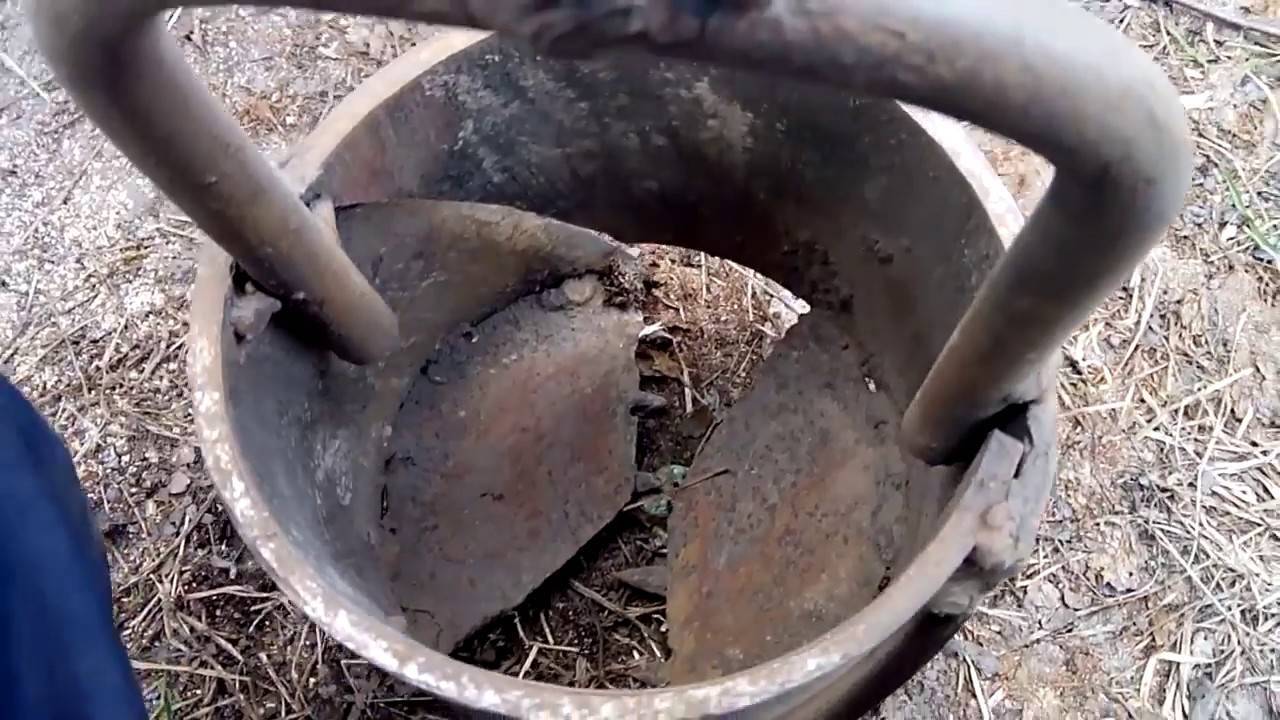
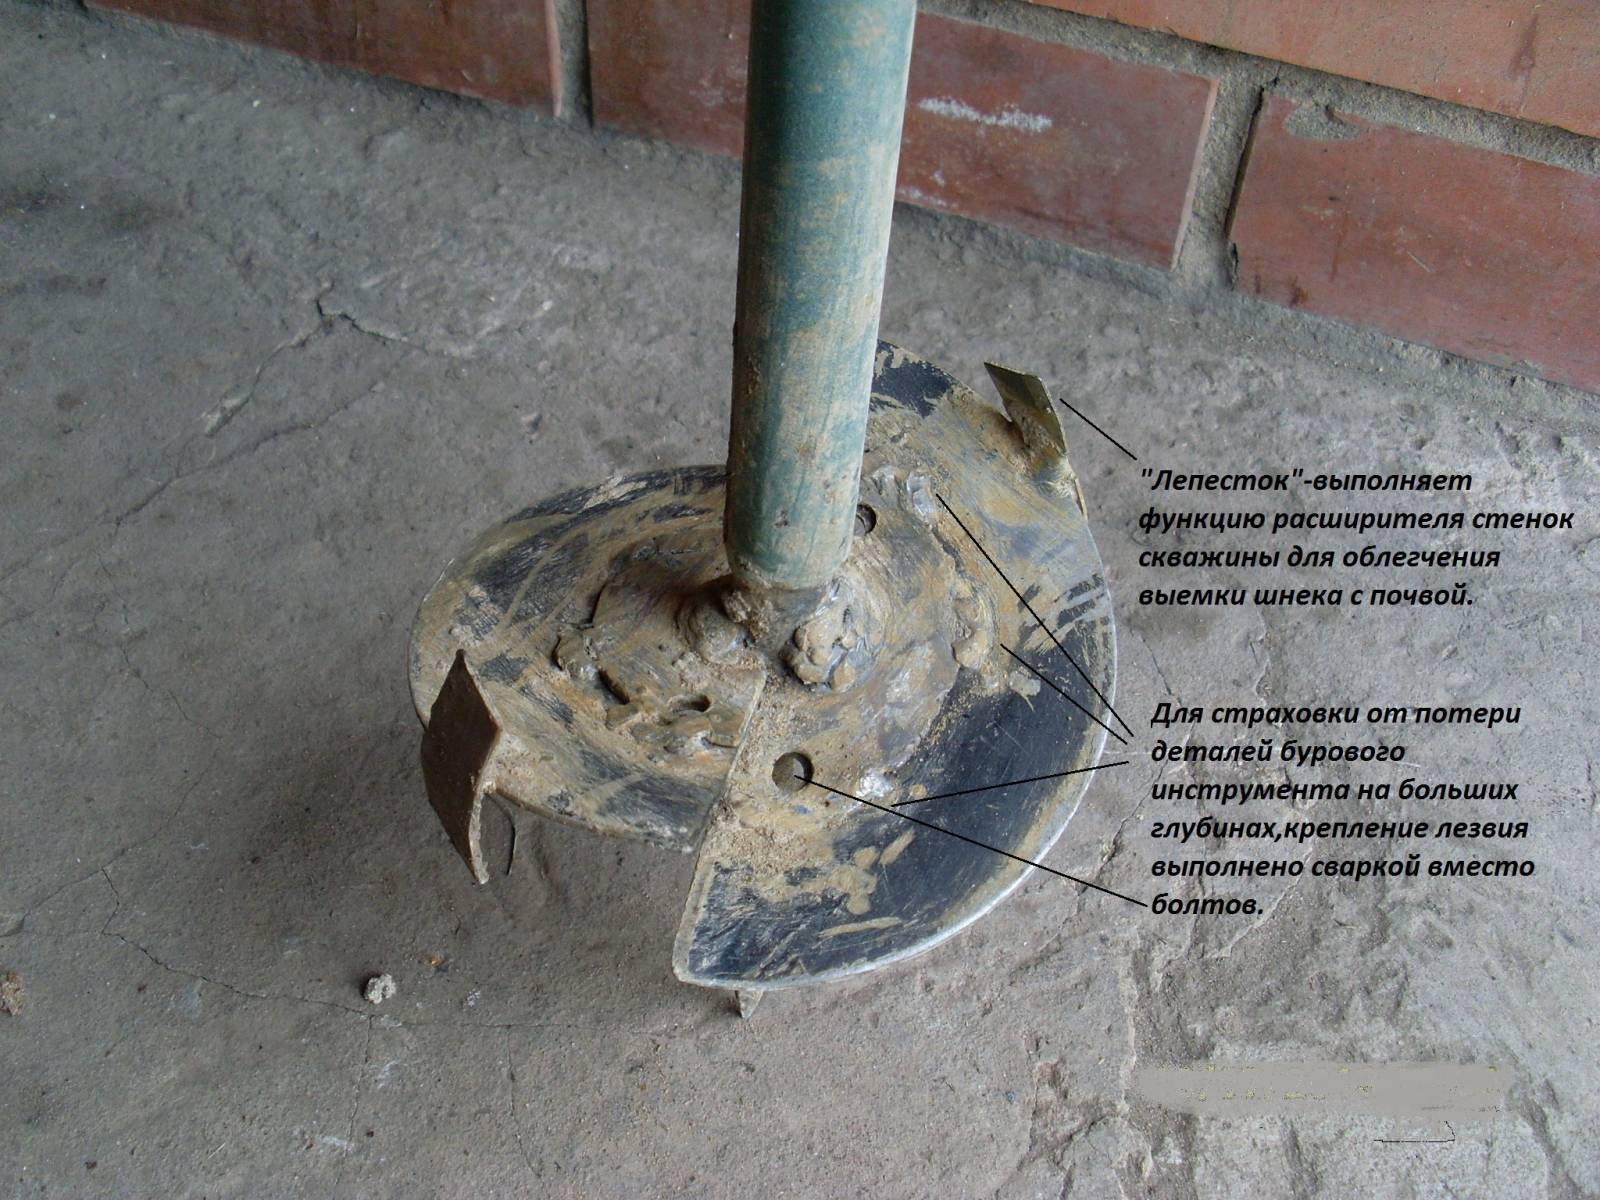
The essence of this development is the presence of a folding blade at the end of the drilling unit, which makes it possible to make the lower part of the hole with an extension. Sometimes the difference between the diameters of the top and bottom reaches two or three times, creating a pear-shaped space.
It is important to keep the distance between the pillars. As supports, you can put plastic pipes, hollow PVC products
Plastic will perfectly cope with the expected load, since the inside is hollow and can be reinforced, filled with cement.
Each span of the fence is attached to the finished supports separately.
Self-construction of the fence should begin with a full familiarization with the technologies of work, so that the result is a high-quality construction. Only painstaking work, combined with knowledge of how to properly install the pillars, will help build a durable fence that fully fulfills its intended purpose. If there is a lack of information, you can always seek the advice of a specialist.


It is possible to get to know the principle of operation of TISE technology better by watching the following video file:
Types of drills for independent drilling of shallow wells in a summer cottage
The choice of drilling method depends on the amount of moisture in the soil, its flowability and hardness. In dense layers that are not oversaturated with top water, it is easier to carry out slaughter using a rotary screw method. As a drill tip, a spiral drill or a drill spoon is used - metal rods with a spiral or stepped petal cutting element. The spoon is additionally equipped with a container to hold the clay inside the tool and prevent it from falling into the barrel.
Handmade homemade spiral drill
A classic do-it-yourself spiral drill is also used in home-made electric or gas drills for wells. The tool is connected to an electric motor (screwdriver, drill, puncher) or chainsaw body. It is much easier and faster to work with such a device than manually.
When you have to work in sandy or clayey-sandy layers, viscous soil with a lot of water, loose crumbling rock, it is better to use the impact (rope-impact) method. To pass up to 20 m, tips are used, which, after impact under their own weight, go deep into the rock.The clay remains in the container and rises to the surface. With your own hands, you can make any of the drills used in the percussion method of downhole wells:
Glass, expansion glass.
Filter needle.
Zhelonka.

The bailer is easy to make yourself
How to make a drill for a well - useful tips
The creation of individual wells is considered one of the simplest, since its depth will usually not be more than 15-20 meters. Sometimes it may be less if the aquifer was reached earlier. For this work You don't need a dedicated team of professionals. You can easily do all the work yourself if you use special equipment that you made with your own hands.
To do this, you must have some skills in working with metal. It's not about something global. You will be fine with minimal skills. Of course, you cannot drill hard rocks with a homemade drill, but you will definitely succeed in drilling an ordinary well in the ground.
- spoon drill;
- spiral screw.
Making a spoon drill
Such a drill should look like a steel cylinder equipped with a special spiral. Its tip is equipped with a steel bucket. So, let's get to work.
- All the work of the drill is taken over by the tip, to the end of which it is desirable to weld a large drill bit for metal.
- The axis of the cylinder must not coincide with the axis of the base and the axis of the drill. Thus, the cylinder will cut the soil mass along the walls. Speaking about the deviation, you need to clarify - this is one and a half centimeters. It is not necessary to make a large offset, since the load created during drilling will be very large.
- The length of the cylinder made of steel sheet should not exceed 70 centimeters.Depending on the flowability of the soil, it is necessary to adjust the gap in the cylinder (reduce it).
- The drilling process must be periodically interrupted in order to extract the accumulated earth.
- If we compare the spoon drill and the screw, then it will be much more difficult to make the first one. To do this, you will need a large metal cylinder. Moreover, the walls in it should be thick.
 Spoon drill
A spoon drill is not used on any soil. The choice falls on wet sand or loose soil.
How to make a drill underwater
To make a drill under water with your own hands, you must understand all the intricacies and principles of its operation. For example, an elementary such drill, which is not even equipped with a screw spiral, should include the following elements:
- drilling cloth;
- a pen.
When choosing a material for making a handle, you can take a durable metal pipe. But it should not be too thin - 3-5 centimeters in diameter. If there is no such pipe nearby, use a tree.
 A simple underwater drill
To create a drill blade, you will need a strip of steel. On one side of it, it is necessary to make a special hole for the handle. On the other - a tip. When rotated, this tip digs the earth and pushes it up. You just have to periodically pull it out. This process must be repeated until the required well depth is obtained.
Step-by-step production of a drill looks something like this.
Step 1. Prepare a one and a half meter strip of steel with a thickness of 1 centimeter.
Step 2. Then you need to make a hole at one end of the strip. This is done at a distance of eight centimeters from the end.
Step 3. Make a pen ring on the other end.
Step 4On the reverse side, create an oval of metal by straightening the metal.
Step 5. Make a sharp tip by cutting off the unnecessary part of the strip.
Step 6. Sharpen the resulting tip.
Step 7 Bend its sides in different directions.


Step 8. Make a drill handle by inserting a metal pipe into the ring you made.
Using this homemade drill, you can easily drill the necessary well anywhere.
Drilling a well with an ice drill
There is a drilling method that will require minimal financial investment. This is the drilling of wells by hand with the help of an ice drill. The tool is used as a drill, and self-made rods are used to build it.

The ice ax knife will serve as an auger, and steel pipes with a diameter of up to 25 mm can be taken as extension rods. To make the process go faster, reinforced cutters are welded to the winding edges of the improvised auger
Among other things, casing pipes will be required to form the wellbore, a shovel and a device for removing cuttings from the site.
Drilling with an auger made of an ice drill includes the following operations:
- Training. We dig a guide recess: a hole two bayonets deep.
- We lower the drill into the resulting recess and begin to screw it into the ground, using the screw tightening rule. It should be remembered that after every three or four revolutions, the tool is removed to the surface and cleaned.
- After the first meter has been passed in depth, we begin the formation of the trunk. To do this, a casing pipe is lowered into the well, its diameter should be slightly larger than the diameter of the drill. It is best to choose lightweight plastic parts equipped with threads for connection.
- When the drilling tool begins to descend into the face to its full height, we attach an extension rod to it. This can be done in two ways: screw the part if there is a thread, or extend it with a steel pin-rod if it is absent.
- In the course of work, we continue the formation of the casing string. As soon as about 10-15 cm of the pipe remains on the surface, we attach the next one to it. The connection must be strong. It is usually done by threading or soldering.
- Periodically check the verticality of the trunk. If the drill starts to beat against the walls of the casing, we level the structure with wooden wedges. They get stuck between the ground and the casing.
- After water appeared in the well and it was decided to stop work, we install a filter and carefully fill the gap between the soil and the casing with gravel.
The casing string can be installed even after completion of drilling operations. In this case, plastic pipes are introduced into the well and connected in series after the previous part is lowered down. This is not the most rational way, since you will have to clean the bottomhole from sludge again.
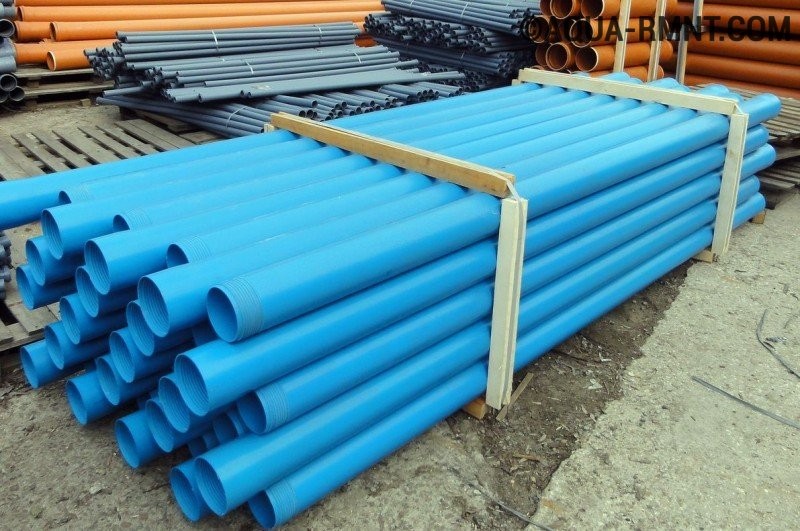
Plastic pipes are very light, strong enough and inexpensive, so they are most often chosen for well casing.
Experience shows that drilling a well with your own hands is quite possible, although quite labor-intensive. The case should be taken with all responsibility: correctly choose the method of drilling, select the necessary materials, study the instructions and then get to work. The result of the efforts spent will be clean water from our own well on the site.
How to make a homemade earth drill with an engine
If you are interested in a drill that works automatically with minimal human effort, then there are several ideas, for example, from a chainsaw. In this case, you should do everything right so as not to hurt yourself.
First of all, the engine power is calculated. The motor on the chainsaw has a large number of revolutions. If the drill rotates at such a speed, then it is extremely difficult to control such a machine. Moreover, there is a serious load on the motor.
You can learn about all the details of this development by watching the prepared video. It tells in detail about how to make a power drill based on a chainsaw:
Plus, there are craftsmen who use the hammer motor when drilling small wells.
In this case, it is important to make the right nozzle and calculate the size of the drilling rig. Here you can also see the details of this miracle:


