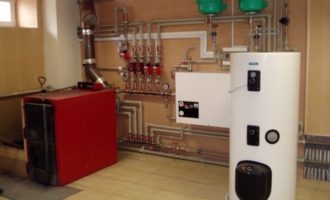
- Boiler design
- Let's start building a boiler
- Types of work and materials
- Do-it-yourself indirect heating boiler: device
- Tying the "indirect" with the boiler
- Installation of the coil and heating element
- Storage water heater, indirect boiler
- General rules for the manufacture of indirect heating boilers
- Indirect heating tanks
- Typical strapping scheme
- Positive and negative points
- Boiler manufacturing procedure
- Stage # 1 - what and how to make a tank?
- Stage # 2 - we solve the issue of thermal insulation
- Stage # 3 - making a coil
- Stage # 4 - assembly and connection of the structure
- Instructions for connecting and starting the system
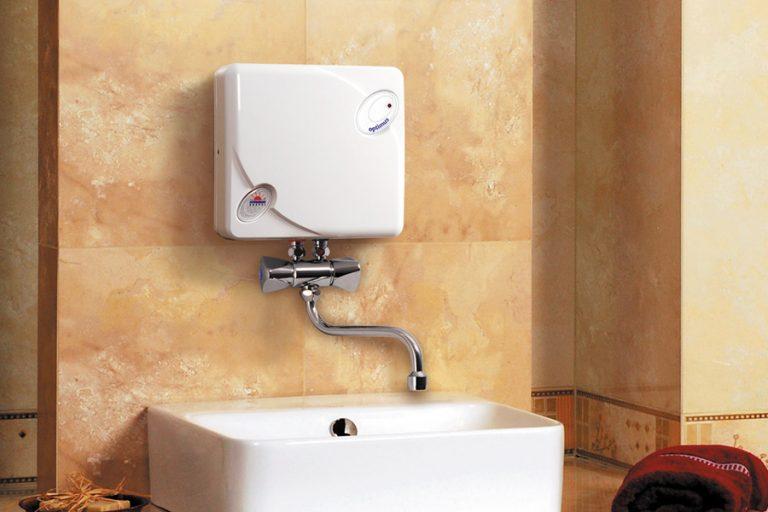
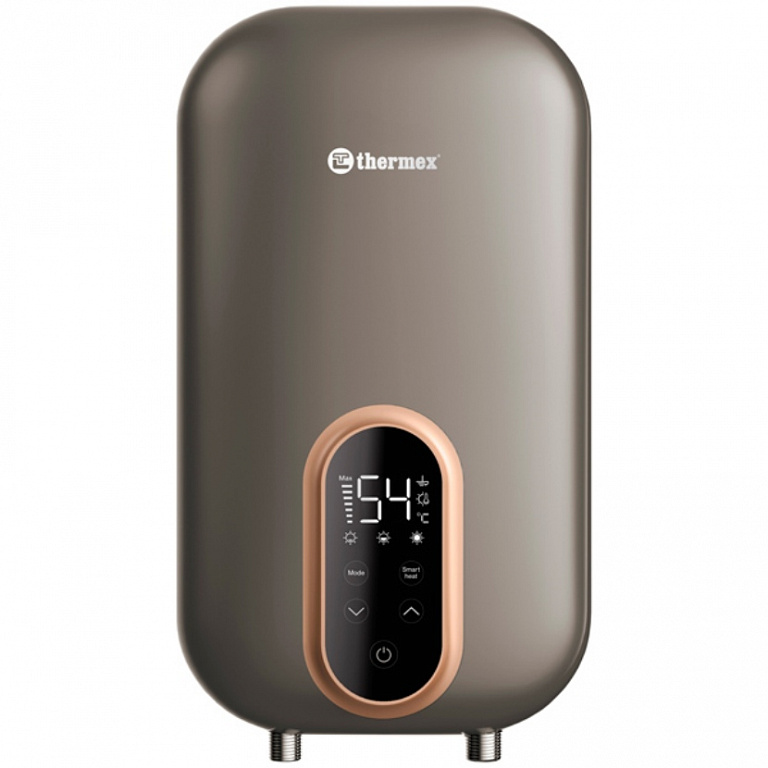
- Variations of water heating equipment
Boiler design
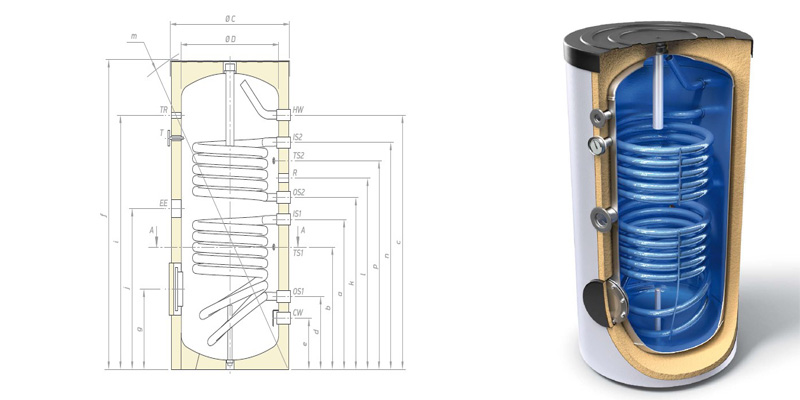
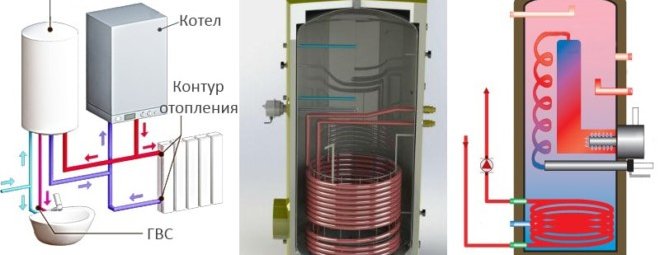
Many private homeowners are interested in the question: what kind of device is this, how does water heat up in it. A product of this type is a large storage structure that does not depend on standard energy sources (gas, electrical systems), in other words, a circulating water heater.
A spiral pipe is installed inside the tank - it is in it that water circulates, heated by an autonomous heating boiler. Cold water enters through the pipe located at the bottom, is evenly heated in the tank and is supplied to the user through the outlet pipe, which is located at the top.For maximum convenience, ball valves are connected to the pipes. Outside, the tank is covered with a thick layer of thermal insulation.
The drawings of this product are very simple and easy to read if you have at least a basic technical background.
Let's start building a boiler
First of all, you need to prepare a container that will act as a water tank. In principle, any non-hermetic metal tank made of stainless material - steel or enameled - will do. You can even take a plastic tank, but with one condition - it must be made of food-grade plastic that does not emit harmful substances into the environment when heated. If the tank is metal, you will need a welding machine to work with it.
Enamelled or glass-ceramic tanks are not very durable and will have to be replaced pretty soon, so a stainless steel tank will be preferable.
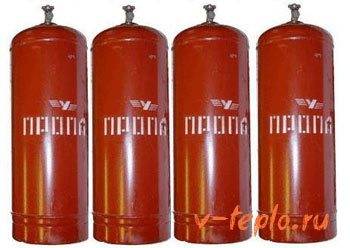
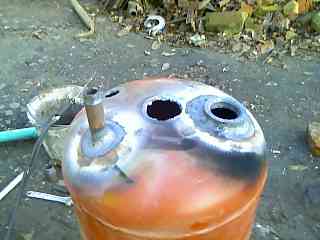
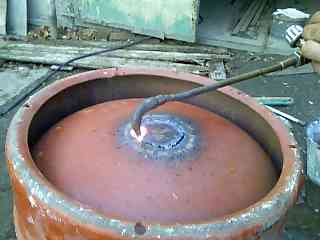
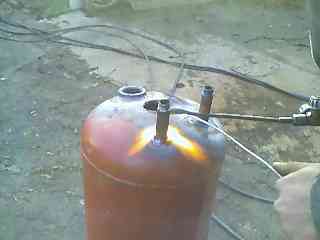
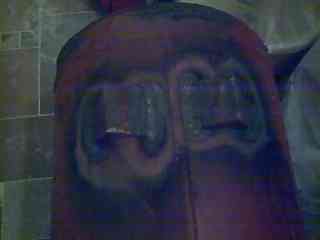
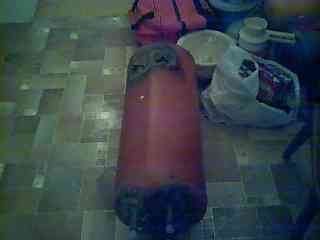
An economical and simple way is to take a gas cylinder as a tank: with the help of a grinder, it must be cut into two halves, cleaned and coated with a primer, and then welded back into a single whole. In extreme cases, you can do without this whole procedure, but you should prepare for the fact that the water will have a strong smell of gas for a long time.
The next stage in the creation of a boiler is the thermal insulation of the walls of its tank. To reduce the level of ordinary heat transfer, you need good thermal insulation. By the way, it will be more convenient to do all this before installing the tank. To isolate the tank, any material will do, even polyurethane foam. Glass wool or other insulation can be attached to the tank with rope, wire, glue.For the insulation to work, the condition must be met - the insulating material must cover the entire surface of the water container. There is another option for improving thermal insulation - install a smaller tank in a larger tank, and lay a layer of insulating material between them.
You can make a coil from any small pipe, be it plastic or metal. Then the task becomes more complicated - the pipe must be wound around some cylindrical object, for example, a log or other pipe. Threaded fittings are installed at the ends of the wound spiral. The spiral from the pipe should not be too dense, since during operation the coil will be covered with scale, and it will be difficult to remove it. From the boiler itself, it is necessary to remove and clean the coil at least once a year.
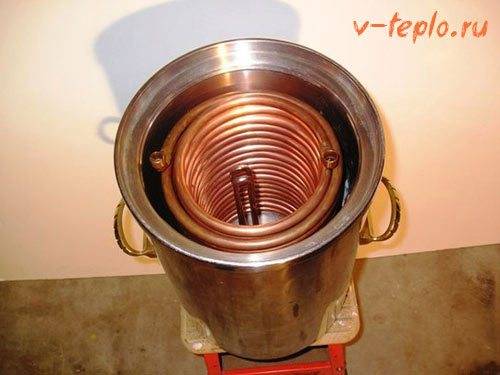
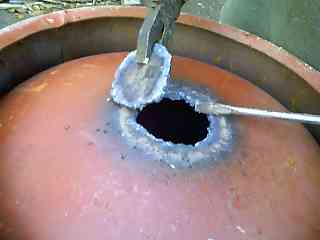
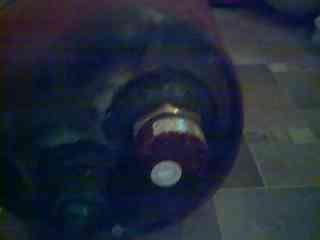
After all the elements of the water heater are ready, it is time to assemble the boiler. Two holes are made in the selected tank - for the inlet pipe with cold water and for the outlet, which will supply heated water. Cranes are attached near the holes. In principle, holes can be made anywhere in the tank, but in practice it is much more convenient if the cold water pipe is connected from below, and the heated supply pipe is connected from the top. A drain pipe is mounted at the very bottom of the tank, through which it will be possible to completely remove water from the tank if necessary, for example, for cleaning or repair.
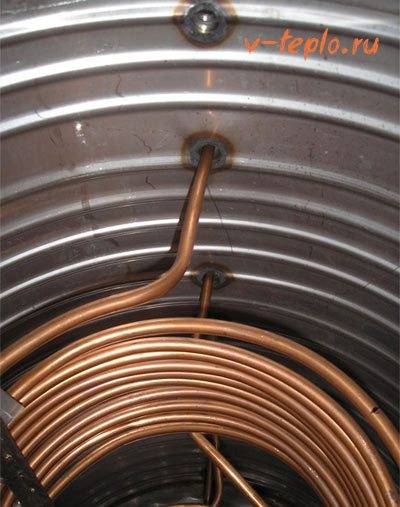
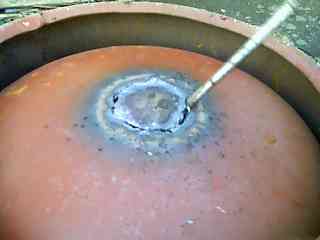
Then you need to cut holes for the coil, and weld metal fittings with a threaded connection to the tank wall, to which the coil itself will be attached.
The tightness of this tube must be checked, and this procedure should be carried out especially carefully if antifreeze or another substance potentially hazardous to human health is used as a coolant. You can check the tightness by blocking one hole and supplying compressed air to the other with a compressor. When checking, the coil should be slightly wetted with soapy water. If there is no tightness, the coil tube must be soldered again.


To ensure that the heat from the tank does not go anywhere, it must be closed with a lid on the latches. The lid also needs to be insulated with insulating material. That's all!
Do-it-yourself indirect heating boiler can only be installed and used!
Types of work and materials
To make a boiler with your own hands, you need to do the following work:
- prepare a metal container with good anti-corrosion characteristics;
- gently bend the pipe for the coil;
- make high-quality thermal insulation of the structure;
- carry out a complete assembly of the entire system;
- bring water;
- securely connect the coil to the home heating system;
- connect the hot water supply to the domestic water supply.
To perform some operations, you will need the following materials and equipment:
- metal-plastic pipes or stainless steel pipes;
- primer based on nitro enamel;
- nut with a diameter of about 32 mm;
- large capacity - a simple gas cylinder will do for a small family;
- welding is required.
We have decided on all the materials and upcoming types of work, now we proceed to direct installation.
Do-it-yourself indirect heating boiler: device
In principle, in order to independently assemble an indirect heating water heater, you will not need many different materials - you need a pipe and a capacity of 150-200 liters. Despite such a small amount of materials and the simple arrangement of an indirect heating boiler, they will have to be pretty tricky to assemble into a single product. By and large, even before the start of the assembly, a number of preparatory work needs to be done. In fact, you will need to make two parts of this device. Let's talk about them in more detail.
Coil. This is the most difficult part of an indirect water heater to manufacture - in essence, it is a pipe twisted into a spiral. You yourself understand that without special equipment it will not work to twist the pipe into a ram's horn - you will have to be cunning and dodge. It should be understood that the shape of the coil is not such an important point. In general, there is a way out of this situation, and not even one. Firstly, the coil can be made from a copper pipe - it is sold in coils and, in fact, is already twisted. You only need to reduce the diameter of this bay and stretch the spiral in height - this is not difficult to do by hand, and comments are unnecessary here. The only difficulty that may arise in such a manufacture of the coil is its connection to the tank itself - either it will also have to be made of copper, which is not very good and also expensive, or use special adapters. By and large, this is not such a problem - any plumber will insert the spurs into the container with the help of gaskets and connect the coil to them through detachable threaded connections.Secondly, the coil can be assembled from a black pipe and ready-made turns (bends) - yes, it will not have a spiral shape, but in general it will fulfill its purpose. The disadvantage of the "black" pipe is its fragility. In general, a copper pipe would be an ideal option - we will stop on it in this example, and you already do as you see fit.
Storage tank - as a standard it is made of sheet iron. In the factory, it is given the shape of a cylinder, but if you make this unit yourself, you will have to be content with the shape of a cube. Or you will need to find a ready-made container in the form of a barrel or something else that can fit a copper spiral
From the point of view of the manufacturing technology of such a container, attention should be paid to only two points - this is tightness (the tank will need to be checked for its ability to withstand water under pressure) and partial manufacturing. To insert a coil into it, the tank must be open at least on one side - it is brewed later, after connecting the two parts of the tank.
In principle, you can be a little far-sighted and play it safe for all occasions. For example, in the summer it would be unreasonable to start a boiler and burn gas for the sake of one hot water supply. To make the indirect heating tank independent of the heating system, an electric heating element can be additionally built into it. An indirect heating boiler with a heating element can be operated both in winter and in summer - for the manufacture of this universal option, you will additionally need the heating element itself (exactly the same as mounted in electric storage water heaters), as well as a coupling for its installation.
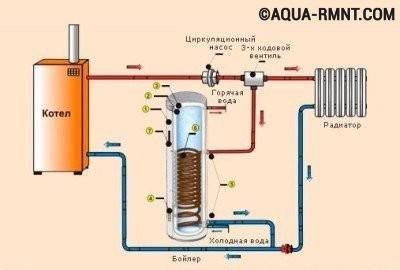
Tying the "indirect" with the boiler
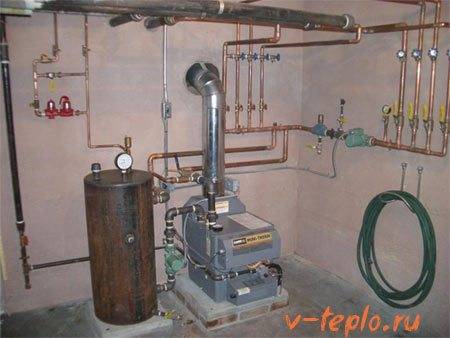
First of all, the unit must be installed on the floor or securely attached to a main wall made of brick or concrete. If the partition is built of porous materials (foam block, aerated concrete), it is better to refrain from wall mounting. When installing on the floor, keep a distance of 50 cm from the nearest structure - clearance is necessary for servicing the boiler.
Recommended technological indents from the floor boiler to the nearest walls
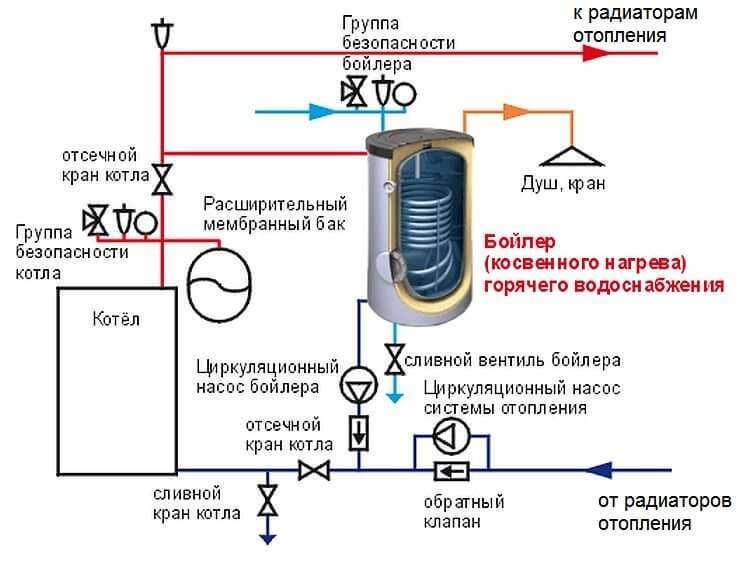
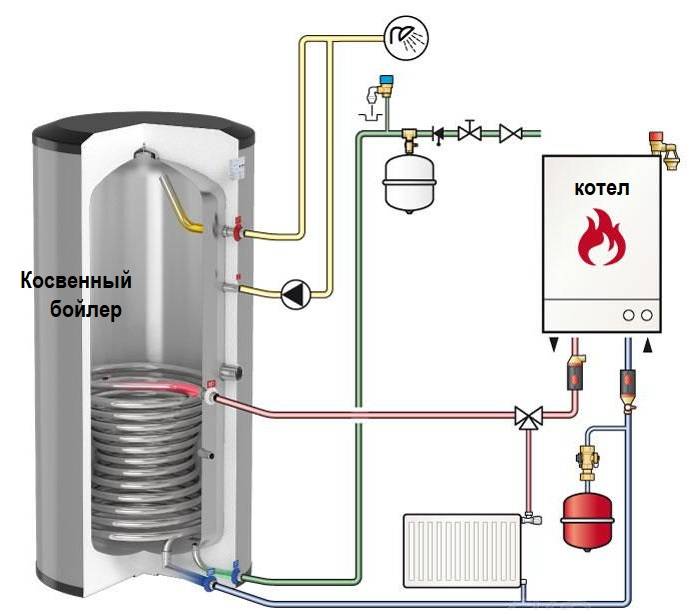
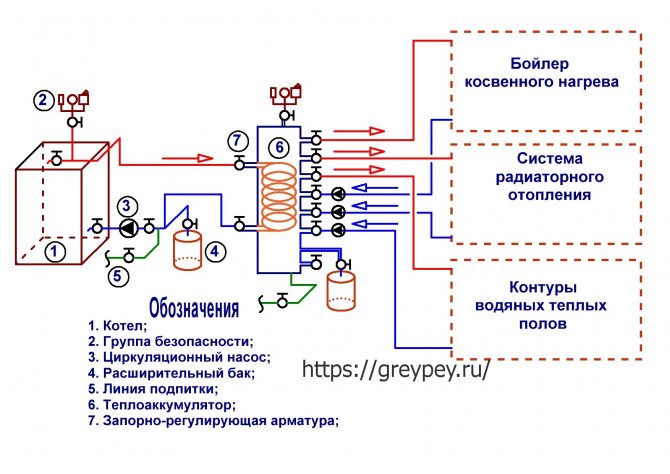
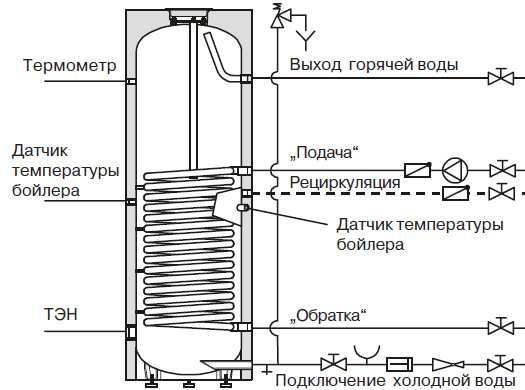
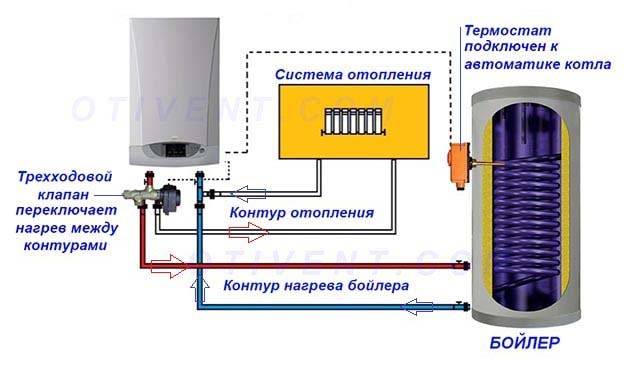
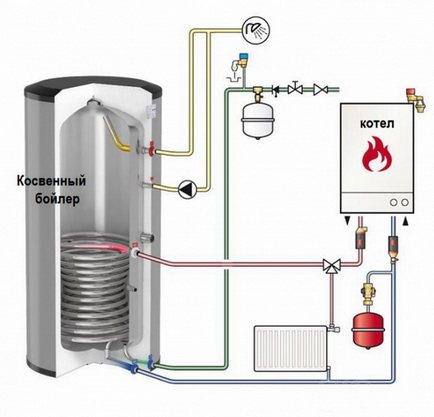
Connecting the boiler to a solid fuel or gas boiler that is not equipped with an electronic control unit is carried out according to the diagram below.
We list the main elements of the boiler circuit and indicate their functions:
- an automatic air vent is placed at the top of the supply line and discharges air bubbles that accumulate in the pipeline;
- the circulation pump provides the coolant flow through the loading circuit and the coil;
- a thermostat with an immersion sensor stops the pump when the set temperature inside the tank is reached;
- check valve eliminates the occurrence of parasitic flow from the main line to the boiler heat exchanger;
- the diagram conventionally does not show shut-off valves with American women, designed to turn off and service the apparatus.
When starting the boiler “cold”, it is better to stop the circulation pump of the boiler until the heat generator warms up
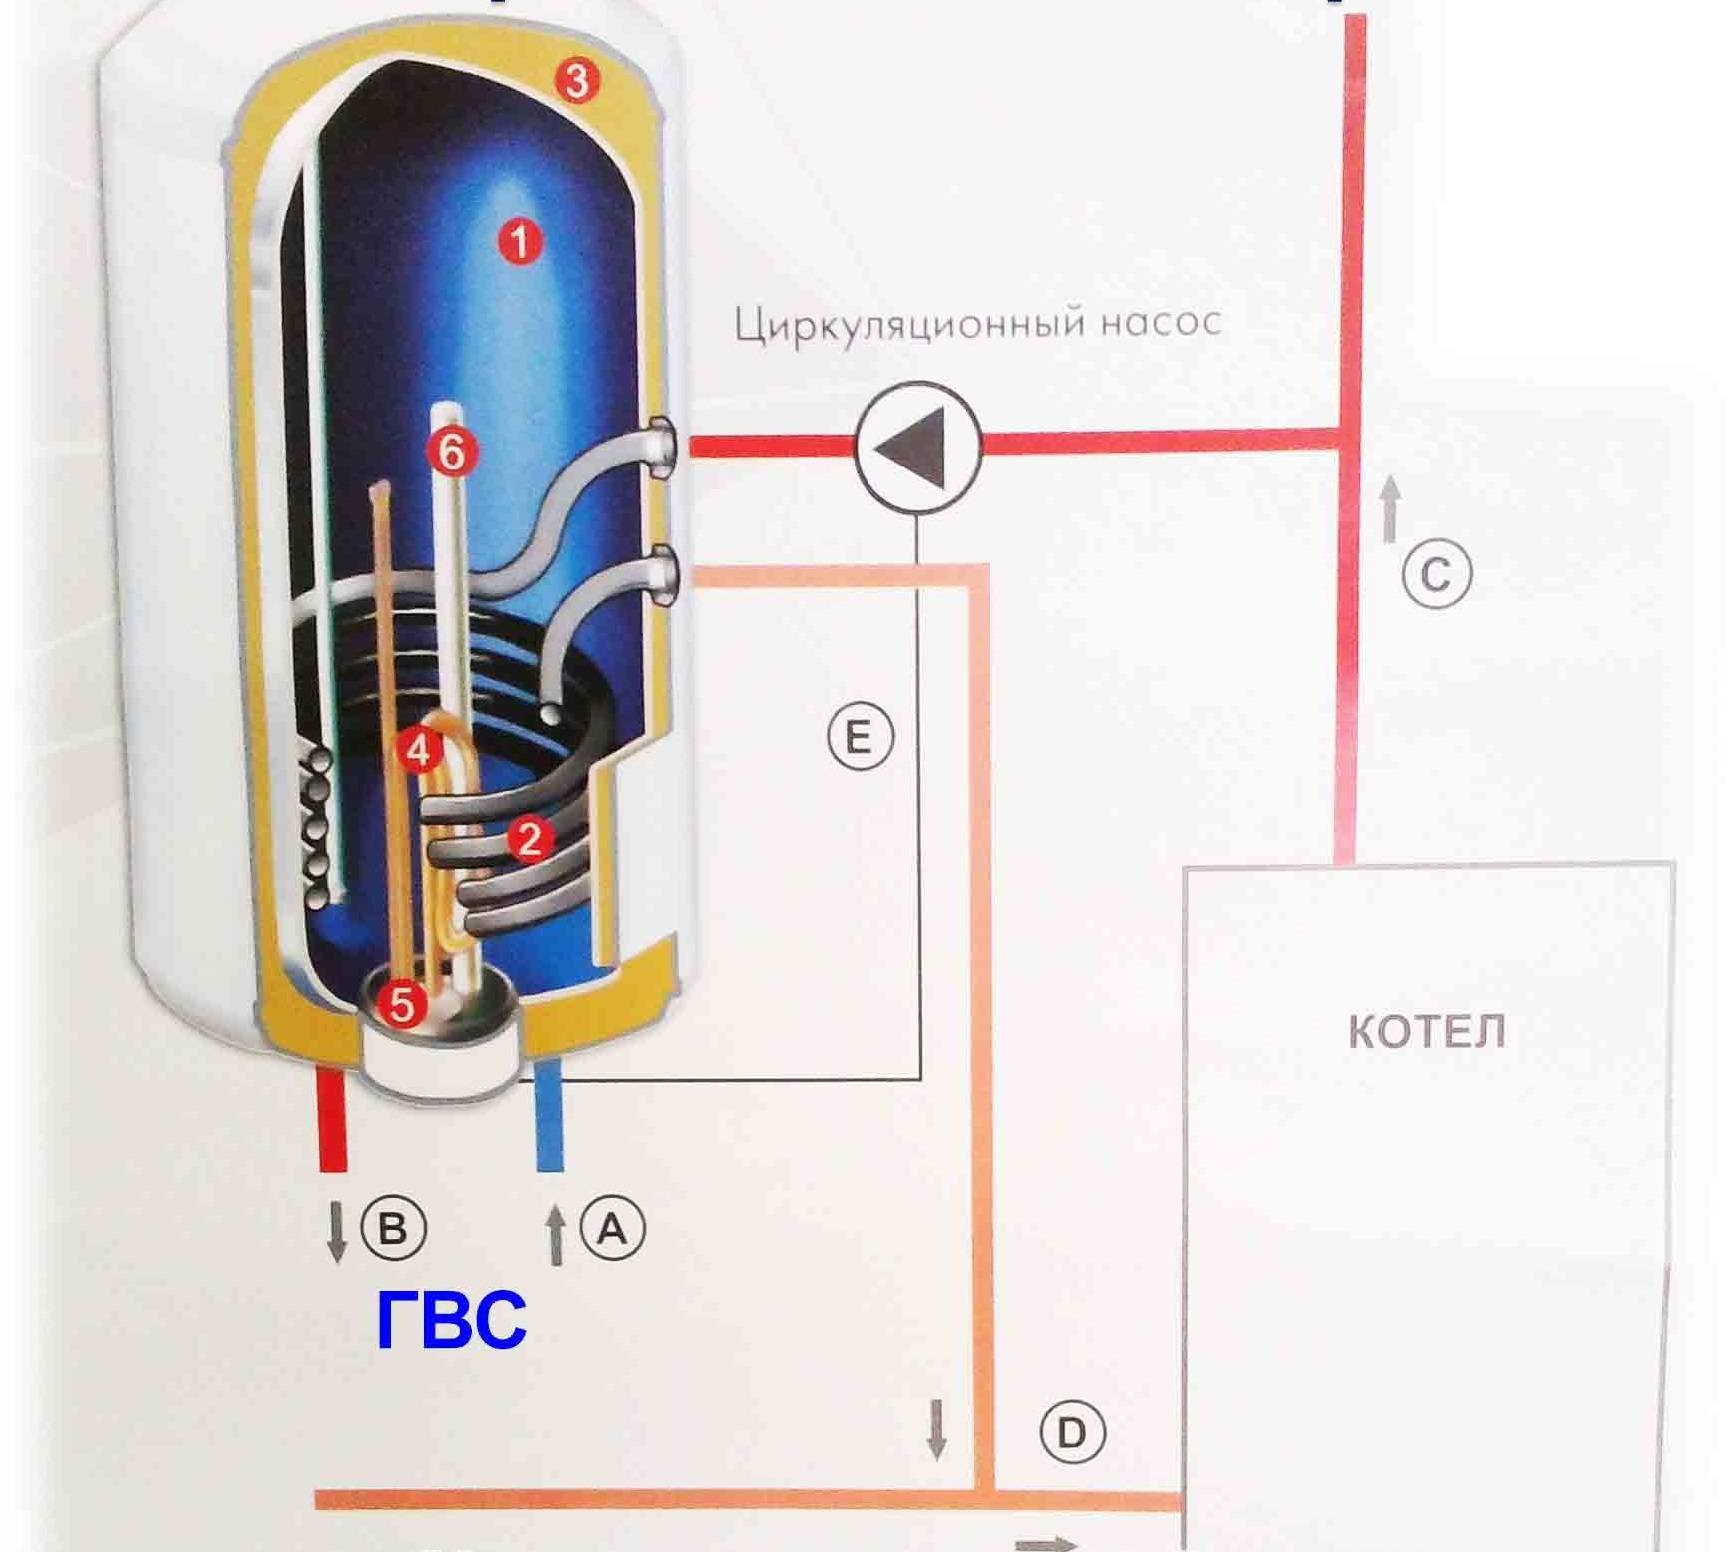
Similarly, the heater is connected to more complex systems with several boilers and heating circuits. The only condition: the boiler must receive the hottest coolant, therefore it crashes into the main line first, and it is connected directly to the hydraulic arrow distribution manifold, without a three-way valve.An example is shown in the strapping diagram by the method primary / secondary rings.


The general diagram conventionally does not show the non-return valve and boiler thermostat
When it is required to connect a tank-in-tank boiler, the manufacturer recommends using an expansion tank and a safety group connected to the coolant outlet. Rationale: when the internal DHW tank expands, the volume of the water jacket decreases, there is nowhere for the liquid to go. Applied equipment and fittings are shown in the figure.
When connecting tank-in-tank water heaters, the manufacturer recommends installing an expansion tank on the side of the heating system
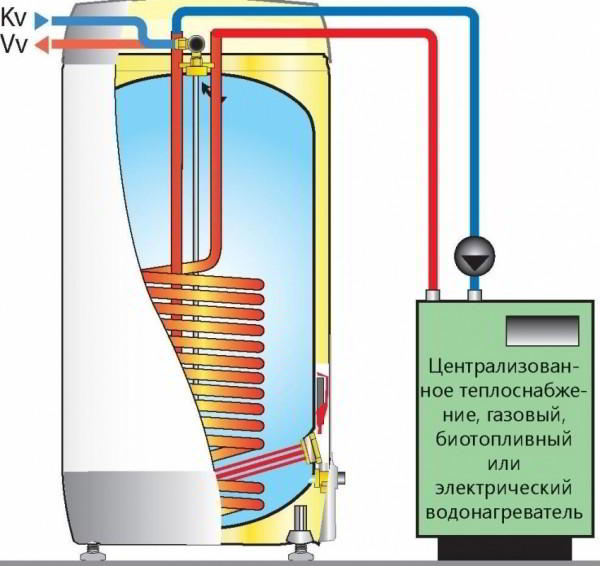
The easiest way is to connect an indirect heating boiler to wall-mounted boilers, which have a special fitting. The remaining heat generators, equipped with electronics, are connected to the water heater via a motorized three-way diverter valve controlled by the boiler controller. The algorithm is this:
- When the temperature in the tank drops, the thermostat signals the boiler control unit.
- The controller gives a command to the three-way valve, which transfers the entire coolant to the loading of the DHW tank. The circulation through the coil is provided by the built-in boiler pump.
- Upon reaching the set temperature, the electronics receives a signal from the boiler temperature sensor and switches the three-way valve to its original position. The coolant goes back to the heating network.
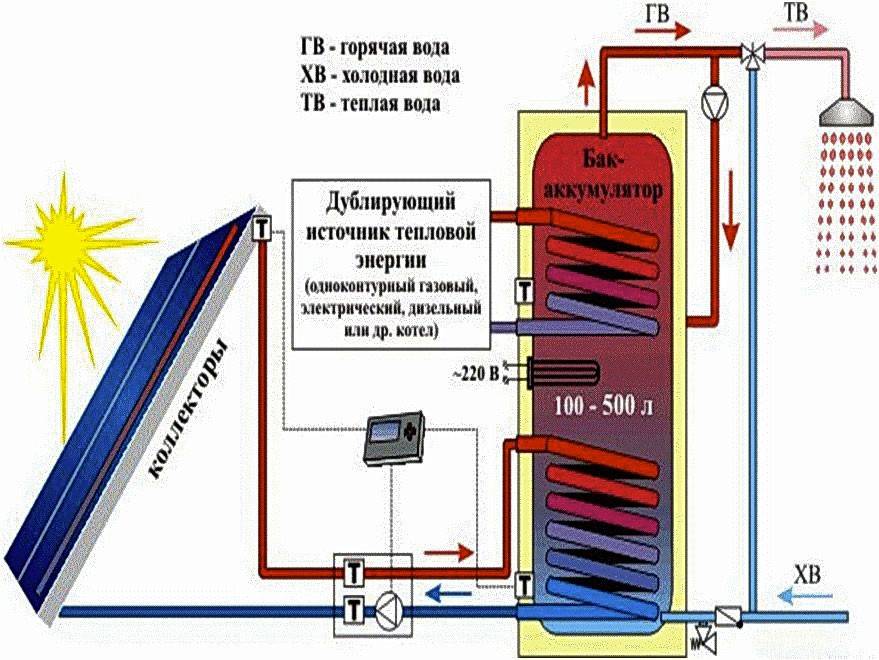
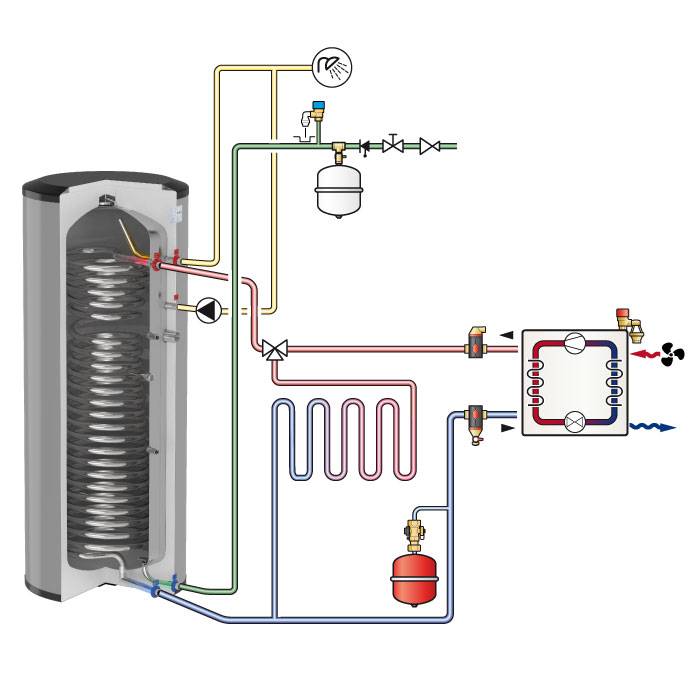
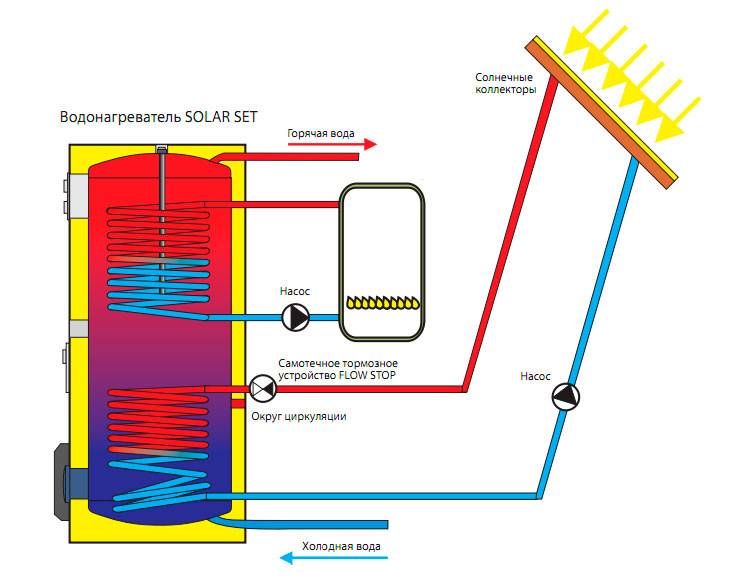
The connection of the solar collector to the second boiler coil is shown in the following diagram. The solar system is a full-fledged closed circuit with its own expansion tank, pump and safety group.Here you can not do without a separate unit that controls the operation of the collector according to the signals of two temperature sensors.
Heating water from the solar collector must be controlled by a separate electronic unit
Installation of the coil and heating element
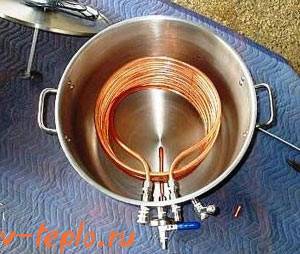
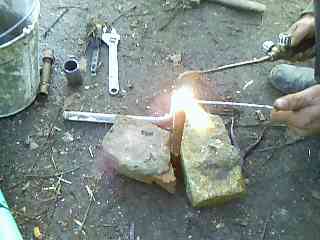
Next, we proceed to the manufacture of the coil - we recommend choosing a copper tube, since copper bends easily and resists corrosion well. The recommended tube diameter is 10-20 mm. To calculate the length, we will use the special formula l=P/π*d*Δt, where l is the tube length, P is the heat output of the coil, d is the tube diameter in meters, Δt is the temperature difference. Thermal power should be 1.5 kW per 10 liters of water. The temperature difference is calculated by subtracting the inlet water temperature from the heating medium temperature.
Let's try to calculate using an example in which we will have a copper tube with a diameter of 0.01 m and a tank of 100 liters. The required thermal power of the coil is 15 kW, the inlet water temperature is +10 degrees, the coolant temperature is +90 degrees. Using the above formula, we find out that the length of the coil should be approximately 6 meters.

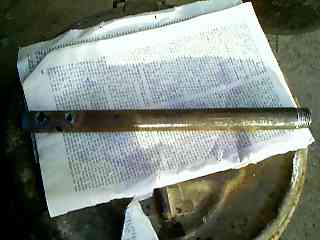
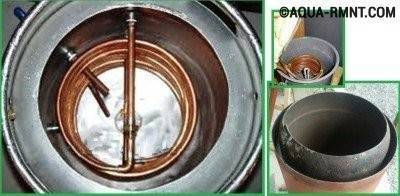
Wrap the copper tube around the plastic tube. The rate of heating of water in the tank will depend on the number of turns of the resulting spiral.
To make a coil, we wind a copper tube on some kind of base, for example, on a plastic sewer pipe. Winding with force is not needed, otherwise it will be problematic to remove the coil from the base. In conclusion, we solder the fittings to the coil - with their help we connect to the fittings inside the tank.This completes the work with the coil, and we just have to install a heating element in the lower part of our home-made boiler, embedding it in a convenient way.
Combined indirect heating water heaters are designed so that the heating elements are located in the lower part, from where the heated water can rise up, gradually mixing. As for the coil, it is advisable to expand it a little and install it so that the water is heated throughout the entire volume - this will ensure faster heating.
Storage water heater, indirect boiler
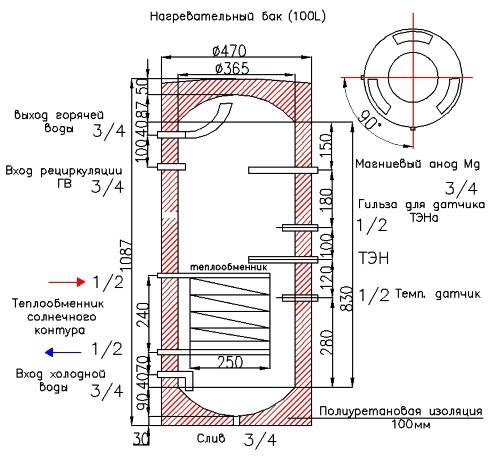
In order to get a water heater also of a bone type - storage, so that it is heated from the heating system, we cut out holes with a diameter of 50 for the heat exchanger, in other words, a pipe in a pipe. Insert the pipe through and weld the joints, plugs and connecting threads. Then, when you connect the water heater to the boiler or heating, bring the supply from above, and bring the return from the bottom of the indirect boiler. You can generally weld it on a vertical supply riser coming from a heating boiler, there are fewer pipes and there is no question of mounting it on the wall. There are other options for indirect heating, but the one given is the easiest in terms of execution.
The whole thing is welded by gas welding or electric welding. We take a steel corner and make ears for mounting and mounting the boiler on the wall. I usually use two factory bolts bent from one edge for fastening, they are quite enough, ask on the market - fasteners for boilers.


Next, the water heater should be wrapped with thermal insulation, the substrate under the laminate keeps heat beautifully and well.Buy two meters and thicker (from 5 mm.), Cut out two circles for a hat, give them the necessary shape with the help of ingenuity, a felt-tip pen and scissors. With the remaining insulation, wrap the balloon around first with the shiny side to the tank, the second layer with the shiny side out. It turns out like a thermos and you can already start installing the boiler.
General rules for the manufacture of indirect heating boilers
- A heat-insulating shell is required. Otherwise, the heated water will rapidly cool through the outer walls. The best option is to install the working container in a larger barrel, and blow out the gap between the walls with construction foam.
- You can wrap the container with building thermal insulation materials, although it does not look so aesthetically pleasing (but inexpensive). If the boiler is located in the boiler room, you can save.
- The inner pipe (if a serpentine circuit is used) must be corrosion resistant. After assembling the structure, access for maintenance will be difficult.
- When using electrochemical couples (eg aluminum tank + copper tube), the connection flanges must be insulated with neutral gaskets.
- It is advisable to arrange an inspection window in the wall of the outer tank through which cleaning or maintenance is carried out.
Indirect heating tanks
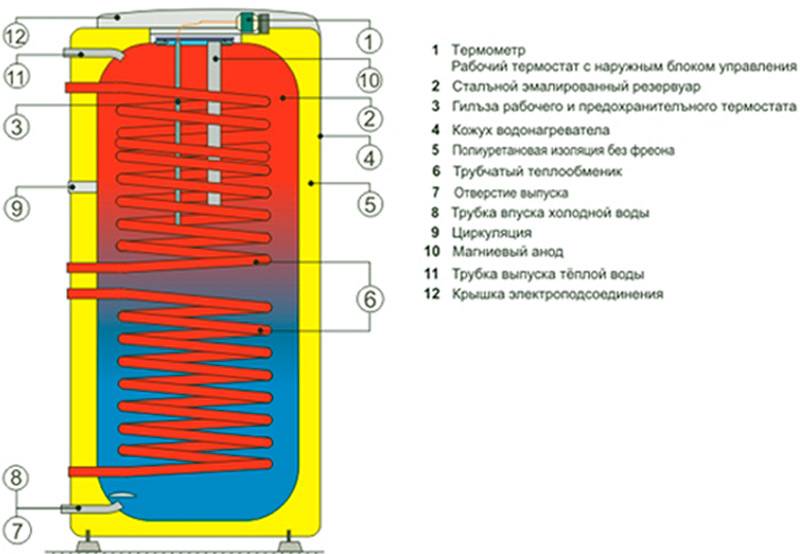
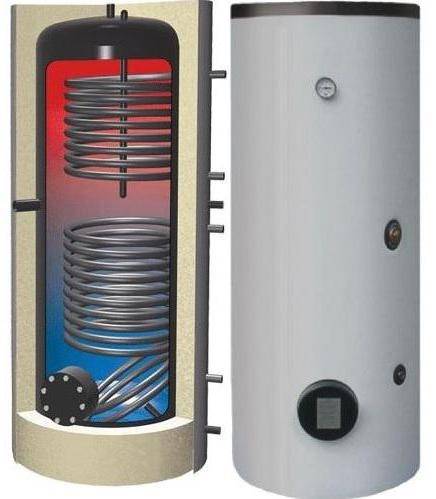
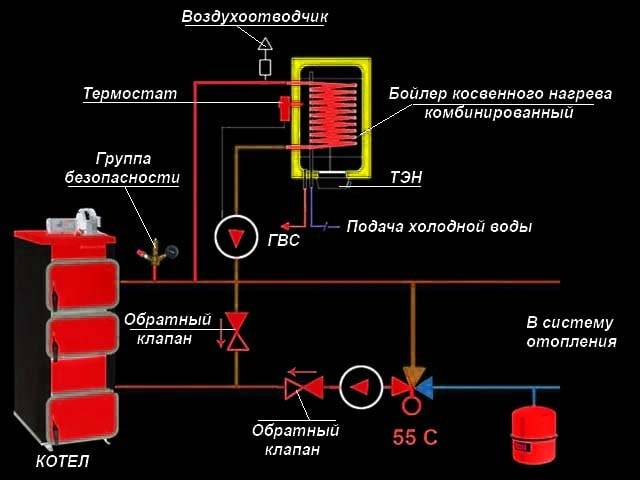
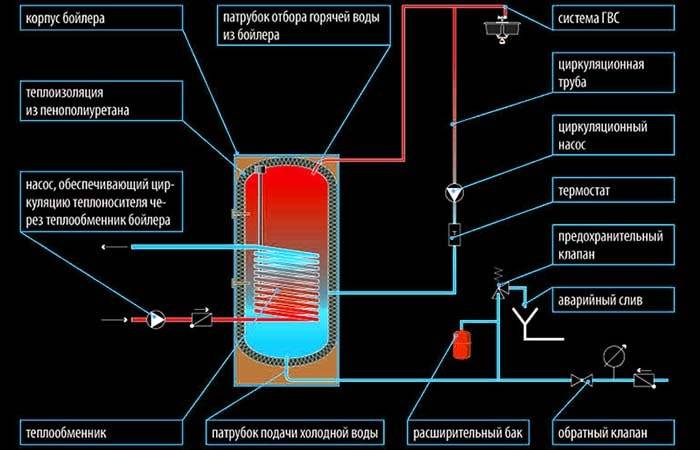
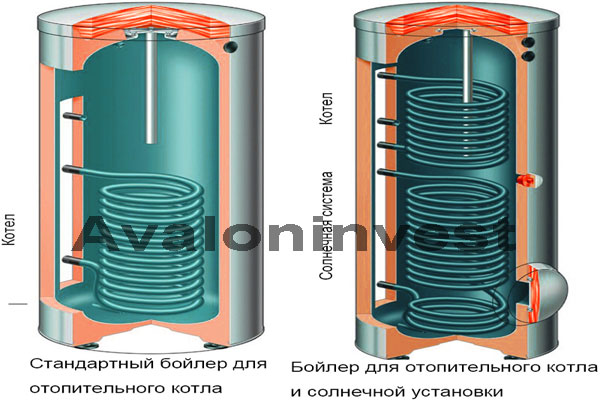
If we compare the designs of different water heaters, then an indirect boiler is the simplest and most reliable option for a storage tank for hot water. The unit does not produce heat on its own, but receives energy from outside, from any hot water boiler. To do this, a heat exchanger is installed inside the insulated tank - a coil, where hot coolant is supplied.
The structure of the boiler repeats the previous designs, only without burners and heating elements.The main heat exchanger is located in the lower zone of the barrel, the secondary one is in the upper zone. All pipes are located accordingly, the tank is protected from corrosion by a magnesium anode. How does the "indirect" function:
- A coolant heated to 80-90 degrees (minimum - 60 ° C) enters the coil from the boiler. The circulation through the heat exchanger is provided by the boiler circuit pump.
- The water in the tank is heated up to 60-70 °C. The rate of temperature rise depends on the power of the heat generator and the initial temperature of the cold water.
- The water intake goes from the upper zone of the tank, the supply from the main line goes to the lower one.
- The increase in the volume of water during heating perceives an expansion tank installed on the "cold" side and withstanding a pressure of 7 bar. Its usable volume is calculated as 1/5 of the capacity of the tank, at least 1/10.
- An air vent, safety and check valve must be placed next to the tank.
- The case is provided with a sleeve for the temperature sensor of the thermostat. The latter controls a three-way valve that switches the coolant flows between the heating and hot water branches.
The water pipes of the tank are conventionally not shown.
Typical strapping scheme
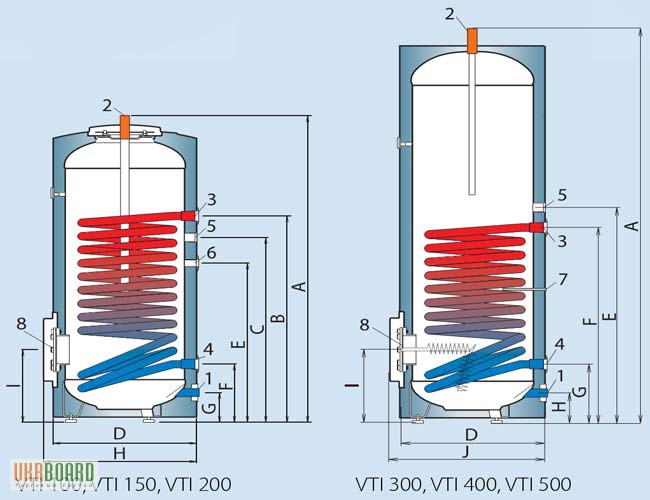
Indirect boilers are produced in horizontal and vertical design, capacity - from 75 to 1000 liters. There are combined models with an additional heating source - a heating element that maintains the temperature in the event of a heat generator stopping or burning firewood in the furnace of a TT boiler. How to tie an indirect heater with a wall heater correctly is shown in the diagram above.
The heat exchange circuit pump is switched on by the command of the contact thermostat installed in the heating tank
Not all wood and gas boilers are equipped with "brains" - electronics that control the heating and operation of the circulation pump. Then you need to install a separate pumping unit and connect it to the boiler according to the scheme proposed by our expert in the training video:
Positive and negative points
Compared to gas models of boilers, indirect boilers are inexpensive. For example, a wall-mounted unit from the Hungarian manufacturer Hajdu AQ IND FC 100 l costs 290 USD. e. But do not forget: the hot water tank is not able to work independently, without a heat source. It is necessary to take into account the costs of piping - the purchase of valves, a thermostat, a circulation pump and pipes with fittings.
Why is an indirect heating boiler good:
- water heating from any thermal power equipment, solar collectors and electric heating elements;
- a large margin of productivity for hot water supply;
- reliability in operation, minimum maintenance (once a month, warming up to the maximum from legionella and timely replacement of the anode);
- boiler loading time can be adjusted, for example, moved to the night.
The main condition for the correct operation of the unit is sufficient power of the thermal installation. If the boiler is chosen purely for the heating system without a reserve, the connected boiler will not allow you to warm up the home or you will be left without hot water.
In order for hot water to immediately flow from the mixers, it is worth installing a return recirculation line with a separate pump
The disadvantages of an indirect heating tank are its decent size (small ones are installed less often) and the need to heat the boiler in the summer to provide hot water.These disadvantages cannot be called critical, especially against the background of high performance and versatility of such equipment.


Boiler manufacturing procedure
To make a homemade indirect heating boiler, you need:
- prepare a container;
- make a coil;
- perform thermal insulation work;
- assemble the structure;
- connect the coil to the heating system of the house;
- connect the cold water supply;
- make a tap or wiring for warm water.
Stage # 1 - what and how to make a tank?
The container that will contain warm water can be made of plastic, stainless steel, enameled metal, etc. In a word, any corrosion-resistant tank that is clean enough and of suitable dimensions will do. To work with a metal container, of course, you need a welding machine. Tanks coated with enamel or a layer of glass-ceramic are not particularly resistant to corrosion and may require replacement as early as a year after the start of operation. Stainless steel tanks are much more reliable and durable.
A gas cylinder is considered quite suitable for the manufacture of a boiler. It is best to purchase a new container, but if this is not possible, a used cylinder will do. You just need to cut it into two parts, and then carefully clean and prime the inner walls of the cylinder. If this is not done, you will have to come to terms with the fact that the water coming from the boiler smells of propane for several weeks.
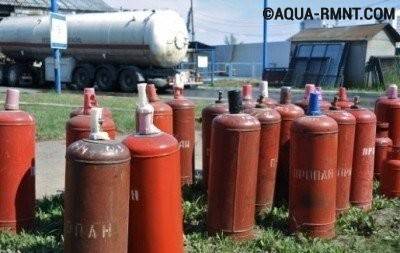
A suitable tank for an indirect heating boiler can be a gas cylinder. It is strong enough, has suitable dimensions and configuration.
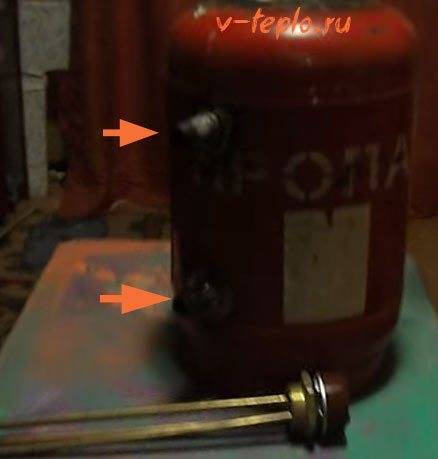
Holes are made in the tank:
- for supplying cold water;
- for the withdrawal of hot water;
- two - for mounting a coil with a coolant.
Since heating equipment is not used in the summer, alternative sources of heating the coolant will be needed. Some successfully use rooftop solar panels for this purpose. A more budgetary solution to the problem is the installation of an electric heating element.
Stage # 2 - we solve the issue of thermal insulation
To reduce natural heat loss, it is imperative to put a layer of good thermal insulation on the outside of the boiler. Thermal insulation work, as a rule, is more convenient to carry out even before the structure is assembled. As a heater, you can use any suitable material, even ordinary polyurethane foam. The insulation is fixed with glue, wire ties or in any other way.
It is important that the entire body of the boiler is insulated, since the efficiency of the device depends on the quality of the thermal insulation.
Sometimes thermal insulation is done using a larger tank. A boiler is inserted into it, and the space between the walls of these containers is filled with insulation
Stage # 3 - making a coil
The coil is made of a metal or plastic pipe of small diameter. The pipe is carefully wound on a cylindrical mandrel, which can be used as a sufficiently strong pipe of large diameter, a rounded log, etc.

To make a coil for an indirect heating boiler, you can use both metal and plastic pipes of small diameter. They are placed in the center of the container or along its walls.
The diameter of the coil itself and the number of turns are selected depending on the size and configuration of the tank.The larger the area of the coil with which the water is in contact, the faster the water will warm up to the required temperature.
It is not necessary to make special efforts when winding the pipe on the mandrel. If the coil is too tight against the mandrel, it will be difficult to remove.
During operation, various deposits accumulate on the surface of the heating element. About once a year, the coil should be cleaned of them.


Stage # 4 - assembly and connection of the structure
After all the elements are ready, you should assemble the device. If during the assembly process the thermal insulation layer was damaged, it must be carefully restored.
The coil is connected to the heating system of the house, then cold water supply pipes are installed. For hot water, a tap is usually installed or wiring is immediately done to the bathroom, kitchen sink, etc.
Brackets can be used to install such a boiler on the wall. To securely fix the structure, special “ears” are welded to the metal tank, which are made from a steel corner. It remains to securely attach the device in a convenient place and enjoy a full hot water supply at no extra cost.
Instructions for connecting and starting the system
When preparing the boiler for operation, it is first connected to the heating system. It can be a network of a home autonomous boiler or a central highway. During the connection process, the lid of the water heater tank must be open. When all the pipes are connected to each other in the right order, open the shut-off valve of the return pipe to make sure that there are no leaks at the joints and the pipes themselves.
If no leaks are found, you can open the coolant supply valve to the coil.After the spiral warms up to normal temperature, the structure is once again inspected for leaks.
If everything is in order, close the tank lid and draw water into it, and also open the hot water supply tap to the water supply. Now you can evaluate the quality of heating.
Variations of water heating equipment
Water heaters are divided into the following groups:
There are boilers with a built-in water heater. A copper tube is mounted in them, which is a spiral.
A homemade water heater with professional assembly can last 5 years or more. At the same time, its price is an order of magnitude lower than bought in the store. The electricity consumption for the operation of home-made water heaters is minimal, and the heating time is commensurate with the factory counterpart. Creating an electric water heater with your own hands is quite a realistic idea. Such homemade products can be used both in country houses and in residential apartments.