- The device and installation locations of socket blocks
- Note
- What gives the use of the socket block
- Overview of products of well-known brands - manufacturers of Internet sockets
- Stages of connection and installation of the socket block
- Installation rules and useful tips
- Choosing a Receptacle Compatible Back Box
- Installation of a socket with a ground wire
- Why is grounding necessary?
- Overhead option for installing sockets
- The most common installation errors
- Types of devices and their features
- Main popular types
- Structure and components
- Conclusions and useful video on the topic
The device and installation locations of socket blocks
The design of the socket block differs from the usual socket only in the number of "seats". It consists of a plastic body and an internal part, represented by terminals with contacts and terminals, to which springs for plugs are attached.
Most modern models are equipped with grounding contacts, which are designed to increase the safety of the system and reduce the voltage from all electrical appliances connected through the unit.
The number of connection points of the installed socket block is determined based on the presence of household appliances planted in one group
Socket blocks are of two types:
- Designed for concealed wiring.They are installed in the thickness of the wall using a module made of socket boxes made in the form of glasses;
- Designed for open wiring. They are installed on the wall surface using a socket box made in the form of a plate.
In addition to the two main types of socket blocks, there is also a very practical retractable type. They are easily mounted in a countertop or in a cabinet, from which they are pulled out during the period of operational need. Their principle of operation is similar to power sources located on / in the wall.
Socket blocks are often installed in kitchens, placing them at a desktop at a height of 10 cm, inside kitchen cabinets and behind the walls of adjacent cabinets at a level of 30-60 cm from the finished floor. They are convenient to use when connecting a group of low-power household appliances: hoods, multicookers, refrigerators ...
The mortise housing of a retractable socket group, consisting of three to five electrical outlets, remains hidden in the tabletop until you lightly press on its top panel
When arranging halls and living rooms, they are placed near computer tables or behind a TV screen. Outlet groups of three electrical outlets can often be found in bathrooms. But in this case, devices with waterproof cases are used, placing them at a distance of at least 60 cm from the water source.
Note
This article only describes how to install and connect the socket block, despite the fact that today we also have such a combination as a socket with a switch, but an article will be published about it some other time.
To install sockets, you need to know the dimensions of the socket blocks, and they are as follows:
- The size of one outlet is 72 millimeters wide and the same in height;
- The block size grid of 2 electrical points is 72 mm long and 142 mm wide;
- The block size grid of 3 electrical points is also 72 mm long and 212 mm wide;
- The grid of 4 parts is 284 mm wide and 72 mm high.
What gives the use of the socket block
This is very convenient if you need to connect several consumers in one place in the room, for example, a desktop computer with a monitor, printer and a whole arsenal of gadgets. In this case, connecting a computer outlet will allow you to abandon the traditional carrying of several connectors and a pile of wires under your feet.
Before connecting a computer outlet, it is necessary to carry out several preparatory operations and pre-wiring:
- We mount the number of socket boxes in the wall, the size depends on the number of consumers that are planned to be connected to the unit;
- We assemble the ground line in the socket block;
- We put loops into the sockets and connect the contacts to the wiring;
- We collect the block of sockets.
Any person who has at least a superficial understanding of the rules for assembling and switching electrical wiring can connect such a block. If necessary, for a computer outlet, you can install a block combined with a switch and a network indicator. Often you have to add an extension cord for a network extension cord in order to connect additional household appliances, the same TV or music center located at the other end of the room.
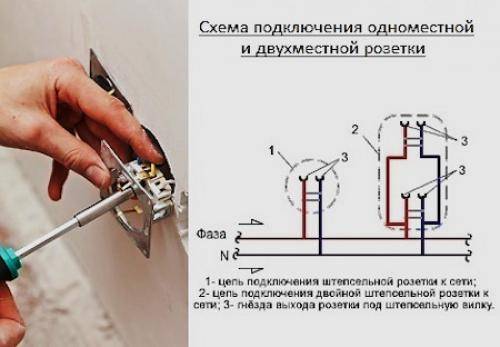
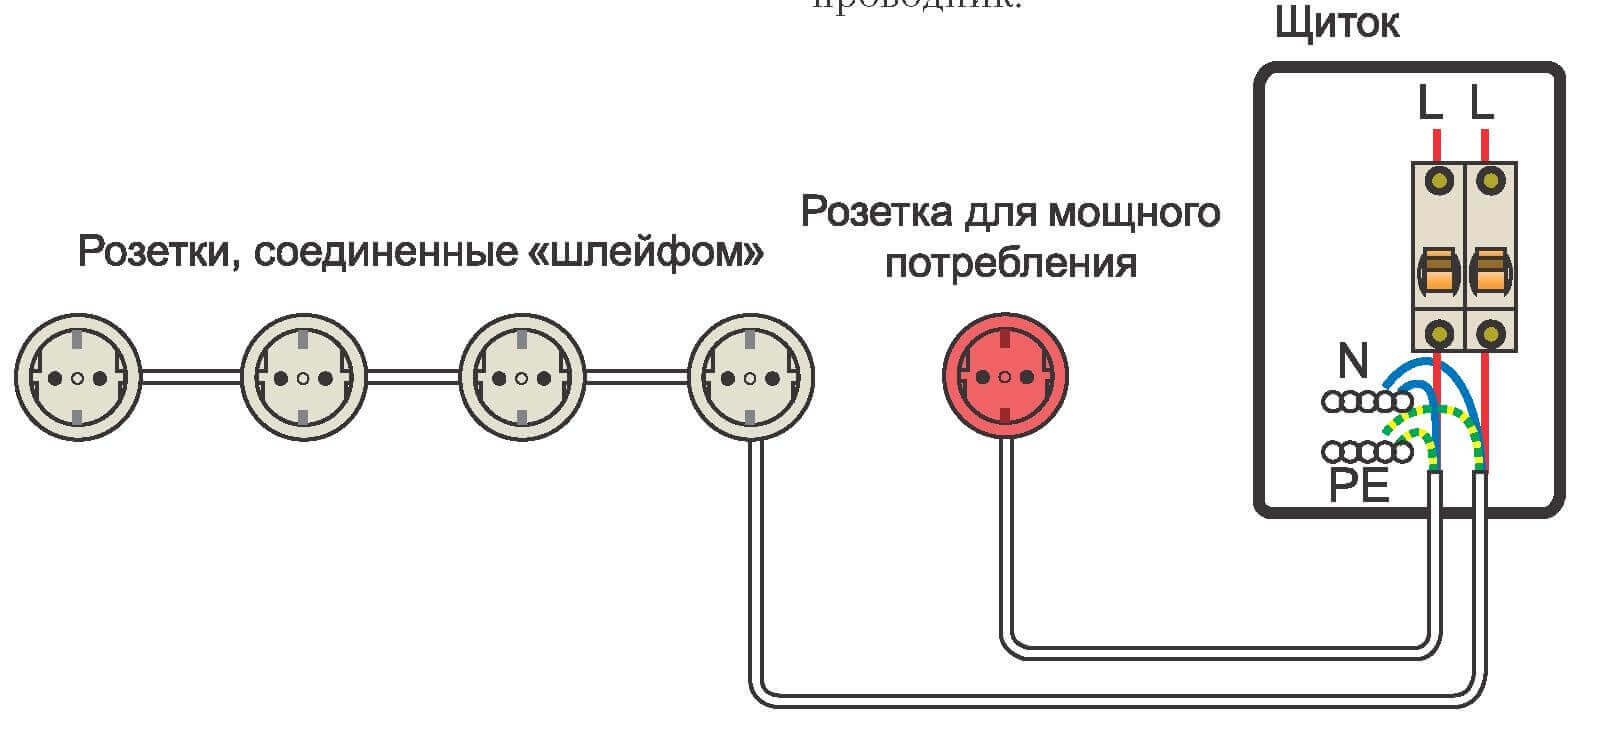
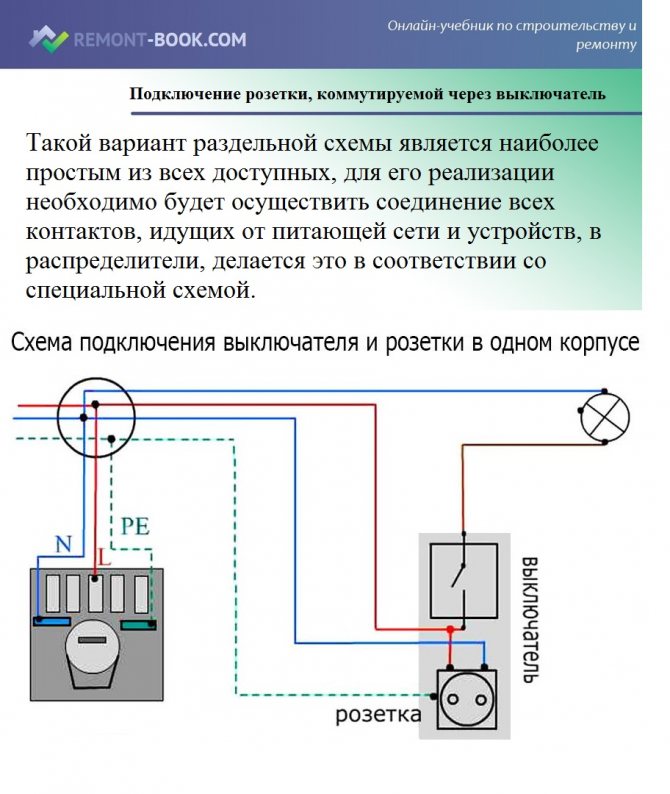
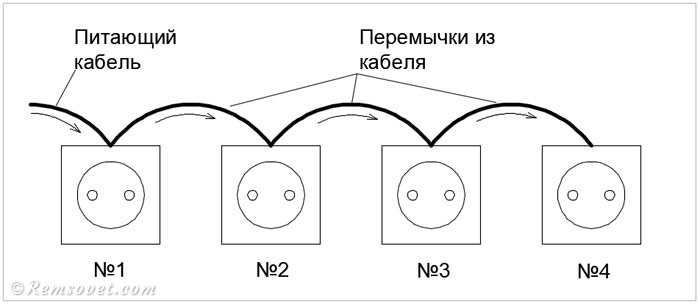
Important! For computer or any other complex electronic equipment, it is very important to correctly connect the zero ground wire.All phase and zero wires in the block must be connected with a loop or, in other words, in parallel to each other
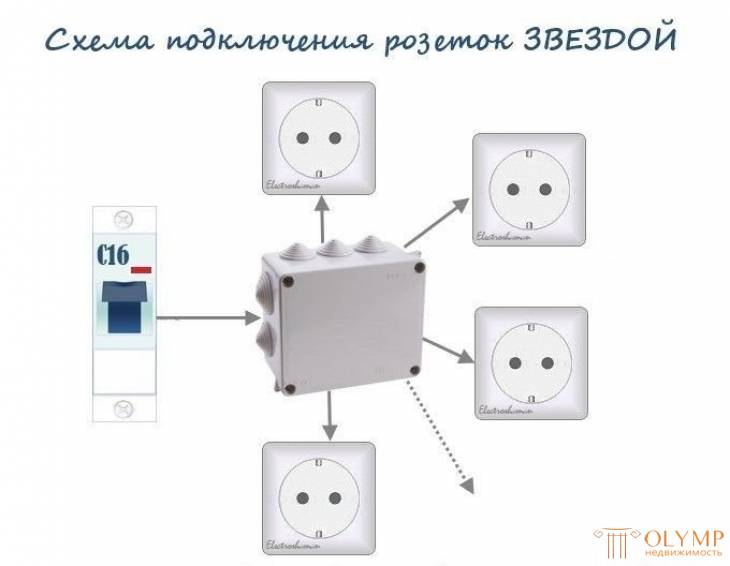
Everything except grounding. Grounding conductors on all contacts of the block must be connected only with a star. What does it give?
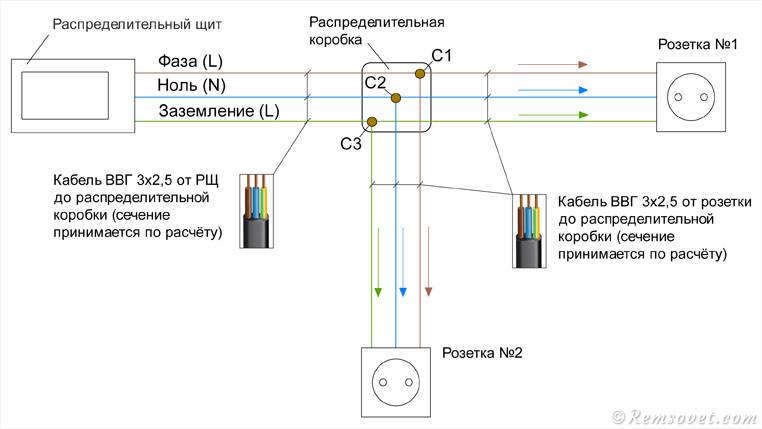


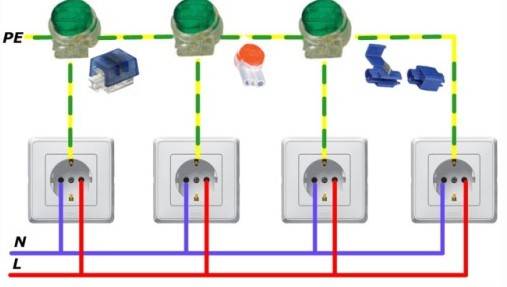


All phase and zero wires in the block must be connected with a loop or, in other words, in parallel to each other. Everything except grounding. Grounding conductors on all contacts of the block must be connected only with a star. What does it give?
Firstly, to connect the "ground" in this way is required by the rules of the PUE. Each consumer must be connected to the ground bus with an individual wire, but this is not the main thing. Secondly, in this case, in the event of an accident and the shorting of any of the consumers to the ground, the burnout of the loaded ground wire, the remaining consumers will remain connected to the ground bus.
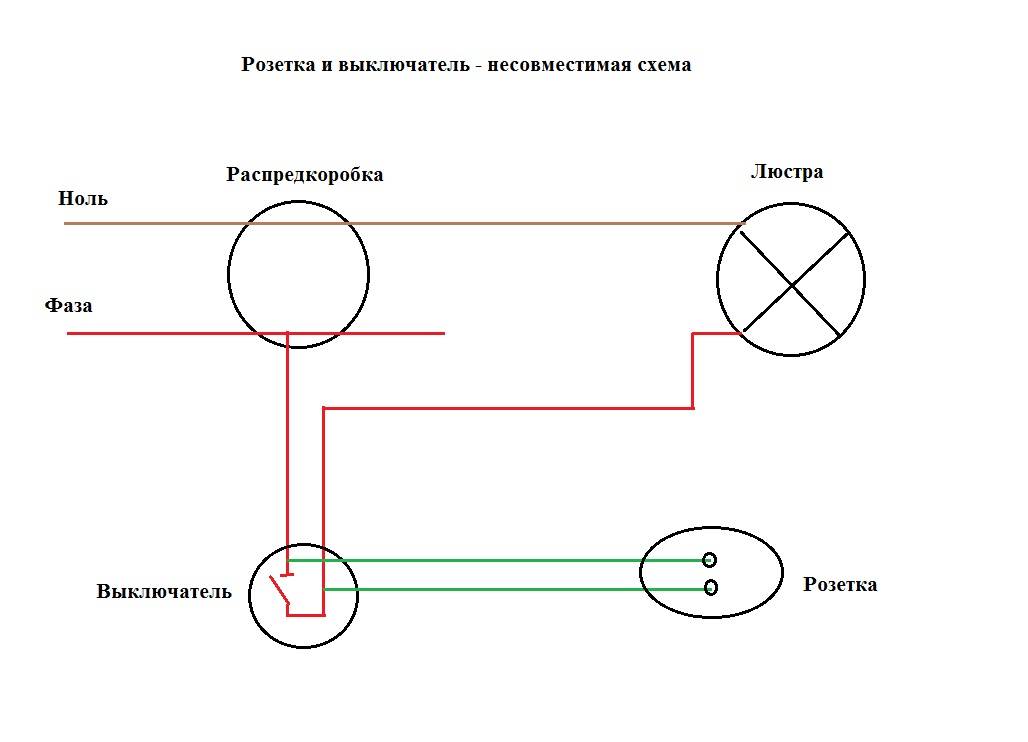
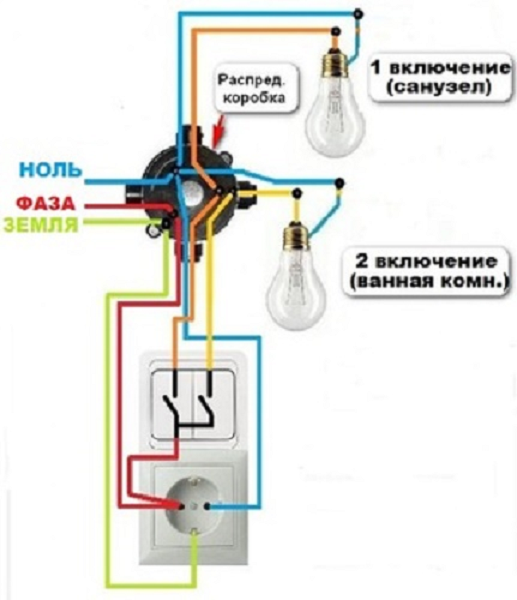
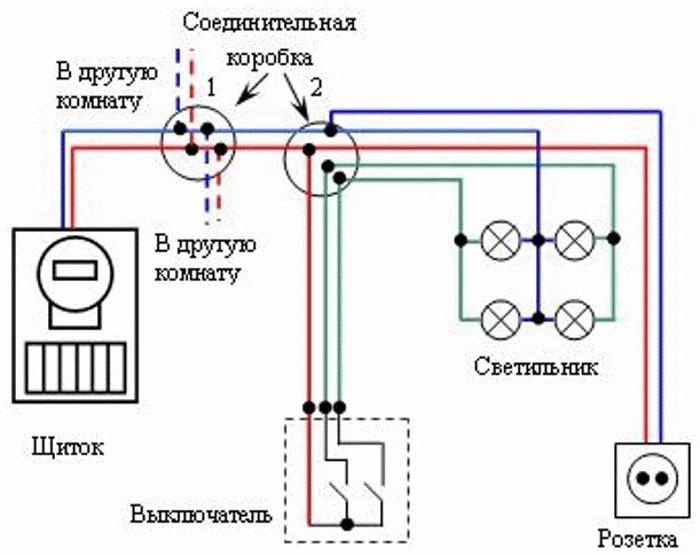
Similarly, according to the same scheme, a block with a switch is connected. For example, in one design, install a socket and a two-gang switch for a bath and toilet. The protection against electric shock depends on how well the connection diagram of the block of sockets and the switch, wiring and grounding is done.
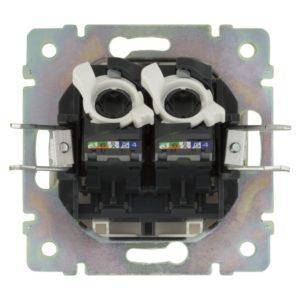
Overview of products of well-known brands - manufacturers of Internet sockets
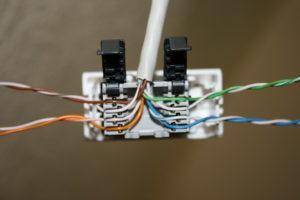
The well-known trademarks Legrand, VIKO, Lezard, Schneider enjoy well-deserved prestige in the world market. The products of these companies are of high quality and reliability, thanks to which they have gained popularity among consumers.Some products from different manufacturers have differences in the internal structure, but they are only visual, and the connection principle remains the same - cross-linking in compliance with the color scheme and the correct crimping of wires in the terminal block.
To be able to conduct a comparative analysis, the attention of users is invited to familiarize themselves with the price values for the goods of the listed brands
| Brand Name | State | Product description | price, rub. |
| Legrand Valena | France | Internet socket RJ-45 for two sockets | 820 |
| Lezard | Turkey | // | 697 |
| Schneider | France | // | 780 |
| VIKO | Turkey | // | 296 |
The indicated prices show the average market value of the products and cannot reflect the full picture of the price segment of numerous models. The information is given as an example and cannot be used as an infobase. Each company has in its assortment products that represent a budget option, as well as premium products designed for a buyer with a high level of income.
Stages of connection and installation of the socket block
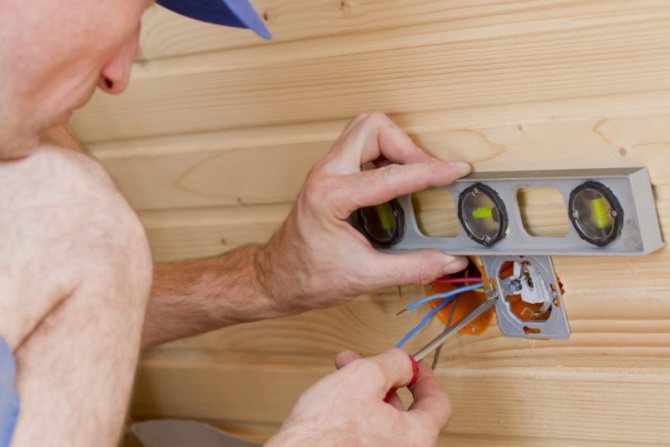
To carry out installation work when connecting sockets, of course, tools will be required. Their set is quite standard:
- - level;
- - wire cutters;
- - screwdriver;
- - a knife with a pencil;
- - perforator.
The latter is not necessary to buy, it can simply be borrowed or rented. Still, the tool is not cheap and it makes no sense to spend money once again if there is no special need for it. With the rest of the inventory, there should definitely not be any problems.
When attaching the socket to the wall surface, screws are used. If it is located inside, then you will need to make a cavity in the surface.We will consider a standard situation in which only one cable is connected to the socket from the shield.
It’s not worth worrying about whether all the cables will fit in a box already occupied by an outlet. A standard 42 mm socket will easily accommodate everything you need.
Installation rules and useful tips
When connecting the socket block, it is worth, among other things, to observe the following recommendations:
- Too long ends of the wires when outputting to the sockets should not be left. The same applies to the jumpers between the electrical points in the block. It is believed that 12-15 cm of wire length will be quite enough for comfortable work.
- It is also not necessary to strip the wires for connecting to the socket terminals for too long. Remove the insulation at the ends of the cores should be no more than 0.8-10 mm.
- For unit jumpers, it is best to use wires of the same gauge as the power cable.
It is best to purchase sockets with a flat-spring contact for installation in an apartment or a country house. Such models are considered the most reliable in operation and durable.


The branching of the ground conductor should be carried out in the most proven way - by crimping using a sleeve. This will maintain reliable contact along the entire length of the conductor.
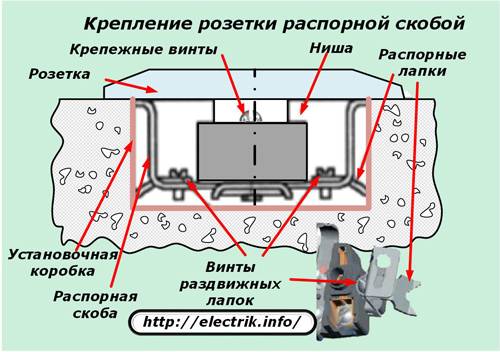
Choosing a Receptacle Compatible Back Box
Recessed sockets are fixed in a special installation box, the so-called socket box. It is a thin-walled cylinder that is immured into the wall. In the future, the socket is attached to it, and not to loose masonry material or concrete, which would be unreliable.
Sockets of individual manufacturers provide for various ways of attaching to the socket.First of all, it concerns the location of the screws. They can be on a vertical or horizontal axis. Some devices have 4 mounts at once. The diameter of the installation boxes is 65-67 mm. Depth 45 mm. They can be made of polyamide, polypropylene and other materials.
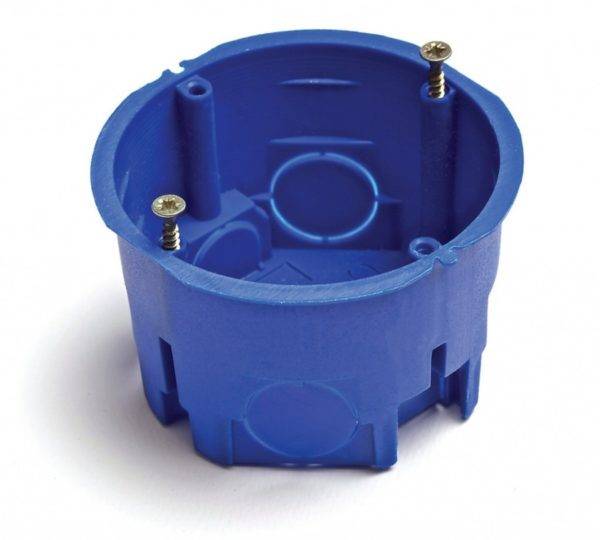 Socket box ordinary
Attention must be paid to the choice of the installation box of the socket block. The fact is that almost every manufacturer produces its products under different width standards.
That is, the distance between the sockets, together with the overhead panels, differs so much that it is not always possible to mount it in an installation box of another brand.
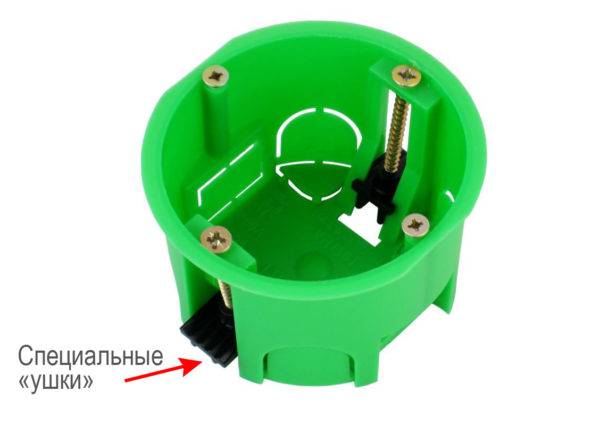 Drywall socket
Installation of a socket with a ground wire
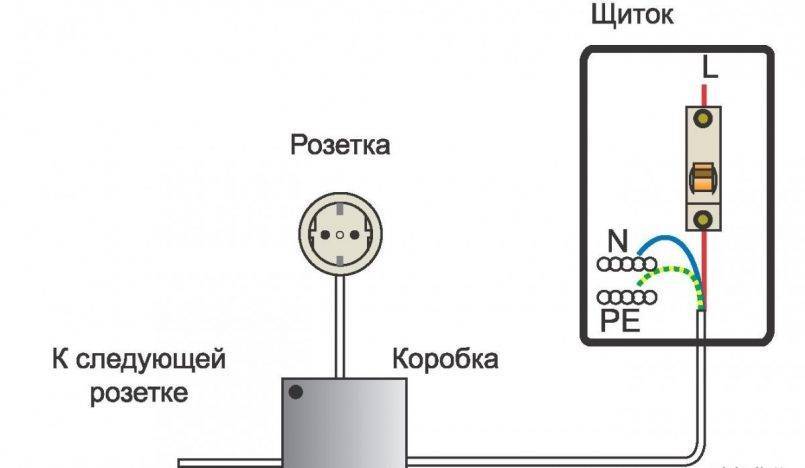
When modern repairs were carried out in an old house, specialists could lay a ground wire, install sockets, while the ground cable was not connected. It is not uncommon for situations when electrical wiring is being improved throughout an apartment building, and then the cable may become in demand.
This situation greatly facilitates the work of installing the outlet - it is only important to connect all the wires correctly, following the diagram. Actions should be like this:
- Unplug the apartment.
- Remove the cover from the old outlet, unscrew the fasteners, pull out the working part of the device.
- Screw the new device to the grounding pin (or fix the old one, but starting by attaching the ground).
- Check the correct operation of the grounding with an indicator screwdriver.
Why is grounding necessary?
The instructions for any electrical appliance clearly state that it is prohibited to use it without grounding. The main purpose of grounding is to ensure the stability of complex household devices and protect against electric shock.
According to the PUE, clause 1.7.6, grounding is a deliberate connection of one of the elements of an electrical installation with a ground loop. It is constructed with the aim of diverting currents of damaging and non-damaging values through a grounding protective conductor to the ground.
If earlier two-core electrical cables were laid in apartment buildings, today it is mandatory to use wiring consisting of three cores
In the outdated system, the "neutral" partly performed the function of grounding. Zero was connected to the metal case of the device, and in case of overload, it took over.


The calculation was that when the load is exceeded, the current will flow through one of the phases, as a result of which a short circuit will occur and, as a result, the network section will be disconnected by an automatic machine or a fuse.
This decision simplified the conduct of electrical work, but carried the risk of electric shock.
The legacy TN-C system does not have a protective earth conductor. For a grounding device in such cases, a PE bus is required in the apartment panel. If there is no grounding bus, then it is necessary to connect all shields to each other and connect the entire group to the grounding system of the house - i.e. re-grounding (+)
It is unacceptable to connect without grounding devices, the case of which is made of metal. For example: multicooker, microwave or electric stove. Indeed, in the event of a short circuit, thinning or partial destruction of the insulation of the wires to the housing, a breakdown of the current may occur.
In case of contact with a current-carrying element of voltage, the protective conductor will take it further to the ground.
No less dangerous is the use of ungrounded devices that come into contact with water during operation, for example: a dishwasher or a boiler.
The type and design of the grounding contact depends on the model. In sockets of American brands, it is presented in the form of holes with side slots. For French counterparts, this is an additional third pin.
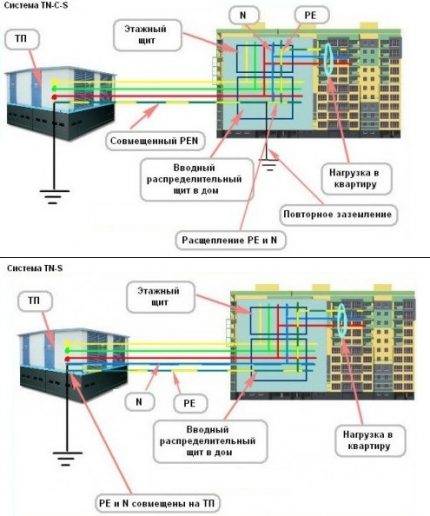 According to the current rules, new buildings are provided with TN-S or TN-C-S systems with a mandatory grounding protective conductor in one- and three-phase power supply systems (+)
But most often on sale you can find the German type of grounding sockets. They are equipped with protruding metal parts on the sides.
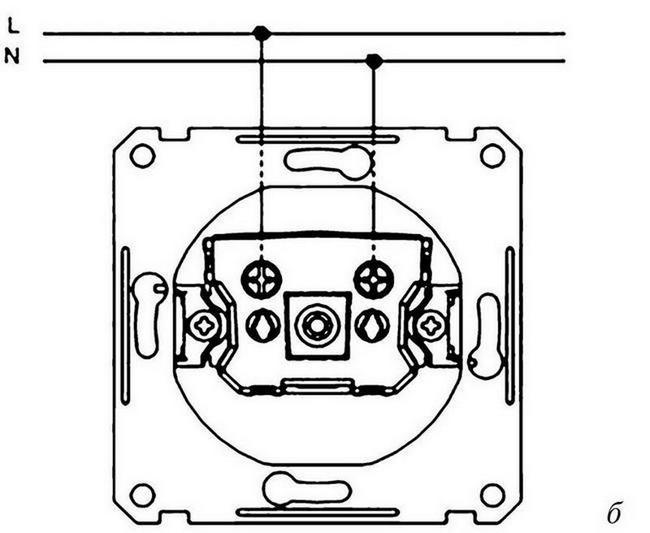
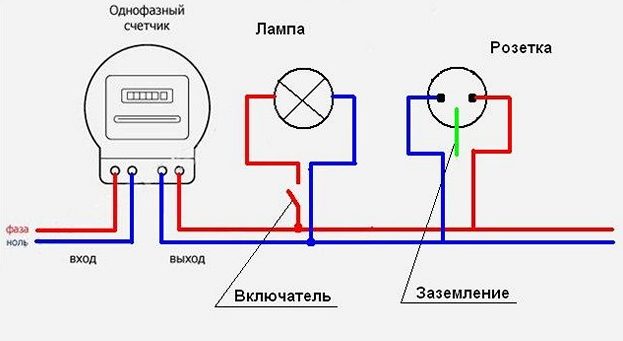
The design of an electrical outlet with grounding assumes the presence of three contacts: "phase", "zero" and "ground". At the moment of switching on, in the first fractions of a second, the ground terminals touch, and after them the “phase” and “0” contacts are connected. This sequence guarantees complete protection.
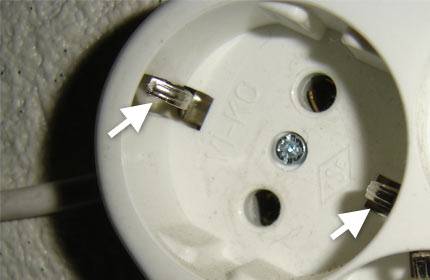
Externally grounding sockets are easy to visually identify by the presence of an additional metal contact - the “grounding” terminal, which is necessary to connect the wire directed from the electrical panel
Overhead option for installing sockets
The overhead method is used in rooms where the wiring is laid in an open way. To understand how it differs from the built-in method, you need to answer the question of how to install a single outlet or a double outdoor socket block on the wall.
Here are the differences:
- This type does not require a socket outlet.For example, an external double socket is mounted directly on the wall surface. The wire connected to the electrical circuit goes inside through a special hole.
- To connect a TV receiver, you will need to install a separate single television outlet. That is, a double outdoor socket cannot be combined into one unit with a TV module.
- It will be much easier to change the overhead socket block than the internal analogue, since it is not required to lead the connecting wire into the new socket, additionally destroying the wall. This property indicates ease of installation.
- If the power wire is embedded in the plinth, then you can mount the corner patch socket block on top of this element. This method greatly simplifies installation and saves cable.
The most common installation errors
During the installation of the socket block, the following errors may be made that can affect the external attractiveness or performance of the product:
- Use for connection with an aluminum wire through a twisting of a conductor with a copper core. Such an error can lead to contact failure due to oxidation and product failure. The cores of the connected current-carrying wires must be either made of one metal, or connected through a terminal block
- Using flat wire with a single layer of insulation and immuring it in the wall without placing it in a plastic or corrugated tube. Previously, this method was allowed, but the use of an additional containment is now recommended.
- Application for the manufacture of jumpers of wires of different sections. This cannot be called a gross mistake, but for these purposes it is recommended to use a core with a cross-sectional area equal to the cross-section of the electrical wiring
- Connecting the RE conductor in a daisy chain way, that is, using jumpers between sockets. As mentioned above, this method is considered a violation of the PUE.
- Leaving too long ends of the wire when entering the socket or junction box. For comfortable work, the ends of the wire should be 12-15cm. Otherwise, there may be problems with its installation at the end of installation.
- The device of splicing or twisting of wire in a cable channel or strobe. All contacts and connections must be made only in electrical junction boxes (distribution or socket). This facilitates the repair and revision of electrical networks.
By avoiding these errors, the user will be able to independently mount the socket block and use it for a long time. article: → “How to install and connect the socket? Connection schemes.


Types of devices and their features
There are quite a few varieties of plug sockets and blocks. Each type has its own design features and purpose.
- Hidden appliances are mounted directly into the wall - in special sockets.
- Open devices are produced for those apartments where the wiring is not hidden in the wall.
- Retractable socket blocks are mounted on a table or other furniture. Their convenience is that after operation, the devices are easy to hide from prying eyes and playful children's hands.
The devices differ in the method of clamping the contacts. It is screw and spring. In the first case, the conductor is fixed with a screw, in the second - with a spring. The reliability of the latter is greater, but it is not so easy to find them on sale.Devices are fixed on the walls in three ways - with serrated edges, self-tapping screws or a special plate - a support that facilitates both installation and dismantling of the outlet.
In addition to conventional, inexpensive devices, there are models equipped with grounding contacts. These petals are located in the upper and lower parts, a ground wire is attached to them. To ensure safety, outlets equipped with shutters or protective covers are produced.
Main popular types
These include:
- type "C", it has 2 contacts - phase and zero, usually bought if it is intended for low or medium power equipment;
- type “F”, in addition to the traditional pair, it is equipped with another contact - grounding, these sockets are becoming more popular, since the ground loop has become the norm for apartments in new buildings;
- View "E", which differs from the previous one only in the shape of the ground contact, is a pin, the same as the elements of the socket plug.
The latter type is less common than the others, since it is less convenient to use: turning the plug 180 ° with such an outlet is impossible.
The security of the case is the next difference between the models. The degree of security is indicated by the IP index and a two-digit number following these letters. The first digit indicates the class of protection against dust, solid bodies, the second - against moisture.
- For ordinary living rooms, IP22 or IP33 class models are sufficient.
- IP43 is recommended to buy for children, as these outlets are equipped with covers / shutters that block the sockets when the appliance is not in use.
- IP44 is the minimum required for bathrooms, kitchens, baths. The threat in them can be not only strong humidity, but also splashes of water. They are suitable for installation in basements without heating.
Installing an outlet on an open balcony is a sufficient reason to purchase a product with a higher degree of protection, this is at least IP55.
Structure and components
In order to thoroughly understand how to properly install a new outlet at home, you need to study its constituent elements a little. All sockets are sold already assembled. Therefore, when installing it, you will have to unwind everything yourself.
The main components of the socket are the base, the conductive part, the decorative front panel. The base is made of ceramic or high quality plastic. All elements are attached to it - conductive parts and a front plate.
Ceramic bases are considered more reliable, but they require especially careful installation, because in case of damage, you will have to buy a new outlet.
The decorative overlay is designed to hide all work items. It serves as a reliable insulator of the working part from external influences. Some models provide for the possibility of a simple replacement of this part of the outlet.
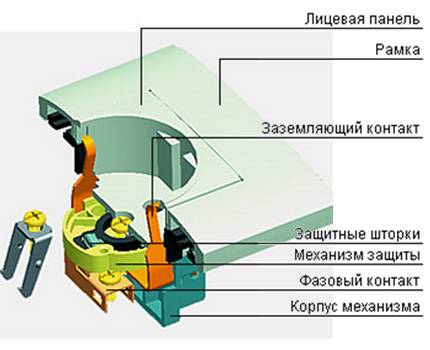
Getting to know the internal structure of the outlet will help you better understand the process of connecting it correctly.
The working part of the socket consists of spring contacts and terminals to which electrical wires are connected. One of the important contacts is the grounding one.
Conductive elements are made of brass or bronze. The latter are better, but are extremely rare. Therefore, you should choose options from tinned brass - they are more reliable than ordinary brass, solder better and last longer.
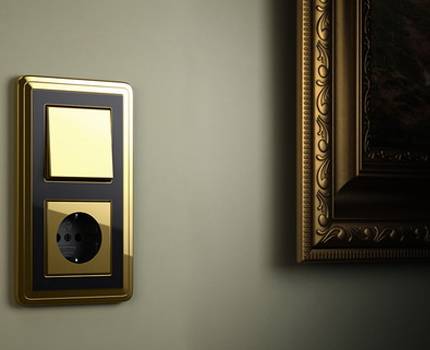
Designer sockets allow you to make the interior of your home unforgettable. Their unusual performance brings its own flavor
Conclusions and useful video on the topic
The video materials we have proposed will clearly help you understand how to properly install the power outlet block.
Video #1 Arrangement of socket boxes for the socket panel:
Video #2 Instructions for installing a five-socket block:
Installing a socket block is not much more difficult than connecting a conventional or double socket
Having shown attention and maximum accuracy, installation is quite within the power of any owner who has only basic skills in electrical work.
Do you want to talk about your personal experience in installing and connecting group sockets? Do you have any useful information or questions while reading the article? Please write in the box below.


