- How to work with wood as the main material for the gazebo?
- Necessary care
- Types of wooden gazebos
- Phased construction of a gazebo
- Create a building project
- Features of the closed design
- Video description
- Two-story gazebos
- Sketches of gazebos with drawings and dimensions
- simple wooden gazebo
- Chinese style gazebo (with drawings and dimensions)
- Large gazebo on the foundation
- Drawing gazebo-swing
- Construction of a frame gazebo with a pitched roof
- Marking the base of the gazebo
- Pit preparation
- Foundation pouring
- Frame installation
- Prices for various types of timber
- Roof installation
- Arbor arrangement
- Installation of the roof of the gazebo
- Video - Do-it-yourself wooden gazebos
- TOP 5 main types of wood for lumber
- Larch
- Cedar
- Pine
- Fir
- Spruce
- Sketches of gazebos with drawings and dimensions
- simple wooden gazebo
- Do-it-yourself gazebo made of wood, drawing with a gable roof
- Arbor made of metal with their own hands. Photos, drawings and schemes of structures
- Do-it-yourself gazebos from a profile pipe. Drawings, photos of finished structures
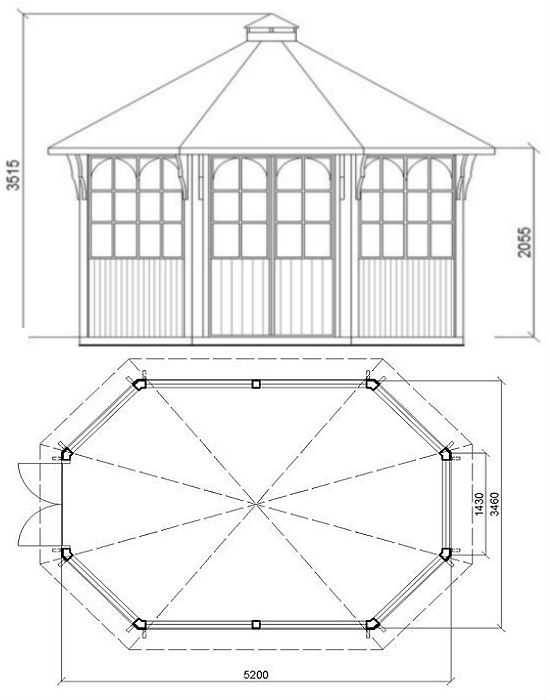
- Hexagonal gazebo with a diameter of 3 m
- Conclusions and useful video on the topic
How to work with wood as the main material for the gazebo?
Arbors are most often created on the basis of wood, since it is very convenient to use and has environmentally friendly characteristics.
And at the same time, the price will be in the region of acceptable figures, which will not be a problem for most Russians.
We note the advantages of this material:
Helps to form an attractive appearance, in harmony with the design of the entire summer cottage on the basis of charming naturalness;
It is easy to combine with other materials - it goes especially well with glass, but can also be used with metal, brick;
Offers an acceptable duration of operation if the wood is properly processed and regularly monitored for its condition;
With a tree, it is easy to carry out the entire list of necessary installation work. And it helps to create structures with different shapes and complexity.
Due to this, wooden arbors have long occupied an important place in the dachas or private houses of Russians. Domestic lovers to spend time in them appreciated the ease of creation and the availability of material for this task.
Necessary care
Having spent energy and money on the construction of a wooden gazebo, each owner wants to use the structure for as long as possible. To solve this problem, the building must be periodically looked after. By following simple rules, you can increase its service life:
- Every 3-5 years, wood must be treated with special protective compounds: flame retardants (protect against fire), antiseptics (from decay, fungi), hydrophobic agents (from moisture).
- In case of mechanical damage to the surface, the resulting cracks, other defects should be puttied.
- When re-painting, it is necessary to carefully prepare the base, remove the old coating, perform protective treatment, cover metal fasteners with a primer layer.
- Timely cleaning should be done, especially in autumn, when the leaves begin to fall en masse.
- With the onset of cold weather, it is better to hide all decorative elements, wooden things in a house or garage.

Types of wooden gazebos
Before you start building a gazebo, you need to decide on its type. All of them differ in several ways:
Form. They are square, rectangular, polygonal (these include hexagonal and octagonal designs), angular and even round. The choice depends on the location of the structure on the site and, of course, your wishes;
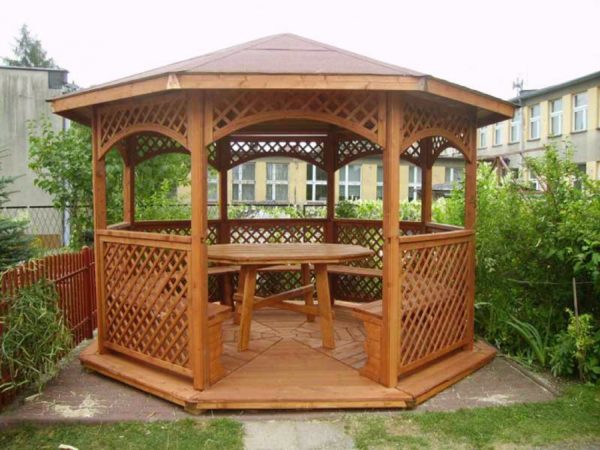
Arbors are tetrahedral and polygonal
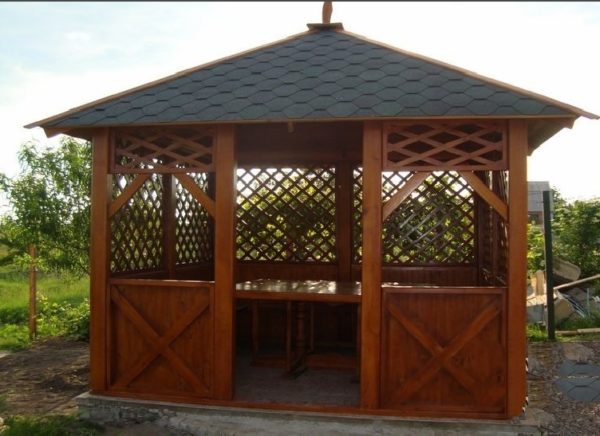
Destiny. Pergolas exist open and closed. The first are intended for outdoor recreation in the summer. I must say that open gazebos also include pergolas that do not have a roof. Instead, a lattice is made along which weaving plants are launched.
In closed gazebos you can relax even in spring and autumn. And if you put a heater or make a fireplace, it will be comfortable to relax in it in general in any weather;
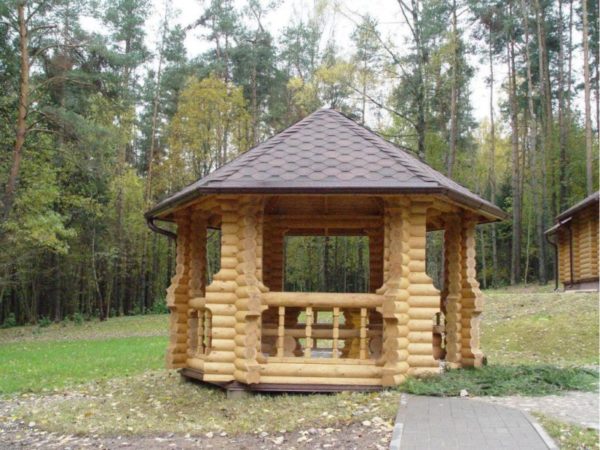
A wooden gazebo can be frame or in the form of a log house
By design. Pavilions are framed (the roof rests on pillars) and in the form of log cabins, i.e. log. The latter are usually used in areas decorated in rustic styles. They are in perfect harmony with timber and log houses;
Hipped roof construction
Roof type. It can be single-sided, double-sided, four-sided or multi-sided.
Having decided on the type of gazebo, you can proceed to its design and construction.
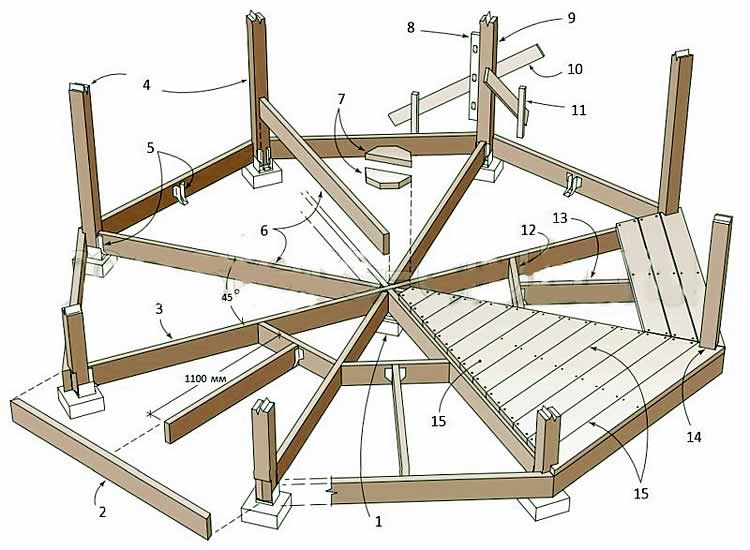
Phased construction of a gazebo
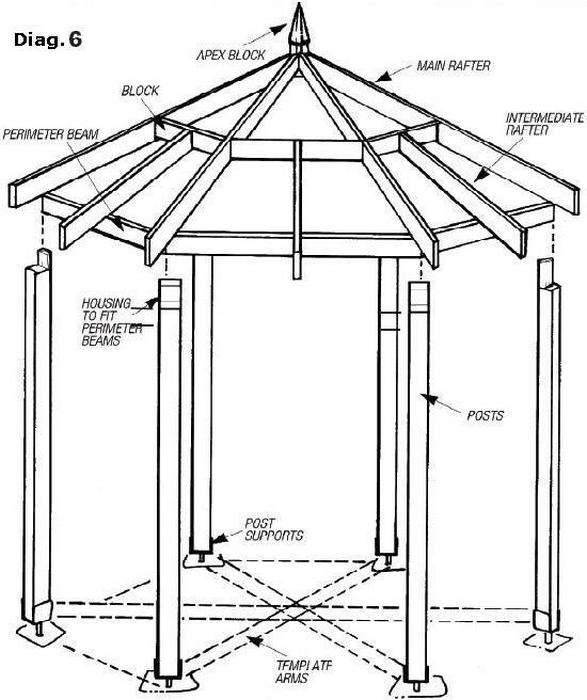
Therefore, we will consider step by step the stages of building a hexagonal gazebo made of wood.
- According to the drawings, it is necessary to make blanks from wood using a circular machine, and then plan the boards with an electric planer.
- Treat the material with an antiseptic and impregnation from decay.
- At the place where it was decided to put the gazebo, it is necessary to make markings in the form of a future building - the basis for the foundation. It is easy to get a hexagon from a circle, so with the help of a rope and two pegs on the ground you need to draw a circle. The radius of this circle is equal to one side of the hexagon - based on this rule, it is easy to build a hexagon from the resulting circle.
- Further, inside the resulting figure, they dig a pit for the foundation, with a diameter of about half a meter. A sand and gravel cushion is formed, which is well compacted.
- Support poles are installed at six designated points. It is best if they are made of concrete. You can use wooden round timber, but in the ground they tend to rot and collapse over time.
- For the stability of the structure, a reinforcing bar is driven into the concrete pillars in the middle. It is on it that elements of wood will then be planted.
- Horizontal supports are seated around the perimeter of the future gazebo on the reinforcement in two rows in the "overlap" way.
- Next, the floor lag is installed. In order for the coating to be strong and stable, additional concrete supports are installed under the intersections of the lag.
- The lag structure must be cut into ready-made horizontal supports.
- Holes for fittings are made in vertical racks with a drill. Further, these supports are installed and, with the help of wood trimmings, are aligned clearly perpendicular to the future floor.
- The temporary measure for aligning the vertical axes is removed after the strapping is installed on top of the structure.
- The middle harness is the future railing. For better stability of the building, the railing is installed in the middle of the structure.
- Next, the installation of the roof frame begins. A board is cut along the diameter of the hexagon, on which a hexagonal pillar is installed in the center. Rafters will diverge from it.
- Six rafters should fit snugly against the edges of the support post. On the other hand, they must cut into the supporting upper harness. The whole structure is reinforced with self-tapping screws.
- The roof frame is ready, you can proceed with the installation of the roof. As a material, you can choose shingles, slate, metal profiles, corrugated board and so on. In the first case, it is necessary to make a base from an OSB board. The slab should be cut on the ground, cutting out the elements strictly along the edges. Next, the OSB is installed and fixed on top of the roof frame, treating the joints with sealant.
- For any heavy roofing material, a metal cornice should be made.
- Now you can lay the roofing material.
- Before finishing work on the floor, it is necessary to protect the structure from below from moisture; for this, the voids between the lags are sewn up with a vapor barrier.
- As a material for floors, a deck or grooved board is suitable.
- The lower part of the gazebo is decorated in the chosen style, the entire structure is painted or varnished.
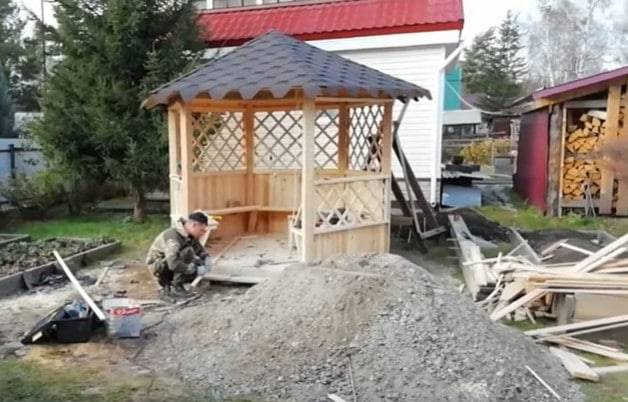
Wooden hexagonal gazebo is ready! It remains to lay a garden path to the building, plant flower beds and shrubs around. As an additional detail, benches can be installed around the perimeter. If the gazebo is large and spacious, it is better not to do this, but to arrange garden furniture inside, for example, a dining group.
Metal structures are similar in installation to wooden buildings, only the set of tools differs, but for brick arbors a reinforced concrete foundation is needed. The secret to the stability of a brick structure is reinforced pipes, which are used as vertical supports, and bricks are laid around them, fastened with cement. The iron pipes are also studs for the roof framing.
Create a building project
The drawing can be varied. Some craftsmen create original gazebos that are equipped with barbeque zones. Initially, a simple sketch is created in 2 projections: profile, frontal.


You should also mark on the drawing the dimensions of the sides of the house, the height of the timber elements. It is advisable to indicate the type of roofing, as well as areas for window and door openings, as well as areas for the placement of stationary furniture.
In the drawing, first draw the structure of the foundation and the roof. It is also necessary to mark various technical modules on the project, which include the truss system, steps, racks.
A special stage in the design development is the marking of electrical wiring for lighting, heating, etc. Also on the sketch, you need a scheme for laying water supply, if it will be supplied to the gazebo.
Features of the closed design
Projects of closed gazebos often involve their active use in winter. Closed buildings are built taking into account the features of use:
- Foundation. Reinforced tape is welcome, capable of withstanding the weight of walls, stoves and roofs.
- Frame (walls). Walls are being erected (taking into account door and window openings). At this stage, a stove (or brick brazier) is installed.
- Roof. The rafter system is mounted, the roof is arranged. In buildings with
- Installed windows and doors (double-glazed windows), communications are mounted.
Video description
About two-story outdoor pavilions made of pine in the following video:
Two-story gazebos
Such buildings are the exception rather than the rule; their advantages:
- Space saving. If the site cannot boast of extra meters, a two-story structure will be the only option for a comfortable stay.
- Year-round use. The upper floor acts as an open terrace, the lower one is convenient for relaxing in bad weather.
For a two-story gazebo, it is important to correctly calculate the strength of the building and the load on the foundation. Two-tier design
The project of a two-story building with a furnace
Eco-style: natural materials, picturesque landscape and fresh air
Interior of a winter wooden gazebo
Woven lattice construction
Decorative pavilion with barbecue area
The original combination of improvised means and fantasy
Combined pavilion with elements of traditional style
Modern design with wooden slats
Two-tier design

The project of a two-story building with a furnace

Eco-style: natural materials, picturesque landscape and fresh air

Interior of a winter wooden gazebo

Woven lattice construction

Decorative pavilion with barbecue area

The original combination of improvised means and fantasy

Combined pavilion with elements of traditional style

Modern design with wooden slats
The gazebo, as a symbol of suburban life, is not just an architectural highlight of the homestead territory. It is an attractive place that promises a comfortable stay and an atmosphere of easy communication. A professionally designed project of a closed gazebo allows the owners to show year-round hospitality, offering guests friendly gatherings in the bosom of nature.
Sketches of gazebos with drawings and dimensions
Available sizes can be scaled up or down proportionally
It is important that you understand that with a significant increase in size, a more powerful frame is required. Do not forget about this, and everything will work out for you: a gazebo made by yourself will be beautiful and reliable
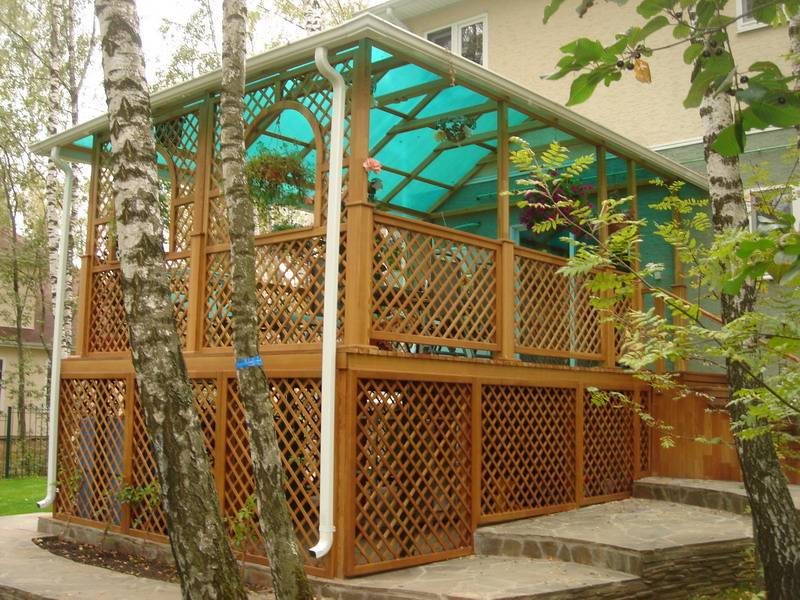
simple wooden gazebo
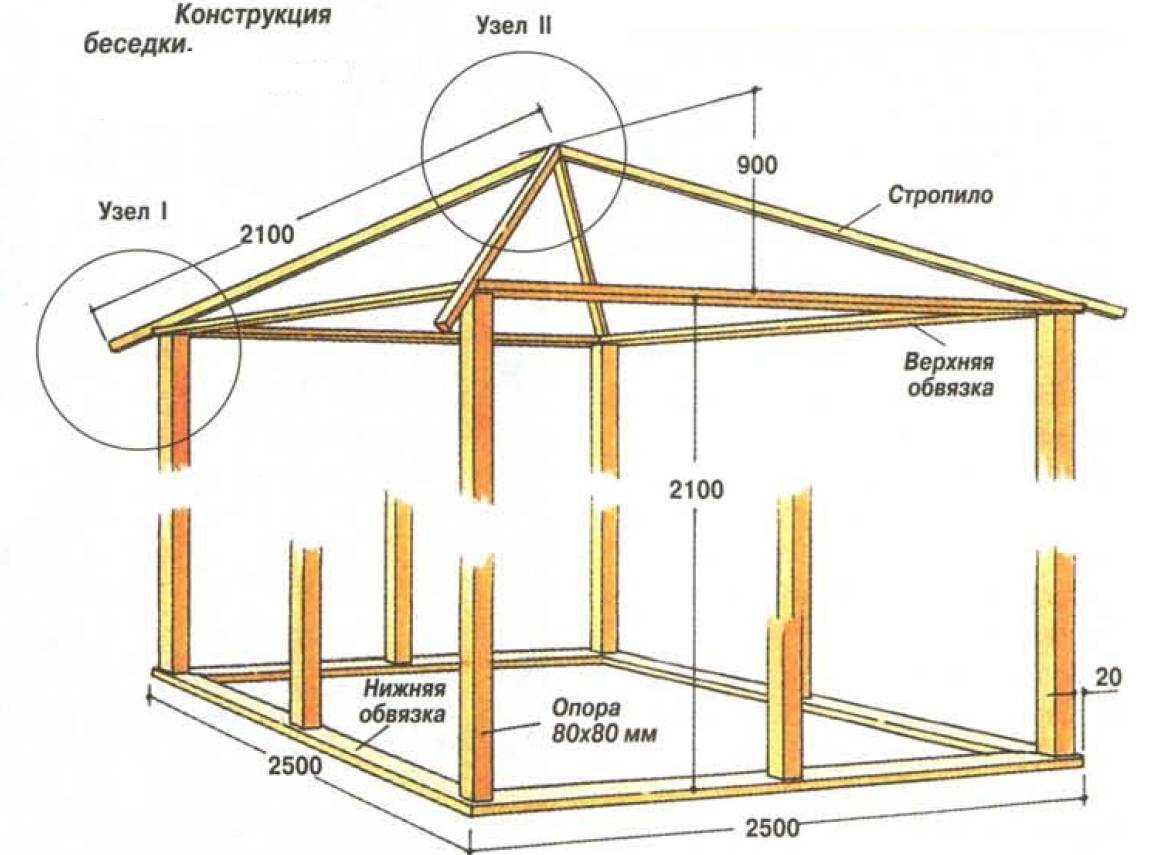
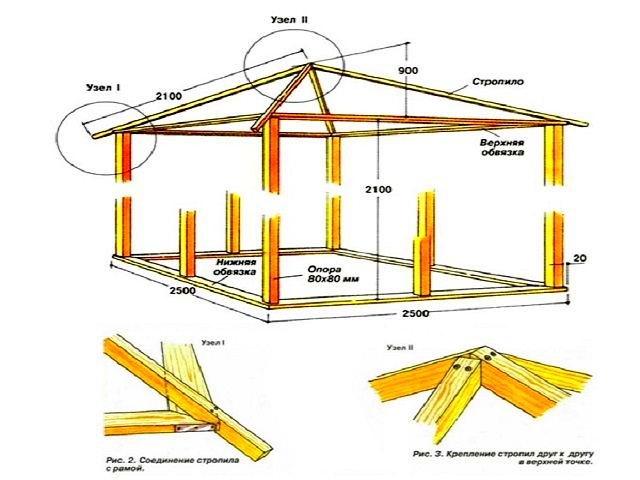
Almost the same project, but with different dimensions: the upper point of the roof is raised higher, which makes it visually lighter. The gazebo is also quadrangular, the roof is hipped.
Square wooden gazebo for summer cottage or garden
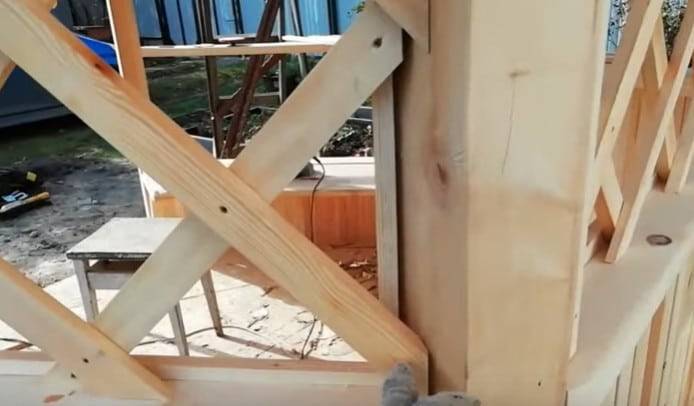
When constructing such a roof, the most problematic are two places (nodes) indicated by circles. How to do them, see the photo below.
Problem nodes when installing a hipped roof on a gazebo
Something like this, you can mark it in height and fill the crate under the roofing material
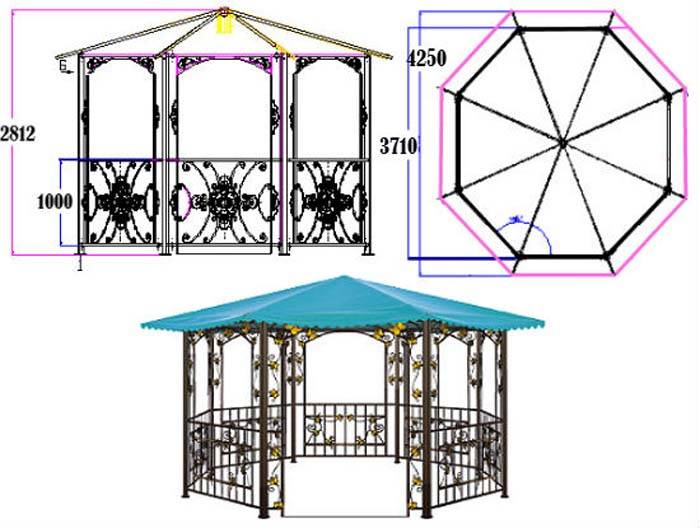
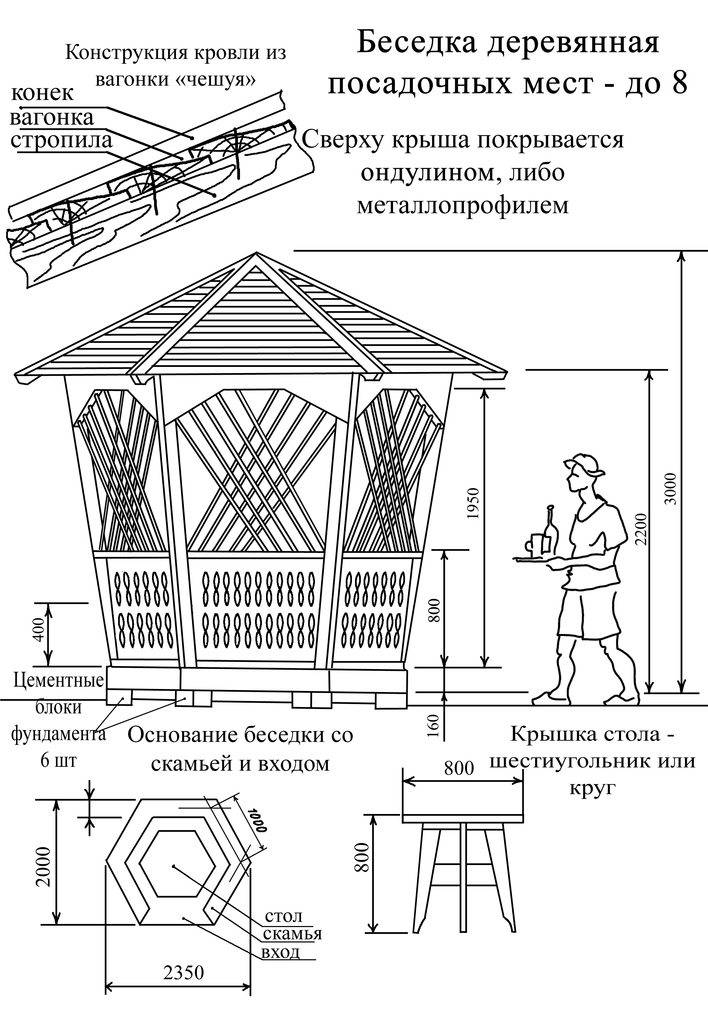
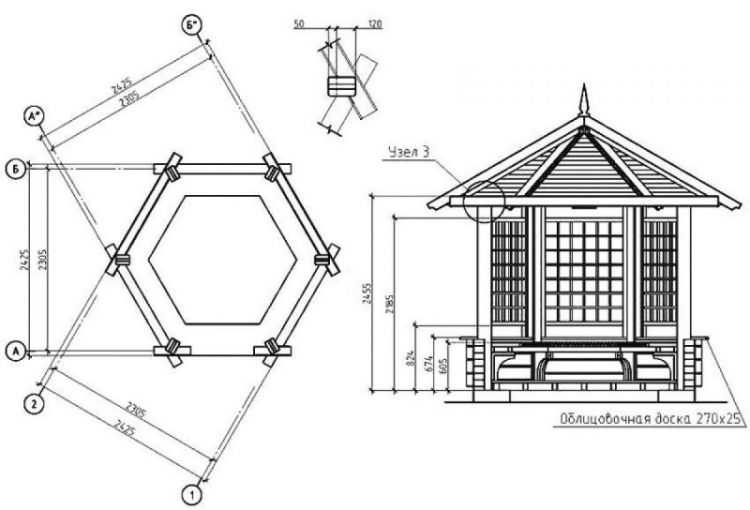
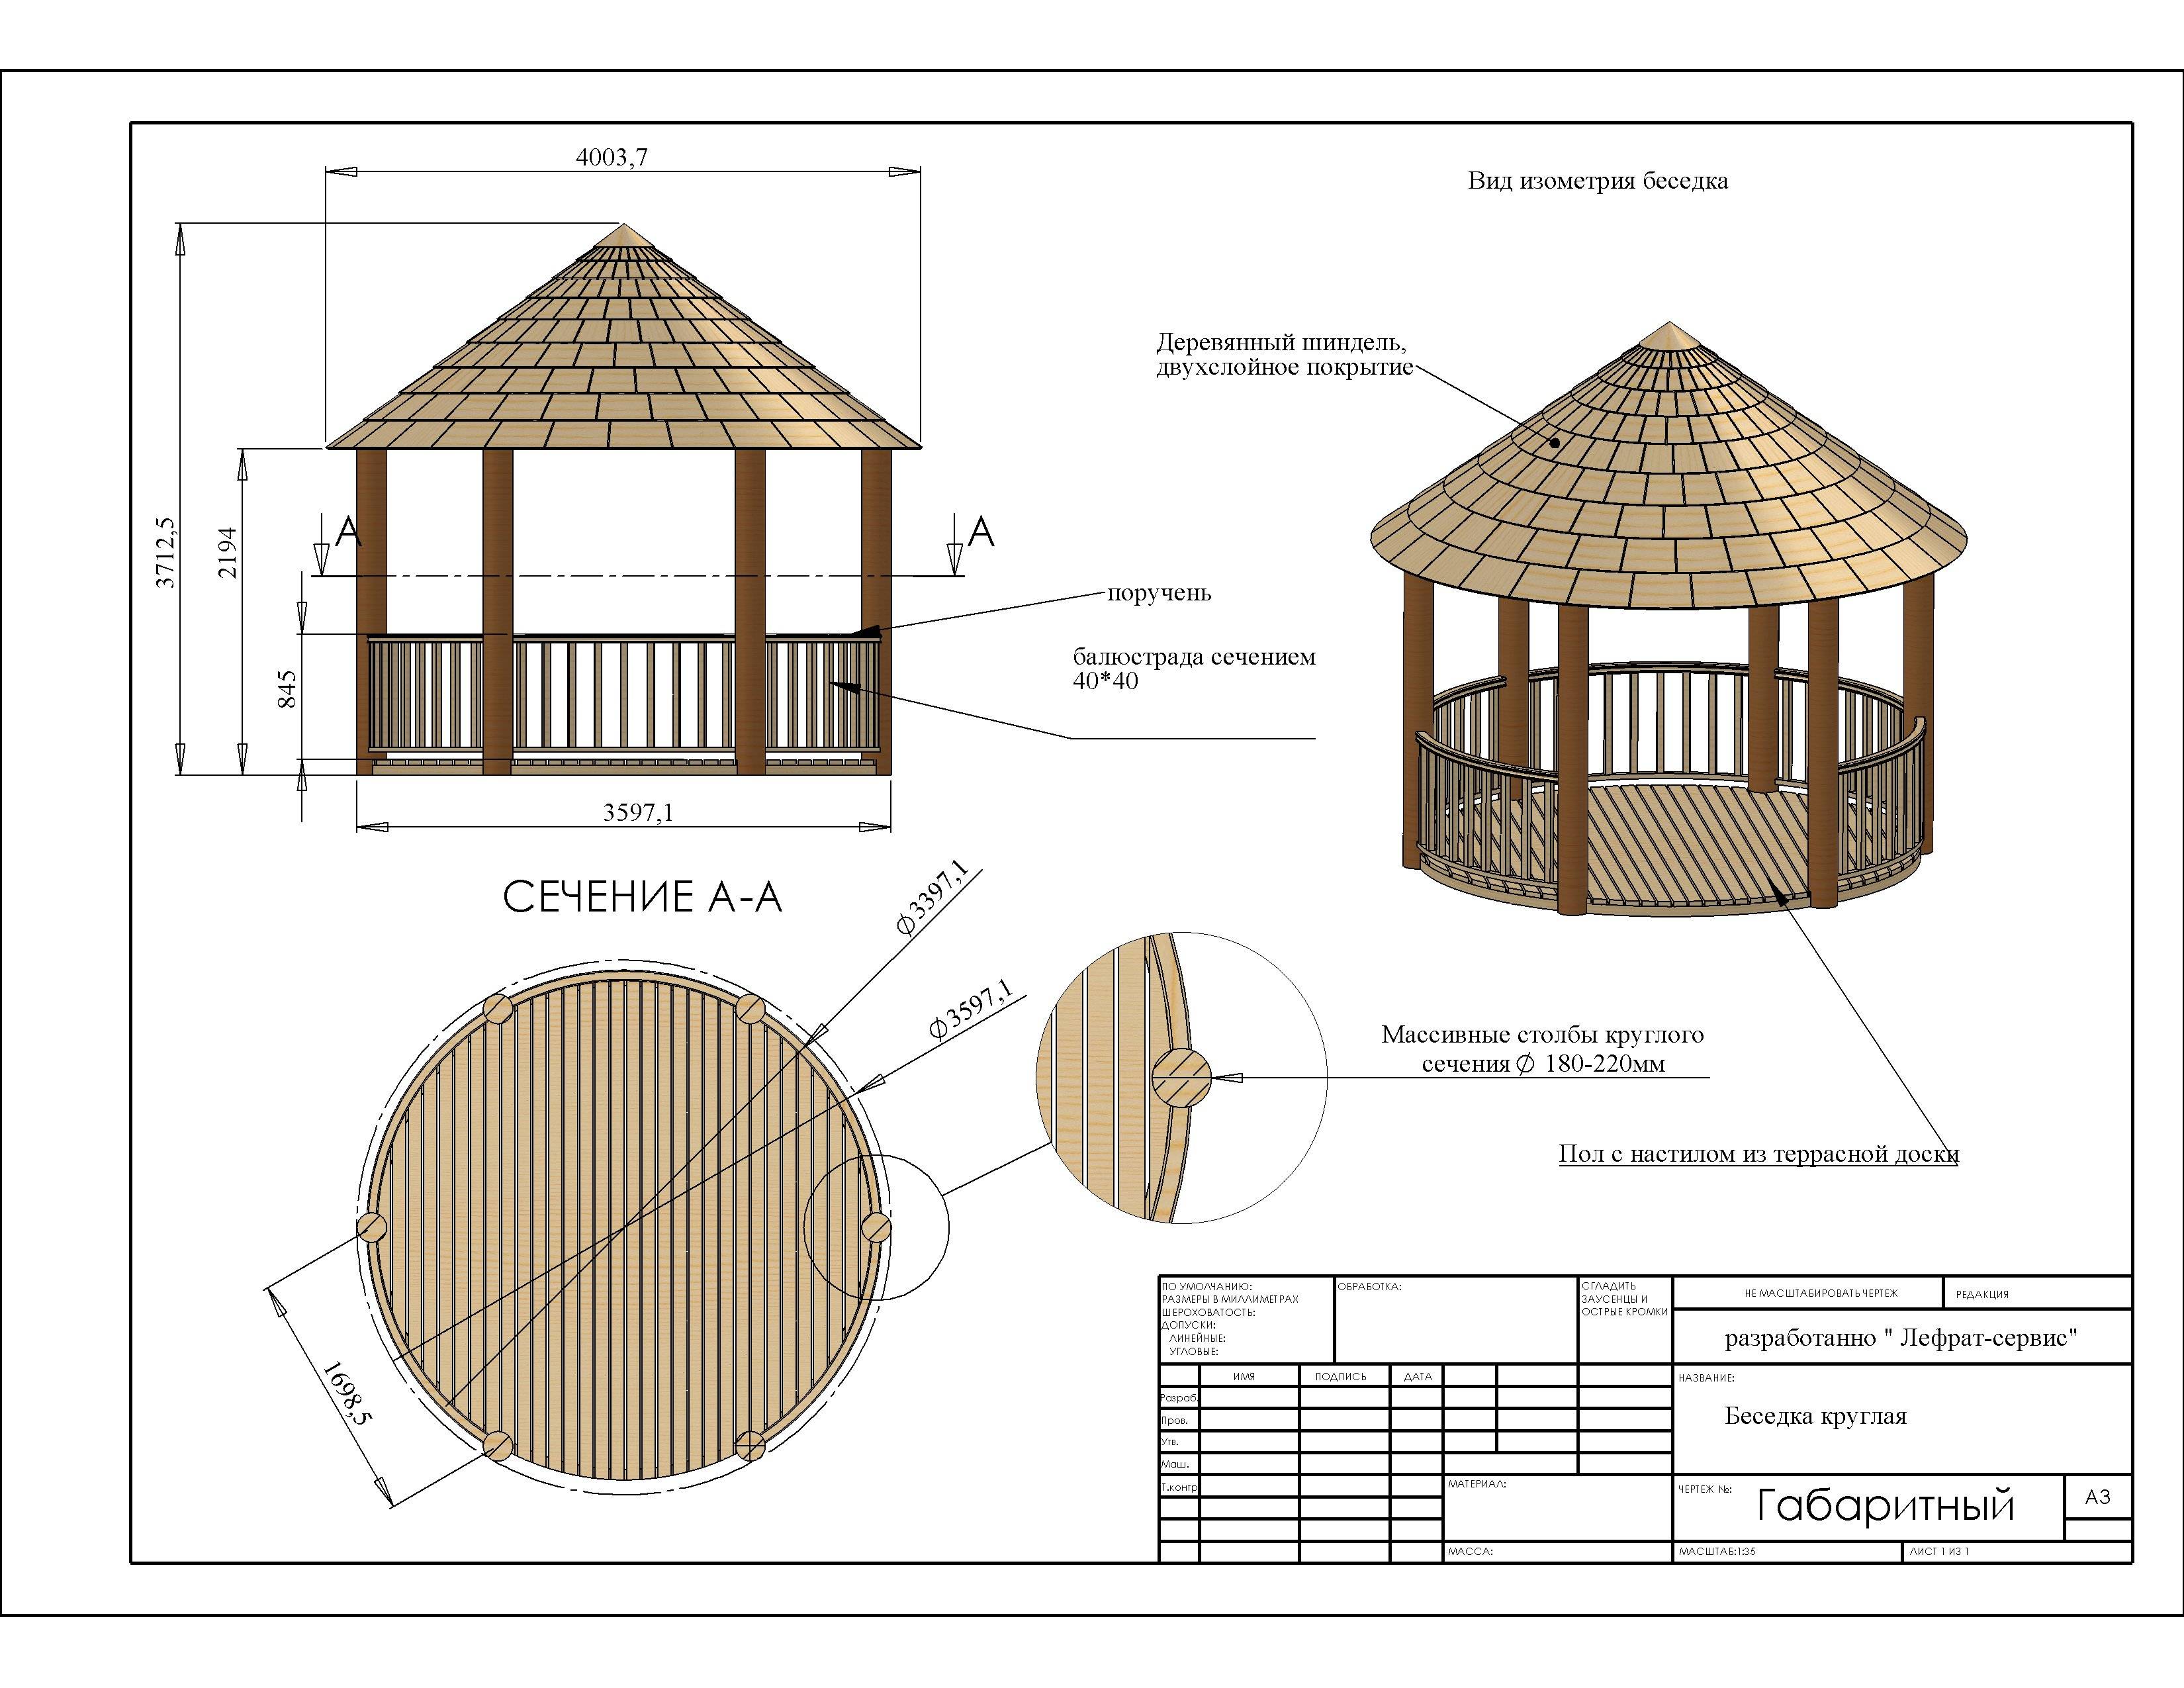
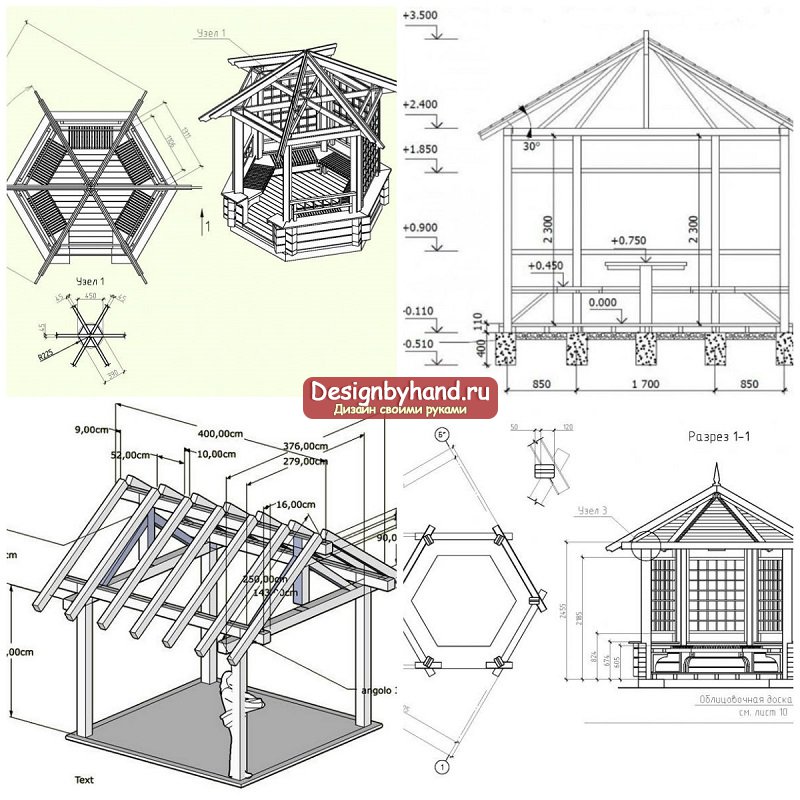
Chinese style gazebo (with drawings and dimensions)
Project with all dimensions, foundation layout, roof truss system, etc. Arranged in a photo gallery.
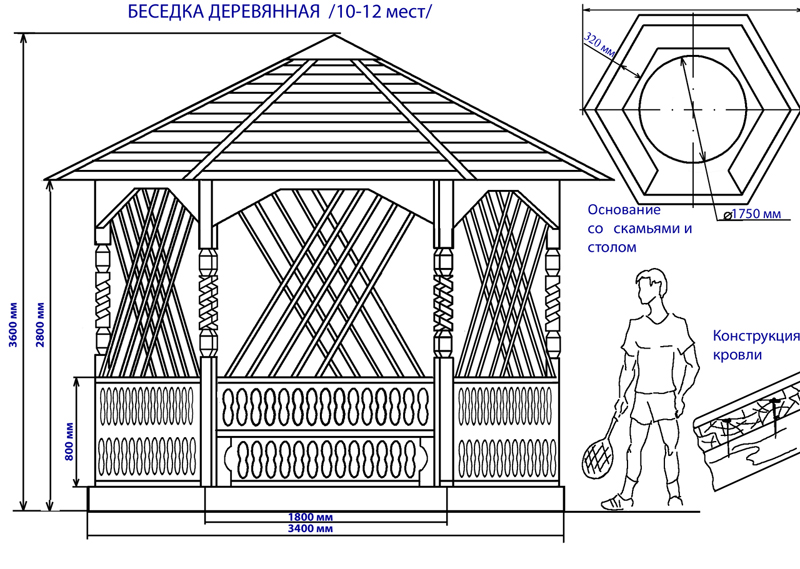
Exterior view of Chinese style wooden gazebo
Main façade - height from floor to top rail 2,160 m
Main facade without roof: vertical posts 150*150 mm
Side view . The railing (railing) is 740 mm high, raised 150 mm above the floor level. The height of the railing in the gazebo is 890 mm
Cross section of a wooden arbor. In the photo on the right - how to make raised ends of the roof
Lengthwise cut
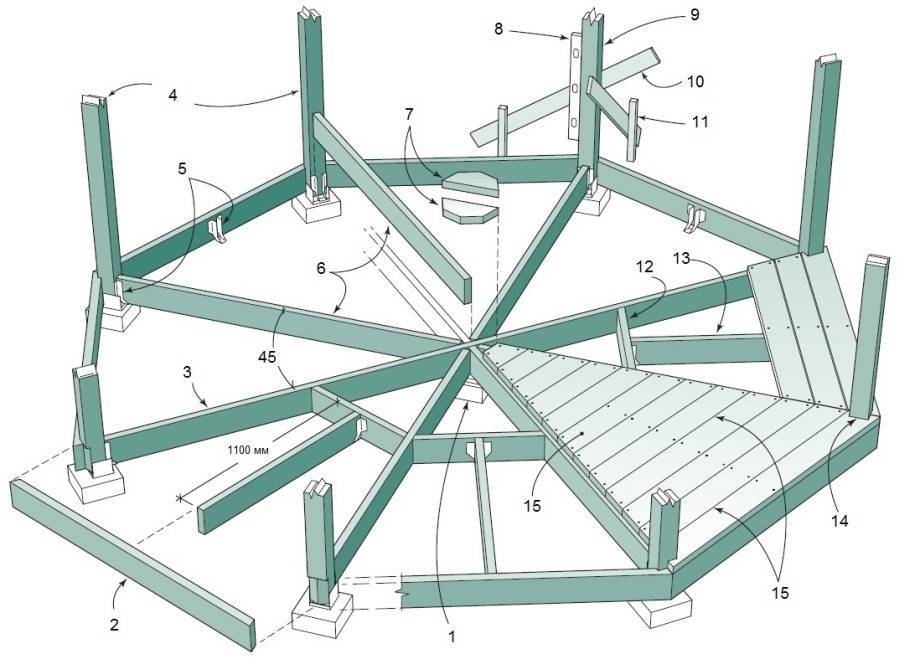
Layout plan for the columns under the gazebo
Bottom harness. The locations of the racks (bar 150 * 150 mm) are marked with crosses
Top harness
Installation of floor beams (numbers are the designation of the material from the specification)
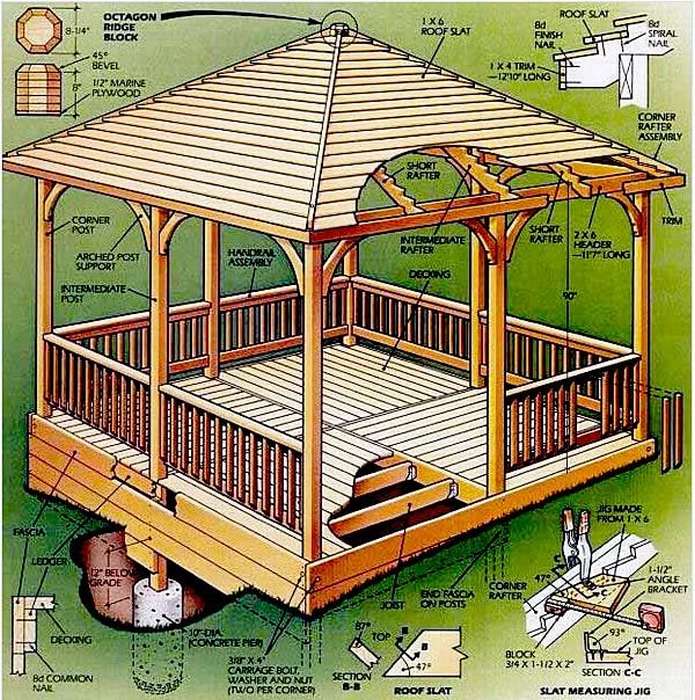
truss system
Detailing node 2 - how to install racks
How to make steps to the veranda - node 2
Fastening the truss system to the upper harness - on wooden pins
Fencing detail
Specification with the dimensions and volume of lumber required for this project of a wooden gazebo
Specification with the dimensions and volume of lumber required for this project of a wooden gazebo
Large gazebo on the foundation
Before you build this gazebo, you need to make a strip foundation. Its parameters depend on the soils, on the material that you are going to use for the frame: metal or wood, and what you are going to glaze it with. In general, the width of the tape is about 20 cm, the depth of occurrence is 20-30 cm deeper than the level of the fertile layer. On heaving soils, it is better to make a pile foundation.


Large glass gazebo
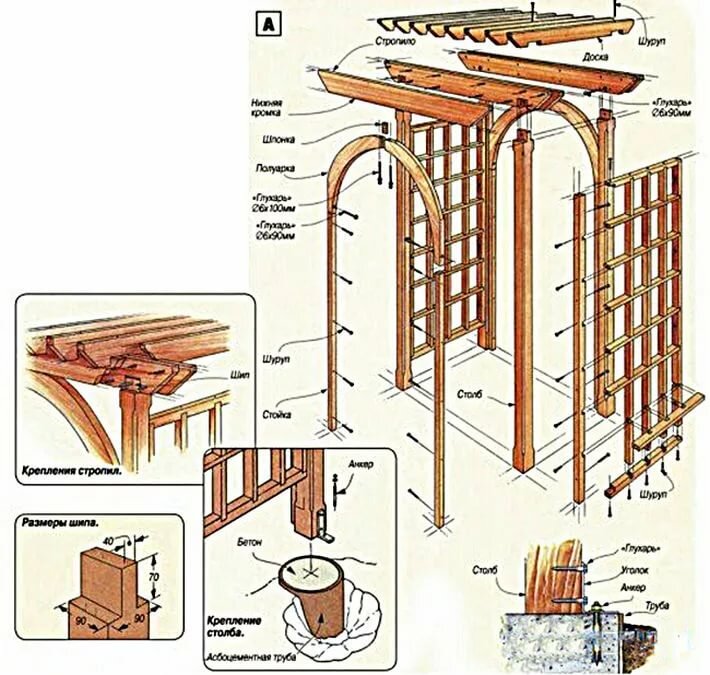
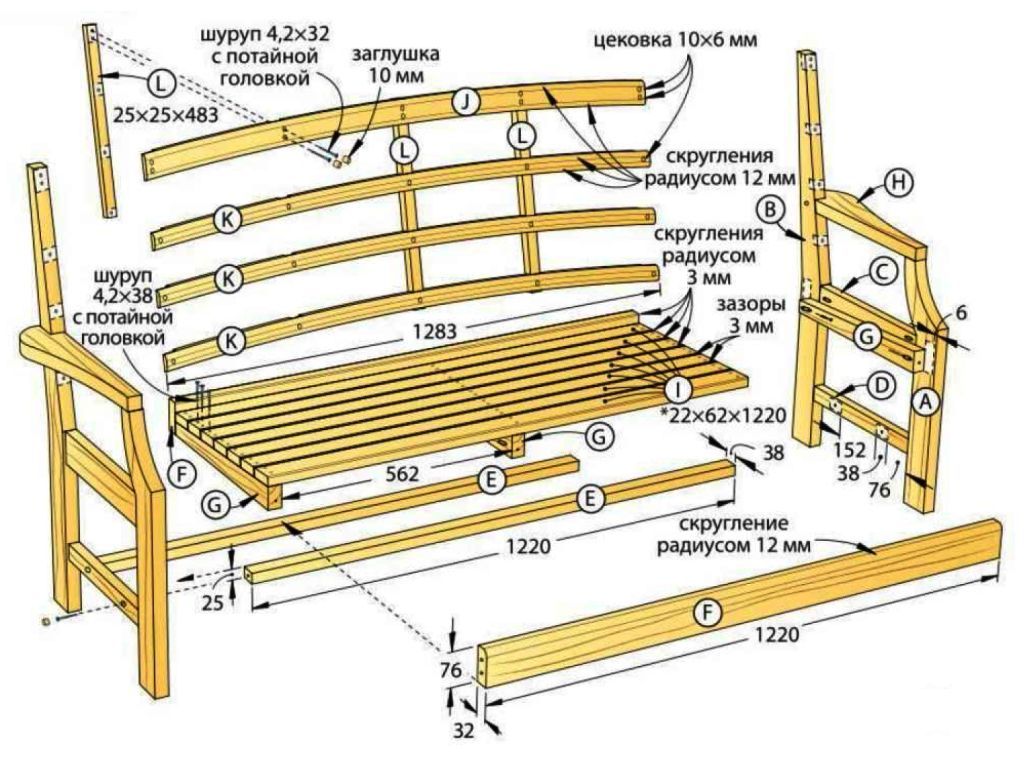
Drawing gazebo-swing
The swing arbor requires special attention: it is fixed very firmly so that the resulting variable loads do not loosen and turn the structure over. To do this, you can extend the legs down, dig a hole under them, fill them with rubble, tamp, and then pour everything with liquid concrete.If you make the frame from a pipe, there are no questions; for a tree, you can use "P"-shaped fasteners with a pin mounted in the lower part. Here it can be bent and poured with concrete.
For even greater reliability, crossbars are attached to the legs, which turn out to be slightly recessed into the ground. They are hammered with U-shaped staples.
According to this drawing, you can build a gazebo-do-it-yourself swing
You can read about the manufacture of ordinary swings of various types here.
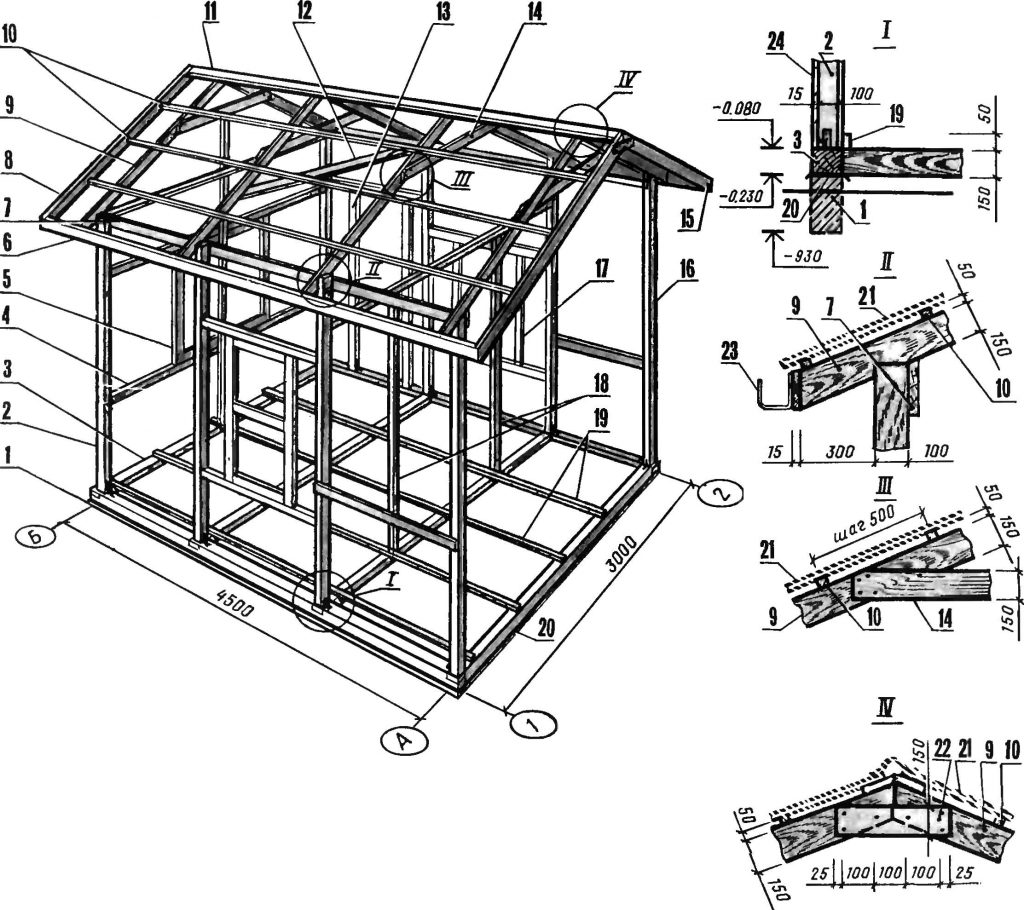
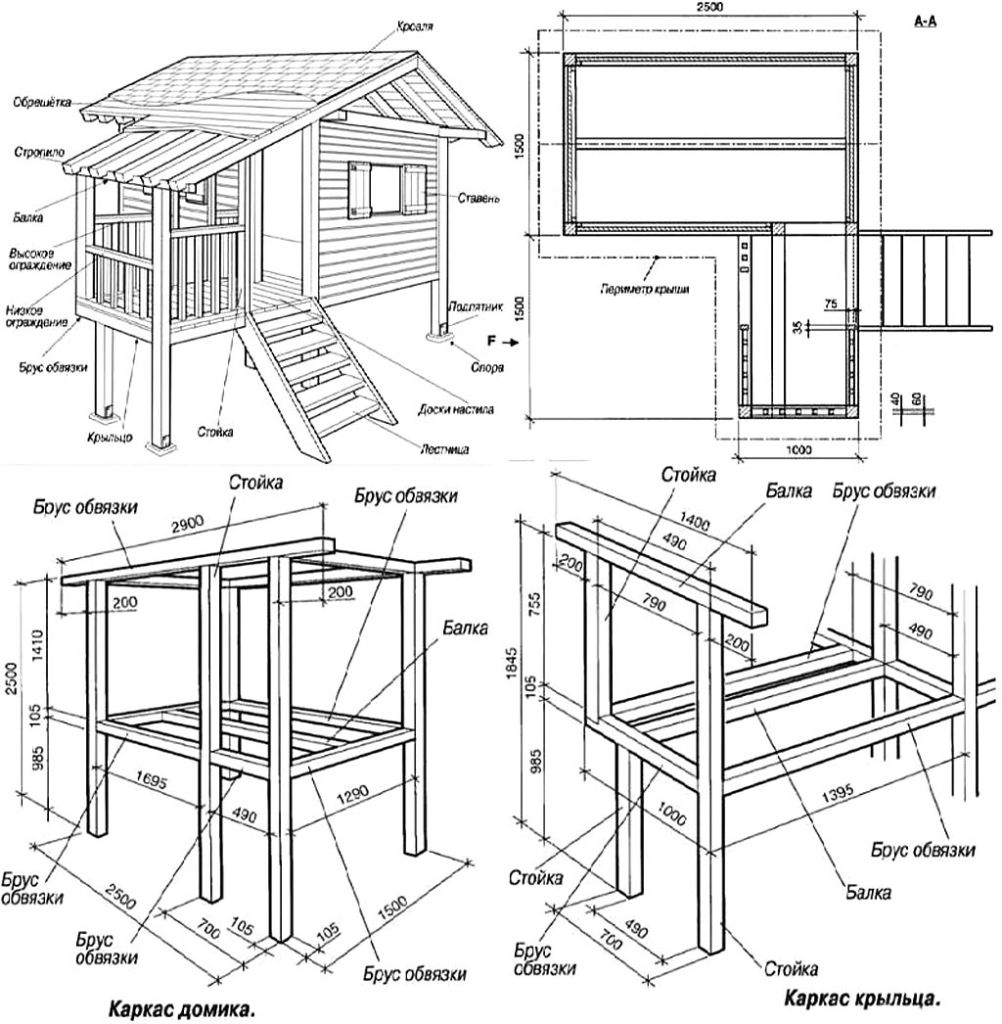
Construction of a frame gazebo with a pitched roof
To avoid serious mistakes and minimize construction costs, you need to start with the simplest. For example, a rectangular gazebo with a pitched roof and on a slab foundation is taken.
Construction of a frame gazebo with a pitched roof
Necessary materials:
- large stone or rubble;
- sand;
- concrete mortar;
- formwork boards;
- timber 100x100 mm and 50x50 mm;
- boards with a section of 30x150 mm;
- primer for wood;
- dye;
- slate or corrugated roof;
- self-tapping screws and bolts;
- reinforcing bars.
You will also need tools:
- shovel;
- building level;
- rule;
- hacksaw;
- jigsaw or circular saw;
- screwdriver;
- a hammer;
- paint brushes;
- Bulgarian.
Construction of a frame gazebo with a pitched roof
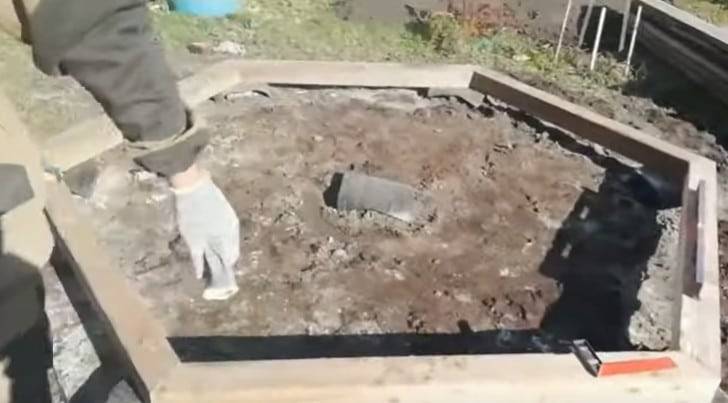
Marking the base of the gazebo
Marking the future gazeboMarking the future gazebo
Choose a flat open area of the garden and make markings. To do this, determine the location of one of the corners of the gazebo and mark it with a peg. They measure the distance to the other corners, put beacons, pull a twine between them. Diagonals are measured in the resulting rectangle: if they are the same length, the markup is correct.
Pit preparation
Backfilling and tamping of sand
The soil is selected with a shovel to a depth of about 25-30 cm, the bottom is leveled, and it is carefully rammed. The walls of the pit must be strictly vertical. Next, coarse-grained sand is poured in a layer of 10 cm, it is well leveled and moistened abundantly for compaction. Along the perimeter, formwork is laid out from boards up to 10 cm high, reinforced with timber.
Foundation pouring
The pit is laid out with large flat stones or covered almost to the top with large rubble. At the corners of the perimeter between the stones, segments of reinforcing bars are driven in; the rods should rise at least 10 cm above the finished foundation. A concrete solution is prepared and the foundation pit is poured. The surface is leveled with a rule or smoothed with a trowel.
Foundation
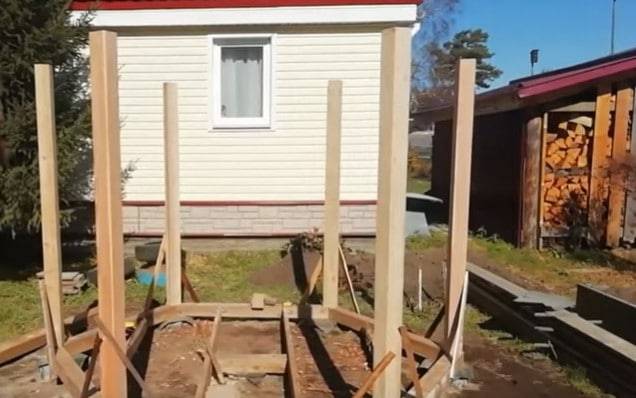
Frame installation
For the frame, take 4 beams of 100x100 mm and cut the gazebo to the height. The front bars are left 15-20 cm longer than the rear ones to make the roof slope. After that, the supports are well treated with a primer and dried. In the lower end of each support, a small hole is drilled along the diameter of the reinforcing bars that protrude from the concrete at the corners of the base. They put the bars on the rods, set them vertically with the help of a level and additionally strengthen them with metal plates and anchor bolts.
Frame made of timber
After installation, the side supports are interconnected with 50x150 mm boards, and then the braces for the rafters are mounted. At a height of 10 cm and 0.5 m from the floor, the racks are connected with horizontal jumpers from a 50x50 mm beam. Vertical bars are fixed between the lintels in increments of 40 cm. The doorway is left free.All fastenings are carried out with the help of bolts and steel corners, which are screwed to the tree with self-tapping screws.
All fastenings are carried out with the help of bolts and steel corners, which are screwed to the tree with self-tapping screws.
Prices for various types of timber
bar
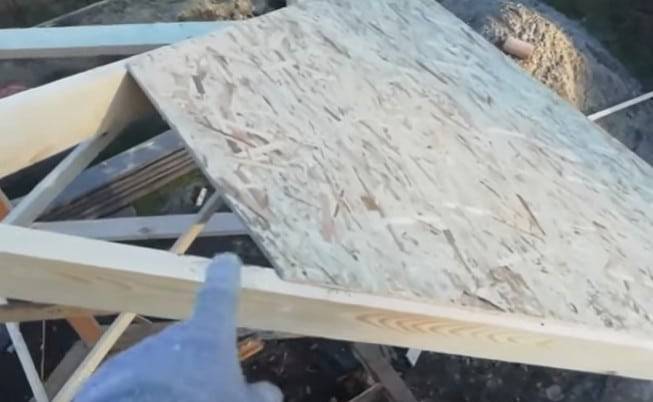
Roof installation
Roof schemeRoof installationWooden logsArbor roof
On the boards connecting the support bars, logs are stuffed in increments of 30 cm. From above, the logs are sheathed with an edged board 30x150 mm. Between the boards leave gaps from 5 to 15 cm wide. Of course, all roof elements must be treated with an antiseptic primer and dried well. On top of the board, you can cover with glassine and fix it with stapler staples. Thin slats are stuffed over the film so that a ventilation gap remains between the roofing and the film. Slate is laid on the rails and fixed with 120 mm nails with galvanized caps.
Arbor arrangement
Painting the gazebo
After installing the frame and roof, all wooden surfaces must be painted. When the paint dries, a wooden table and benches are placed inside the gazebo along the walls. From the house to the gazebo they conduct electricity, hang a light bulb or a lamp. To give the room coziness, you can hang the walls with a dense light fabric. The interior decoration is completely dependent on the taste and capabilities of the owners of the house.
This version of the gazebo is basic. If desired, you can improve the design: install wooden gratings between the supporting beams, sheathe the walls with clapboard or waterproof plywood, lay logs on a concrete base and make a wooden floor. Instead of beams for the frame, you can take metal pipes, and replace the slate with polycarbonate or soft tiles.
Installation of the roof of the gazebo
Gazebo frame assembly
The roof for the gazebo can be made single-pitched, gable or in the form of a tent. The simplest option is a shed roof, but the hipped roof is the most common. For its arrangement, they take 4 beams with a section of 80x80 or 100x100 mm, knock them down on the ground so that they form a regular pyramid, and lift them up. To attach the rafters to the top trim, it is recommended to use metal plates and bolts. Also, with the help of plates, bars are fixed in the center of the roof.
A simple gazebo from a bar
To strengthen the rafter system, horizontal struts are stuffed between the rafters from a beam of a smaller section. If the gazebo is very large and has a rectangular shape, it is better to mount a gable roof. To do this, triangular trusses are knocked down from 80x80 cm bars and installed on the upper trim. The distance between the trusses is 1 m, they are fastened with a tie-in into horizontal bars and fixed with spacers. On the upper edge of the farm are connected by a ridge beam.
When the rafter system is installed, it is covered with a waterproofing film, slats 2 cm thick are stuffed over the film and the roofing is fixed. In order for the gazebo to harmoniously fit into the landscape, the roofing must be the same as on a residential building. After installing the roof, it remains to equip the interior space, connect electricity, paint or varnish the walls.
Hexagonal gazebo, scheme Types of varnishes for wood Qualities that varnish for outdoor woodwork should have
Video - Do-it-yourself wooden gazebos
TOP 5 main types of wood for lumber
| A photo | Name | Rating | Price | |
|---|---|---|---|---|
| #1 | Larch | 100 / 100 | ||
| #2 | Cedar | 99 / 100 | ||
| #3 | Pine | 98 / 100 | ||
| #4 | Fir | 97 / 100 | ||
| #5 | Spruce | 96 / 100 |
Larch
Larch is a special type of softwood often used for lumber. In strength, it is second only to yew and oak, and ease of cultivation and processing provide a low price compared to elite types of wood. It is slightly affected by the environment, resistant to moisture and the sun. It is a good material that is used for floorboards, floor beams and building walls.


Larch
pros
- high strength and moisture resistance;
- durability;
- little susceptibility to warping.
Minuses
- high thermal conductivity;
- There is a possibility of internal cracking due to improper drying technology.
Cedar
Cedar is an expensive wood used for building decoration and creating load-bearing structural elements. In fact, it is almost impossible to find products made from real cedar in the CIS market, because it grows only on a few islands in the Mediterranean. The alternative used is Korean pine, often named after this rare tree.
Cedar
pros
- resistance to decay and wormhole;
- high strength;
- minimum defects (radial cracks or annular bundles).
Minuses
- has a specific woody aroma;
- cedar wood is very expensive.
Pine
Pine wood is considered versatile in woodworking because of its qualities. It has a lower density than larch, but the processing costs are lower here. Pine contains a high proportion of resins, so its durability is high. This material is used for beams, boards, logs and timber, as well as facing material. It is from pine that lining is most often produced.
Pine
pros
- environmental friendliness;
- strength;
- long period of operation;
- easy repair.
Minuses
- pine wood is soft, easily scratched and damaged;
- tar stains may form on the walls.
Fir
Fir is rarely used for lumber, because it requires long processing. This wood has a high natural moisture content and low moisture yield, which is why it needs to be dried for a long time and diligently using special ovens. Therefore, such material is used only for cladding.
Fir
pros
- wood is practically odorless;
- does not contain resin.
Minuses
quickly rots and is destroyed by wood-boring insects.
Spruce
Spruce lumber has a low price and high prevalence. It is a simple wood often used for cladding. Spruce timber is almost never produced, more often sawlogs or lining are made from it.
Spruce
pros
- spruce wood is practically not subject to warping;
- sticks perfectly.
Minuses
- high humidity;
- large deformation during drying;
- a large number of branch bases.
Sketches of gazebos with drawings and dimensions
In this section, we will look at examples of different types with drawings. If you don’t have time to draw yourself or you don’t know how, then the examples given will help you when building your own version of the gazebo.
simple wooden gazebo
Wood, the most common material, is cheap and not difficult to work with. When it comes to construction, most do not even hesitate to choose wood as the material.
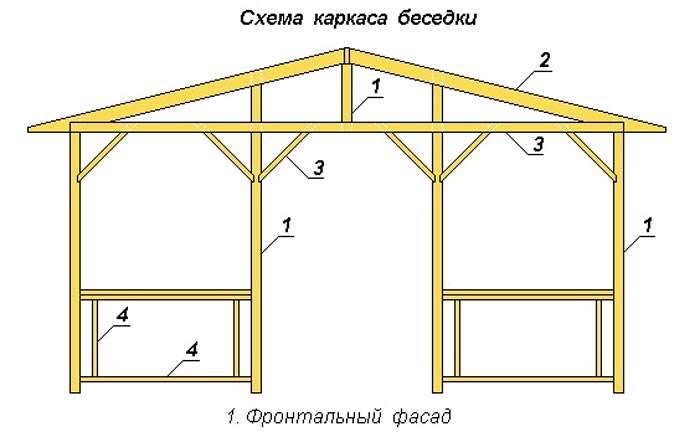
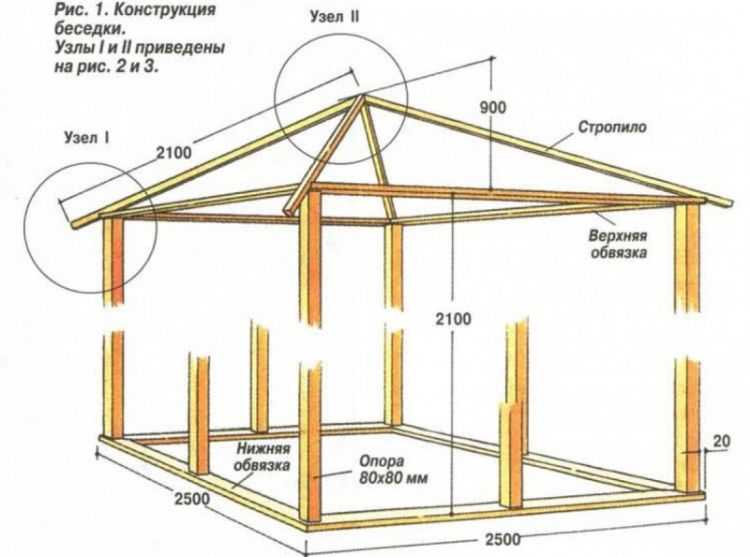
This figure shows a fairly simple version of a gable gazebo.
The next drawing also represents a simple gazebo, though already with a hipped roof.
Under the number 1 is the lower trim of the 100x50 timber, 2 is the vertical support (80x80 timber), 3 is the entry posts (80x50 timber), 4 is the upper trim and 5 is the rafters.
In this option, the main thing is to connect the top of the tent. Here, a slightly different scheme of rafters is needed than with a gable roof.
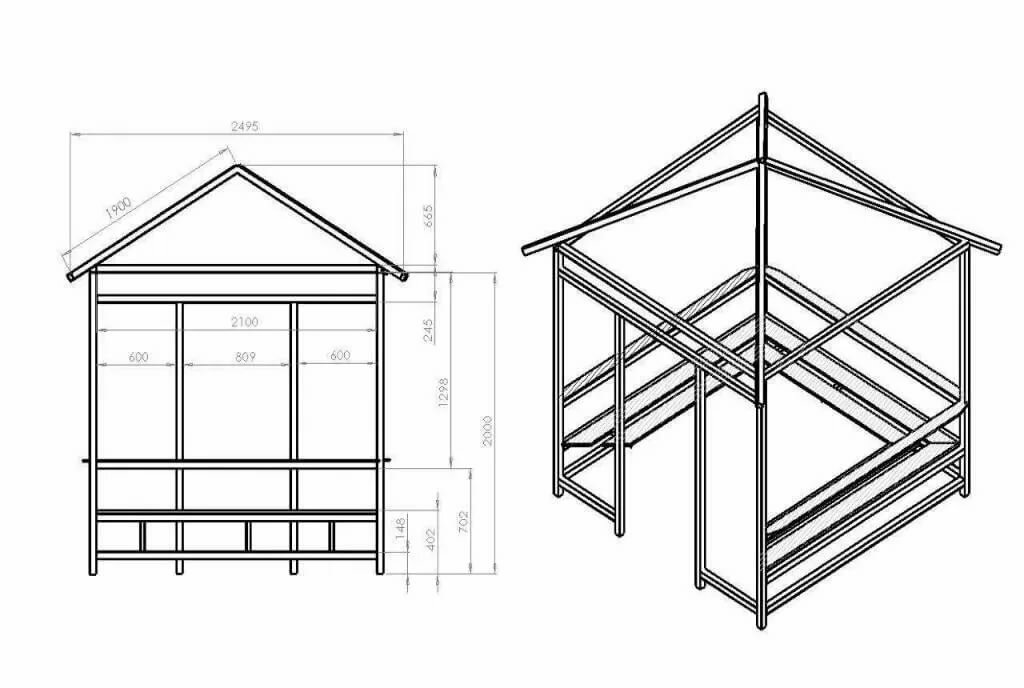
Do-it-yourself gazebo made of wood, drawing with a gable roof
A gazebo with a gable roof, as well as a flat one, is one of the most common options built on a garden plot.
The figure shows a 3x3 size diagram.
Foundation
Concrete blocks are used as the foundation, which are installed according to the level on the prepared and marked site. This is a less time-consuming process compared to concreting. Roofing material is placed on the foundation blocks. Next up is the bottom trim. For it, a bar measuring 100x100 is used. To fasten the vertical posts at the ends of the timber, gaps are cut, which, when the timber is connected, give a square where the rack will be inserted.
This is a very convenient option, as it gives an additional mount to the rack. We install the assembled lower trim on the foundation, after which we begin to assemble the side walls.
Walls and trim
First of all, we install four support posts, after which we make the upper harness. In order for the racks to be aligned, during further construction we strengthen them on the jibs. After the top harness has been erected, we make the middle one.
Fastening is done using metal corners and self-tapping screws. After assembling the frame, you can start building the roof.
Roof
You can first assemble the roof on the ground and install it on the top trim, or you can make triangular rafters, strengthen it on the top trim, and already assemble the roof on them. As for the second option, the triangular rafters are made as shown in the photo.
If you are assembling the roof on the ground, then it will look like this:
The assembly scheme is the same in both cases, the only difference is in the assembly location. Therefore, choose the option that is more convenient for you. When assembling the roof, grooves are cut in all elements, then the entire rafter system will be even. At least two people will have to lift the rafter system up, so you will have to take care of a partner.


After installing the truss system, a crate is made.
The crate is needed for laying roofing material on the roof. It can be slate, metal tile and other material.
Having installed the roof, you can proceed to the flooring. We use a floorboard. Before installation, it is covered with an antiseptic. The main thing is to install the first board evenly, and then attach the rest to it.
And the last - lining the gazebo with clapboard
Usually, only the lower part of the gazebo is sheathed: from the floor to the middle harness. The upper part can be left open, or you can install a decorative grille. At the end of the finishing work, the gazebo can be painted, you can leave it covered with stain.
The end result will be something like this:
Arbor made of metal with their own hands. Photos, drawings and schemes of structures
In addition to wood, metal is often used for the construction of gazebos: iron or aluminum. This material is durable and products from it do not need repair. The elements are connected using welding. Models of gazebos made of metal can have a stationary or collapsible design. In the case of a collapsible version, bolted connections are used as fasteners.
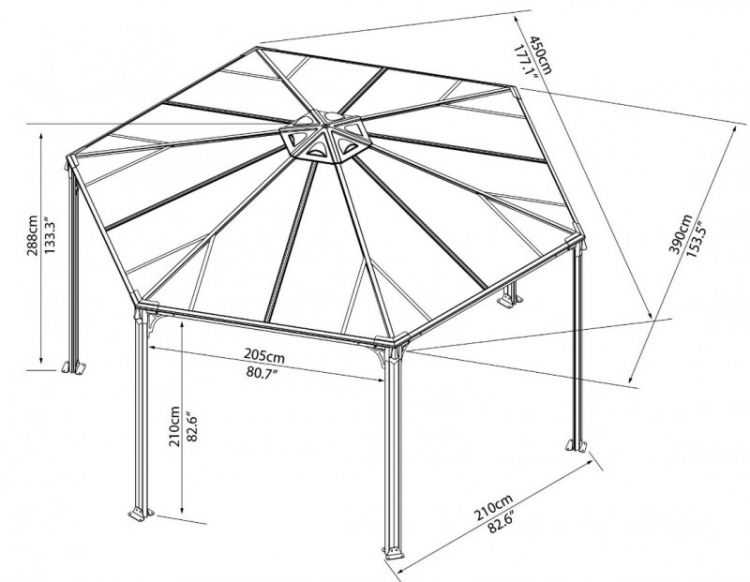
Hexagonal metal gazebo with pointed roof
When planning the location of the gazebo, it must be borne in mind that metal elements get very hot in hot weather. In this regard, it is recommended to carry out such structures open and install in the garden.
Before starting the project, it is necessary to think over the design of the gazebo, which would match the style of the existing exterior. The dimensions laid down in the drawings of a metal gazebo with your own hands depend on the estimated number of people who can be inside it, as well as furniture and the availability of certain equipment (barbecue, barbecue).
Drawing of a metal gazebo with forged elements
Many people use ready-made schemes for the construction of metal gazebos with their own hands, photos of which can be found on the Internet. Relatively easy to install is a rectangular design with dimensions of 2.5x3 m. This model will not be bulky and at the same time it can accommodate a table and several seats for a comfortable stay.
Do-it-yourself gazebos from a profile pipe. Drawings, photos of finished structures
Due to a number of properties of a profiled metal pipe, many people use this material to build a gazebo. Structures from the profile are easy to erect, excellent resistance to weathering and durability. In addition, this material is relatively inexpensive, and the structures made from the profile have a decent neat appearance.
Arbor from a profile pipe, complemented by a fabric canopy
Before proceeding with the manufacture of the gazebo, it is necessary to select the type and shape of the structure, prepare drawings, check the availability of the necessary materials and tools for installation.A photo of gazebos from a profile pipe with your own hands demonstrates various configurations of these structures: rectangular, hexagonal, square and other more complex shapes.
The project of arranging a rectangular gazebo from a metal profile
Sketches and drawings of the gazebo can be done independently or you can use ready-made schemes, proportionally changing the dimensions to fit your option. In the drawings, it is necessary to indicate all dimensions, to perform all calculations as accurately as possible, since the appearance of the structure and the selection of the necessary materials will depend on this.
For the construction of the structure, the following materials will be needed: concrete, a profile pipe, a primer for processing metal surfaces, fittings, roofing material. Of the tools you will need: a building level, a drill with a set of drills, a grinder, a welding machine, a shovel, fasteners.
The project of a square gazebo from a metal pipe with wooden benches
Having chosen and marked out a place for the structure, they proceed to the device of the pits. Their number is determined by the number of supports, according to the drawings. Pits are made with a depth of about 60 cm. The height of the support posts is taken taking into account this value. For supports, a profile with a section of 80x80 mm and a wall thickness of 3 mm is used, to which the supporting metal heels are welded. This will give the structure additional stability.
The bottom of the prepared pits is covered with rubble, carefully tamped, the support posts are inserted and concreted.
At this stage, it is important to maintain the maximum verticality of the installed racks. To do this, as soon as the concrete hardens a little, the position of each support is checked and leveled.
Drawing of a gazebo from a profile with a square section
After installing the supports, it is necessary to withstand about 2 days until the concrete has completely set, and then proceed to the lower horizontal piping. For it, a profile of a smaller section is used, which is welded to the supports at a certain height above the ground. The distance from the ground to the horizontal strapping is taken so that it is as comfortable as possible to enter the gazebo.
Next, proceed to the manufacture of the roof. A system of rafters is formed from the profile according to the schemes. For a gable shape, a profile is welded at an angle of 15 degrees. For the convenience of attaching the roofing material, a profile pipe is welded to the roof frame as a crate in increments of 45 cm. On this, the gazebo frame is considered assembled.
Scheme of a collapsible gazebo from a professional pipe measuring 20x20x2 mm
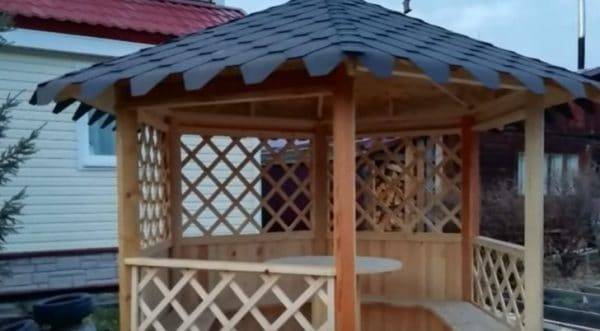
Hexagonal gazebo with a diameter of 3 m
With your own hands, you can build a garden gazebo in the form of a hexagon. It looks unusual and very interesting, but it's easy to make. The whole process of work is presented in stages in a step-by-step instruction.
For this gazebo, you need to prepare the following material:
- timber 40 to 150;
- rail;
- OSB board;
- soft tiles;
- concrete.
Operating procedure:
After the space for the gazebo has been selected and cleared, you need to install a peg in the center of the site, tie a rope and measure 1.5 m. Attach another peg to the end of the rope and draw a circle, outline the boundaries of the gazebo. Its diameter will be 3 m.


Install a concrete foundation. Make reference points on all faces of the future hexagon and in the center.
Install logs for the floor and assemble the frame of the gazebo from the timber.
Cover the roof with OSB sheets.

Decorate the sidewalls of the gazebo, sheathing it with clapboard.
Decorate the openings with a lattice. Details on how to do this are described above.
Cover the roof with soft tiles.
From the same material, you can build benches around the perimeter of the gazebo and make a table. Drawings and calculation of materials for a hexagonal gazebo are in the photo above.
Conclusions and useful video on the topic
Video instruction for building a rectangular wooden gazebo:
Video with instructions for building a hexagonal gazebo:
Building a gazebo out of wood is not such a difficult thing. To do this, you will need tools: a circular saw, a screwdriver, a drill, chisels, a planer, a grinder. Some woodworking skills, free time and the desire to decorate your site with a new functional and beautiful gazebo will also come in handy.
You can ask questions on the topic of the article or share your own experience in building a wooden gazebo. The contact block is located immediately below the article.


