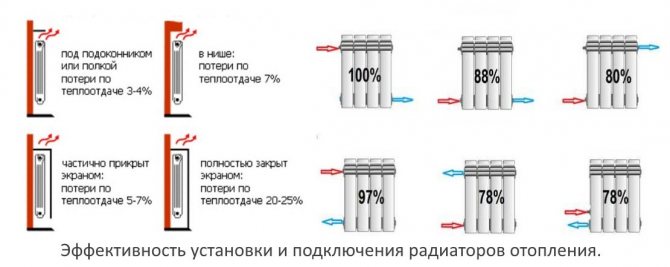
- Placement of heating devices
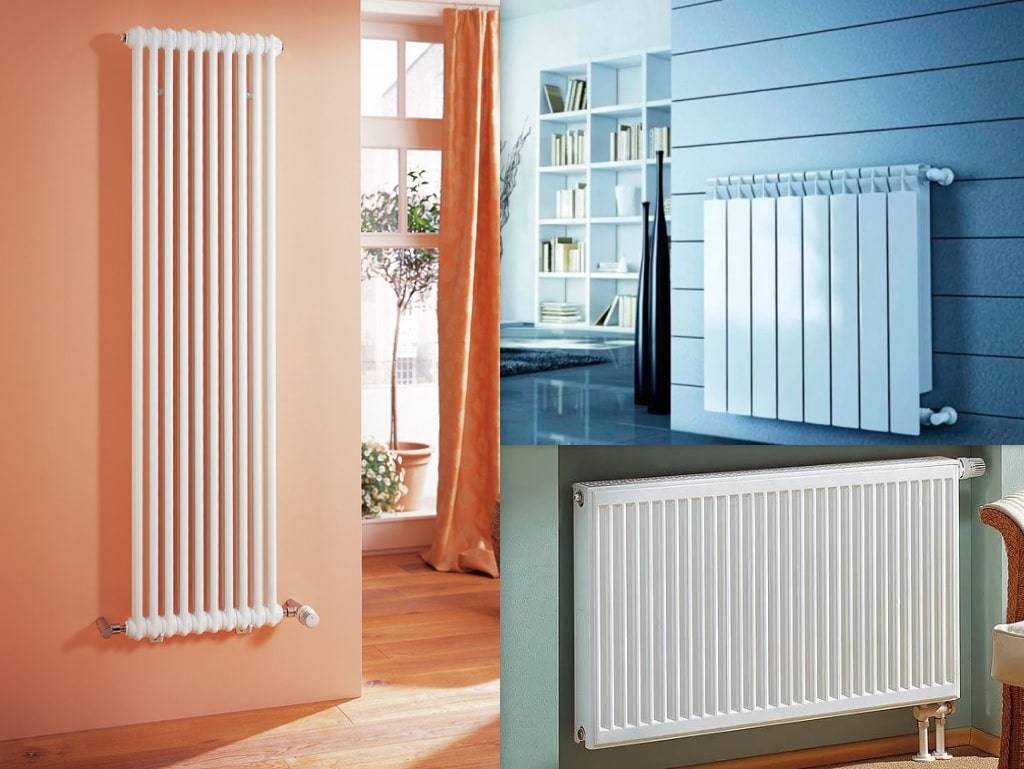
- Bimetal heating devices
- aluminum batteries
- Disassembly of cast iron radiators
- Helpful Hints
- Features of mounting heating radiators for self-installation
- Connecting fittings
- Heating wiring options
- Correct connection
- Counting radiator sections
- Adjustment of radiators Heating system
- Adjustment of radiators
- 2 Making radiators with your own hands
- Advantages and disadvantages of homemade radiators
- Do-it-yourself installation of heating radiators in the apartment
- Types of control valves
- Conventional direct acting thermostat
- Temperature controller with electronic sensor
- glass screen
- What is needed for installation
- Mayevsky crane or automatic air vent
- Stub
- Shut-off valves
- Related materials and tools
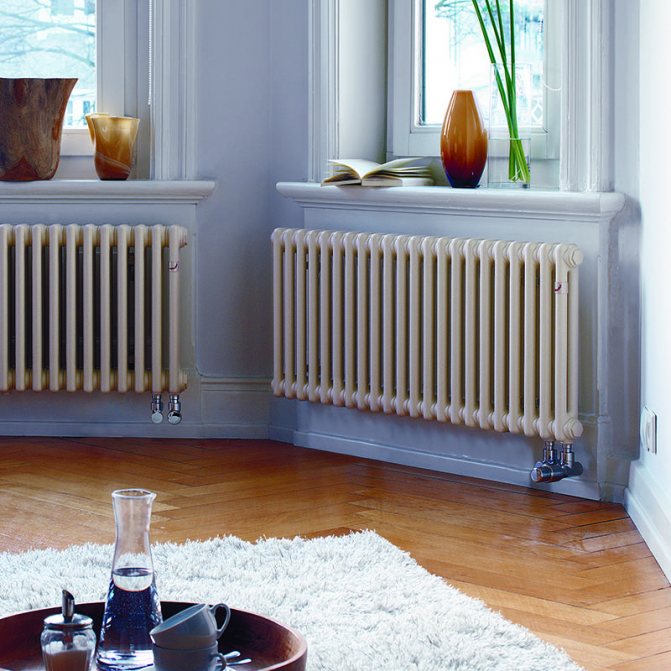
Placement of heating devices
It is of great importance not only how to connect the heating radiators to each other, but also their correct location in relation to building structures. Traditionally, heating devices are installed along the walls of the premises and locally under the windows in order to reduce the penetration of cold air flows in the most vulnerable place.
There is a clear instruction for this in the SNiP for the installation of thermal equipment:
- The gap between the floor and the bottom of the battery should not be less than 120 mm. With a decrease in the distance from the device to the floor, the distribution of the heat flux will be uneven;
- The distance from the rear surface to the wall on which the radiator is attached must be from 30 to 50 mm, otherwise its heat transfer will be disturbed;
- The gap from the upper edge of the heater to the window sill is maintained within 100-120 mm (not less). Otherwise, the movement of thermal masses may be difficult, which will weaken the heating of the room.
Bimetal heating devices
To understand how to connect bimetallic radiators to each other, you need to know that almost all of them are suitable for any type of connection:
- They have four points of possible connection - two upper and two lower;
- Equipped with plugs and a Mayevsky tap, through which you can bleed the air collected in the heating system;
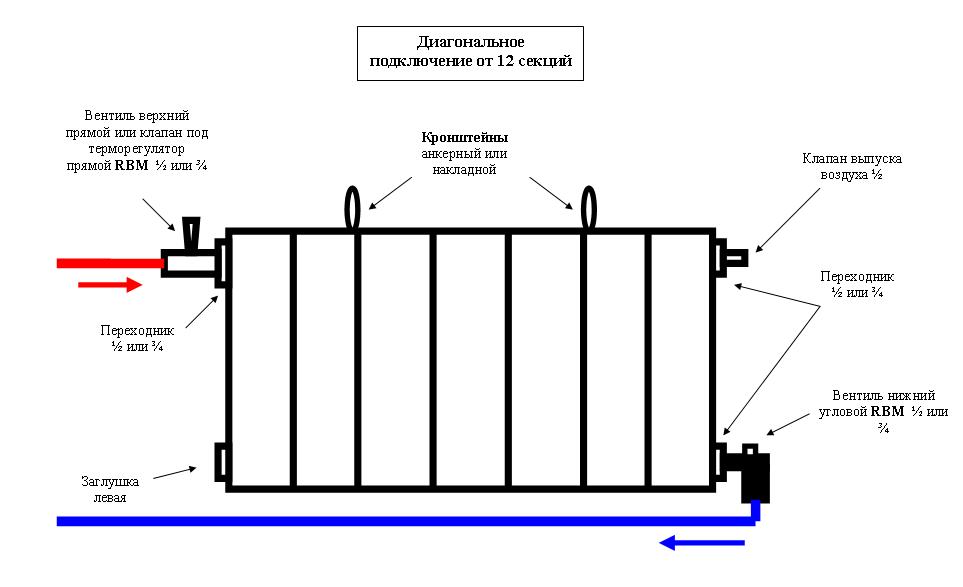
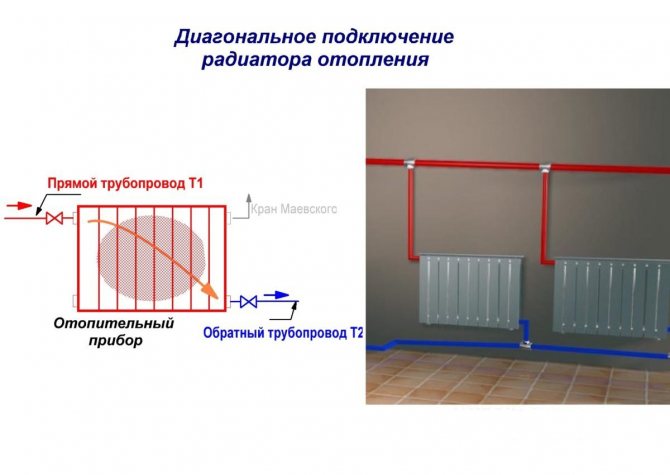
The diagonal connection is considered the most effective for bimetallic batteries, especially when it comes to a large number of sections in the device. Although very wide batteries, equipped with ten or more sections, are undesirable.
Advice! It is better to consider the question of how to properly connect two 7-8 section heating radiators instead of one device of 14 or 16 sections. It will be much easier to install and more convenient to maintain.
Another question - how to connect sections of a bimetallic radiator can arise when regrouping sections of a heater in various situations:
The place where you plan to install the heater is also important.
- In the process of creating new heating networks;
- If it is necessary to replace a failed radiator with a new one - bimetallic;
- In case of underheating, you can increase the battery by attaching additional sections.
aluminum batteries
Interesting! By and large, it should be noted that a diagonal connection is an excellent option for any type of battery. Do not know how to connect aluminum radiators to each other. connect diagonally, you can't go wrong!
For closed-type heating networks in private houses, it is advisable to install aluminum batteries, since it is easier to ensure proper water treatment before filling the system. And their cost is much lower than that of bimetallic devices.
Of course, over time, moving along the radiators, the coolant cools down.
Of course, you will have to try before you connect the sections of the aluminum radiator for rearrangement.
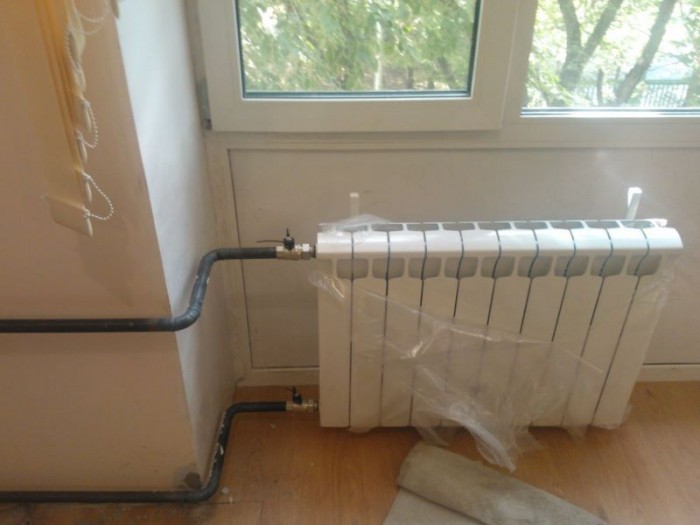
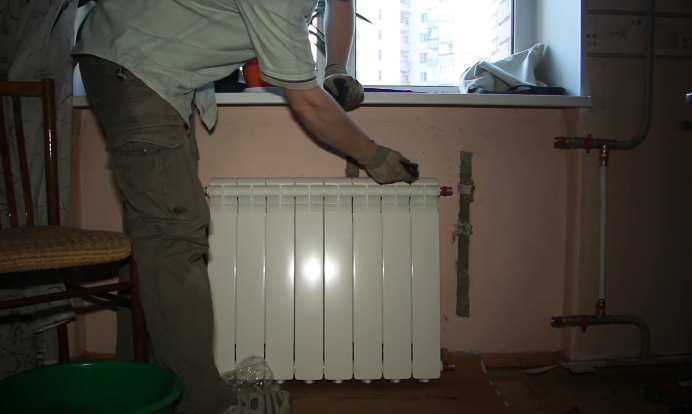
Advice! Do not rush to remove the factory packaging (film) from the installed heaters until the finishing work in the room is completed. This will protect the radiator coating from damage and contamination.
The work process itself does not take much time, you do not need any special skill or expensive equipment, you can purchase all the necessary tools at any hardware store. And do not forget, the connection will serve you for a long time and without hassle only if you used high-quality materials in your work and followed all the rules for installing the heating system.
We are talking about exactly what is shown in this picture.
In the presented video in this article you will find additional information on this topic.
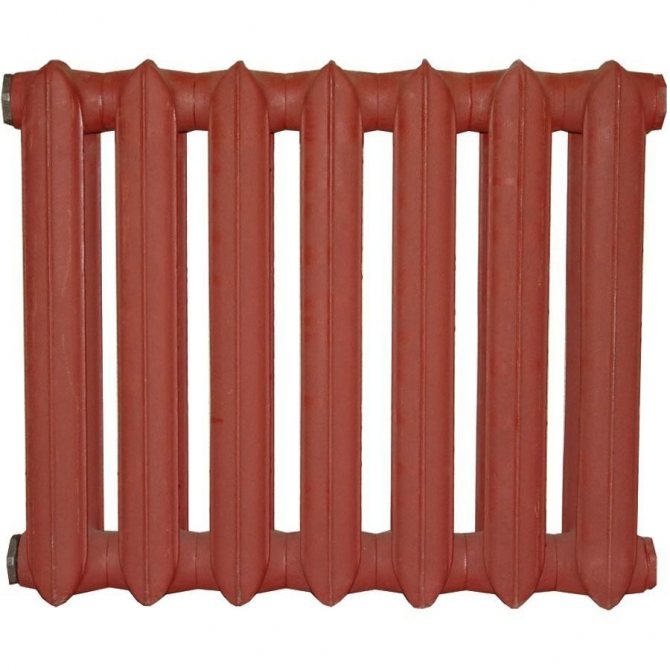
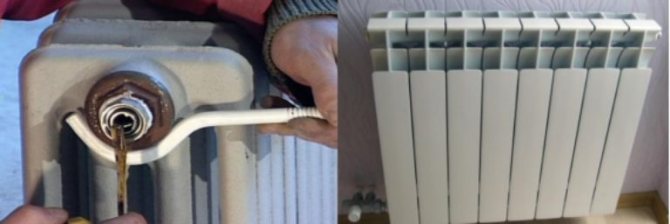
Disassembly of cast iron radiators
Dismantling cast-iron radiators sometimes becomes a very time-consuming process, but necessary.
Scheme of disassembling cast-iron heating radiators: a - capturing the threads of sections by nipples by 2-3 threads; b - turning the nipples and joining the sections; c - connection of the third section; g - grouping of two radiators; 1 - section; 2 - nipple; 3 - gasket; 4 - short radiator key; 5 - crowbar; 6 - a long radiator key.
A new or old radiator is placed on a level place. At least on one side, you need to remove the usual futors or deaf ones - plugs. On different sections of radiators, they can be left-handed or right-handed. Usually, cast iron fittings have a right-hand thread, and plugs have a left-hand thread. If there are no disassembly skills, and there is a free section, it is better to find out what kind of thread this is and in which direction the key should be rotated before applying force. If the thread is left-handed, when disassembling cast-iron batteries, turn the key clockwise.


As with unscrewing any nuts, you first need to “break” the futors from their place, i.e. turn them a quarter of a turn on both sides of the battery. Then the futors are unscrewed so that a gap of several millimeters is formed between the sections. If you release the futorki more, the whole structure will begin to bend under its own weight and due to the applied efforts. In this case, the thread may jam. To prevent this from happening, an assistant must stand on the disassembled battery, which will prevent bending with its weight.
Usually, dismantling of old heating radiators is difficult because the fittings and sections are “boiled”. In order to disassemble such a battery, you will have to use an autogen or a blowtorch. The junction is heated in a circular motion. As soon as it is warm enough, the futorki are twisted out.If it was not possible to unscrew the first time, the actions are repeated.
If there is not enough strength to disassemble the battery, you need to increase the length of the key. An ordinary pipe is used, which serves as a lever.
Similarly, built-in nipples for airing cast-iron radiators are unscrewed.
If it was not possible to disassemble the cast-iron battery using the considered methods, it remains to cut it with a grinder or autogenous or smash it in a supine position with a sledgehammer. You need to carefully break or cut one section. After this operation, the adhesion between the sections may loosen, the battery can be disassembled, the remaining sections can be saved.
The use of a “liquid key” or WD liquid does not give an effect, since in old cast-iron batteries the futors were sealed with flax and paint, and liquids would not get on the threads.
Helpful Hints
If the heating system of the house was assembled taking into account the use of forced movement of the coolant, that is, a circulation pump is installed in it, then the home-made device can be installed as you like (vertically or horizontally).
If in the heating system the coolant moves according to natural laws, then the battery must be mounted only horizontally. At the same time, there is no need to install an air vent (Maevsky crane) on it.
You cannot make a high-quality radiator from pipes if you have the skills to work with a welding machine at the beginner level. It is necessary to weld the seams well, the safety of operation of the device and the entire heating system depends on this.
The thickness of a 100 mm pipe must be at least 3.5 mm.
Two spurs can be welded to the ends of the pipes, where metal pancakes were welded.In this case, the holes in the ends are not made in the middle, but with an offset: the inlet (upper) is closer to the upper edge of the pipe, the outlet (lower) is closer to the lower edge. It is better to make holes in pancakes in advance, before welding them to the pipes.
When calculating heat transfer, there is no need to pay attention to the area of return. It is clear that this figure for a cast-iron radiator will be greater
All this is compensated by the high thermal conductivity of steel.
Welding seams need to be cleaned and given a presentable appearance. To do this, scales and smudges are knocked down with a hammer, and the entire surface of the seams is polished with a grinder.
Features of mounting heating radiators for self-installation
Special conditions for the strength of fastening and the quality of the base put forward heaters made of cast iron
It is important to consider that in addition to the mass of the product itself, there is also the internal volume of the sections that are filled with a coolant. If for an aluminum unit it is no more than 0.5 liters, then for the cast-iron MS-140 series, the volume reaches 1.5 liters
When calculating the number of mounting brackets, the craftsmen are guided by the standards of paragraph 3.25 of the SNiP already mentioned above. According to its standards, the correct installation of heating radiators is as follows - one support per 1 m² of battery heating area, but not less than three. The area of a section depends on its type. For example, for the M-140 it is 0.254 m², and for a set of 12 sections you will need 4 brackets.
If the installation is carried out with three brackets, then two of them are placed at the bottom, and one at the top in the middle. Four hooks are installed one above the other in pairs.The bend of the bracket must firmly cover the neck connecting adjacent sections. In addition to the above, there are a few more fastener rules:
- Installation of batteries made of aluminum or bimetal is carried out according to the same standards as those made of cast iron. The reason for this approach is the low resistance to mechanical loads and the weak strength of the connecting nodes of the sections. Therefore, at least three brackets are also needed here.
- Cast iron products are mounted on brackets paired with anchors or dowels.
- In some cases, floor stands are used with fixing the upper part of the battery to the wall. With more than 10 sections, three stands should be used.
Connecting fittings
By itself, the radiator cannot be connected to the system, especially if you take into account the presence of right and left threads on it on both sides. To make connections, fittings are needed, the minimum kit includes:
- Two furs.
- Two stubs.
Depending on the design of the heating system, the external thread of the fittings and plugs can be either left-handed or right-handed. The internal thread of the fitting always has only a right helix. It happens that the installation of a do-it-yourself cast-iron heating radiator in an apartment is accompanied by equipping the latter with an automatic air vent or a Mayevsky tap. In this case, a futorka is screwed instead of a cork. For products made of aluminum or bimetal, there are ready-made kits for sale, consisting of:


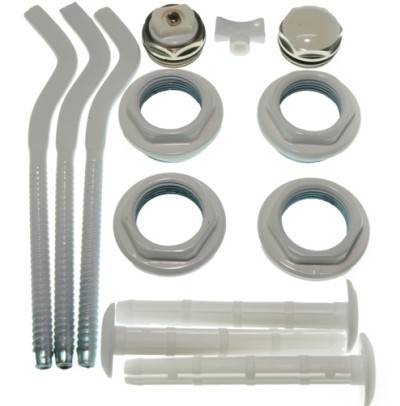
- Four paired futorok.
- One plug corresponding to the internal thread pitch of the futorka.
- One Mayevsky crane.
Those who are interested in the question of how to properly install batteries should take into account an important recommendation, the essence of which is to add ball valves to the piping scheme.This measure provides an opportunity to repair or replace elements of the home system without interfering with the functioning of the central heating system.
The concept of autonomous heating implies the installation of a temperature control unit on the supply. Taps and accessories for the heater through the "American". The method of connection with the supply depends on the material of the pipes.
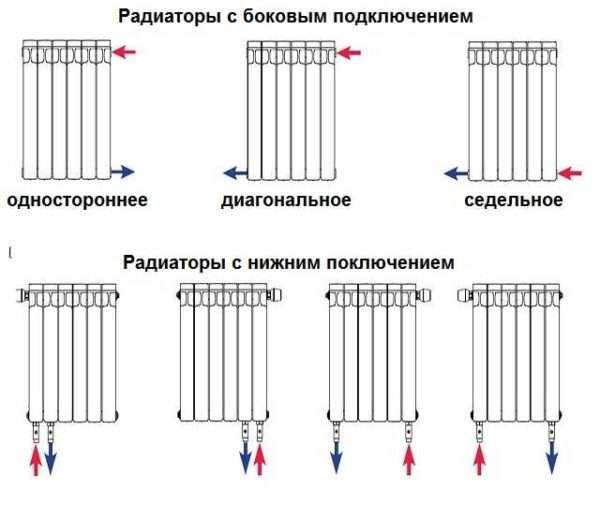
Heating wiring options
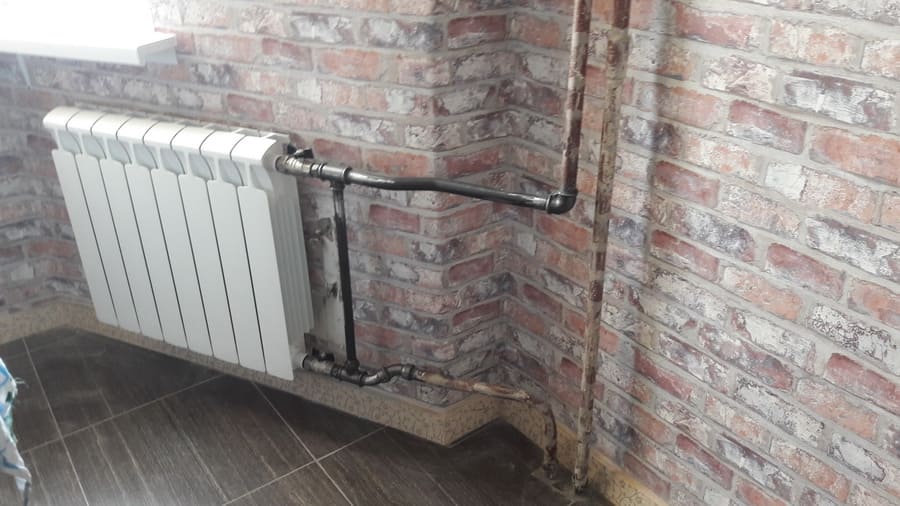
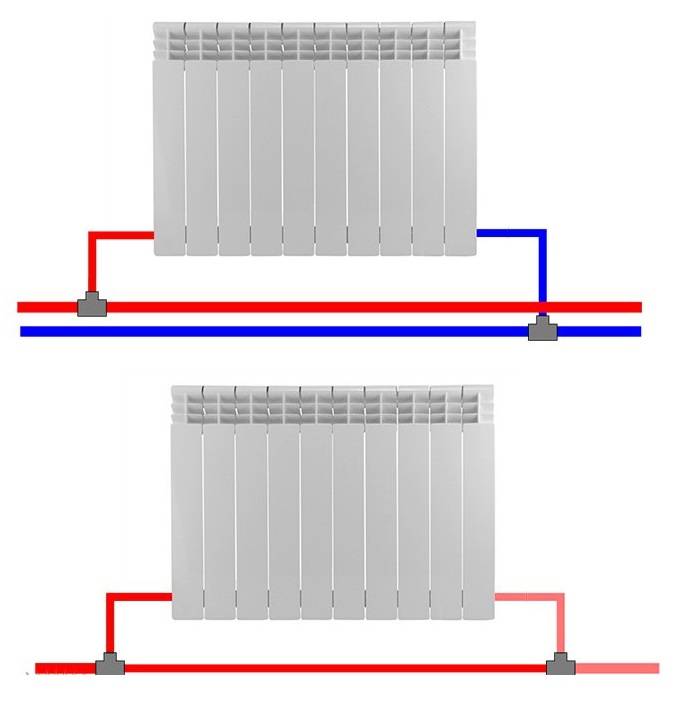
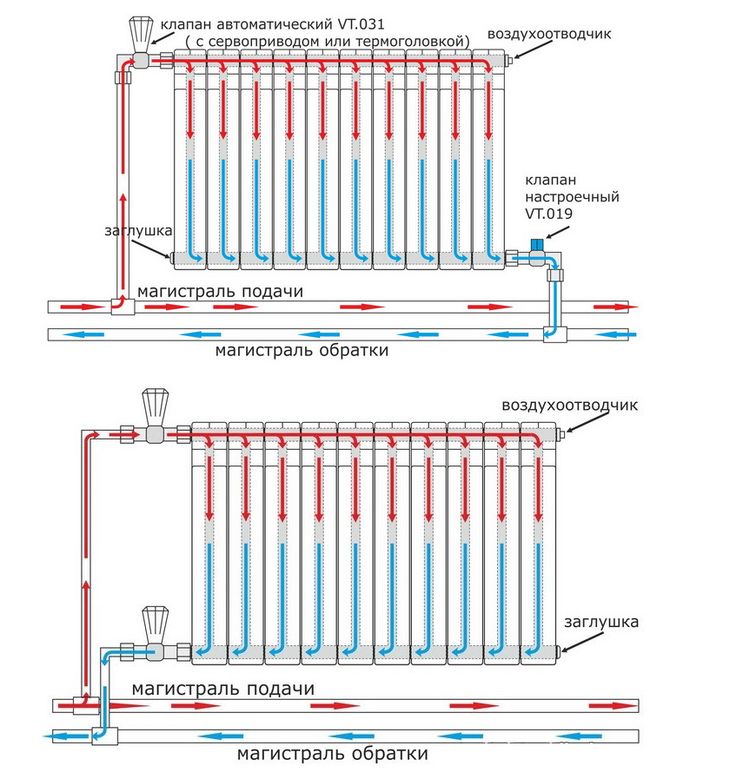
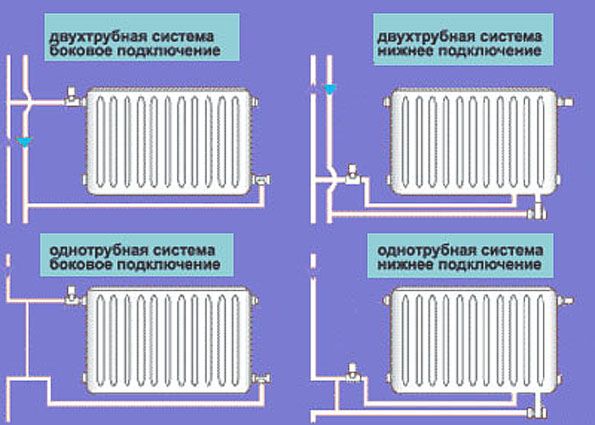
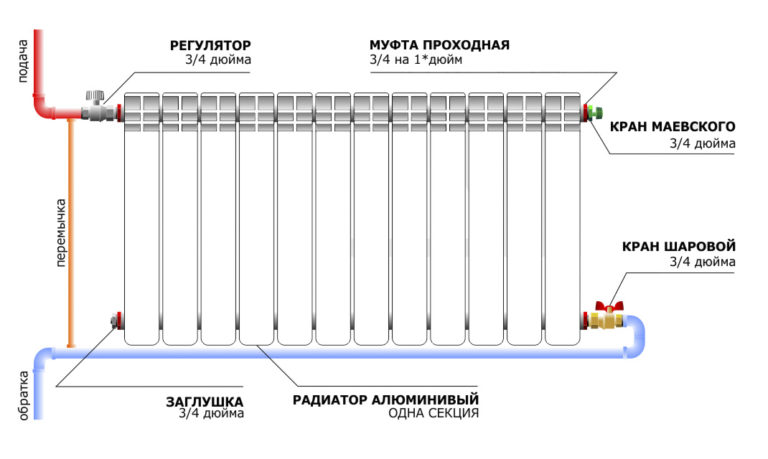
The scheme for installing heating batteries can be as follows:
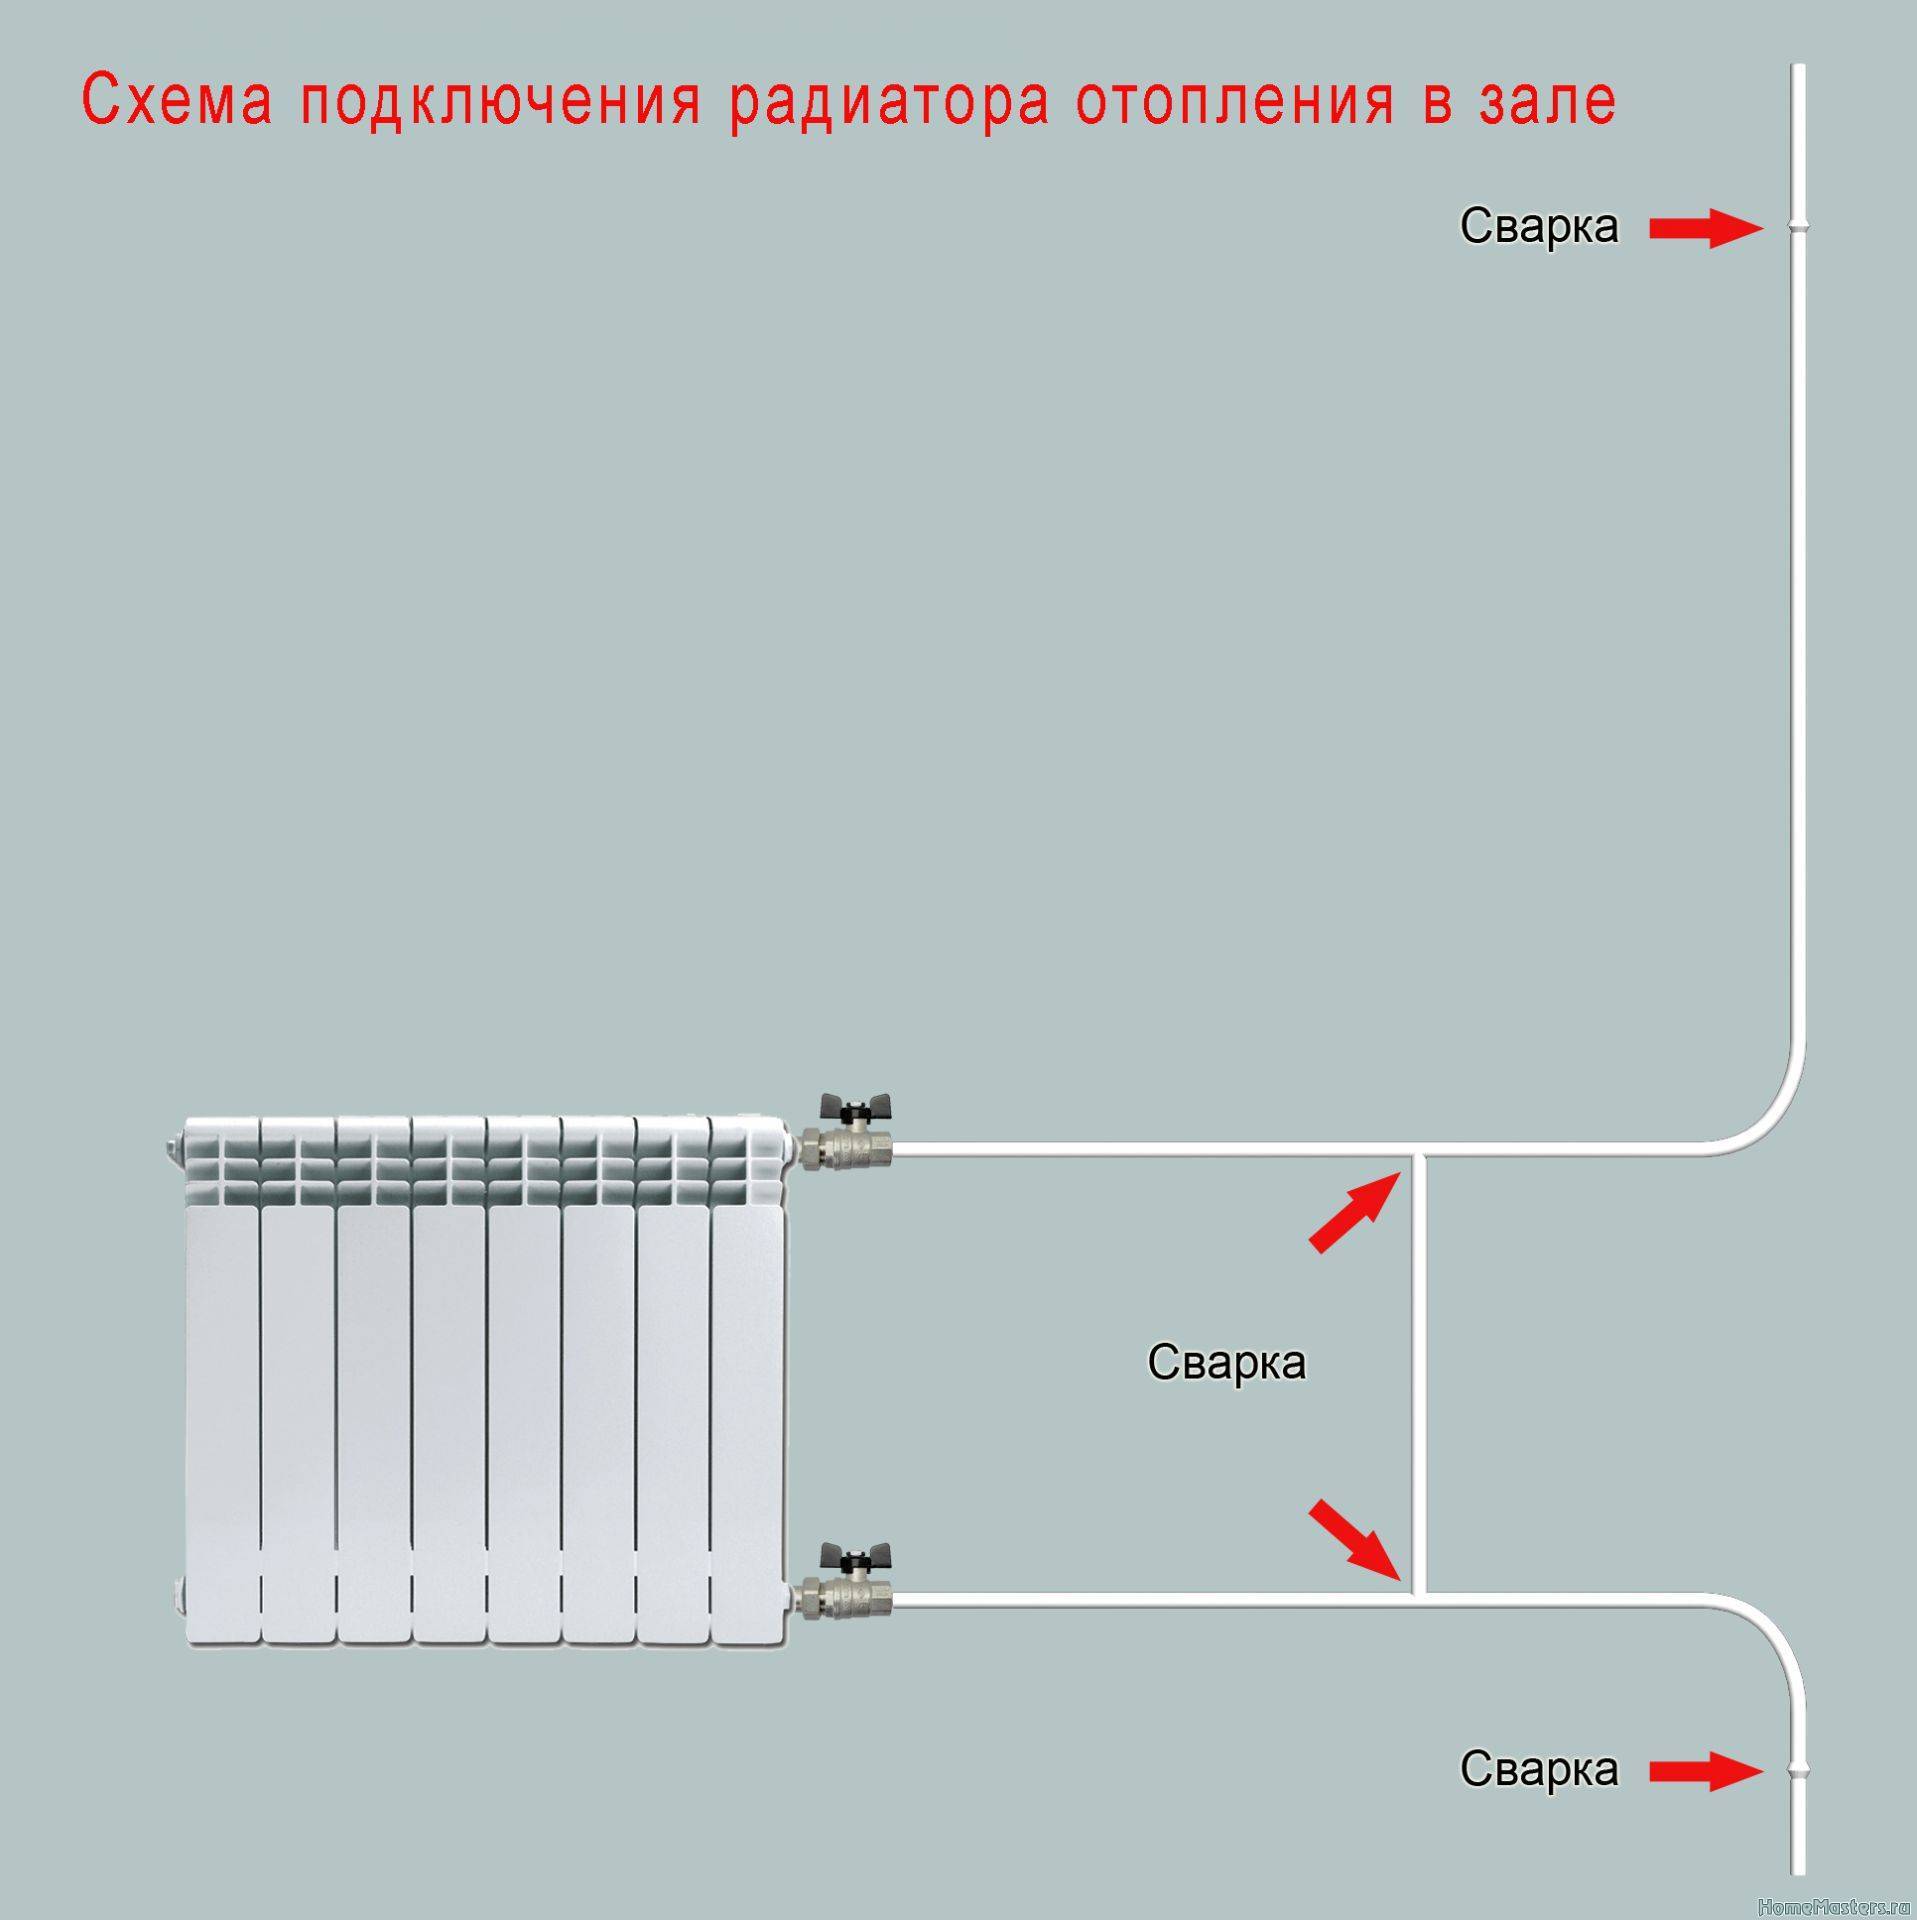
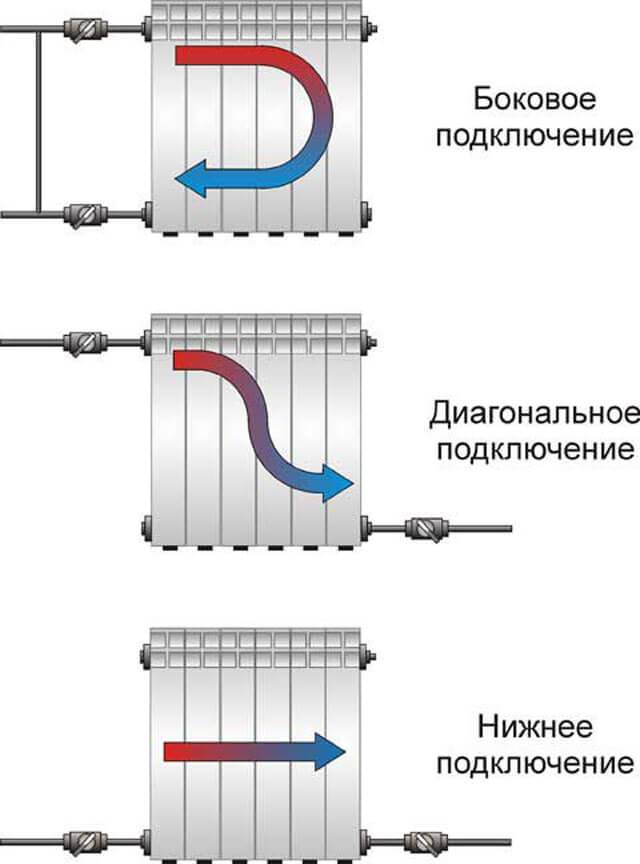
- Diagonal. In most cases, it is used when connecting multi-section heating devices. A distinctive feature is the connection of pipelines. So the supply is connected to the upper futorka on one side of the radiator, and the return is connected to the lower futorka on the other side. In the case of a serial connection, the coolant moves under the pressure of the heating system. Mayevsky cranes are installed to remove air. The disadvantage of such a system is revealed when it is necessary to repair the battery, since the installation of central heating batteries in this way does not imply the possibility of removing the batteries without shutting down the system;
- Lower. This type of wiring is used when the pipelines are in the floor or under the plinth. This method is the most acceptable in terms of aesthetics. The return and supply pipes are located at the bottom and are directed vertically to the floor;
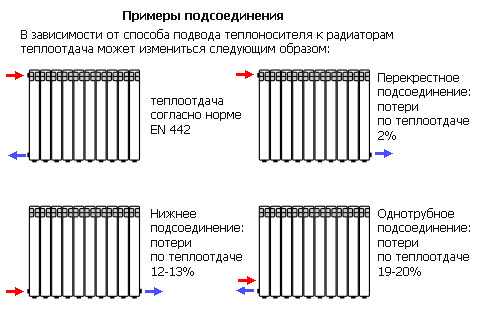
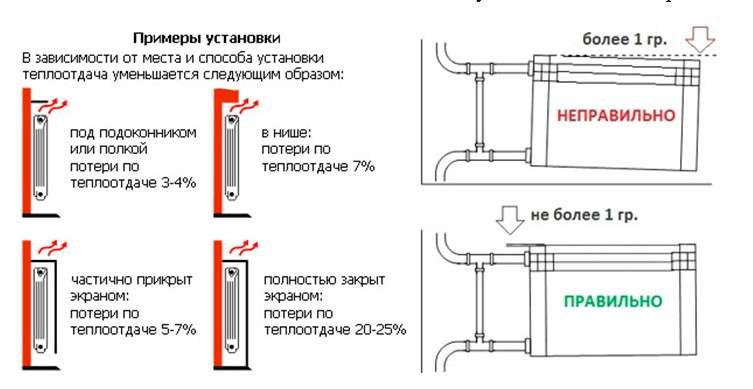
Connection examples
- Lateral one-sided. This is the most common type of connection, if you wish, you can find a lot of photos and videos about it on the Internet. The essence of this type is to connect the supply pipe to the upper futorka, and the return pipe to the lower one. It should be noted that such a connection gives maximum heat transfer.If you connect the pipelines the other way around, then the power will drop by ten percent. The rules for installing radiators state that in case of poor heating of sections in multi-section radiators, an extension of the water flow must be installed.
- Parallel. The connection in this case is carried out through a pipeline that is connected to the supply riser. The coolant leaves through a pipeline connected to the return. Valves installed before and after the radiator make it possible to repair and remove the battery without interfering with the operation of the system. The disadvantage is the need for high pressure in the system, since circulation is poor at low pressure. How to install a heating battery in this way, more experienced installers will be able to help you.
Correct connection
The rules for installing radiators are the same for all types of heating elements, whether they are cast iron, bimetallic or aluminum radiators.
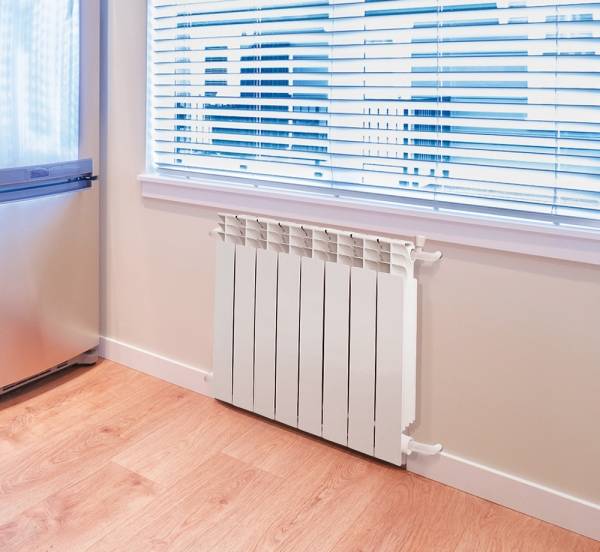
Bimetal radiator
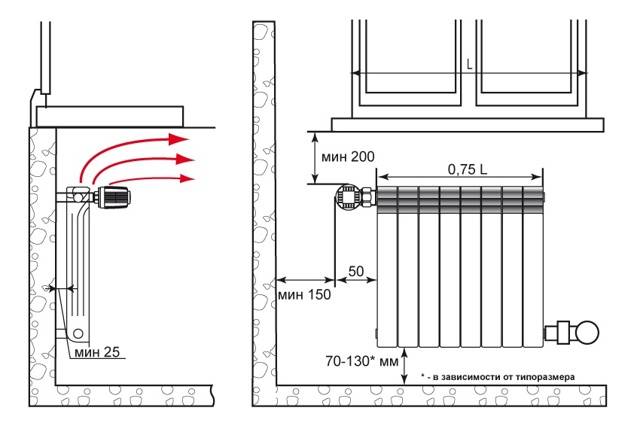
To ensure normal air circulation and heat exchange, strict adherence to permissible distances is required:
- For the necessary circulation of air masses, you need to make a distance of about five to ten centimeters from the top of the radiator to the window sill;
- The gap between the bottom of the battery and the floor covering must be at least ten centimeters;
- The distance between the wall and the heater must be at least two centimeters and no more than five. In the event that the wall will be equipped with reflective thermal insulation, then the standard brackets will be short. To install the battery, you need to buy special fasteners of the desired length.
Counting radiator sections
Before installing radiators, you need to determine the required number of sections. This information can be found out when buying in a store, or you can take note of the rule: with a room height of no more than 2.7 meters, one section is able to heat two square meters. When calculating, rounding is done up.
Aluminum radiator device
Of course, heating an insulated cottage or a corner room in a panel house is a different task. Therefore, you must understand that the calculation of sections is an individual process, which is based on the characteristics of the room and heating elements, and the price of heating devices in these two cases will be different.
Adjustment of radiators Heating system
On this tab, we will try to help you choose the right parts of the system for giving.
The heating system includes, wires or pipes, automatic air vents, fittings, radiators, circulation pumps, expansion tank thermostats heating boiler, heat control mechanism, fixing system. Any node is unambiguously important.
Therefore, the correspondence of the listed parts of the structure must be planned correctly. The cottage heating assembly includes various devices.
Adjustment of radiators
Temperature control in batteries used to seem like something out of the realm of fantasy.
In order to reduce the excessive temperature in the apartments, a window was simply opened, and in order to prevent heat from escaping from a cool room, the windows and all the cracks were sealed and tightly hammered.
This continued until spring, and only after the end of the heating season did the appearance of the apartment acquire at least a slightly decent look.
Today, technology has come a long way and we no longer worry about how to regulate heating batteries. New, more efficient and progressive methods of controlling the temperature regime in the room have appeared, and we will talk about them in more detail below.
Ordinary taps that are mounted in batteries, as well as special valves, can help partially solve the problem. By blocking the access of the hot water flow to the system, or reducing it, you can easily change the temperature in your home.
An even simpler and more reliable system is the use of special automatic heads. They are mounted under the valve, and with their help (namely, using a temperature sensor), you can adjust the temperature in the system.


How it works? The head is filled with a composition that is very sensitive to changes in temperature, so the valve itself will be able to react to an excessive temperature increase and will be able to close in time, preventing the batteries from overheating.
Do you want a more modern and innovative solution that will tell you how to regulate the temperature of the heating battery, and even practically not participate in this process? Then pay attention to these two ways:
- The first option involves mounting one radiator in the room, which is closed with a special screen, and the temperature in the system is regulated using devices called a thermostat and a servo drive.
- Next, consider a method for regulating the temperature in a house with several radiators. The features of such a system are that you will have not one, but several zones for temperature control.Also, you will not be able to make the adjustment valves enter the horizontal pipeline, and you will have to equip a special service niche, which will include a special supply pipeline with mounted shut-off valves, as well as a “return” with valves for the servo drive.
Note that there are two main methods of adjustment, the advantages of which are obvious:
- The ability to control the temperature level of the water entering the system by a special automatic unit, which bases its work on the indicators of sensors built into the system;
- Mounting a device in the system that will control and regulate the temperature not in the entire system, but in each individual battery. Most often, factory regulators are used for this, which are mounted on the batteries themselves.
After weighing all the features of your room, choose the method that suits you best.
2 Making radiators with your own hands
In order to make a radiator with your own hands, it is necessary to use a steel pipe, the dimensions of which do not exceed 100 mm in diameter, the wall thickness is 3.5 mm. The diameter of the steel pipe will be 95 mm. The cross section of the total area of the pipe will be equal to 71 cm. To calculate the length of the pipe that we need, we divide the total volume by the cross-sectional area of \u200b\u200bthe pipe and get 205 cm.
From the foregoing, we can conclude that heating radiators can be made using a steel pipe. The ends in this pipe must be welded. Two surges must be welded on its plane, which are responsible for supplying and discharging coolant into the heating system.
Materials and tools:
- welding machine and consumables for it (electrodes),
- grinder or grinder,
- steel pipe 2 m long and 10 cm in diameter,
- steel pipe type VGP 30 cm long,
- steel sheet 600x100 mm, not less than 3 mm thick,
- a plug and 2 special sleeves (used only on one side of the radiator pipe).
After assembling all the required materials and tools, you can proceed directly to the manufacture of the radiator with your own hands. To begin with, grinder cut a large piece of pipe into three equal parts. Further, using a welding machine, we make 2 holes in each piece of pipe. Their diameter should be 2.5 cm. Position the holes so that the distance between them is 5 cm from the ends of the pipe at an angle of 180 ° between them. After the work done, we clean the pieces of pipes from metals and excess particles that remain from the welding machine.
At this stage of work, we take a steel sheet and cut out 6 blanks, the diameter of which is equal to the thickness of the pipe. We weld all pipe ends with our blanks. We take a pipe made of VGP steel and cut it into two equal parts. Then we weld them to a pipe of a larger diameter, where we previously made holes.
Now we take reinforced elements, the length of which is 10 cm and weld them to thin pipes. This will make our design much more reliable. Then you can proceed to the welding of pre-prepared sleds. Upon completion of the preparatory work, it is necessary to check the entire structure for tightness and strength. To check the tightness, we close one of the pipe elements, pour water into the second. In this way, you can see water leakage at the joints, we eliminate this by brewing such areas (not forgetting to drain the water first).
Advantages and disadvantages of homemade radiators
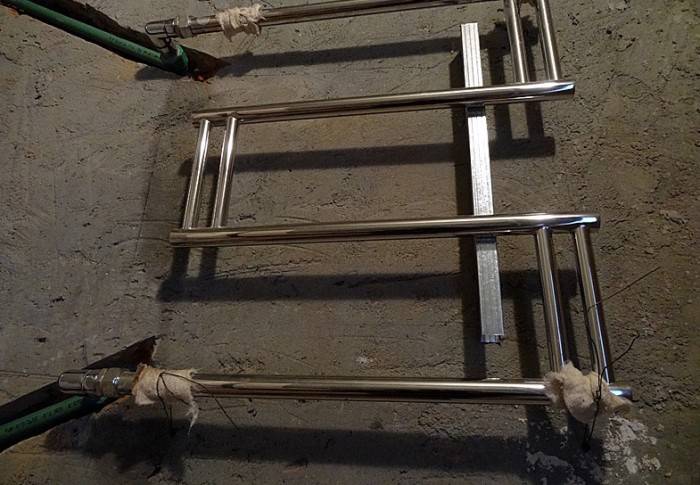
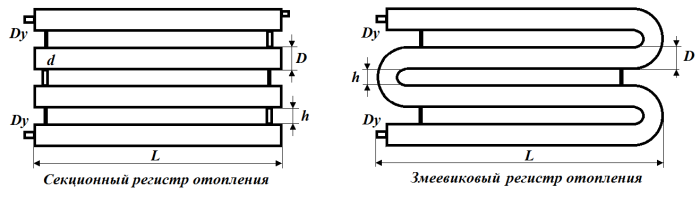
Homemade heating radiators are full-fledged heating appliances. They will be an excellent solution for heating warehouses, production halls, corridors, basements and other non-residential premises. For their manufacture, large-diameter pipes are used, welded together by jumpers and fittings. Separate varieties are welded from bent pipes, resulting in serpentine radiators.
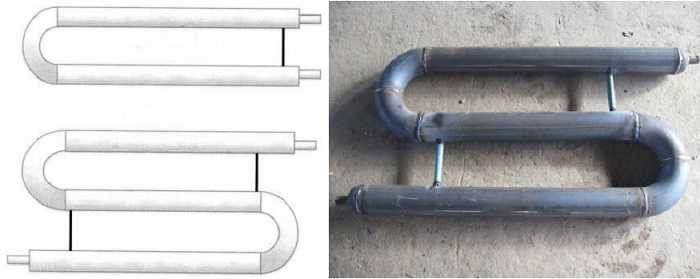
Serpentine radiators do not need jumpers, but it is necessary to use fittings to reinforce them.
The large area of pipes used provides quite good efficiency and good heating. In order to improve heating, the pipes are made long - up to the point that their length reaches the length of the room itself. What are the advantages of homemade heating radiators?
- Absolutely simple design - every person who knows how to work with tools and a welding machine can make a heating battery with their own hands;
- Minimum material costs - buying inexpensive or used pipes will provide significant savings;
- Ability to work in systems with natural and forced circulation;
- Possibility of installing a heating element with a thermostat for autonomous operation.
It was not without certain disadvantages:
- The need to own a welding machine - if you have never been involved in welding, then it is better not to take on such work;
- The need to observe the high quality of welds - finished radiators must withstand high pressure;
- Low efficiency when compared with factory batteries - here they lose a little.
The construction of home-made heating radiators is recommended in cases where the installation of the heating system is carried out on a limited budget. Also, their use will be justified if there are cheap or completely free materials (for example, if there are free pipes or the opportunity to purchase them at a bargain price).
The main disadvantage is that pipe radiators cannot be used in apartments. They do not meet safety requirements and are distinguished by their bulkiness. Therefore, they are recommended to be used only in non-residential premises.
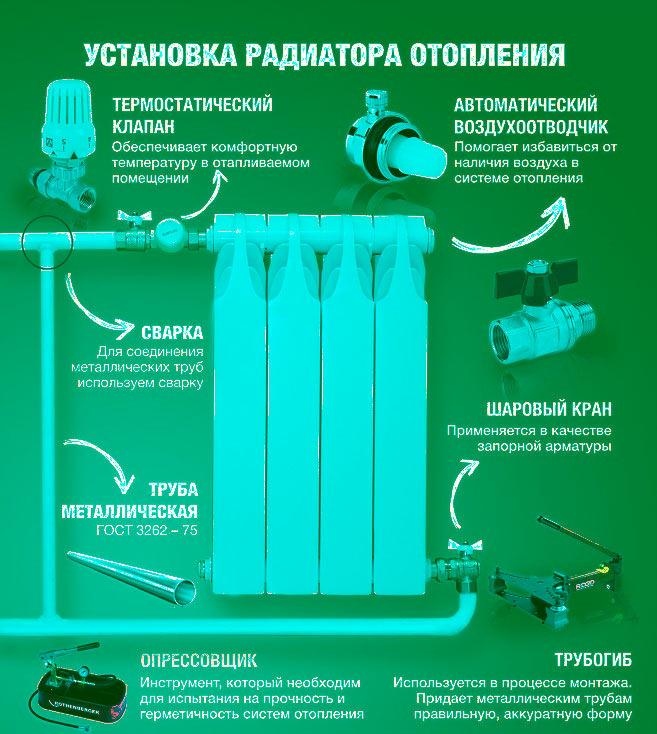
Do-it-yourself installation of heating radiators in the apartment
First, you should familiarize yourself with the list of necessary tools. You need to stock up on a drill with a drill bit. The list of tools includes torque wrenches, a screwdriver, pliers, a tape measure, a level, a pencil with a ruler. In general, the characteristic composition of a toolbox.
Installation steps:
To begin with, the heating system is turned off and the liquid is drained. In private buildings, a pump is used for these purposes, and in apartments, you will need to contact the housing and communal services. Then the old structures are disconnected.
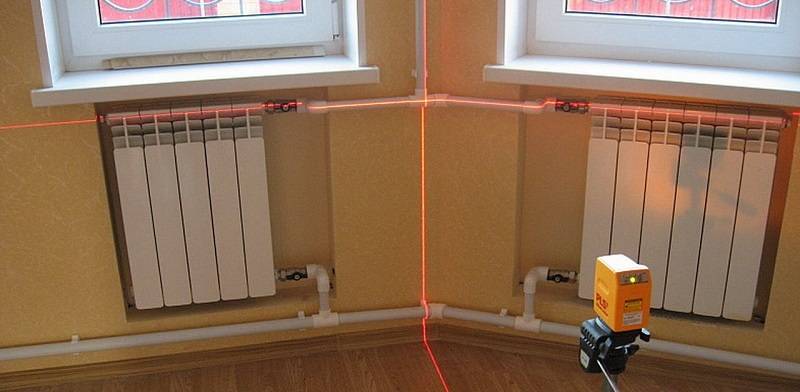
Next, carry out the markings for the brackets. For proper and even installation, you will have to use the building level. Horizontal installation will eliminate the gas content of the system and allow you to completely drain the water.
Then mount the brackets


It is important to test the devices for strength by pressing them down with your own weight. For cast iron and aluminum radiators, only 2 fasteners are used. Plastic will need more elements
The walls must be clean, smooth, plastered.
Then the stop valve is installed. All connections are securely sealed.Then pipes are connected. To connect the structure to the pipeline, you will need to make a thread on the spurs. Now metal-plastic pipes are used for heating.
Plastic will require more elements. The walls must be clean, smooth, plastered.
Then the stop valve is installed. All connections are securely sealed. Then pipes are connected. To connect the structure to the pipeline, you will need to make a thread on the spurs. Now metal-plastic pipes are used for heating.
Use a torque wrench to prevent leaks. This is a mandatory element when installing aluminum pipes, where the installation of an air valve is necessarily implied. In this case, the force on the tool should not exceed 12 kg.
To seal the joints, tow or any other sealant is used. Pressing will be required after installation. This work should be entrusted to a professional. He has a special tool and the necessary skills. If a leak is detected, the nipple will need to be adjusted.
Types of control valves
Existing modern heat supply technologies make it possible to install a special tap on each radiator that controls the quality of heat. This control valve is a shut-off valve heat exchanger, which is connected via pipes to the radiator.
According to the principle of their work, these cranes are:
Ball valves, which serve primarily as 100% protection against emergencies.These locking devices are a design that can rotate 90 degrees, and can let water in or prevent the passage of coolant.
The ball valve must not be left in a half-open state, as in this case the sealing ring may be damaged and a leak may occur.
- Standard, where there is no temperature scale. They are represented by traditional budget gates. They do not give absolute accuracy of adjustment. Partially blocking the access of the coolant to the radiator, they change the temperature in the apartment to an indefinite value.
- With a thermal head, which allow you to adjust and control the parameters of the heating system. Such thermostats are automatic and mechanical.
Conventional direct acting thermostat
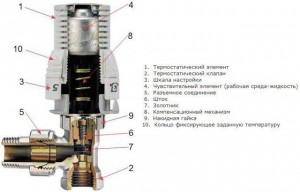
A direct acting thermostat is a simple device for controlling the temperature in a heating radiator, which is installed near it. By its design, it is a sealed cylinder into which a siphon is inserted with a special liquid or gas that clearly reacts to changes in the temperature of the coolant.
When it rises, the liquid or gas expands. This leads to an increase in pressure on the stem in the thermostatic valve. He, in turn, moving, blocks the flow of coolant. When the radiator cools, the reverse process occurs.
Temperature controller with electronic sensor
This device according to the principle of operation does not differ from the previous version, the only difference is in the settings. If in a conventional thermostat they are performed manually, then the electronic sensor does not need this.
Here the temperature is set in advance, and the sensor monitors its maintenance within the specified limits.The electronic thermostatic sensor adjusts the air temperature control parameters in the range from 6 to 26 degrees.
glass screen
If wooden screens are well suited for traditional and rustic styles, and metal screens for industrial ones, then glass screens look great in modern interiors, such as high-tech, minimalism, fusion, pop art. It all depends on the decorative glass processing.
In principle, a self-adhesive film with large format printing can be ordered for the glass screen. And you can make a picture on a matte or transparent surface using sandblasting or chemical glass etching paste.
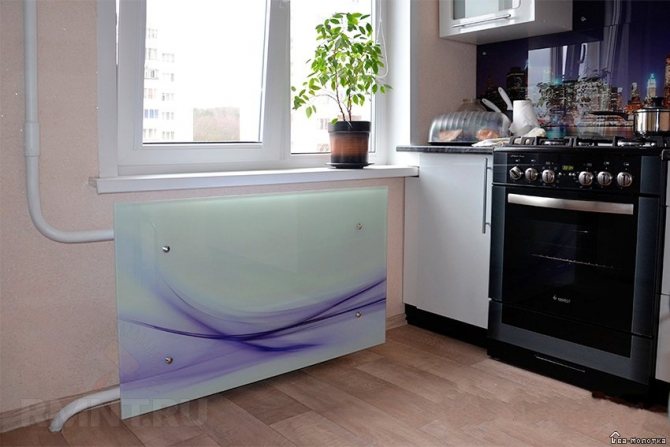
If you don’t want to bother with decorative processing, then glass with a matte surface or colored in bulk is on sale - you just need to order the right size, and you can process the edge yourself. The only condition is that the glass must be tempered.
The easiest way to mount the screen is to point-fix the glass to the wall in four places. To do this, use special fittings with remote mounting.
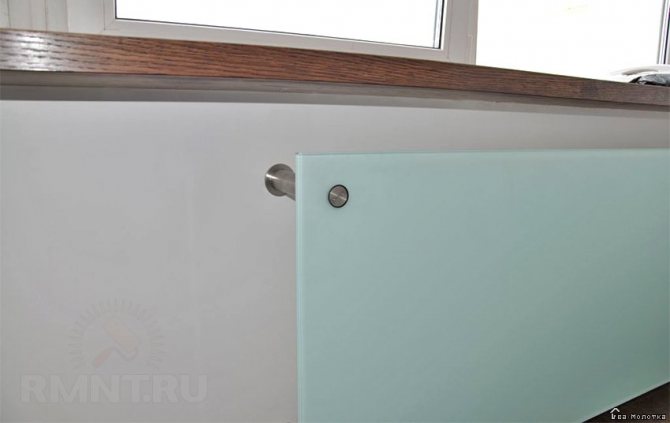
But there is one drawback - you need to drill holes in tempered glass, and this is difficult to do at home.
Therefore, it is better to use cold-rolled thin-walled pipe as the supporting structure of the screen. She (and fastenings for her and glass) are sold in stores selling everything necessary for making furniture. As a rule, such pipes and fittings are made chrome-plated, but you can order them to be painted in any shade from the RAL palette. Screen stands are fixed to the floor.


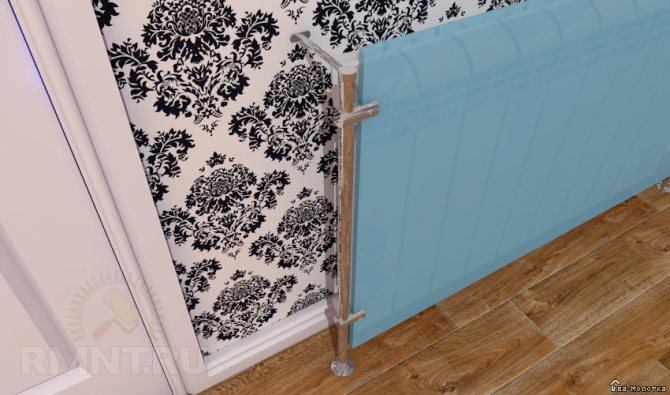
As an additional stop for the racks, two remote adjustable closed-type mounts (with a cap for the pipe) can be fixed to the wall.Glass is fixed between the racks on the clamps.
What is needed for installation
Installation of heating radiators of any type requires devices and consumables. The set of necessary materials is almost the same, but for cast-iron batteries, for example, the plugs are large, and the Mayevsky tap is not installed, but, somewhere at the highest point of the system, an automatic air vent is installed. But the installation of aluminum and bimetallic heating radiators is absolutely the same.
Steel panel ones also have some differences, but only in terms of hanging - brackets are included with them, and on the back panel there are special metal-cast shackles with which the heater clings to the hooks of the brackets.
Here for these bows they wind up hooks
Mayevsky crane or automatic air vent
This is a small device for venting air that can accumulate in the radiator. It is placed on a free upper outlet (collector). Must be on every heater when installing aluminum and bimetallic radiators. The size of this device is much smaller than the diameter of the manifold, so another adapter is required, but Mayevsky taps usually come with adapters, you just need to know the diameter of the manifold (connecting dimensions).
Mayevsky crane and method of its installation
In addition to the Mayevsky tap, there are also automatic air vents. They can also be placed on radiators, but they are slightly larger and for some reason are only available in a brass or nickel-plated case. Not in white enamel. In general, the picture is unattractive and, although they deflate automatically, they are rarely installed.
This is what a compact automatic air vent looks like (there are bulkier models)
Stub
There are four outlets for the radiator with lateral connection. Two of them are occupied by the supply and return pipelines, on the third they put a Mayevsky crane. The fourth entrance is closed with a plug. It, like most modern batteries, is most often painted with white enamel and does not spoil the appearance at all.
Where to put the plug and the Mayevsky tap with different connection methods
Shut-off valves
You will need two more ball valves or shut-off valves with the ability to adjust. They are placed on each battery at the input and output. If these are ordinary ball valves, they are needed so that, if necessary, you can turn off the radiator and remove it (emergency repair, replacement during the heating season). In this case, even if something happened to the radiator, you will cut it off, and the rest of the system will work. The advantage of this solution is the low price of ball valves, the minus is the impossibility of adjusting heat transfer.
Taps for heating radiator
Almost the same tasks, but with the ability to change the intensity of the coolant flow, are performed by shut-off control valves. They are more expensive, but they also allow you to adjust the heat transfer (make it smaller), and they look better outwardly, they are available in straight and angular versions, so the strapping itself is more accurate.
If desired, you can put a thermostat on the coolant supply after the ball valve. This is a relatively small device that allows you to change the heat output of the heater. If the radiator does not heat well, they cannot be installed - it will be even worse, since they can only reduce the flow.There are different temperature controllers for batteries - automatic electronic, but more often they use the simplest one - mechanical.
Related materials and tools
You will also need hooks or brackets to hang on the walls. Their number depends on the size of the batteries:
- if the sections are not more than 8 or the length of the radiator is not more than 1.2 m, two attachment points from above and one from below are sufficient;
- for every next 50 cm or 5-6 sections, add one fastener from above and below.
Takde need a fum tape or linen winding, plumbing paste to seal the joints. You will also need a drill with drills, a level (a level is better, but a regular bubble one is also suitable), a certain number of dowels. You will also need equipment for connecting pipes and fittings, but it depends on the type of pipes. That's all.