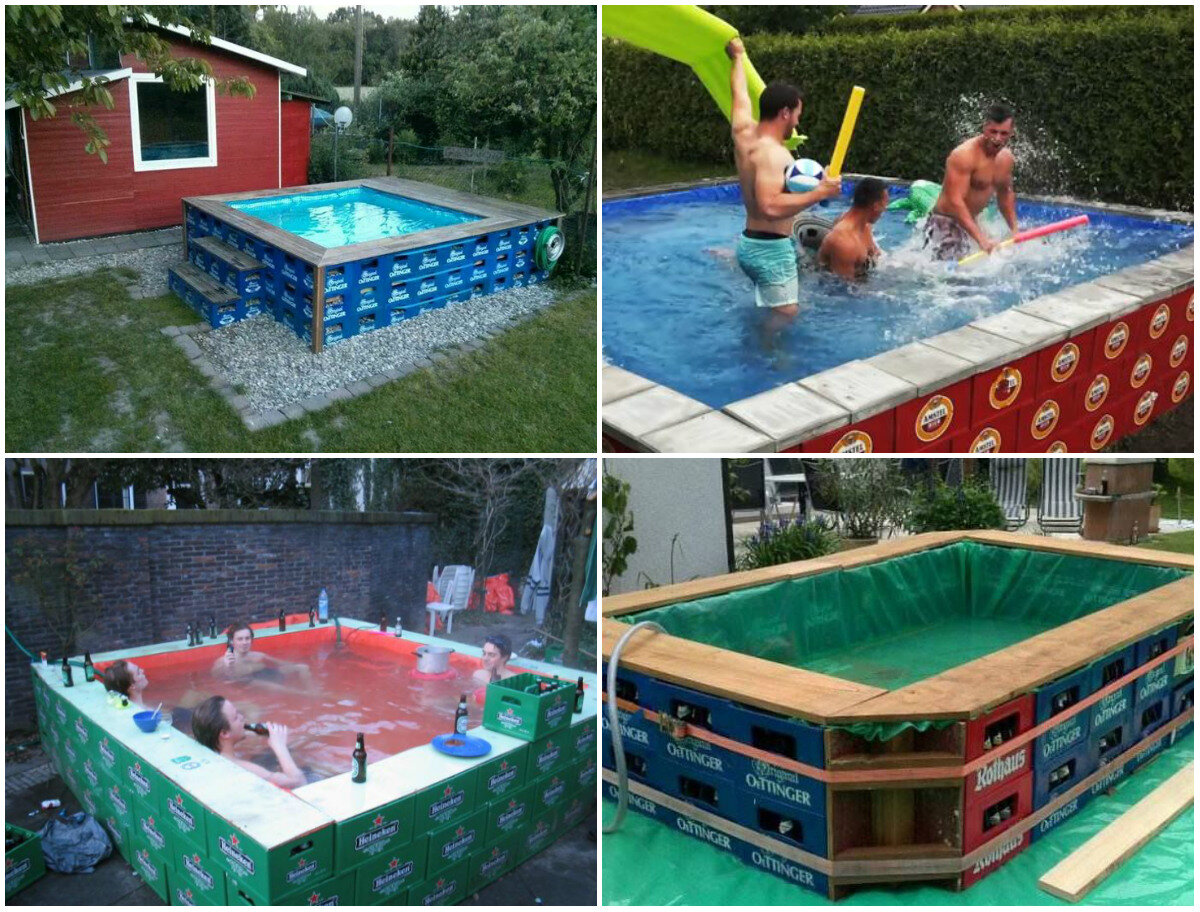
- Budget wooden pool
- How to install a pool
- Construction stages
- polypropylene
- General site requirements
- Construction of a home pool: types of structures and their arrangement
- Building materials and selection of suitable tools
- Step-by-step process of creating a monolithic pool
- Installation of the finished pool in the country
- Installation of an inflatable pool
- Frame pool installation
- Installation of a plastic pool
- Natural pond at their summer cottage
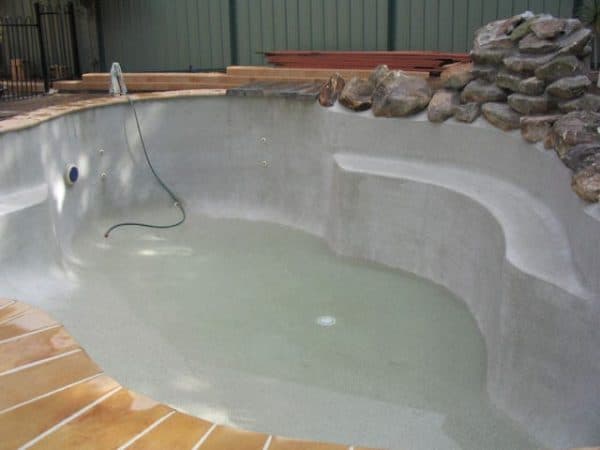
- Construction of the pool (creation of a bowl of concrete)
- Stages of pool construction
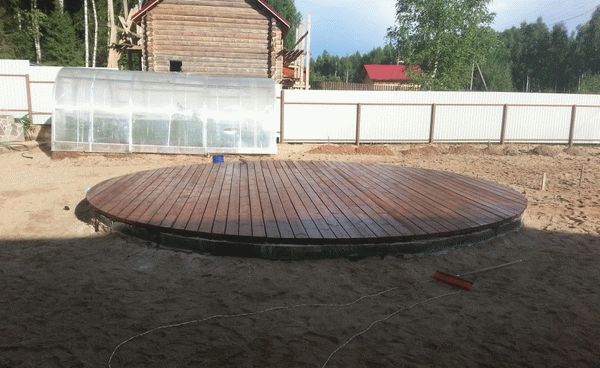
Budget wooden pool
The most affordable pool at their dacha hands can be assembled from long wooden bars. We will need thick bars that will serve as racks, long thin ones that will serve as walls.
How to make a frame pool with your own hands:
- we prepare the site: we remove a layer of soil of 15-20 cm, we fill it with sand, we compact it tightly;
- we make holes for the racks at the four corners of the reservoir, insert our supports (the entire part that will stand in the ground must be covered with resin);
- we fill the free space with gravel;
- we align the posts, pull the cords to check the level;
- the rest of the supports are set along the cords, at the same distance (about a meter);
- we nail pre-treated horizontal boards;
- racks need to be reinforced with spacers;
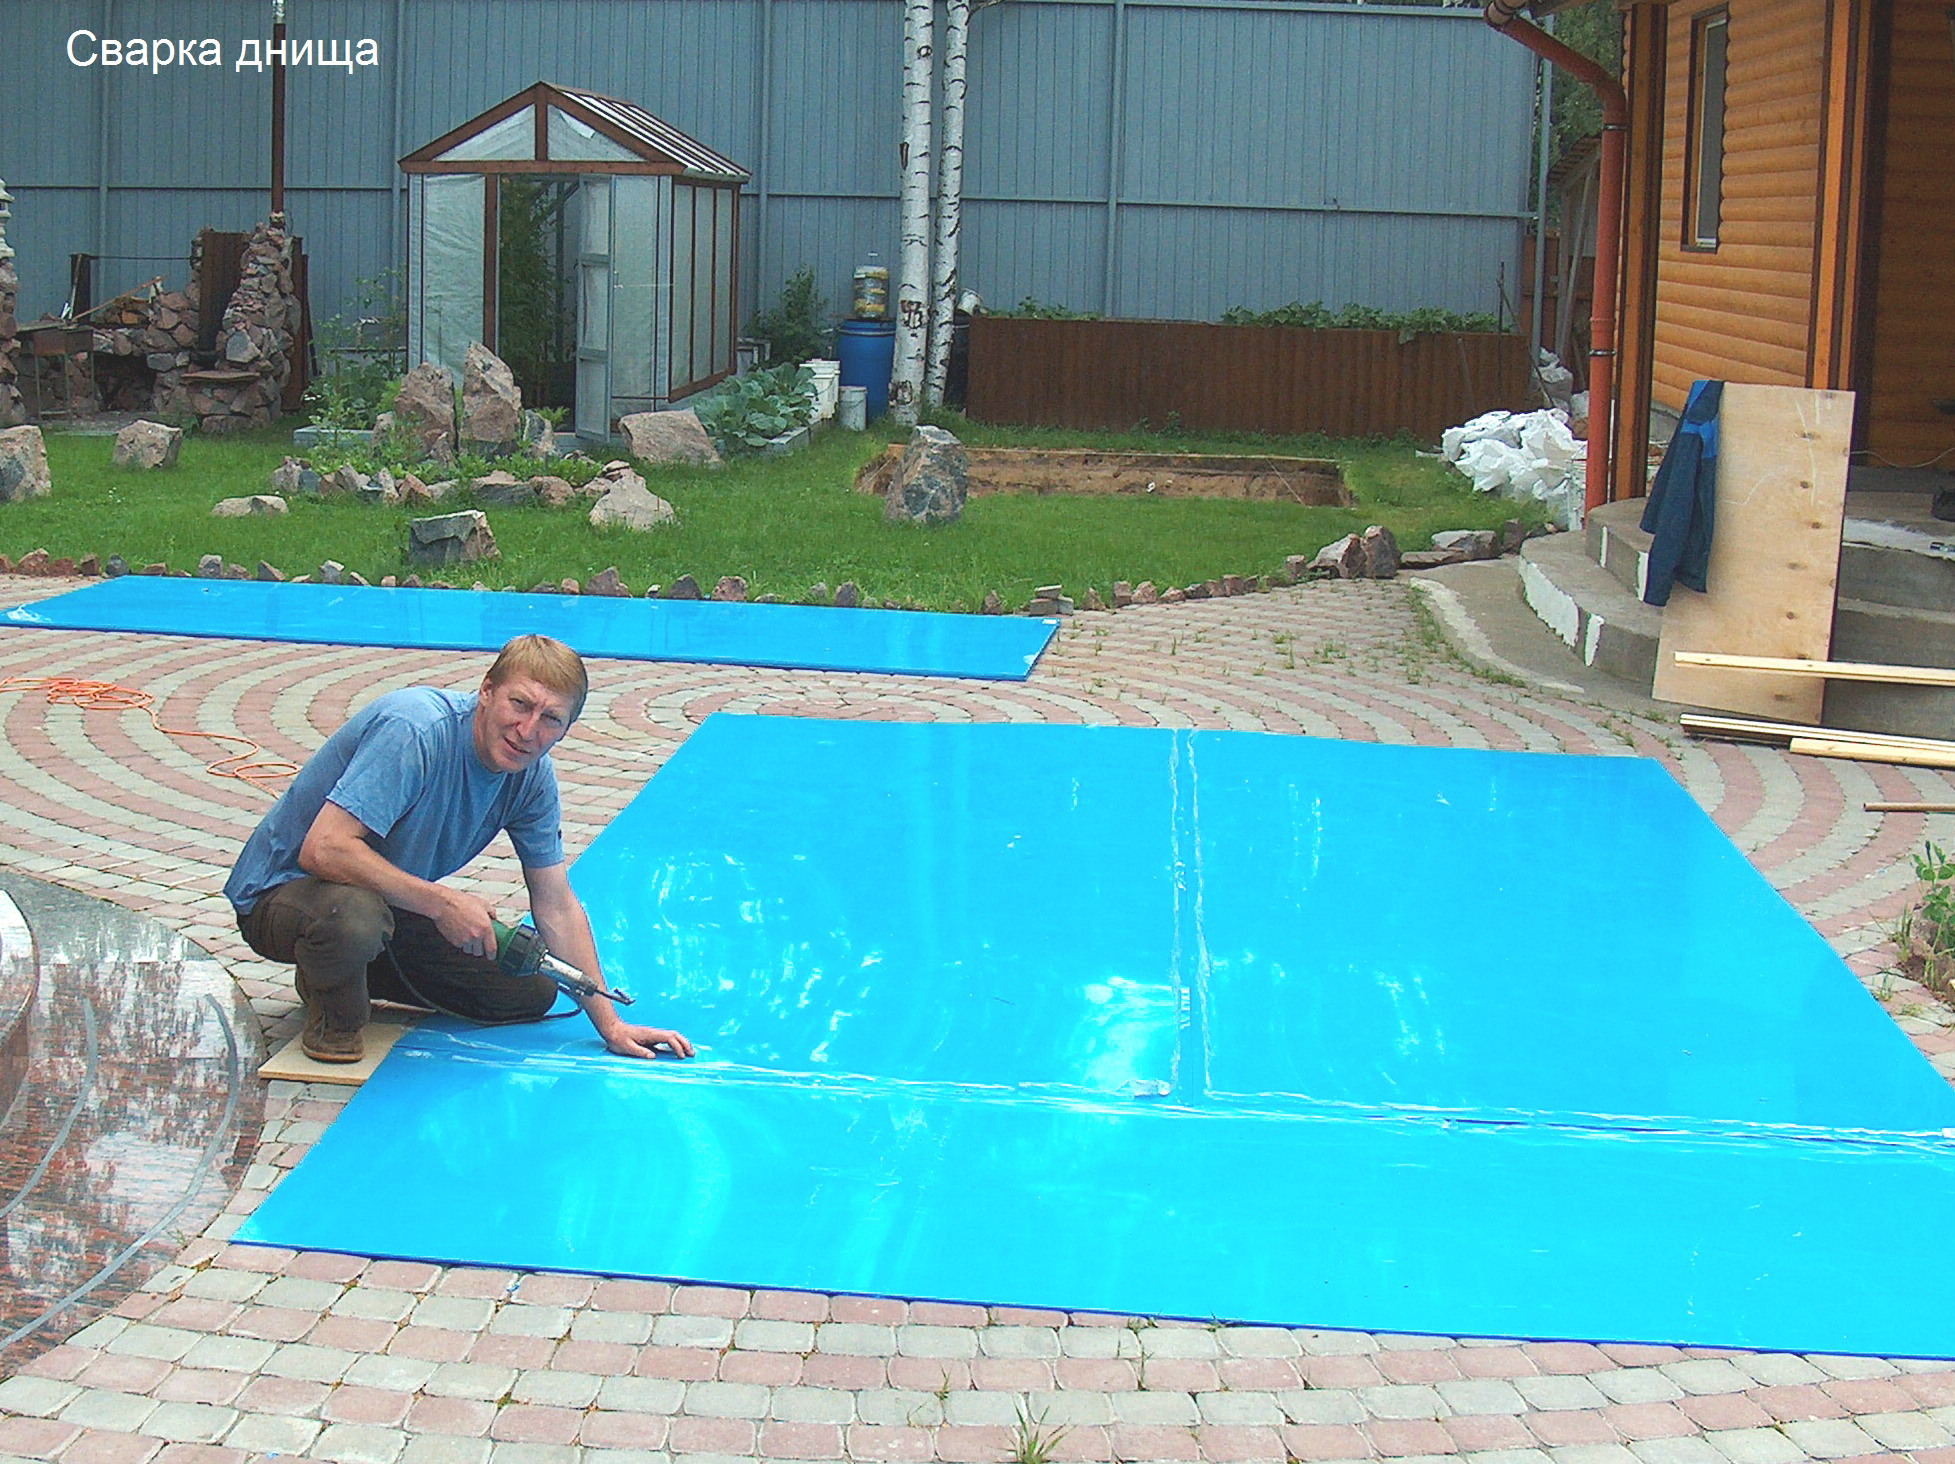
- inside we put a PVC film (you can use an awning for trucks);
- a building hair dryer is used to glue the film. Under the action of high temperature, the film begins to melt, and after walking with a silicone roller, two parts of the film can be glued to each other;
- from the outside we fix the film.
The outer side can be upholstered with wood, stained, varnished. Then your pool will be in no way inferior to expensive store options.
 Pool Finish
Another way to quickly create a wooden frame pond is inexpensive pallets. They are not difficult to purchase in warehouses. This option is similar to the previous one, only the difference is that the wall details will be ready.
Installation principle:
- we dig a recess of 30 cm;
- we fill the pit with fine gravel or sand by 15-20 cm, level it;
- we fasten the pallets together with nails, corners and everything that is found;
- we drive in wooden pegs around the structure, which will ensure the strength of the walls;
- fill the pit with concrete, wait a few weeks until it dries;
- we cover the pool bowl with PVC film, fix it on the outer walls;
- decorate.
The dream of a pond in a summer cottage is not so fantastic. It takes a little effort and time and you can dive into your own pool after a hard day's work.
How to install a pool
Delivery of the product is usually accompanied by installation instructions. It must be carried out strictly so that the service life of the structure corresponds to the guaranteed one.


The order of work related to the installation:
- determine the location of the structure;
- assemble the frame;
- install supports, if required by the size of the pool;
- sheathe the PVC frame.
Approximately the process will take a couple of hours, no more, and the pleasure of your own pool will last for months! Children will be especially happy, as usual.
Sometimes pools for reliability are mounted in the ground or installed on a special stand. In this case, it is necessary to carry out a number of preparatory work.
You will need to dig a pit and compact it, and cover the bottom with a layer of sand, possibly with the addition of clay, you can even make a concrete pad. The relief of the pit is carried out based on the shape of the pool. The design is installed in the finished recess of the desired shape.

For aesthetics and comfort, we recommend making paths from tiles or stone, especially if there is already something suitable available in the country.
And if you simplify the task and do not dig a pit, but simply make a special platform for the pool, this will also extend the service life and make its use more comfortable. The choice is yours.

At the site of the future site, it is necessary to remove the top layer with vegetation and rhizomes, fill it with sand over the entire surface, and properly level the sand. Lay a bedding from the pool on top, and a heat-insulating sheet on top, cut as needed. And already from above the pool mounted by that moment is installed.


At the end of the installation, we systematically move on to an important point - setting up the pool. Start filling the pool and check the moment when the water depth in it is about ten or fifteen centimeters
Then set the rack to the required level. It may be necessary to deepen them additionally, or vice versa, use gaskets and raise them to the desired height.
Start filling the pool and check the moment when the depth of the water in it is about ten or fifteen centimeters. Then set the rack to the required level. It may be necessary to deepen them additionally, or vice versa, use gaskets and raise them to the desired height.
The lower rope of the pool is tightened when the water level reaches forty centimeters.
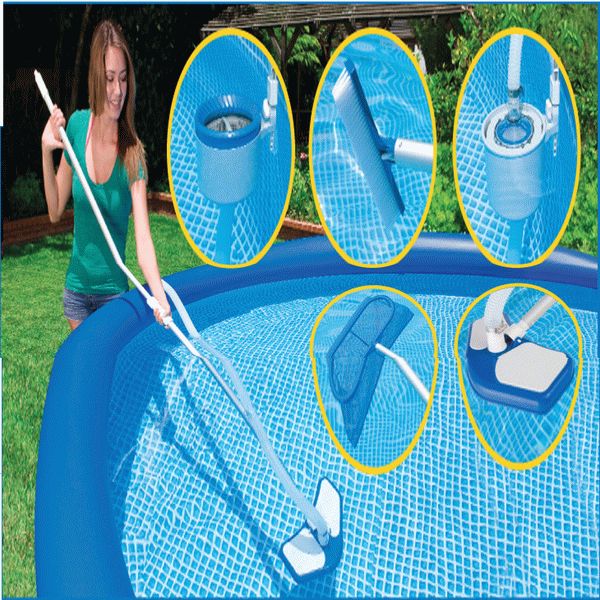
Everything, the pool is ready for the summer, you can enjoy the fruits of your labor. Feel free to fill it with cold water, because one sunny day will be enough for the water to warm up to a temperature pleasant for swimming. At night, do not forget to cover the pool with a special cover, or at least plastic wrap. Sometimes you still have to clean the pool, but you will determine the frequency of cleaning and changing the water yourself, as it gets dirty, there are no special instructions.
Have a nice summer vacation!
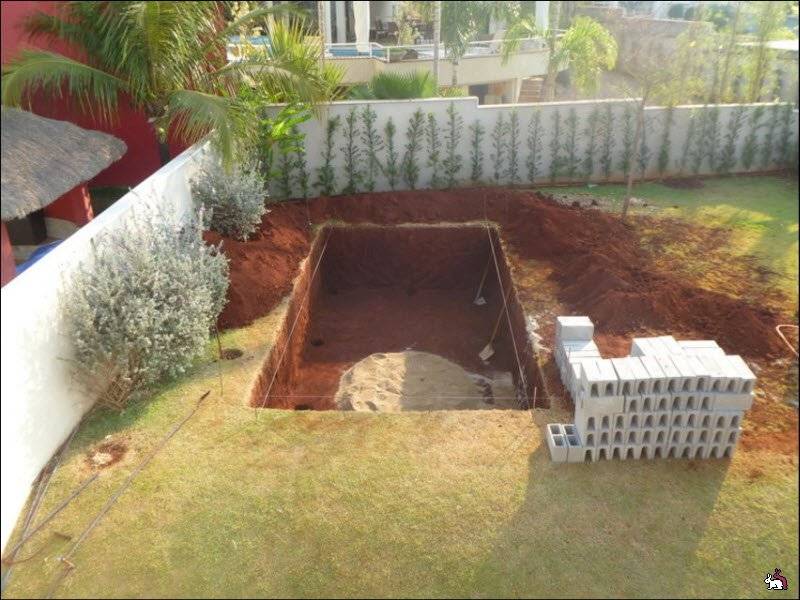
Construction stages
All work can be divided into 13 stages. The most important is design. If it is done incorrectly, then the final structure will not meet quality standards and may collapse after some time. Where does the pool start?
- Site inspection
- Design
- Coordination
- Purchase of material
- Site preparation
- Pit preparation
- Foundation pouring
- bowl shaping
- Reinforcement
- concreting
- Waterproofing
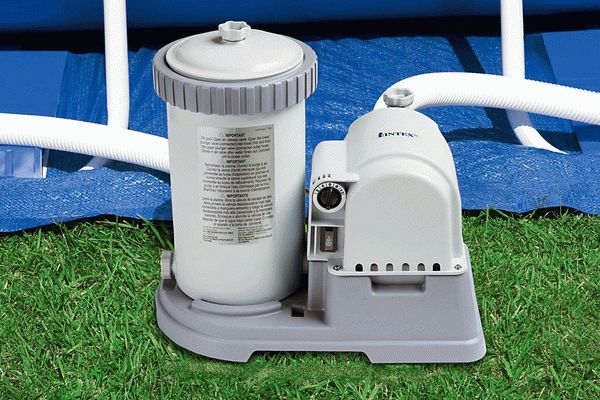
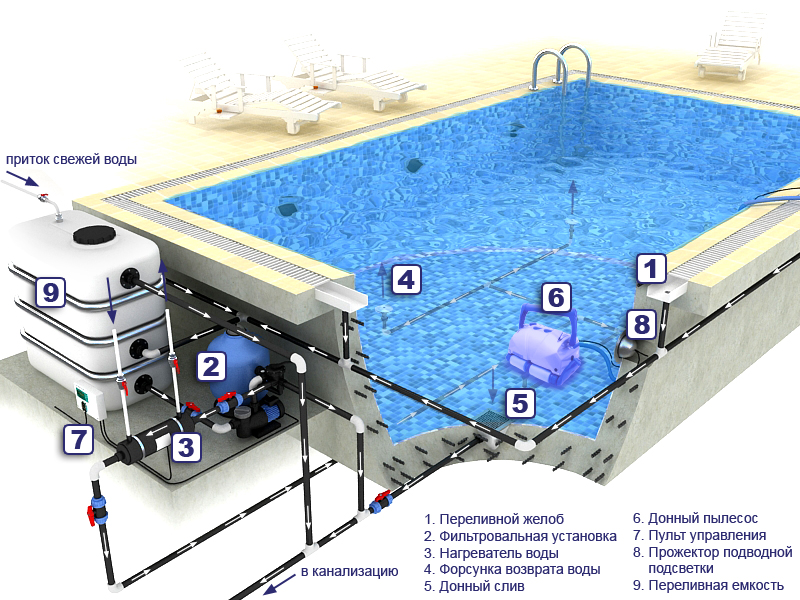
- Placement and connection of technical equipment
- Finishing work (Decoration)
The pool installation process - from preparation to installation of the font Technical standards are prescribed in:
- GOST 53491.1 - 2009
- SanPiN 2.1.2.1188-03
- SP 31-113-2004
- SP 118.13330.2012
These documents contain technical and safety information.After the preparation of the project, it is checked by a responsible person and allows construction to begin.
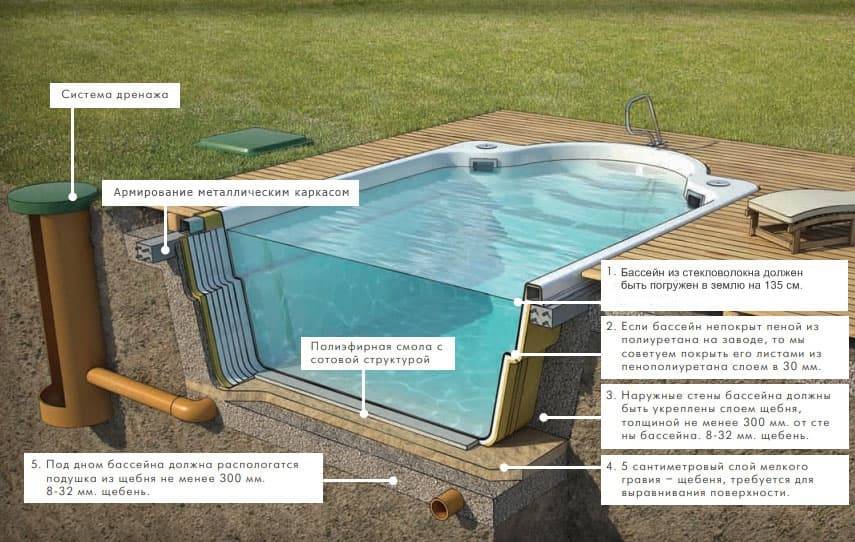
polypropylene
A polypropylene pool also requires a foundation pit and pouring a concrete bowl. The polymer allows you to solve the main problem in the construction of pools - to ensure reliable waterproofing. Polypropylene is an extremely durable material and is able to take any shape. Pools from it are made in two ways:
- a ready-made bowl of the desired size and shape is bought;
- sheet polypropylene is bought and a bowl is made from it.
Welding of sheets is carried out using a thermal welding machine - an extruder.
Polypropylene bowl - concreting
After mounting the polypropylene bowl and installing all communications, concrete is again poured from above and decorative material is laid.
It is polypropylene pools that are most suitable for installation in a summer cottage. They are not afraid of temperature changes and the vagaries of the weather.
General site requirements
Frame bowls are very demanding on the base under them, this is due to the large mass of water. The larger the volume of the frame structure, the more stringent the requirements for its foundation. Although frame bowls are considered self-supporting, this is achieved under the condition that the weight of the water is evenly distributed.. To do this, the base must have a perfectly flat plane (tolerance for deviation of not more than 2-5 mm per meter when aligned with the horizon). If this is not the case, then there is a high probability of distortions and deformation of the walls of the pool, which in the end can lead to the destruction of the supporting elements.
The base must be strong enough to support the heavy weight of the bowl.. Depending on the quality of the soil and the size of the pool, this is achieved by tamping with the arrangement of a sand and gravel cushion or by tamping with the arrangement of a concrete base. Potholes, dents, bulges, tree root systems (they have the ability to germinate), and construction debris should not remain under the tank.

Partially submerged frame pool installation
When determining the location of the site for installing a frame tank with water, a number of simple rules should be followed, in particular swimming pool should not be arranged:
very close to home, capital outbuildings, cellars. Water can get inside them in an emergency and cause material damage;
next to trees and shrubs (especially fruit-bearing), they will cause excessive pollution of the water in the tank;
on an unfinished foundationintended for other designs;
on loose and creeping soils;
on the site left after the dismantling of the old building, since there may be cavities that, under the influence of a load, will cause collapse;
on the edge of cliffs and river banks;
in areas close to railroad tracks, highways on which heavy truck trucks pass;
in seismically unfavorable areas.
Concrete base with board deck ready for framed pool installation
The classic base for the pool is flush with the level of the summer cottage. Small frame structures can be installed on podiums (wooden platforms on a concrete foundation).


Large in volume and depth, on the contrary, can go deep.It is recommended to fence the bowl area around the perimeter for the safety of small children and animals, to protect it from prying eyes, to equip it with landscape design elements and small architectural forms (sunbeds, benches, gazebos). The location of the bowl should be well lit by the sun.
Construction of a home pool: types of structures and their arrangement
Pools in the bath can be of various types, types and designs. To date, there are three types of such structures that are usually installed in the bathhouse. Pools can be large and small, deep and shallow, as well as round, square, rectangular, oval or have an unusual geometric shape. It all depends on the project of the bath, as well as the place that will be reserved for the pool.
If the bath is small, then we recommend making the pool a small corner one, so that you can just rinse after the steam room. And if the project involves a huge bath of a large area, then you can install a large reservoir where you can swim freely.
Small swimming pool for a small bath
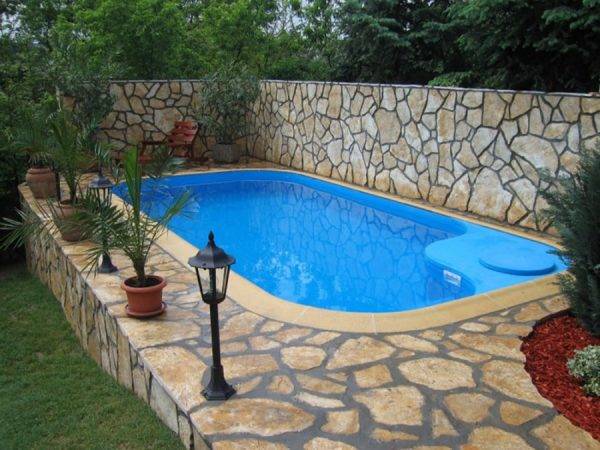
Stationary pools are the most durable, comfortable and durable. They are a deep bowl made of concrete, which can be of any shape. Such a design can be recessed into the ground or located on the surface. A concrete pool will require more time to build, as well as funds to purchase materials, but it has a long service life, and therefore will serve you for many years. Inside, it is usually tiled.
Stationary pool in the bath
PVC pools can also be installed indoors, sunk into the ground during the construction of a bath or left on the surface.But such reservoirs do not have a long service life, have certain conditions for their operation and are quite expensive. In the event of a crack in such a pool, it will need to be replaced, and this is a big investment of time and money. Therefore, if you choose this type of construction for a bath, then it is best to make it mobile so that, if necessary, you can remove it from the room.
Plastic pool in a PVC bath
Spa pools with hydromassage, made of a special durable material, are not intended for swimming, but only for taking relaxing water treatments. Since such designs are already sold ready-made, it is not always possible to choose the required size or shape specifically for your bath project. I would also like to say that a hot tub would not be entirely appropriate in a bath, so it is best to abandon such an idea, unless, of course, it is included in your plans.
SPA pool with hydromassage in a wooden bath
Building materials and selection of suitable tools
In order to properly organize the construction of the pool, it is worth thinking about all the materials in advance and preparing a construction tool.
For arrangement you will need:
- concrete mixer;
- carpentry tools (hammer, knife, stapler, rules);
- carpentry set (self-tapping screws, screws, nails, tape measure, wrench, etc.);
- ramming machine;
- screwdrivers;
- sand and cement;
- boards 25 mm in diameter;
- timber 50 mm;
- material for waterproofing;
- fittings;
- primer;
- stapler for fittings;
- adhesive base for tiles.
Pool decoration can be made of: tiles, mosaics, polypropylene, PVC film.The film can be selected in different colors: white, blue, blue, pink, etc.
Choosing polypropylene as a finishing material, you can be calm, because it is resistant to aggressive influences and is highly durable.
If you decide to equip the pool with tiles or mosaics, then when choosing, you should pay attention to the water absorption indicators - it should be low. At the same time, the mosaic always looks respectable, more expensive and aesthetically pleasing.
Step-by-step process of creating a monolithic pool
Instructions for those who want to make a pool at their summer cottage on their own and inexpensively with their own hands:
Choose the best location for the reservoir. Beginners in construction will choose it according to their preference, while it would be more correct to take into account the characteristics of the site and its capabilities. Therefore, before the direct laying of the reservoir, it is necessary to draw up a site plan, indicate in it all the technical nuances and analyze the features. Based on several parameters, the most suitable points are determined.
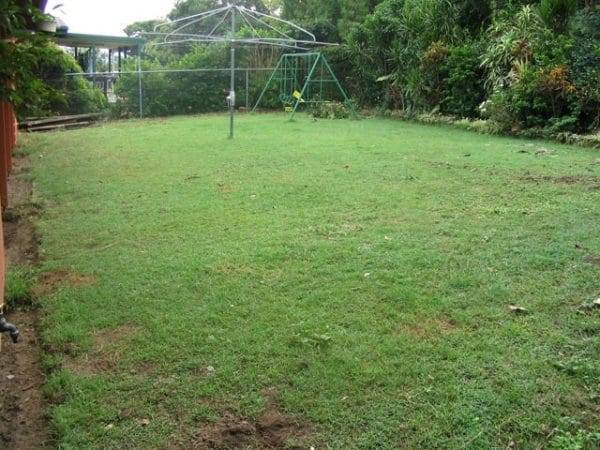
One of the main rules for the placement of the pool is the absence of trees and shrubs around the perimeter. In the sun, the water will heat up quickly, while in the shade of trees it will remain cold.


Leaves from trees will fall into the water, and because of this, it will need to be cleaned much more often. In addition, the roots can destroy the bowl of the reservoir.
The depth of the pool is an important factor when you are in it. If the depth is less than 1.5 meters, then it will be uncomfortable for adults to swim. This pool is only suitable for children. When the optimal depth is chosen, 1.5 meters for drainage is added to it and the thickness of the walls of the thicket is taken into account.
It is also important to take into account such an issue as communication.The main thing is not to touch this system during the preparation of the pit
Therefore, before starting work, it is necessary to study the route along which the water follows.
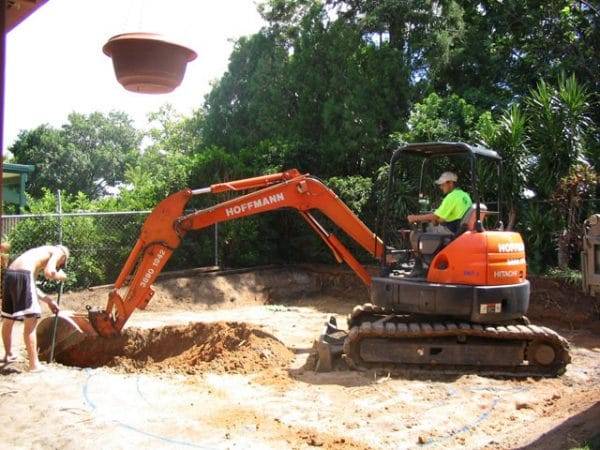
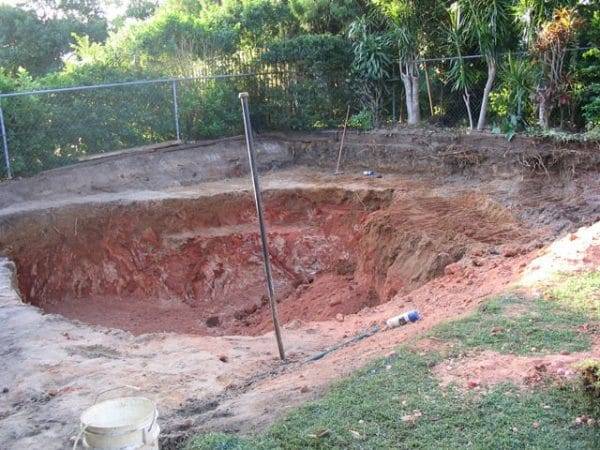
When the place of the future pool is fully outlined, you can start earthworks. When digging a pit, it is recommended to observe the angle of the slope of the walls. In order not to face the problem of crumbling earth, it is necessary to choose a slope angle of 5º.
The next stage of construction with your own hands is waterproofing. First of all, a layer is created from a mixture of sand and gravel with a depth of 15 cm. The resulting mixture is carefully leveled. The "pillow" is covered with two layers of roofing material in such a way that the edges of the sheets protrude above the ground by at least 20 cm.
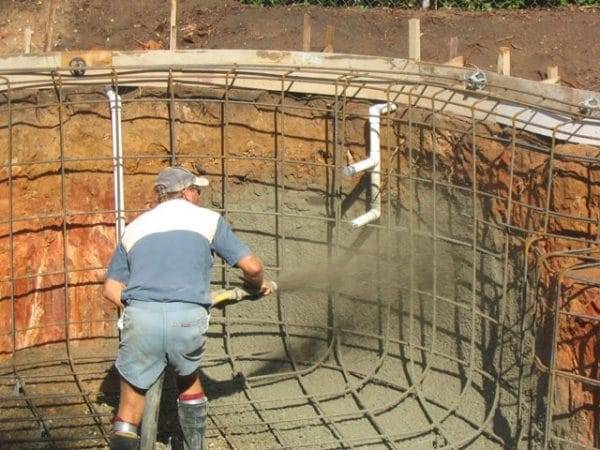
Structural reinforcement. To form the frame, reinforcement 20 cm in diameter is taken. Next, a frame is assembled from the rods and placed in the pit. After that, it must be poured with concrete.
The fastest filling option is a one-time, it is done immediately for the entire volume of the frame, without breaking down into layers. However, in order for everything to work out the first time, you need a certain skill. If there is no experience, it is better to fill the frame in several passes. In this case, the bottom of the pit is first poured. Do not forget that it should be with a slight slope towards the water drain.
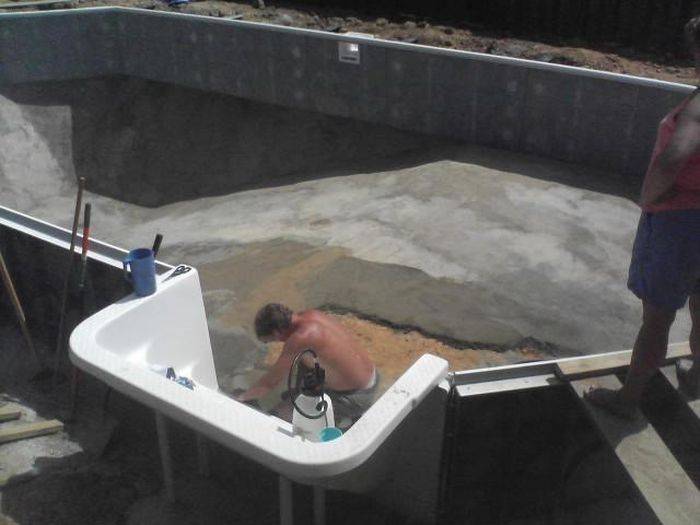
In order for the filling to last for a long time, vibration installations are usually used. During the solidification of the solution, free time appears, which can be spent on laying communications. When the bottom completely hardens, it will be time to start building the walls of the pool. For this step, you need to create a formwork. The width of the wall of an artificial reservoir should be at least 40 cm. If the bottom is poured in 2 stages, then the walls are erected accordingly.
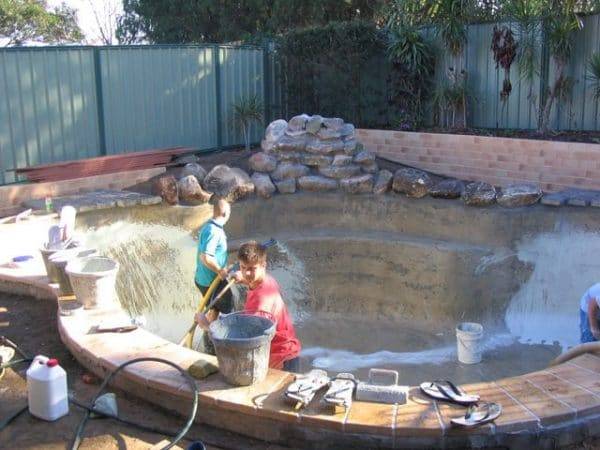
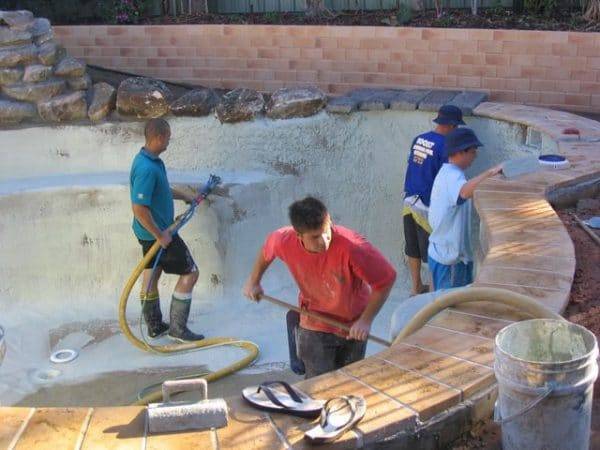
After the formwork is ready, the builders begin to manufacture a frame that connects the horizontal parts. Next, you can pour concrete into the walls. The vibrator is excellent for compacting the concrete mass. When the concrete has completely hardened, finishing work can begin.
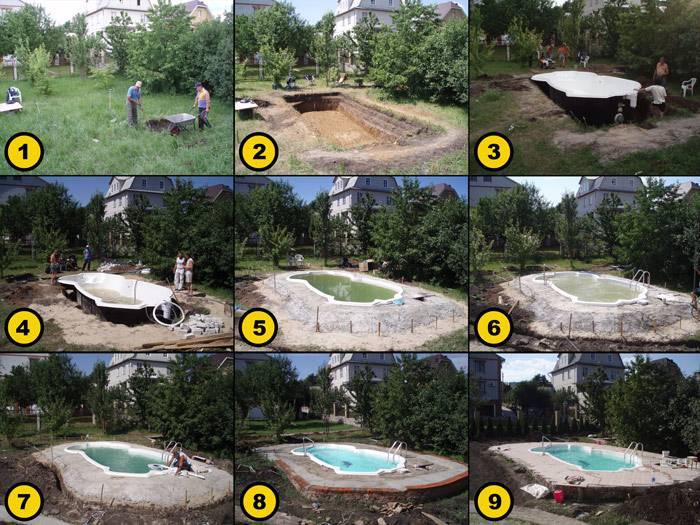
Installation of the finished pool in the country
The process of mounting the structure on the ground depends on the type of bowl. If this is a wooden frame-type pool, a hole is dug up to 30 cm deep under it, dense layers of soft materials are laid out under the inflatable structures. The main rule before buying is to estimate the dimensions of the model and tie it to the area.
The presence of free space, water resources - these nuances are discussed before purchasing a bowl. Stationary systems are installed next to the water supply, drain. Inflatable and collapsible, as well as containers of small capacity, are placed in any convenient place.
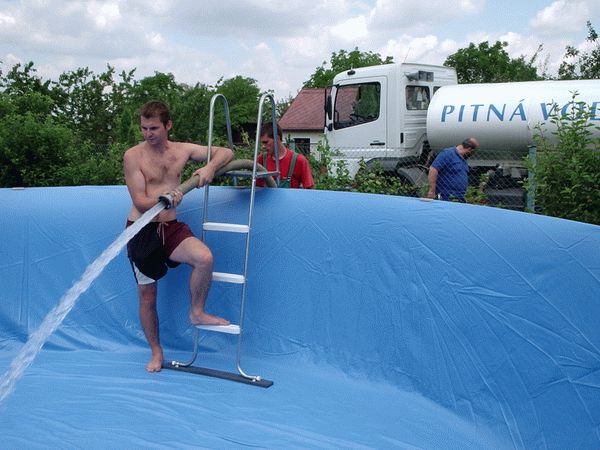
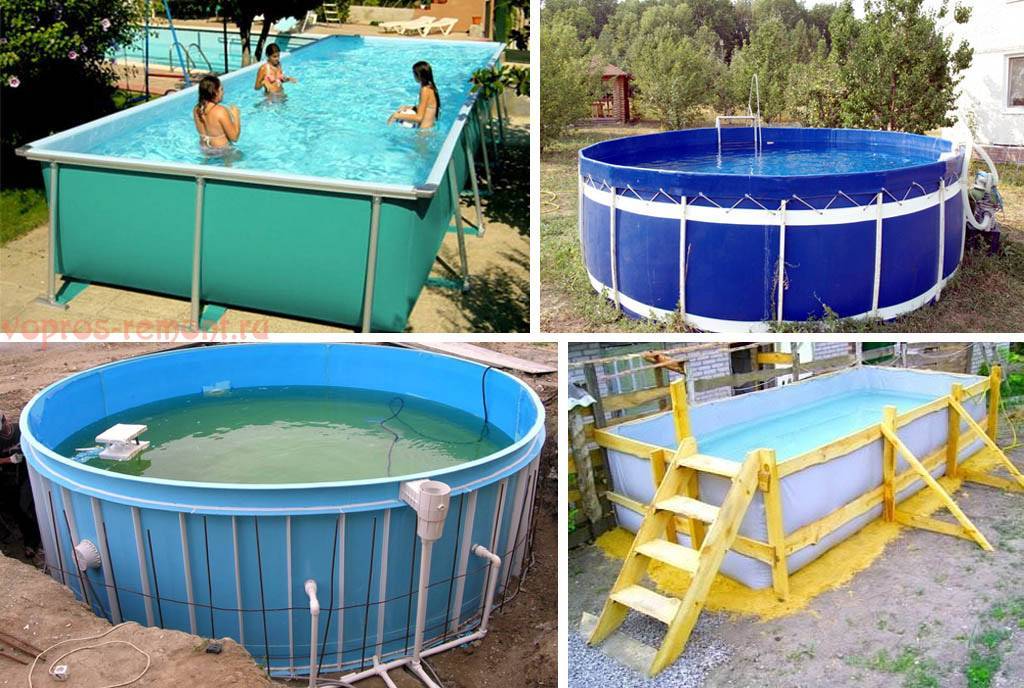
Installation of an inflatable pool
Even the largest bowls are easily mounted on any free space. The kit already has a pump, a hose, a cover, so installing an inflatable pool in the country will take little time.
They do it like this:
- level the site;
- clean it from debris, roots, sharp objects;
- lay a layer of thick cellophane or tarpaulin;
- foam, foam mats are thrown from above - they will ensure evenness;
- lay out the bowl;
- inflate with a pump;
- run water.
The process is over. After bathing, cover the bowl with a lid or drain the water.


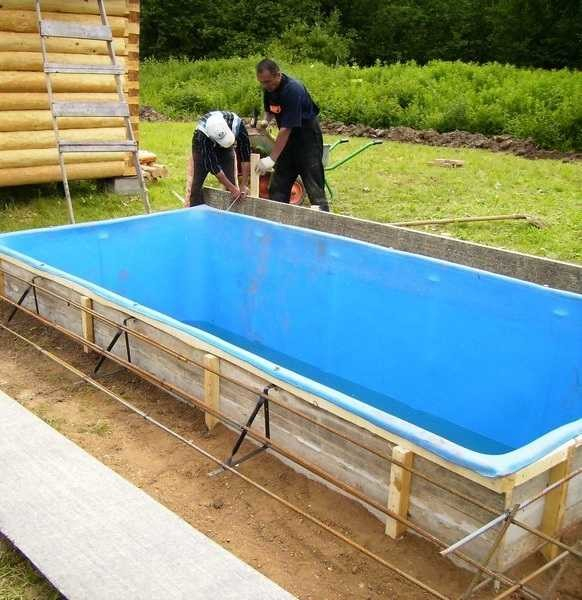
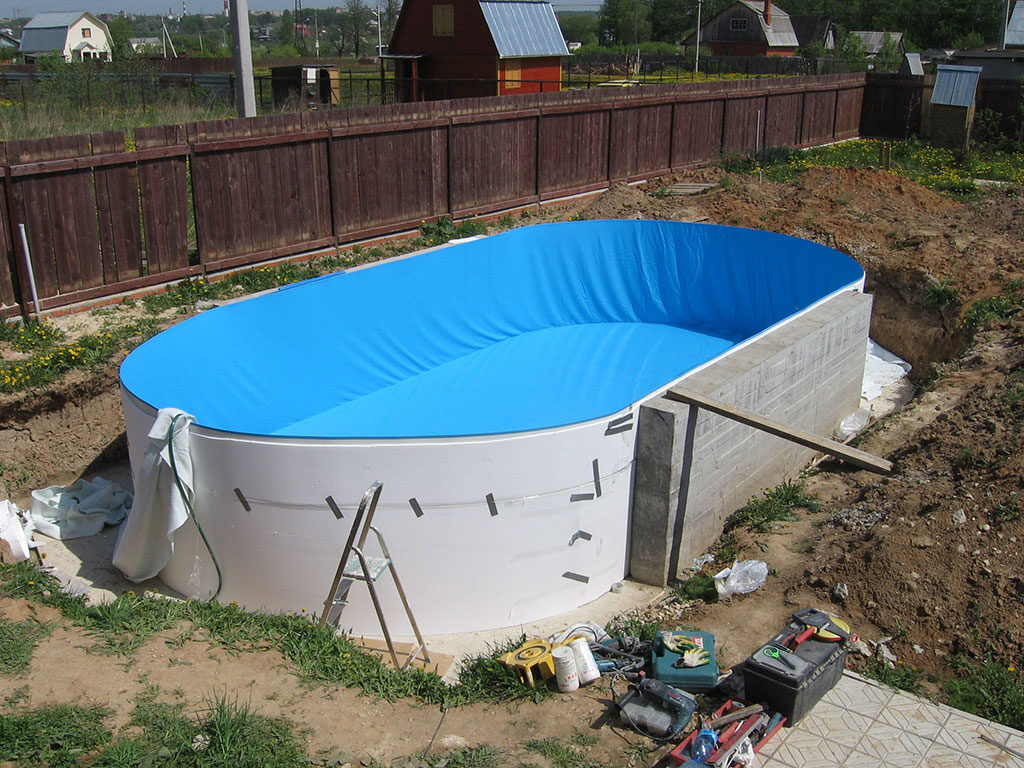


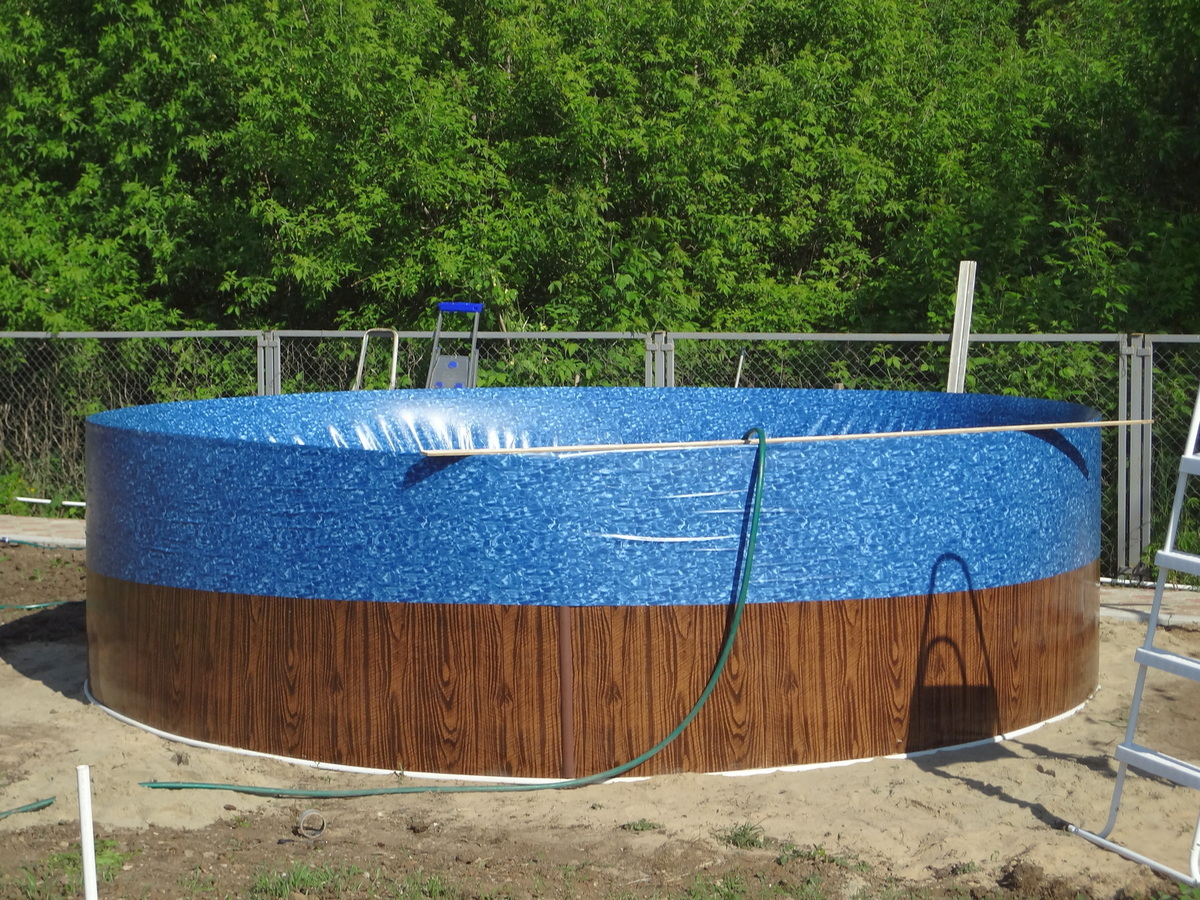
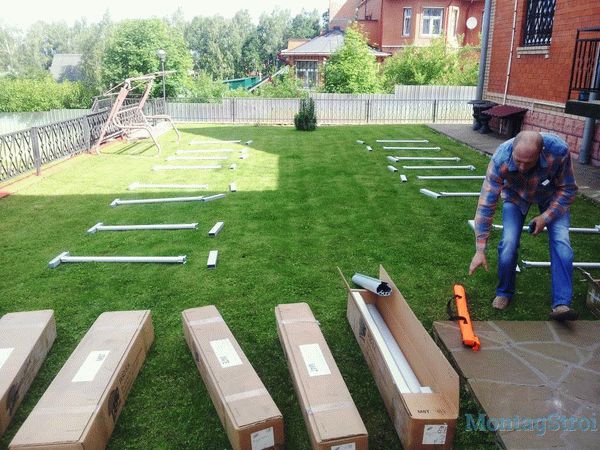
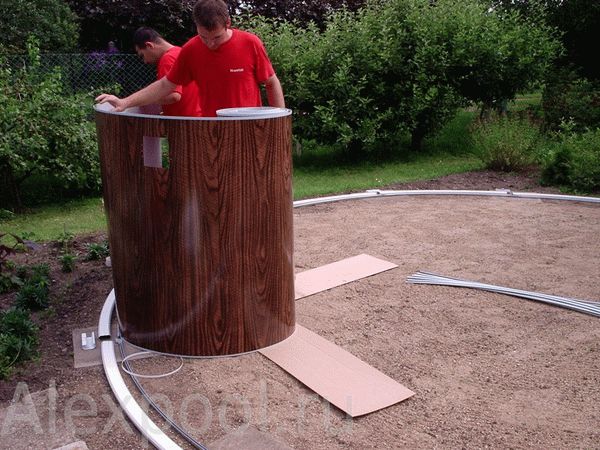
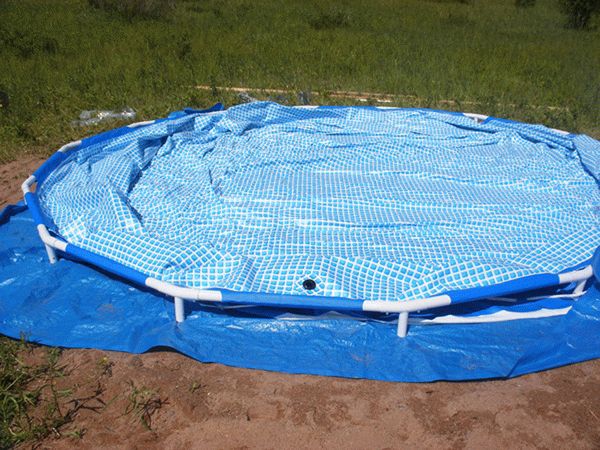
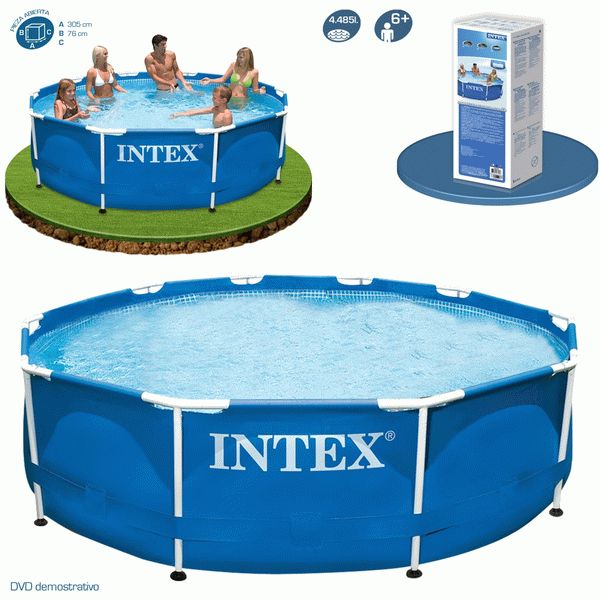
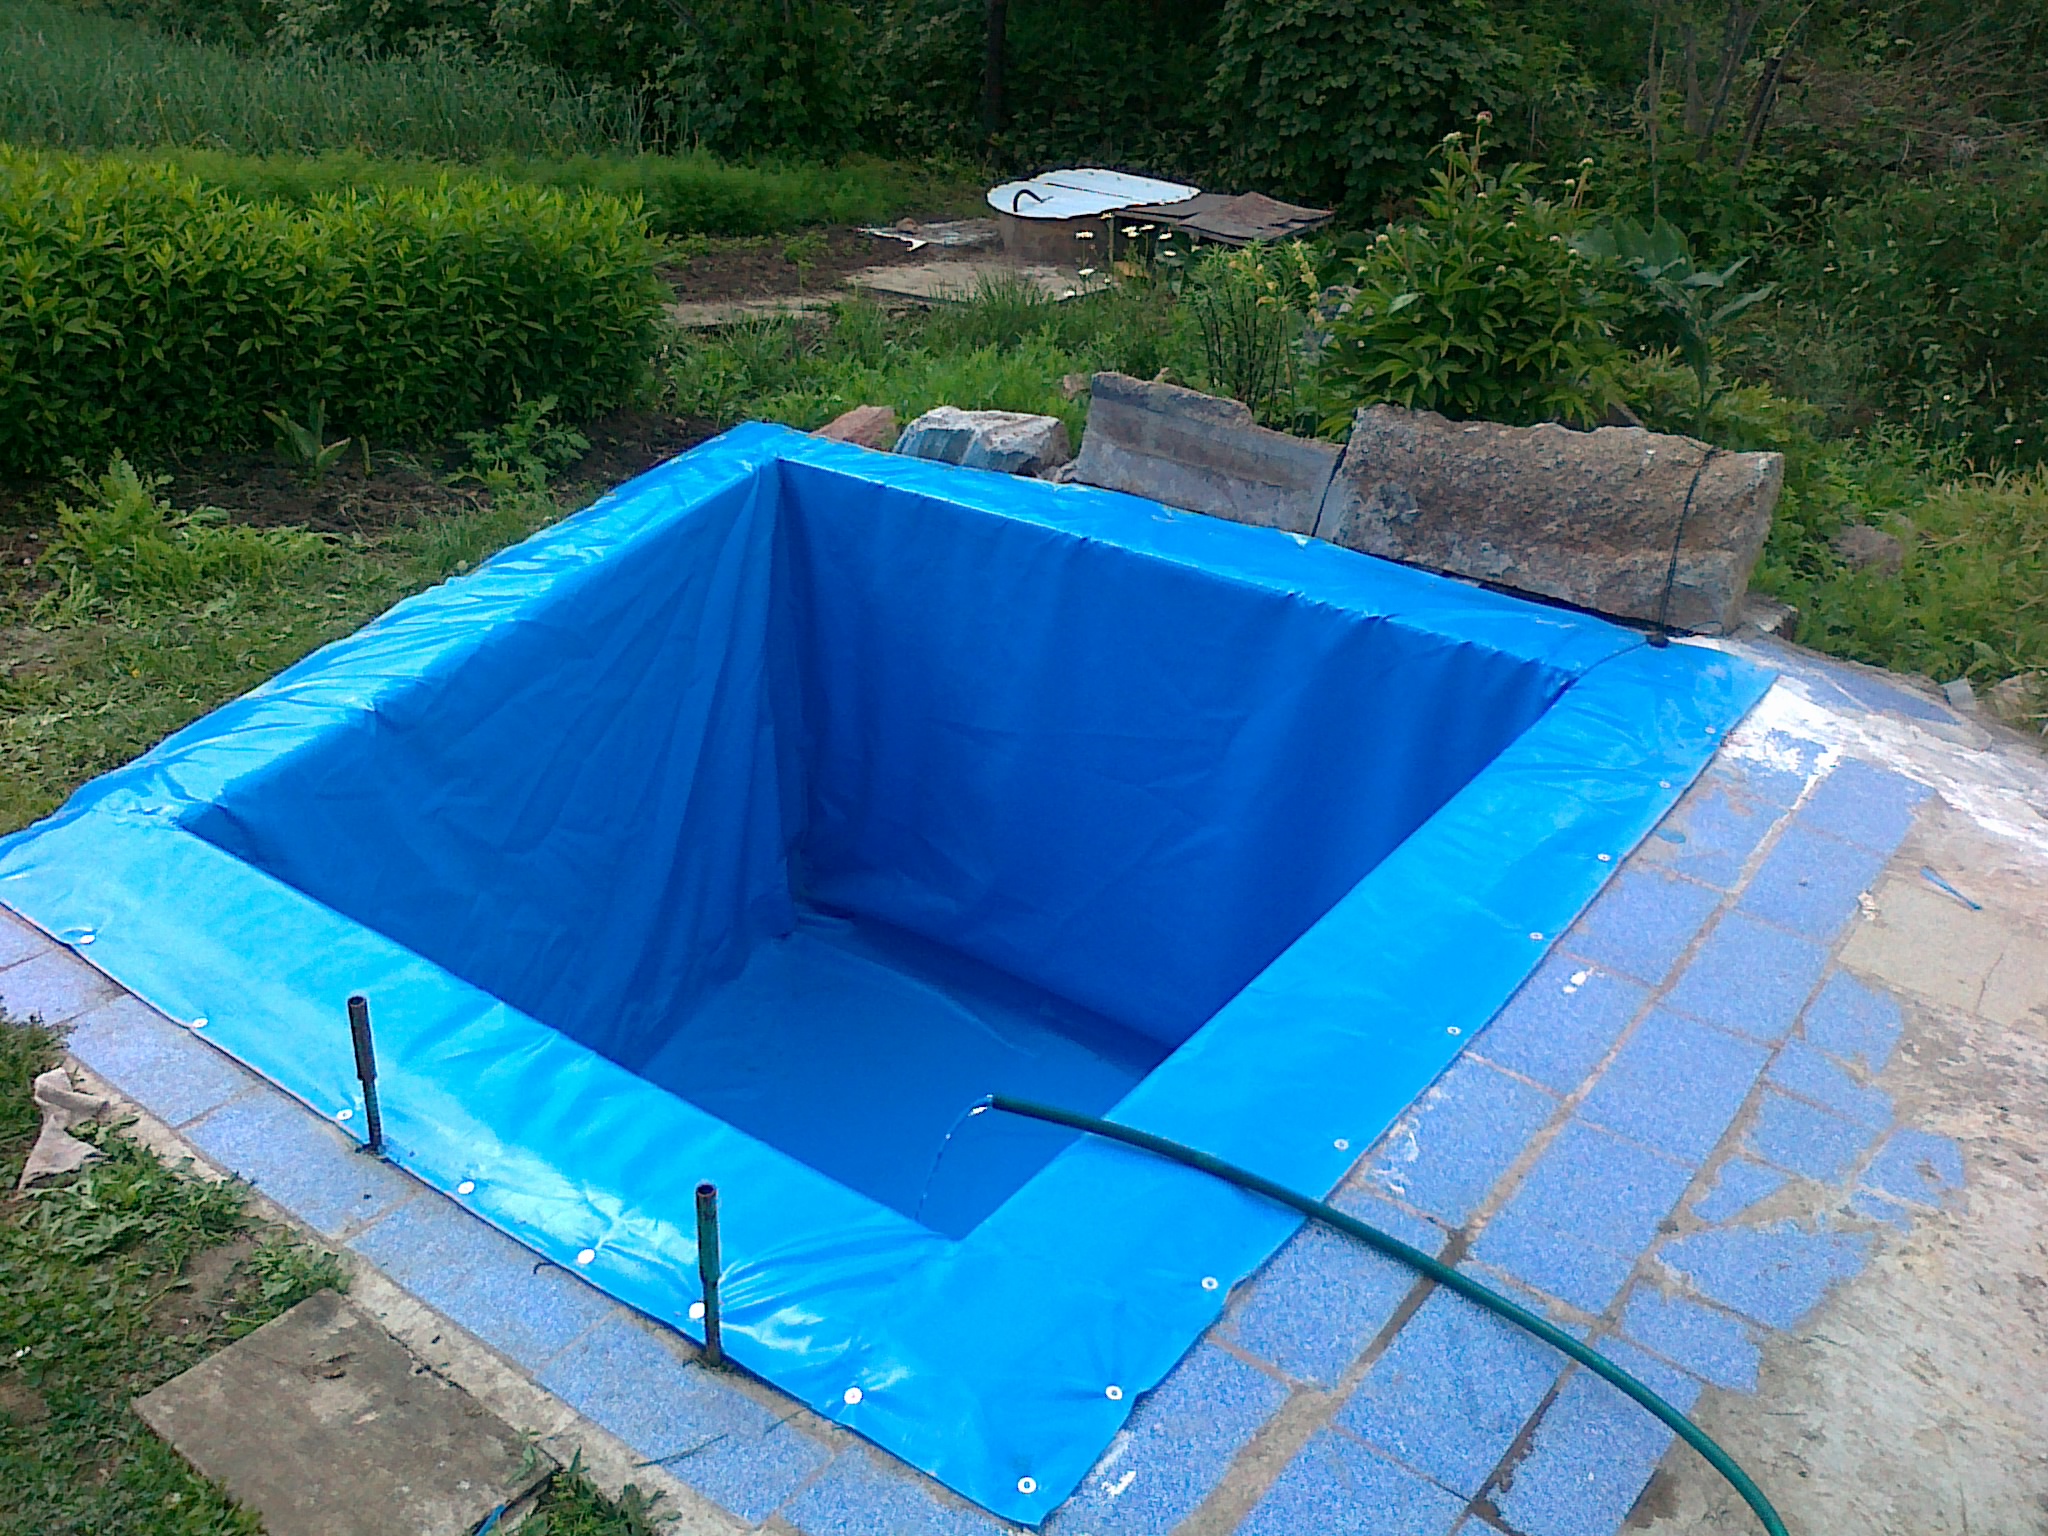
Frame pool installation
Structures are placed on a ready site or buried in the ground. After doing this:
- They remove the fertile layer of soil to a depth of up to 3/4 of the height of the walls. Allowance in all directions of the bowl 50 cm.
- Pour a layer of sand on the bottom, compact.Spread a layer of geotextile - it will not give growth to the roots.
- Install the frame according to the instructions. Support posts are attached from the outside. The recessed part of the wall is insulated. If the soil is wet, the base is covered with insulation - this will prevent the rapid cooling of the water.
- A ring is laid out at the bottom, then the sides are mounted. After that, they are laid out on the bottom of the EPPS. The edges are trimmed, the gaps are made minimal. Joints and edges of polystyrene plates are sprinkled with sand.
- A film is laid out in the prepared frame, attached to the adhesive tape. They start pouring water. Under the weight of the volume of water, the film straightens out, it is leveled and fixed on the walls with fasteners.
- Fixing strips are installed along the upper edge, the walls are insulated with polystyrene.
- Backfilling the pit is done to strengthen the structure. The water from the bowl is not drained so that the pool with their own hands in the country house from the film retains its geometry.
- Install the equipment included in the kit. Check the tightness of the joints.
- Installation completed.
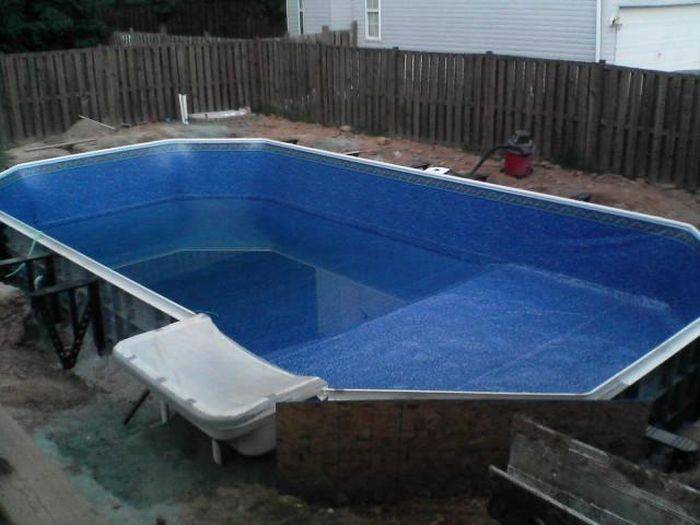
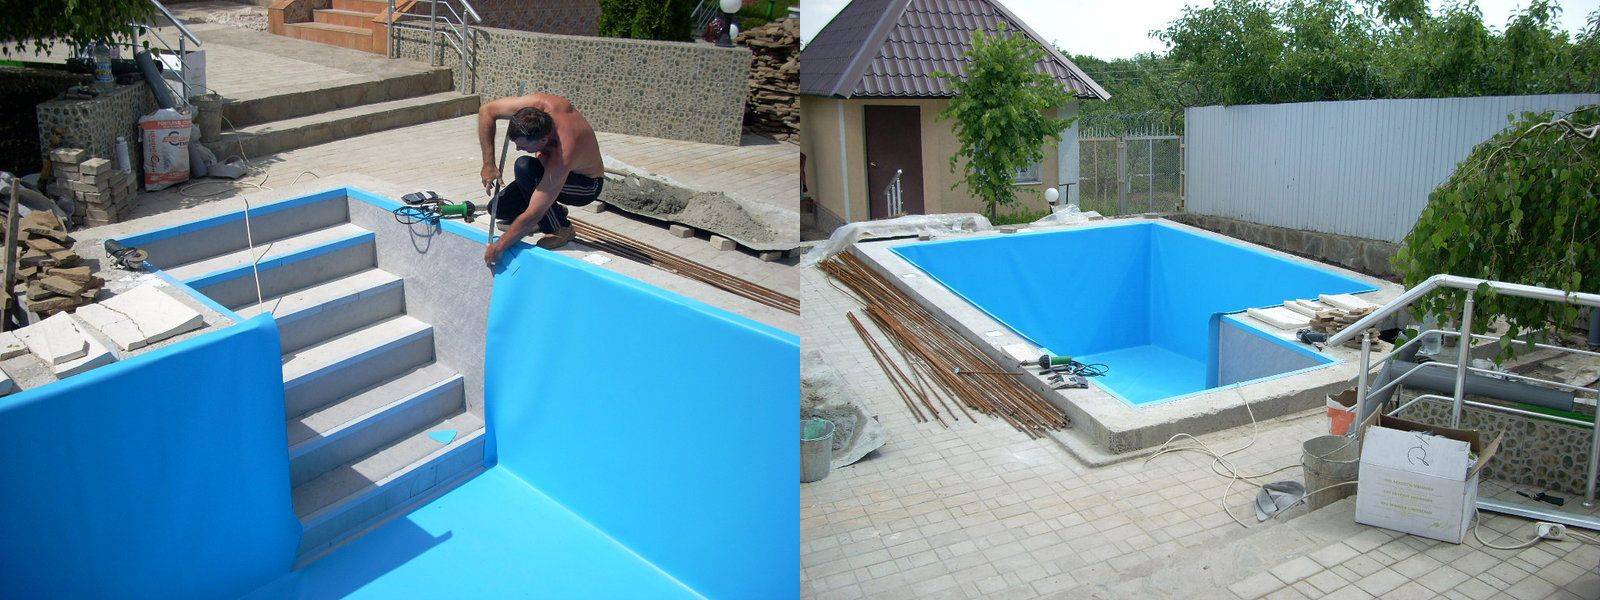
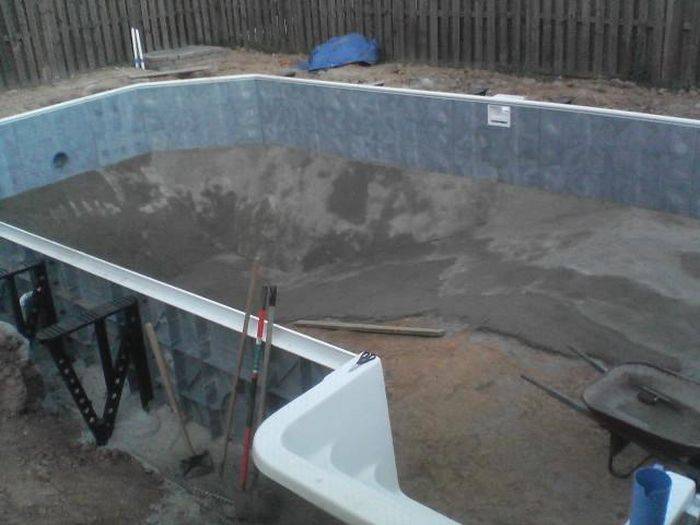
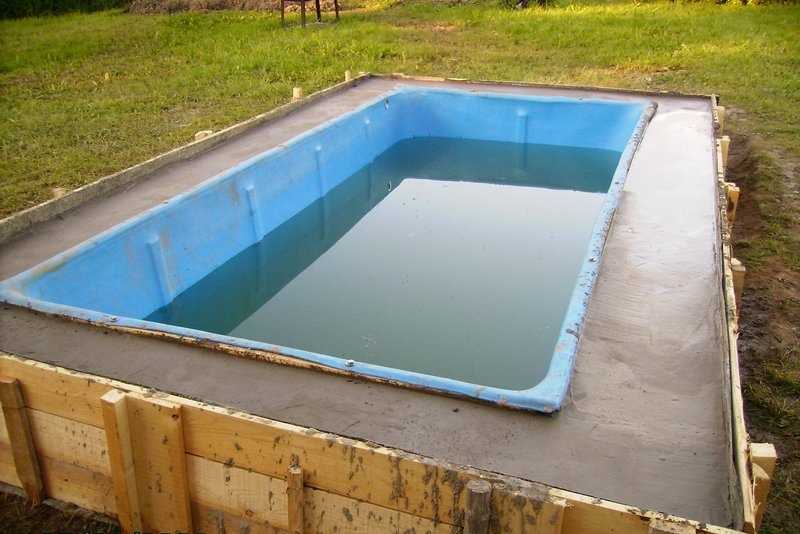
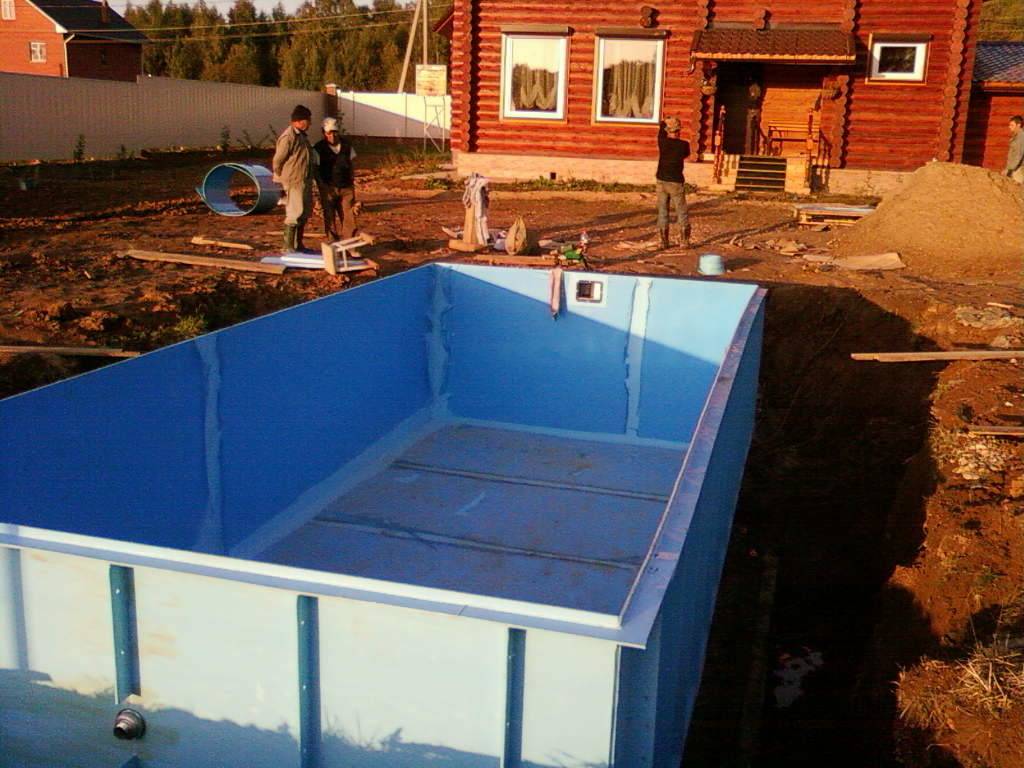
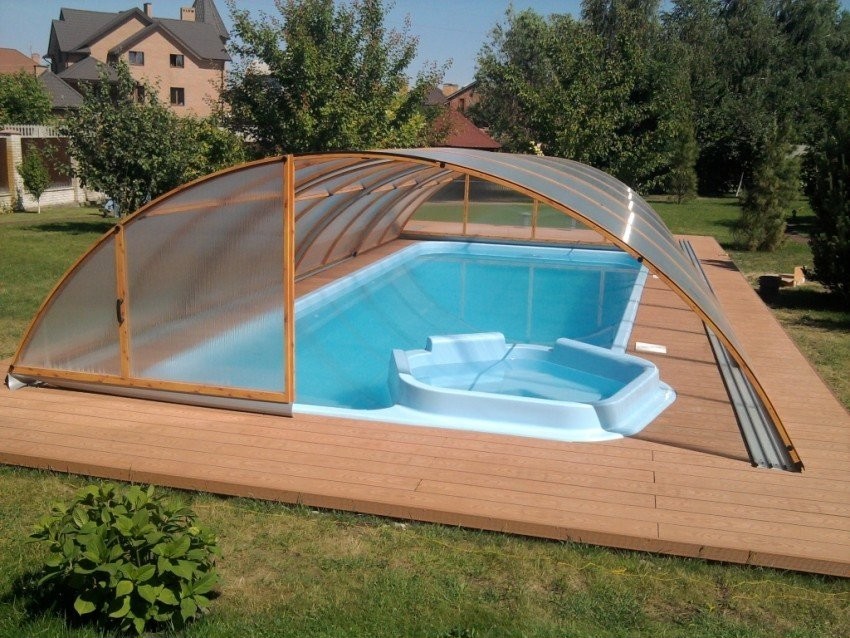
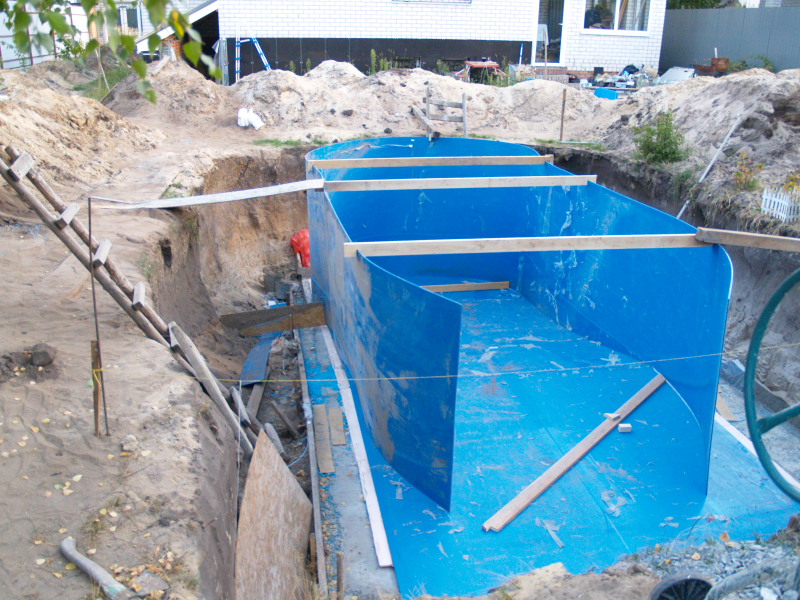
Installation of a plastic pool
Installation of the finished font is carried out only in a pre-dug pit. A pit is dug with markings on the terrain. Up to 0.5 m is added to the dimensions of the bowl - these are allowances for the installation of formwork.
They put a plastic pool like this:
- an even layer of sand up to 30 cm thick is poured into a pit 100 cm deep;
- knock down shields from boards according to the size of the pit, the inner surface of the shields is covered with a dense film;
- the frame is made of a bar 50x50 mm, it is launched along the upper border of the shields;
- the beam will serve as a fastener for the upper edge of the bowl, so it is pre-treated with an antiseptic, flame retardant;
- after assembling the walls inside the pit, a pool is installed in them;
- along the perimeter of the tank, a side of reinforced concrete is cast;
- along the perimeter, corners are installed with fastening to the beam and the bowl through and through, fixed with stainless bolts;
- install mortgages, overflow pipes - they are taken out of the font;
- pour water into the bowl, at the same time knead the concrete composition;
- concrete is poured between the walls of the plastic pool and the frame of the shields;
- the concrete is compacted with a compacting machine with vibration, after 4-5 days the formwork is removed.
After completing the work, the plastic container is securely fixed in the ground, there is a side along the edge - the pool is ready for operation.
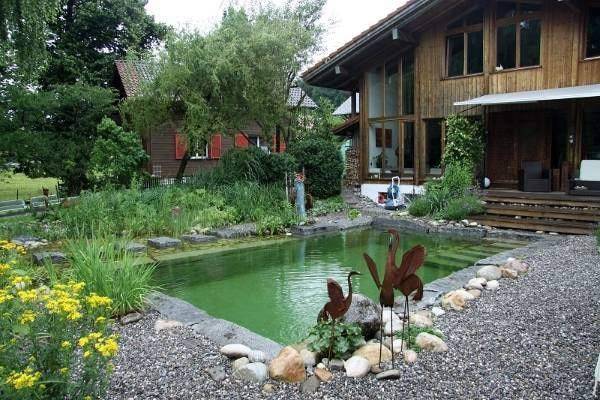
Natural pond at their summer cottage
A pond in a summer cottage can also be made with your own hands, you get an inexpensive stationary reservoir. Instead of cold concrete, clay and gravel serve as walls and bottom. To decorate this type of pool, natural water lilies, reeds or sedge are taken.
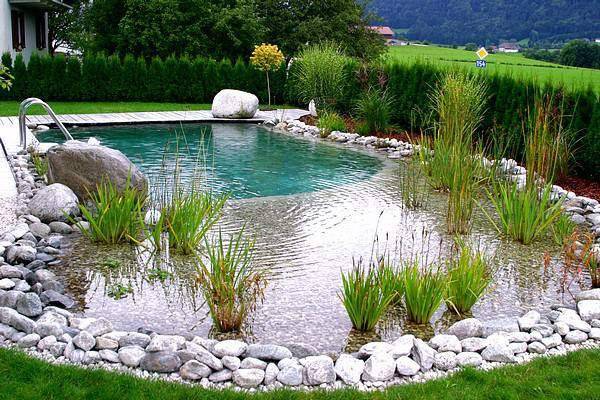
The scheme for constructing a pond corresponds to the process of building a pool of concrete, however, you can not use a reinforcement frame. It is enough that the walls of the reservoir are smoothly inclined, and not standing perpendicular to the bottom. If there is not enough space for sloping walls, and they turned out to be perpendicular, it is necessary to strengthen them well with a layer of clay or betonite.
The advantage of a natural pond is that you do not need to buy expensive equipment in the form of pumps and filters to clean it. The pool will be self-cleaning due to the plants planted in it. However, for these processes to take place in full, it is necessary that the plants occupy at least 50% of the surface.
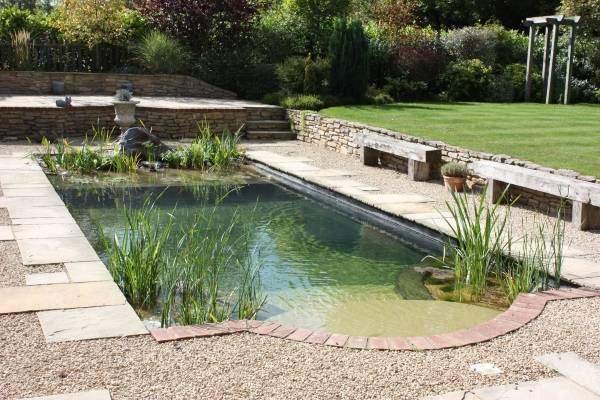
In a natural pond, water constantly circulates and is filled with oxygen, the same processes should be in a self-built pond. Otherwise, the water will stagnate, unpleasant odors will appear.
PVC pipes will help direct the flow of water through the pond, they are resistant to frost and therefore will last for more than one year. They are buried in the ground to a depth of about 45-50 cm.
Underwater aeration processes are obtained using an air compressor, which is attached to high-strength tubes connected to a diffuser. The resulting device for filling water with oxygen requires little energy. Their work during the day is from 4 to 8 hours, depending on the size of the reservoir.
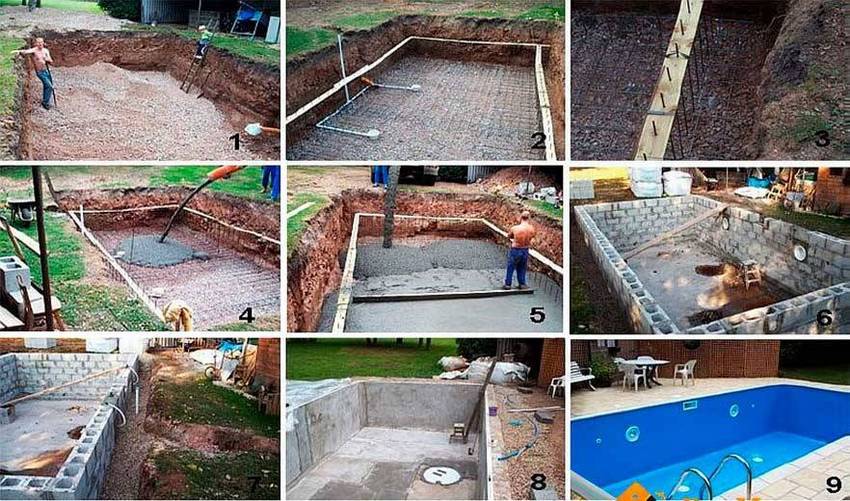
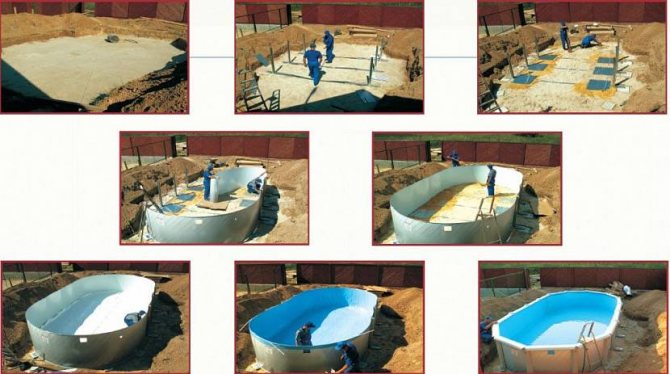
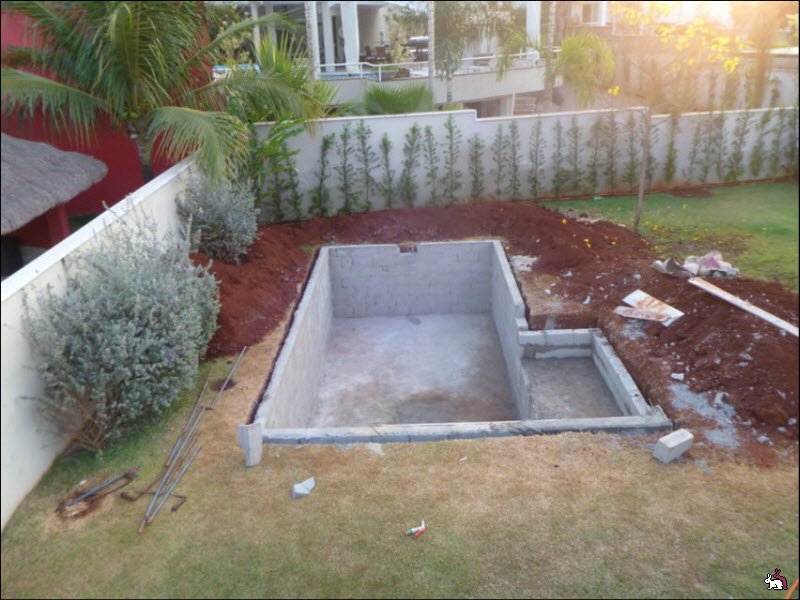
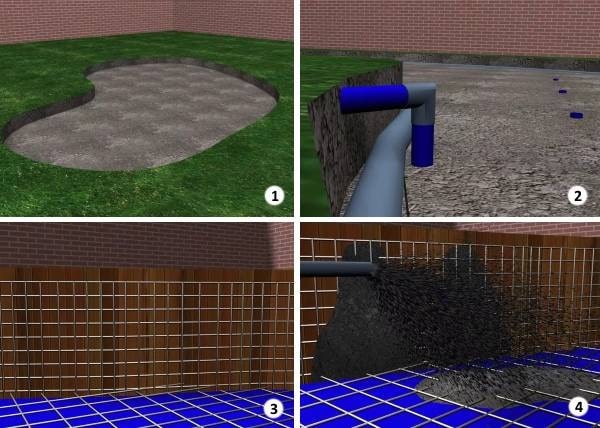
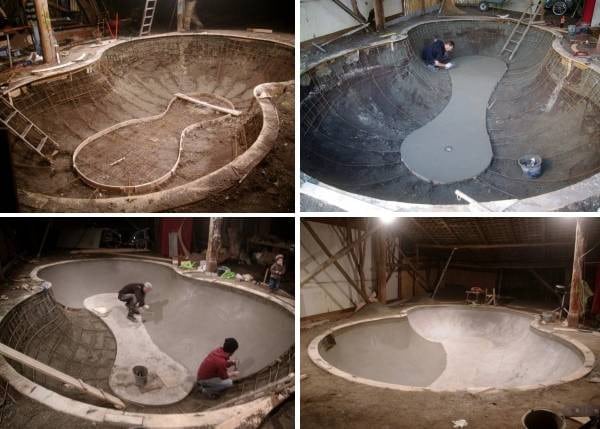
Construction of the pool (creation of a bowl of concrete)
Initially, it is necessary to design and prepare, as in the first option, the construction of a pool with a finished bowl. Then we follow the following algorithm.
- Dig a pit using the scheme described above.
- Establish the necessary communications. Choose a place for water discharge (it is necessary to provide a slope in the region of two to three cm per one meter of the bottom, which goes to the drain hole).
- Create a pillow. It will make concrete pouring stronger. For manufacturing, sand and gravel are used, which are tightly compacted. The thickness of the pillow is within 30-35 cm.
- Waterproofing works. Lay the waterproofing sheets with an overlap of 15-20 cm. It is better to repeat this procedure several times. The most popular materials for this are roofing material, bitumen, PVC membrane or liquid rubber.
- Pouring the base of the pool.
The ideal concrete composition for one cube of the finished mixture is:
- 625 kg of sand;
- 1250 kg of crushed stone;
- 325 kg of cement;
- 170 liters of water.
It is necessary to fill the base with balls according to the following scheme:
- the soil;
- sand ball 100-150 mm thick;
- a ball of crushed stone 100-150 mm thick;
- concrete ball 150-200 mm thick;
- cement mortar;
- waterproofing;
- reinforced concrete bowl.
Reinforcement refers to the use of a steel bar or rebar. It is better to use a ribbed rod with a diameter of 8 to 14 mm.
Filling the pool
Formwork creation. For formwork, it is good to use wooden boards or moisture-resistant plywood (it is easy to form bends with it). Do not forget about the installation of stiffeners and spacers. The distance between them is 50 cm. The crate for the steps must be created separately.
Formwork creation
Wall pouring. After the concrete solution is poured, you need to close it to protect it from external factors. It is also advisable to water from time to time. After the final drying, remove the formwork and ennoble the entire territory.


Before creating a pool on do-it-yourself dacha watch this video. It will help you estimate the amount of work and clearly show the sequence of actions.
Stages of pool construction
To make a pool in the country with your own hands, it is worth studying the process of building a stationary inexpensive reservoir, which consists of several stages:
- Choosing the type of pool and drafting a project. At this stage, you need to choose the site on which the reservoir will be built.
- Create markup.
- Pit preparation and other earthworks.
- Filling the bowl and arranging the formwork.
- Creation of a waterproofing layer.
- Bowl finish.
- Installation of equipment and equipping an artificial reservoir with lighting.
Building a stationary pool can take a lot of time. At the same time, each stage of construction should be taken seriously.Remember: not only how attractive the pool will be, but also its operational properties directly depend on how well the work will be done.


