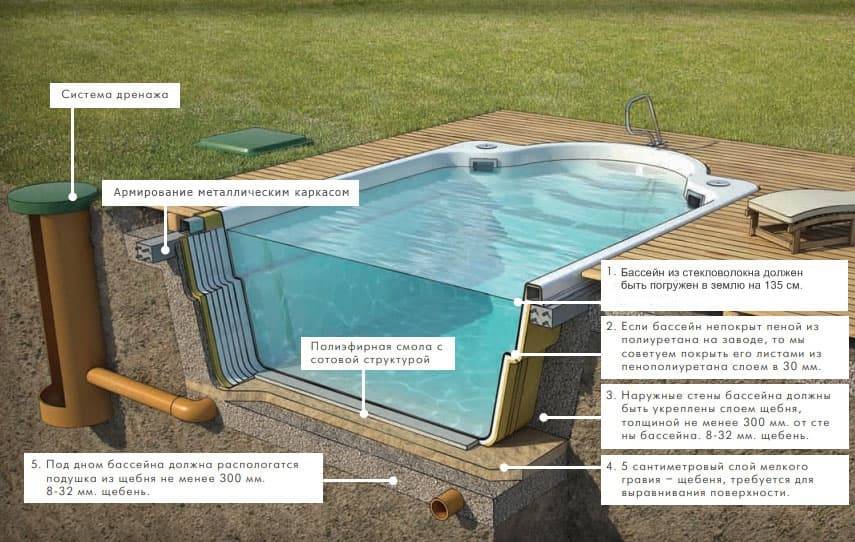
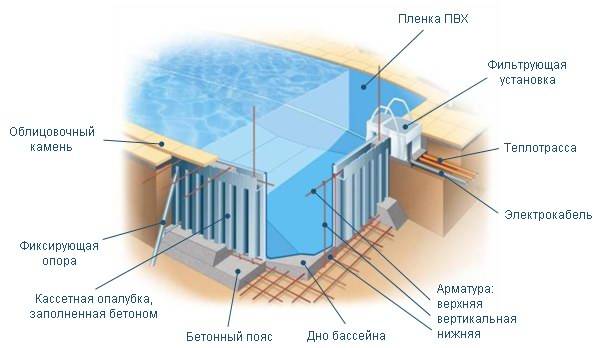
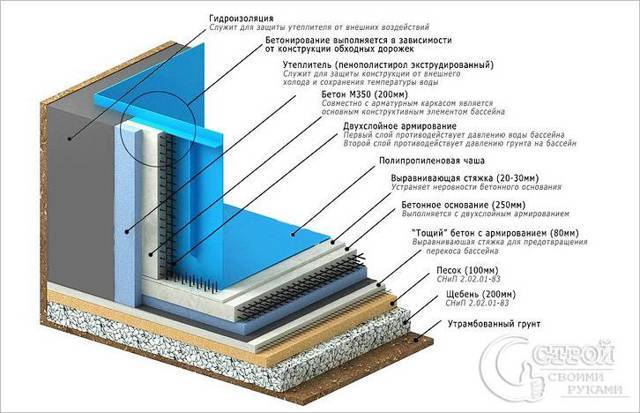
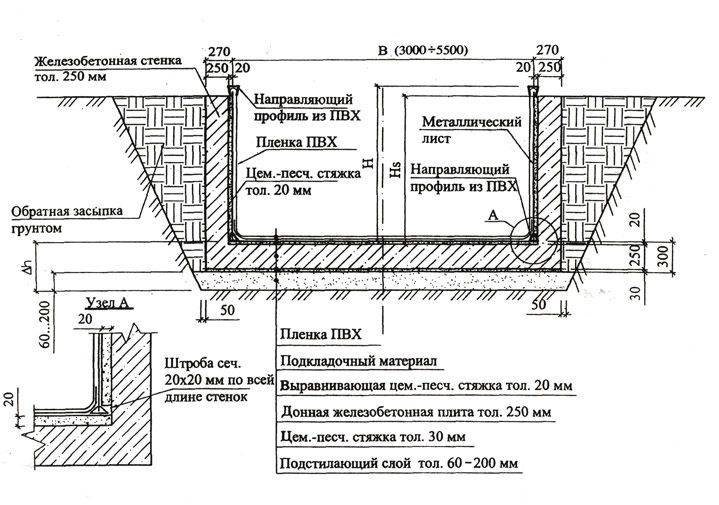
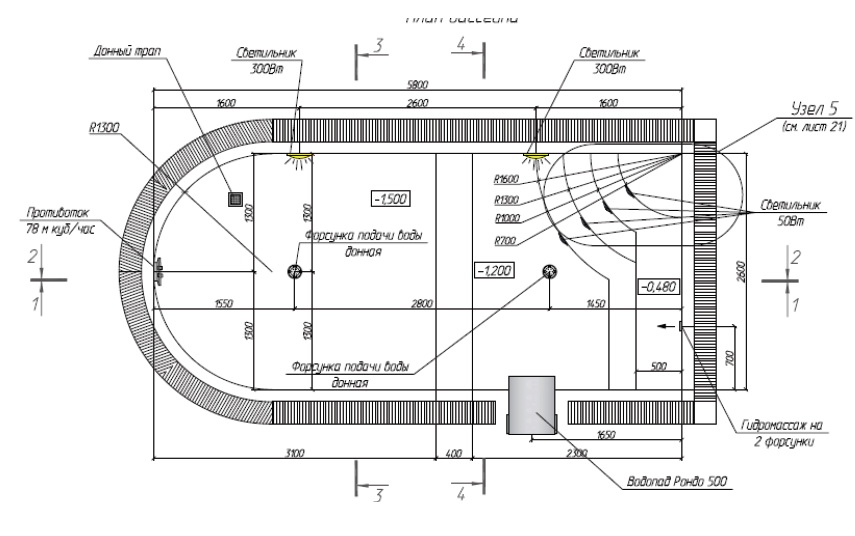
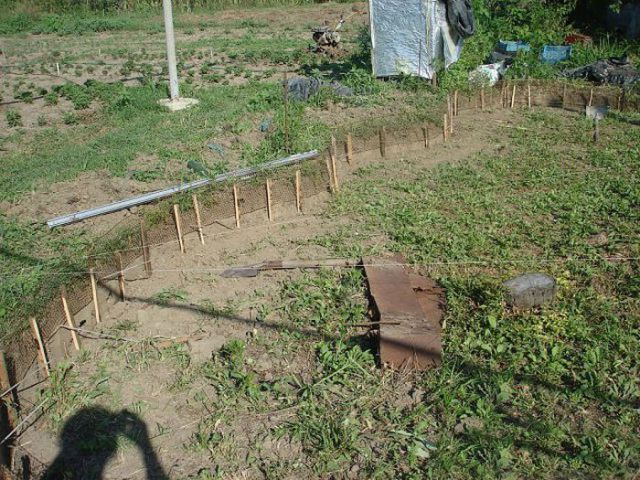
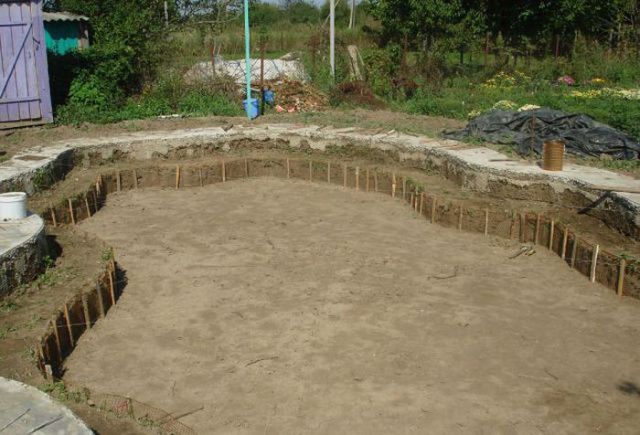
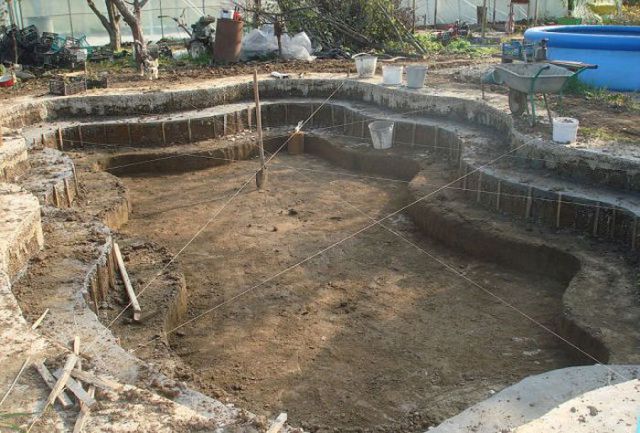
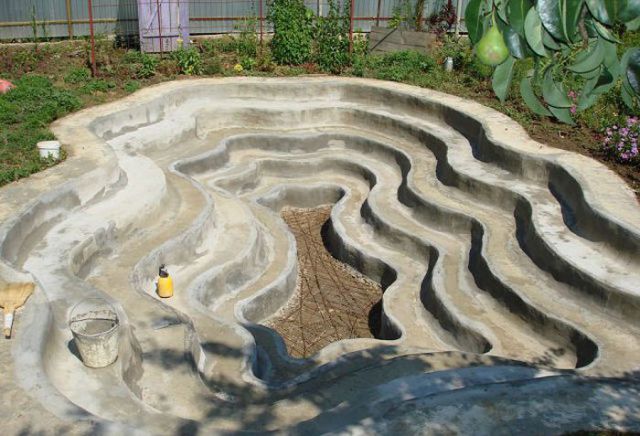
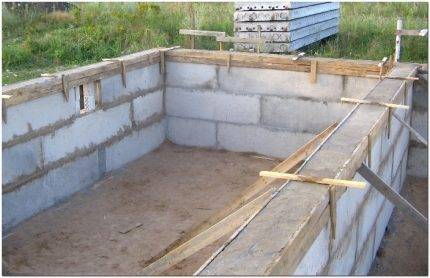
- Drainage pit and bowl reinforcement
- Choosing the optimal size and location
- Pool types
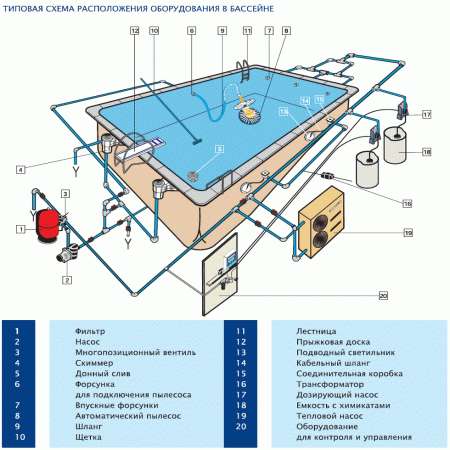
- Water treatment systems
- Plastic pool: do-it-yourself installation
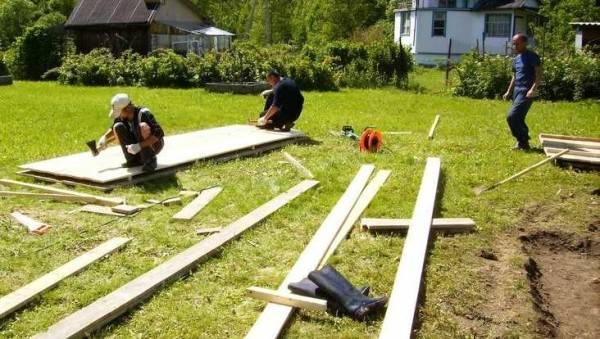
- Construction of a reservoir from pallets (pallets)
- Calculation of required materials
- Tools
- Stages of work
- Nuances of care and operation
- Preparation and calculation of the structure
- Tools and accessories
- Do-it-yourself frame pool: ground preparation
- Finishing work
- The benefits of such a solution
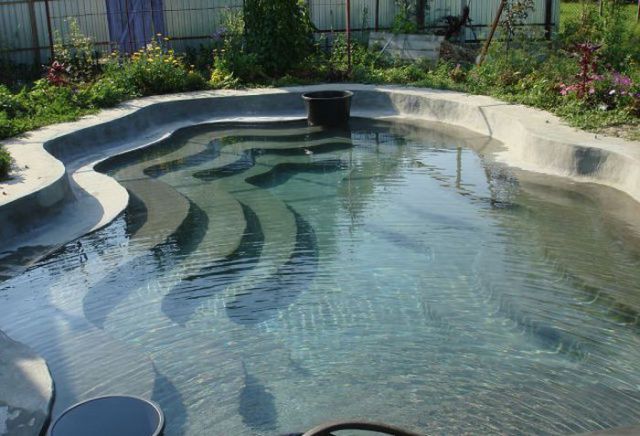
- Multi-level pool and features of its self-construction
- wooden pallets
- Alternative options for the construction of the bowl
Drainage pit and bowl reinforcement
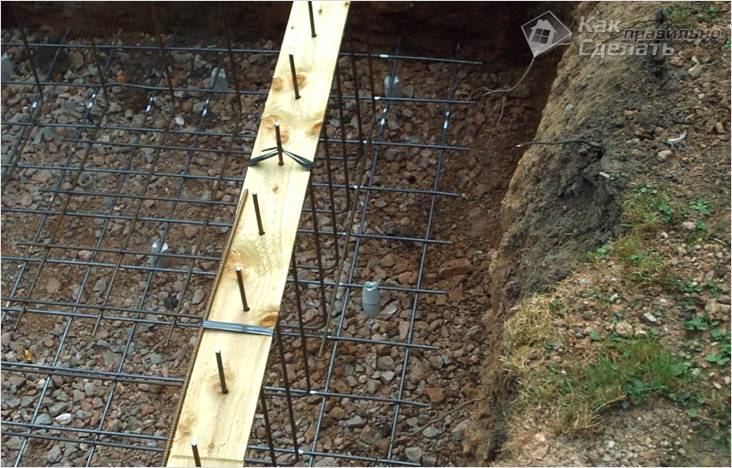 bowl reinforcement
Be sure to build a drainage hole with a depth greater than the height of the walls of the pool. Connect the pit to the drain pipe. Install a valve on the side of the pond bowl. When you need to drain the water to wash the pool, the valve opens. The empty bowl is washed, the valve is closed again and filled with clean water.
The bottom of the pit must be covered with a sand layer of 30 cm. To tamp the pillow, use a thick bar.
For the waterproofing layer, prepare bituminous roofing material. The price of the material is low, and the roofing material itself is practical and reliable. When you complete the waterproofing work, start laying small stones.Lay reinforcing bars on the stones or lay a special reinforcing mesh.
If you are laying rods, the distance between them should not be more than 30 cm. Use wire for fastening.
Choosing the optimal size and location
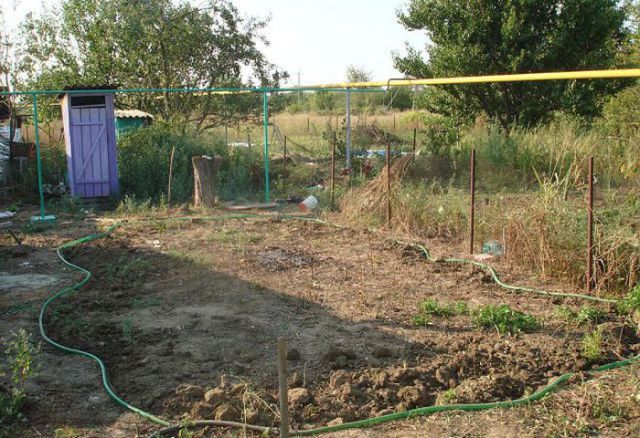
The choice of location largely depends on the wishes of the owner. Many install a pool behind the house, not far from the recreation area.
But when choosing a place, it is important to consider some factors. Namely:
- Priming. Much will depend on its properties. First, it is better that the soil is clay. In this case, you will receive additional natural waterproofing. Secondly, when creating a stationary pool, you will have to dig a foundation pit. If the selected area has rocky soil, then the work can be quite complicated and time-consuming, especially if you do it yourself;
- Prevailing wind direction. Since the pool will be located in an open area, there is a high probability of various debris getting into it. So that when swimming you do not encounter debris from a piece of paper or dry leaves, it is better that the artificial reservoir is protected from the prevailing wind direction;
- Presence of vegetation nearby. It is better that there are no bushes and especially trees near the reservoir. Plants are always drawn to moisture, and their roots are quite strong and can easily break through the concrete thicket of the pool.
If we are talking about the size of an artificial reservoir, then there are no special requirements. Everything will depend on the availability of free space and your preferences. For example, for swimming in one lane, a width of two and a half meters and a length of 5 meters is quite suitable. If there are two tracks, then the width increases to 4 meters.
The optimal depth of the pool can be considered 1.4 meters.But even here everything will depend on the purposes for which you are building a reservoir. If you have children and the main task of the pool is to entertain them, then you should not make it too deep. And vice versa, if you are a fan of jumping from a tower, then the depth will play a very important role.
Pool types
Depending on your needs, you need to decide on the type of pool. They are:
Inflatable frameless. Such pools are quite suitable for 1 - 2 small children. They warm up easily, have a shallow depth, soft walls. For maximum convenience, we recommend purchasing an electric pump and placing the pool close to the water source.

Inflatable frame. Due to the fact that the base of the pool is reinforced, it can be large enough and suitable for the needs of adult family members.

Such structures must be removed for the winter without fail. Otherwise, the material may not withstand the temperature difference.


Frame collapsible. It would be more correct to call them frame stationary, because with the right installation site and compliance with all the rules, they do not need to be dismantled for the winter.


Stationary, capital. These are serious structures that require serious preparatory work, from the development of a pool project to the need for constant maintenance.

If you decide to build such a structure yourself, then you need to know that this will require serious skills in construction and sufficient engineering knowledge.

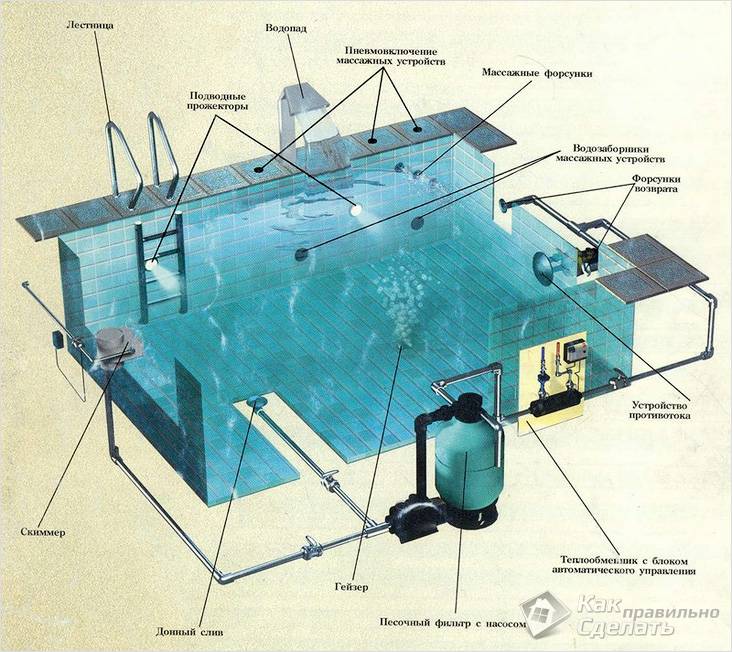
Water treatment systems
Without a filtration system to match your pool, pretty soon it will be unusable. The water will begin to bloom, algae and microorganisms will begin to multiply.

Consider the main water purification systems:
Overflow. This system allows you to fill the pool bowl to the very edge. The cleaning process is a continuous cycle of draining part of the water, cleaning it and returning it back.


As a disadvantage, its high cost can be noted. Most often, such systems are used in the construction of pools in country houses.

Skimmer. Suitable for small pools. The water level should always be 15-20 centimeters below the upper border of the side. This system is easy to maintain, inexpensive, but you need to understand that periodically the pool will require a partial change of water.

Surface. It is a filter floating on the surface of the water. Usually there is a replaceable cartridge inside it, which must be replaced as it gets dirty.

Others. This group includes all less common water purification schemes. There are various experiences with chemical cleaning using chlorine, industrial hydrogen peroxide, brilliant green solution, bromine-based reagents, as well as using active oxygen and silver ions.

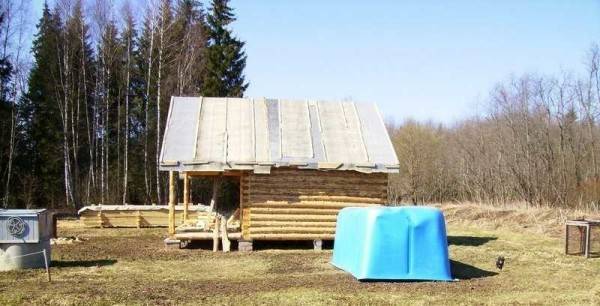
Plastic pool: do-it-yourself installation
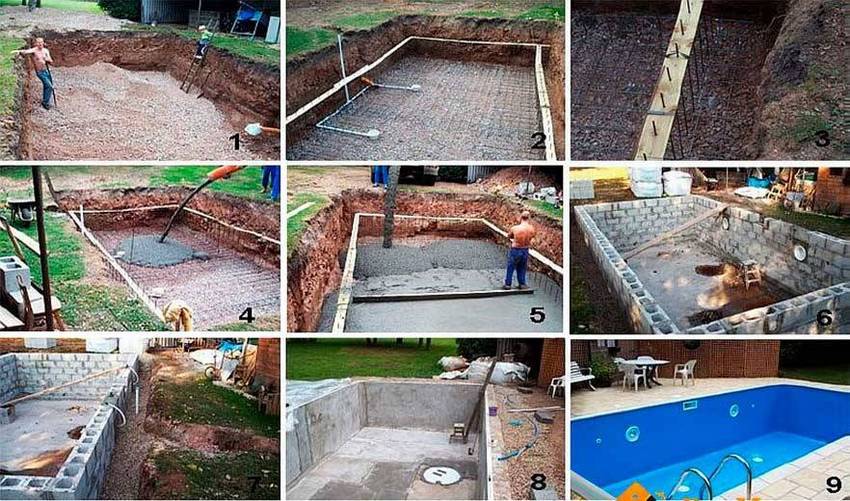
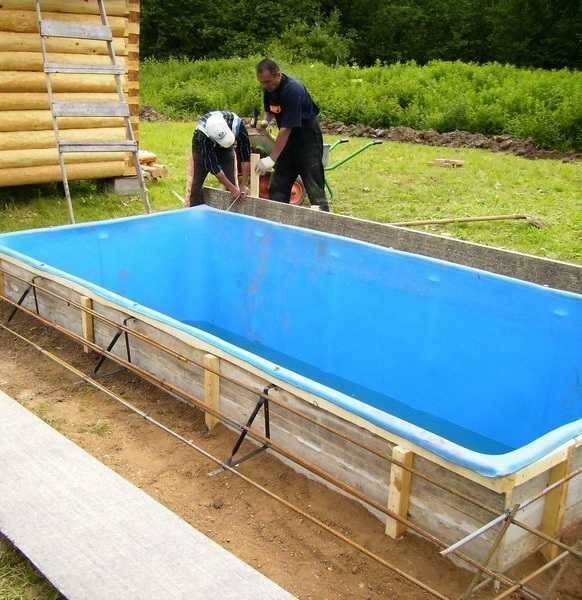
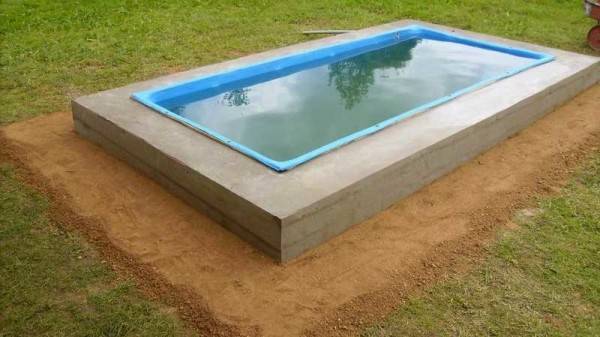
The easiest way to make a stationary outdoor pool in the country is from a plastic or composite (fiberglass) liner: a finished cast bowl. This is one of the easiest ways to make a stationary pool in the country or near the house. A pit is being dug under it, in which it is installed. One of the installation options is in the photo report.
Purchased plastic pool bowl
The size of the selected plastic bowl is 183*415*140 cm. The simplest shape was chosen for easier installation. It all started in the marking of the site for the pit.The bowl was turned upside down, circled the contours, added 5 cm to the boards (installation in a wooden frame was planned). So they nailed the pegs, pulled the twine, and began to dig.
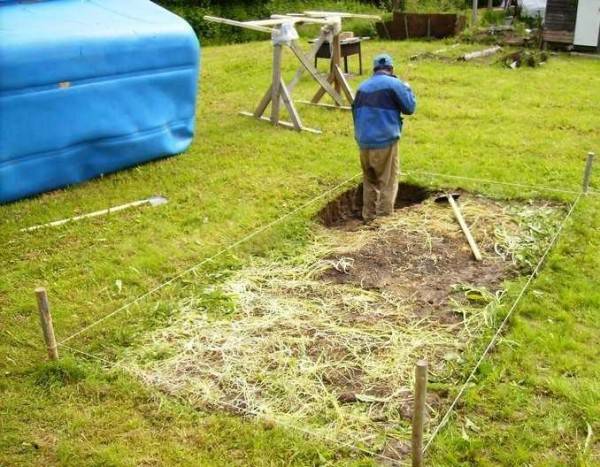
Start of earthworks
It was decided to leave part of the side outside, because the depth of the pit is 1 meter. A layer of sand about 15 cm was poured at the bottom, everything was filled with water to compact the substrate.
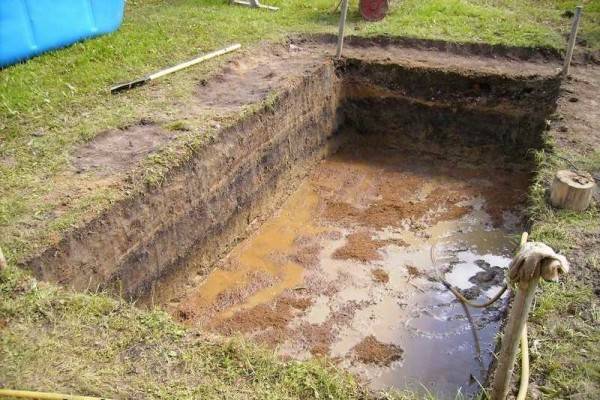
Sand is poured, water is poured
While the water is leaving, the sand dries up, shields are knocked down from a board 2.5 cm thick according to the size of the pit. A bar 50 * 50 mm was used as a frame, it was also put on top of the shields. The upper edge of the plastic bowl was attached to this beam.
Shield assembly
All boards are treated with an antiseptic for direct contact with the ground. The manufacturer promises 10 years without rot ...

Shields installed in the pit
When they assembled and fixed all the walls, they inserted the bowl inside. The bottom lay down tightly, the height was calculated correctly.

Put a plastic bowl inside
Along the perimeter of the pool there should be a side of reinforced concrete. To more tightly connect the bowl with concrete, corners are installed around the perimeter. They are fastened to the beam and the edge of the bowl through, with stainless bolts and nuts.


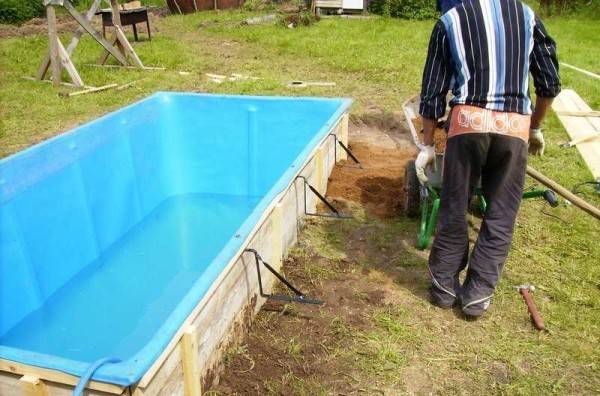
We fix the corners around the perimeter of the pool
So that during operation the plastic does not “walk”, we grab the edges with a clamp.
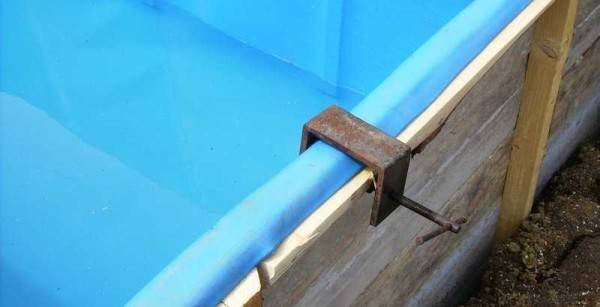
The clamp fixes the position of the bowl when attaching the corners
Reinforcement is attached to the installed corners. Used 15 mm, put 4 bars: two top and bottom. Knitted with special wire.
Strengthening the reinforcing belt for the side
Formwork is installed around the perimeter. First, sand was poured under the reinforcement, therefore, external shields were installed. From the inside, the boards are upholstered with a dense film to make it easier to remove the formwork.Mortgages are also installed: overflow pipes. They will be brought out of the pool and will protect the bowl from overflowing.
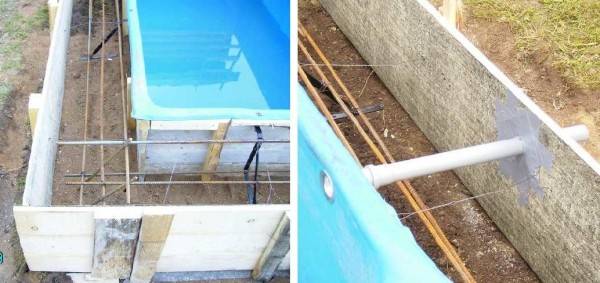
Formwork and drain pipe
Before pouring concrete, they began to fill the bowl with water. This is necessary so that the concrete does not crush it. At the same time, the gaps remaining between the walls of the bowl and the plank frame were sprinkled with sand. So it turns out that the bowl is fixed in the best position. When it was almost full, concrete was poured into the formwork, treated with a vibrator to increase strength and uniformity.

Concrete is poured
The formwork was removed four days later. The side turned out to be 40 cm wide and the same in height. Next, we begin to prepare the base for finishing the adjacent territory.
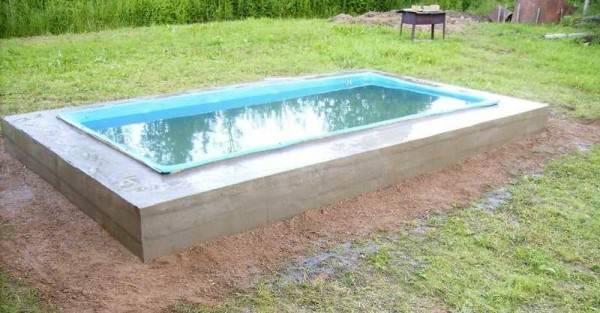
On the one hand, I had to pour sand, on the other, remove some soil
Since the site is slightly sloping, on the one hand it was necessary to remove the soil. Sand was poured and rammed along the perimeter. Roofing material is rolled out on the leveled surface.
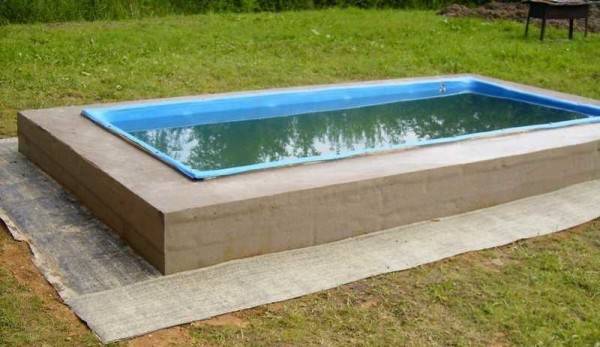
Roofing material is laid on level ground around the pool
Another layer of sand was poured on it, in which paving slabs were laid. The cracks between the tiles are also filled with sand.
More sand on top of the roofing material
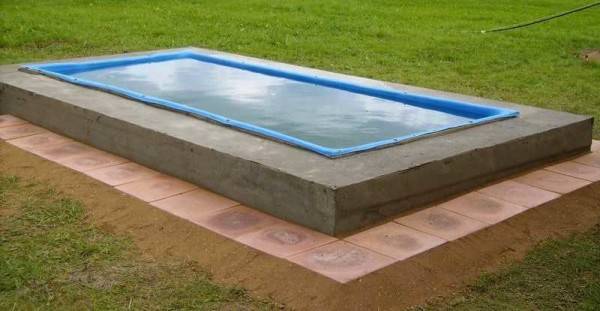
Paving slabs laid
To prevent leaves from falling into the pool, debris and other pollution from getting into the pool, a polycarbonate greenhouse was bought, assembled and installed as a shelter for the pool. It turned out that it is very comfortable: warm and light.
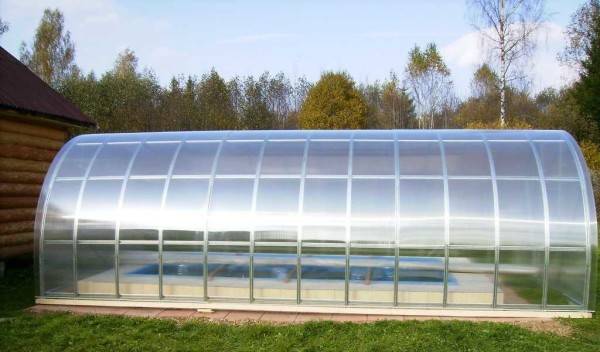
There is a greenhouse installed outside.
Only you need to fasten it firmly, a strong wind moved it. I had to correct. The pool at the dacha is also operated in winter, but only after the bath - an ice hole is cut down)). For the winter, empty bottles with a twisted cap are thrown into the water. When water freezes, they serve as a damper, taking most of the load from the ice onto themselves.


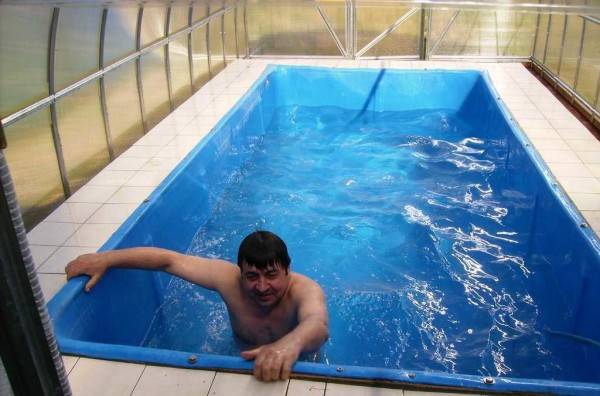
This is a do-it-yourself pool in the country house
And until late autumn we swim just like that, we just installed a water heating system to make it more or less comfortable.
Construction of a reservoir from pallets (pallets)
Calculation of required materials
Pallets will be an excellent solution for a country pool. From them we will build the walls of the structure and the more pallets we take, the larger and rounder our pool will be.
-
In order to calculate the volume of the reservoir, we will use the mathematical formula S=A
2-a2, where "A" is the side of the square that contains the octagon, and "a" is the side of the octagon. Therefore, “a” will act as a pallet sidewall length of 1.2 meters.
-
First, we find the value of "A" by the following formula:
- The result from the root is 1.41421356. Further, according to this formula, we find a fraction and it turns out to be 0.8485281. Then we substitute our numbers into the formula to calculate side "A": 1.2 + 2x0.8485281 = 2.8970562 m.
- We calculate the construction area: S=A2-а2 and we get 2.89705622 – 1.22=8.3929346–1.44=6.9529346m2. Now we round up our figure and get 6.95 m2.
- Having all the values, we calculate the volume of the pool using the formula V=Sgroundsxh, where "h" stands for the height of the structure, which is 0.9 meters. We get 6.95x0.9 = 6.255 m3.
Tools
- Shovels are large of various types.
- Big hammer.
- Electric or cordless screwdriver.
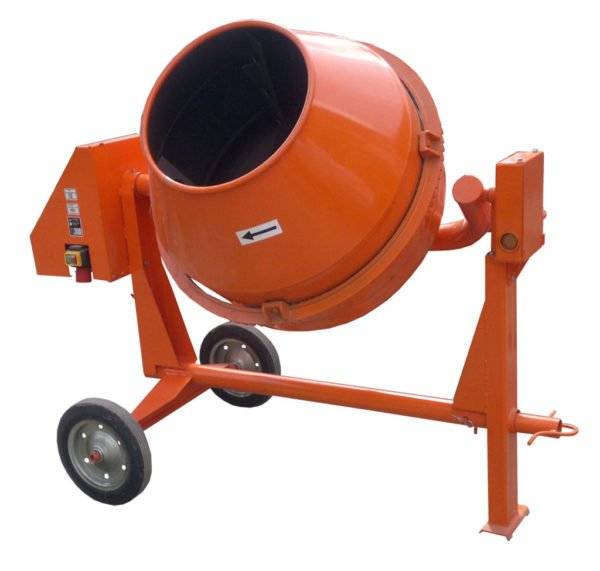
- Concrete mixer.
- Buckets for sand, water and concrete.
- Gravel or crushed stone (the amount is calculated based on the diameter of the pool).
- Electric jigsaw.
- Sander or sandpaper.
- Roulette at least 10 meters.
- Stakes and strong cord.
- Square.
- Rule (level) and plumb line.
- Marker or pencil.
- Large pliers.
- Wood planer.
- Hardware.
Stages of work
- First, we treat all pallets with antiseptic and antifungal agents and special impregnations, since the tree will be in close proximity to the water.
-
For pool sections we take pallets 120x90 cm. From them we will create an octagonal structure.
- We dig a circular pit with shovels so that we get a diameter slightly larger than the size of the future reservoir.
- We level the bottom of the pit well and fill it with gravel or gravel - a layer of 20 centimeters.
-
Inside the pit, we assemble a frame from pallets (8 pieces). Before that, we lay dense polyethylene at the bottom of the pit. We put the pallets with a solid part inside the structure.
-
We connect all the elements with boards, which are nailed or screwed along the perimeter of the sides of the frame. We strengthen the joints with wooden blocks using a screwdriver and self-tapping screws.
- We make holes of the required diameter in the frame to install a good drainage system.
-
After assembling the entire frame, we must securely fasten it with two reliable tie-down straps in a circle at the top and bottom of the pool.
- In the holes prepared in advance, we insert plastic pipes for supplying and draining water.
- In order to further strengthen our frame, we drive wooden pegs into the distance between the pallets and the walls of the pit.
- We fill the bottom of the pool with a 10 mm concrete solution and leave it for 5–7 days for it to completely solidify.
-
After the concrete has dried, we begin the waterproofing work. To do this, we take a dense polyethylene film and lay it over the entire inner surface of the pool. We fix with tape to the sides.
-
We can decorate the outer sides of the pool frame with OSB, chipboard or fiberboard boards, as they will help to hide all the unaesthetic elements of the pallet fasteners. You can also quickly and inexpensively decorate the frame with ordinary rolls of reeds, bamboo, etc. fastened together.
Nuances of care and operation
It is necessary to take care of such a pool carefully. Regularly check the plastic film for cuts or other damage through which water can flow. Over time, even a small leak from a small hole will damage the wooden frame (mold, rot, wood will swell, etc.).
Periodically, it will be necessary to drain the water and wash the pool well from sand, dirt and other debris. If you do not have good filters, you will have to change the water frequently, and this is very expensive, so it is best to purchase a good water purification device once. You can even use a homemade sand filter, which is the most common among summer residents who make pools with their own hands.
Also, once a year or several years, if necessary, it will be necessary to re-treat the wooden products of the pool with special impregnations.
Preparation and calculation of the structure
old tire and wooden pallets are the most affordable material for creating a pool with your own hands. Based on this, we will calculate the volume of the container based on the overall dimensions and the number of pallets.
Other models and their sizes can be seen in the table in the photo below.
The outer diameter and width of the tire for creating a pool
To calculate the volume of the future pool, we use a simple formula: V \u003d π * r2 * h, where V is the volume of the container in the form of a cylinder, π is a constant value (3.14), r is the radius of the circle, h is the tire width.
Let's carry out the calculation for the FT-117M2 tire, the width of which is 1175 mm, and the diameter is 3575 mm. The total thickness of the sand-concrete cushion will be 30 cm.
The sequence of calculations is as follows:
- According to the initial data, the tire radius will be equal to: 3575 / 2 = 1.7875 mm.
- We substitute the data into the formula and calculate the volume of the structure: 3.14 * 1.78752 * 1.175 = 13.1899 or 13.19 m3.
- Similar steps for calculating the volume of sand and cement: 3.14 * 1.78752 * 0.15 \u003d 1.6838 or 1.68 m3.
Other finishing materials are selected individually according to taste and design project, if any.
Wooden pallets are produced in accordance with GOST and have dimensions of 800 × 1200 mm. Knowing the dimensions of the pallet, you can calculate the volume of the pool of almost any shape. Since we advised using from 9 pallets, we will carry out the calculation for the pool in the form of a nonagon.
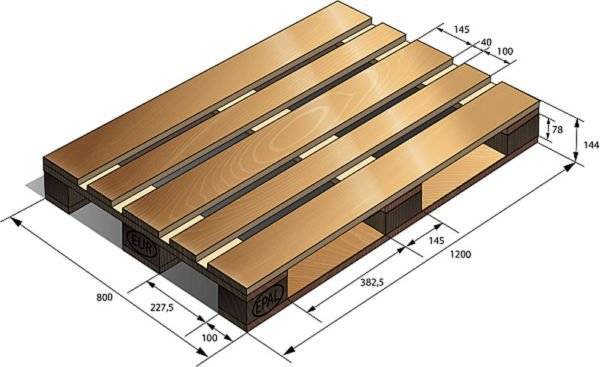
Dimensions of a standard wooden pallet
To do this, we use the standard formula for calculating the volume: V - Sabout *h, where Sabout is the area of the base, and h is the height of the pallet. Nonagon area formula: Sabout \u003d 6.18182 * a2, where a is the side of the nonagon, which in our case is equal to the height of the pallet.
The sequence of calculations in the following order:
- Calculate the area of the base: 6.18182 * 1.22 = 14.8363.
- Pool volume: 14.8363 * 0.8 = 11.869 m3.
If the pallets are arranged in height, then instead of 1.2 m, substitute 0.8 m in the first formula. We do the same with the second formula.In this case, the pool will turn out to be deeper, but slightly decrease in diameter.
Tools and accessories
To build a pool from an old tire, you will need the following tool:
- A sharp knife with a strong blade.
- Shovel and bayonet shovel.
- Capacity for kneading cement-sand mixture.
- Construction mixer or drill with a suitable attachment.
- Roulette and bubble level.
For mixing a large volume of mortar, it is better to use a concrete mixer. This will significantly speed up the work process.
The use of a concrete bag will allow you to get a better concrete mix for pouring the base.
To build a pool from pallets, you will need the following:
- Hammer and screwdriver.
- Jigsaw, planer and grinder.
- Pliers, screws and nails.
- Shovel and bayonet shovel.
- Tanks for sand, cement and water.
- Roulette, square and pencil.
An electric jigsaw can be replaced with a conventional hacksaw for wood, a grinder with sandpaper. It will have virtually no effect on the final result.


Do-it-yourself frame pool: ground preparation
This stage is obligatory both for purchased carcases and for self-made reservoirs.
Please note: the sequence of actions is given for a UNDERGROUND pool. If you plan to mount it in a recess, then all of the above work is carried out after excavating the pit.
- Level the site by level, removing recesses and protrusions with a height of more than 2 ... 3 cm. It is also necessary to remove solid objects (stones, remnants of building materials), plants and their roots.
-
Set up a sand bed. The thickness of the pillow is 50…100 mm, this parameter depends on the size of the pool.The larger the container, the greater the pressure on the bottom and the thicker the pillow should be. It is better to use sand of medium fraction, without foreign inclusions. To obtain a perfectly flat and horizontal surface, profiles (wooden beam or metal) are set according to the level and the sand is leveled over them with a rule.
- You can additionally moisten the sand and lightly tamp.
After installing the frame, the sand will have to be leveled again!
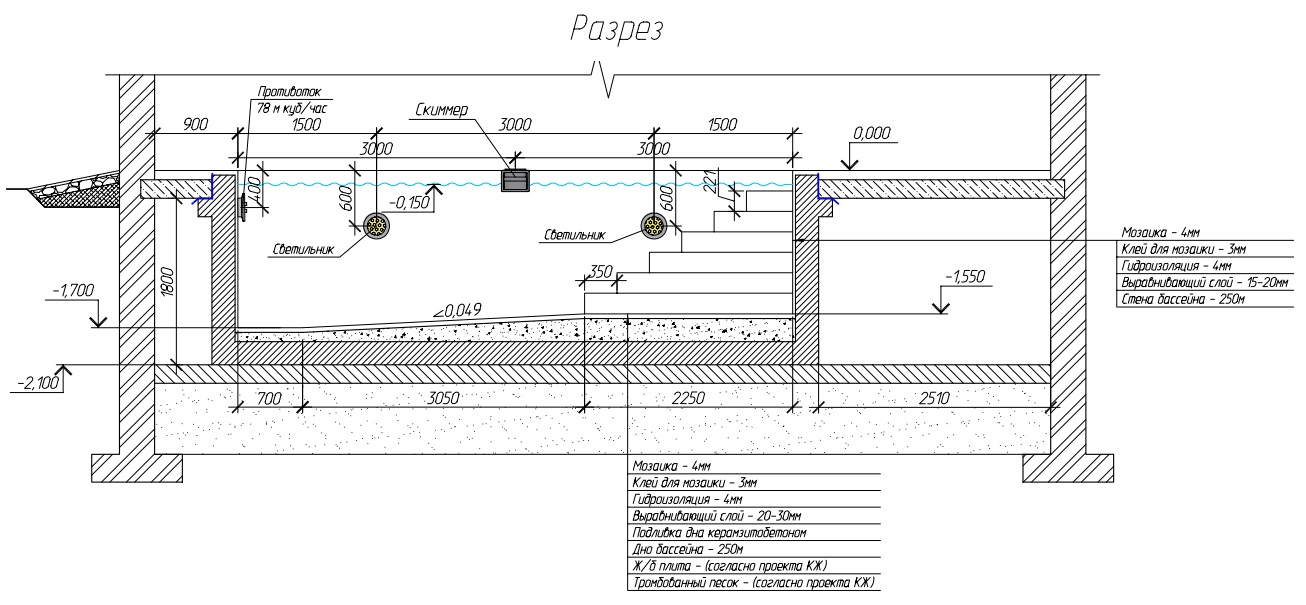
Finishing work
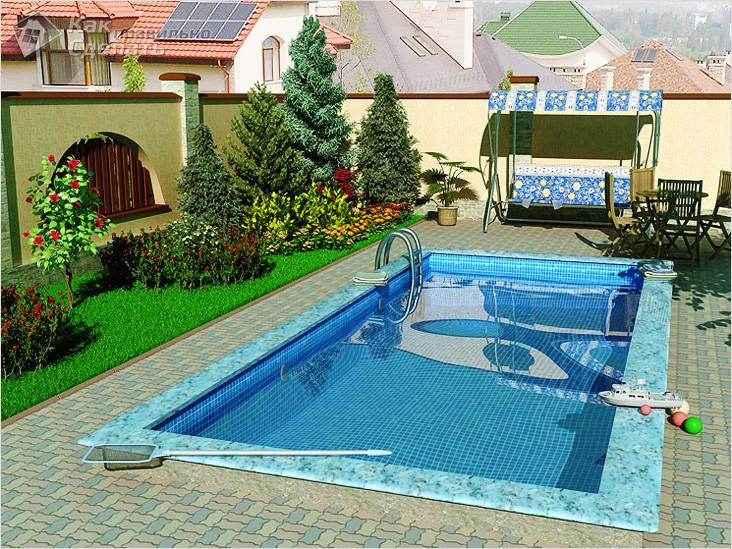 Design of the pool and recreation area
After the concrete has hardened well, remove the formwork and proceed to the fine finishing of the structure. You can lay out the bowl inside with tiles, glass mosaics, or simply plaster. You can give naturalness to your small pond by covering the bottom of the bowl with a thin layer of clean river sand. Lay out a ceramic tile walkway with a special anti-slip coating around the pool.
The recreation area can also be arranged in different ways. A platform covered with sand will remind you of a seashore. Ceramic tiles also look good and are very practical. Immediately determine where the barbecue will be located.
The benefits of such a solution
 wooden ground
Perhaps, thinking about the pool, one immediately imagines a foundation pit, which will then be filled with concrete and tiled. Indeed, this is done in many cases. This requires a lot of time, effort and money. But if you replace the concrete pool with a wooden structure, earthwork may not be required at all. You can independently develop a unique project that will differ in an intricate shape. In addition, at any time the structure can be moved to another location. With the right selection of components, there is no need to dismantle it for the winter.The water inside can simply freeze and expand, but this will not do any harm to the coating. Changing the fluid also does not take much time. In some cases, you don’t even need a pump, it will be enough to connect the hose to the tap at the bottom and, going about your business, wait until the container is empty. Moreover, the drained water can be used to water garden plants. You will be surprised how quickly and easily such a project can be implemented.
Wood is an environmentally friendly material that can fit into any area.
Multi-level pool and features of its self-construction
Do you want to know how to make a pool in the country with your own hands inexpensively? The video on this page will help you understand the basic principles and methods for doing all the necessary work. Read our descriptions, see photos and videos, and you will be able to build your dream pool in your summer cottage. For example, a luxurious multi-level pool.
In this section you will find detailed recommendations for each stage of the construction of a multi-level simple pool without complex communications. In it, the bowl is simply filled with water, and after a while it is sucked off, and the bowl is filled with fresh clean water.
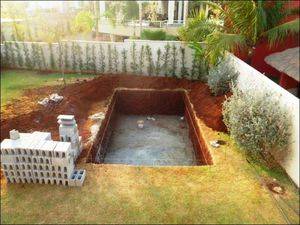
First of all, you need to choose a place. Then it is necessary to carefully consider each stage of the work, assess the feasibility of their implementation at a specific site chosen. Next, an optimal plan is drawn up that will allow you to do everything you need, with maximum savings and efficiency. After that, you can proceed to the pit.
Since a multi-level structure is planned, it is necessary to calculate the size of each level.In the process of digging the pit, level by level, the filling is also carried out. So, gradually, you will reach the bottom. After hardening, you can carry out a test set of water to find out where there are leaks. If there are no defects, then the water must be pumped out. Next, you can finish the concrete according to your personal preference.
This is one of the easiest and most affordable ways to build a pool in the country with your own hands. In this case, you will not have to bother with sewers, sewage and other communications. Such a pool does not need cleaning devices. A simple, comfortable and economical pool, which not only allows you to enjoy the coolness of the water, but also serves as a wonderful decoration of the site.
wooden pallets
A wooden pallet is a rough plank on a support. It has a convenient shape and design, which is great for constructing the supporting walls of the pool. Such pallets are used for storing mixtures in bags.
Forming the frame of the pool, pallets are knocked together in a vertical position. The more pallets used, the more round the water tank will be.
In order to build a medium-sized pool, you need 9-11 pallets. In such a container, 3-4 people can freely accommodate.
Design advantages:
- due to the height of the pallet, you can build a large capacity;
- convenient installation and fastening of stairs, slides for descent into the water, steps;
- no deep foundation pit is required;
- mobility, the ability to dismantle and transfer to another place;
- Possibility to renovate and expand if necessary.
The disadvantage of such a structure is instability.Therefore, it is required to install supports for fastening the structure and use tie-down straps.
To protect the pool from the effects of natural precipitation and moisture, it is necessary to finish the outside and treat all wooden elements with an antiseptic.


Alternative options for the construction of the bowl
When figuring out how to build a concrete pool, do not forget about alternative options for building a bowl.
For its construction, you can use:
- concrete blocks;
- polystyrene blocks;
- steel sheet;
- finished construction made of fiberglass or plastic.
When using concrete blocks, the bottom of the pool is first poured, but the walls of the bowl are laid out from these same blocks. Every third row of masonry should be reinforced to give the structure additional strength. You can also make a stationary ladder out of blocks, instead of a ladder, which is not so convenient.
The walls of the pool can be laid out from concrete blocks. Every third row of masonry should be reinforced. The surface of the bowl must be treated with waterproofing, and then carry out finishing work
Further, the bowl is processed in the same way as a monolithic structure: waterproofing and finishing work is carried out. As a decorative coating, you can use a special PVC film.
It looks very attractive, it costs much less than ceramic tiles, and it is much easier to lay it. But the life of this material is only 5-7 years, then the finish will have to be updated.

PVC film is a convenient material for finishing pools. It is easy to install and looks attractive, but only lasts a few years.
Large-format polystyrene blocks are also laid on a concrete base.They are connected using the grooves and ridges provided for by the design.
The material is very easy to use, because it weighs a little. If necessary, the blocks are cut with a regular hacksaw.
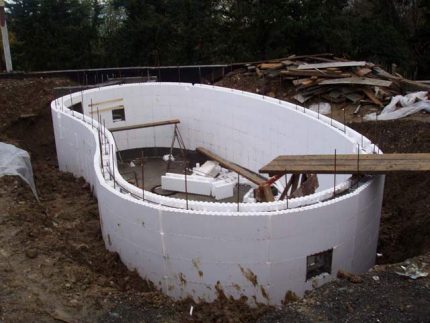
A pool with walls made of polystyrene blocks is not difficult to make. The structure should be reinforced, and then concrete mortar should be poured into special holes
After the laying is completed, the pool equipment, as well as fittings, should be installed. It is placed inside the cavities in the blocks.
The space between the communication pipes and polystyrene foam is blown with mounting foam. After that, liquid concrete is pumped into the cavity with reinforcement. When the design is dry, you can start finishing the finished bowl.
A steel sheet pool can be made both on a concrete base and on carefully compacted soil, although the latter option is not as reliable as a screed. Since the steel sheet is supplied in a roll, it is most convenient to make a bowl from it in the form of a circle, oval or “eight”.
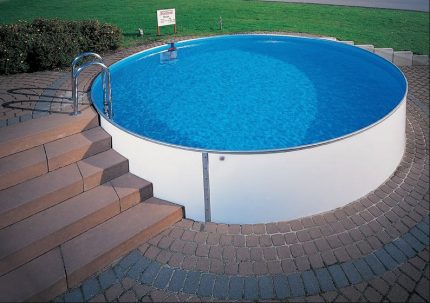
The pool made of steel sheet can be given a round or oval shape. Such structures can be deepened into the ground or located on the surface.
The edges of the sheet are connected with a special profile, which avoids welding. After installing the bowl, it is covered with PVC film and filled with water so that the finishing material is tightly pressed against the walls of the bowl. To fix the film on the top of the side, a fixing profile is used. After that, the technical equipment of the pool is installed.
A finished bowl made of fiberglass, plastic or modern composite materials is not cheap, even if you choose a typical design, and not a custom one.
To deliver and install the bowl, you will have to use a crane and other special equipment. First you need to dig a pit of a suitable configuration. Then its bottom is leveled, covered with a layer of crushed stone or gravel and rammed.
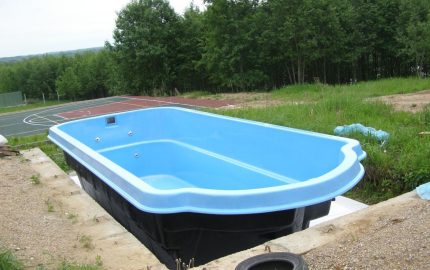
The finished pool bowl is not easy to deliver and install in the pit, but its further installation is relatively simple, since waterproofing and finishing are not needed
After that, you can lower the bowl to the bottom of the pit. The space between the walls of the pit and the bowl is covered with soil and rammed. Such structures usually do not need additional waterproofing and finishing. It remains to install the equipment and start operating the pool.
The weight of such pools is usually relatively low, so owners of areas with a high level of soil freezing should be careful. In winter, frozen groundwater can simply push the bowl to the surface.


