
- Economy option: pool from a banner
- About building a swimming pool
- Pillow
- Plate
- Concrete
- boards
- Ironing
- Do-it-yourself podium from boards
- Sequencing
- Concrete stationary pool - the best solution for home or garden
- The benefits of such a solution
- frame
- Planning and design selection
- Compliance with technology is a guarantee of quality and durability
- Photo of country pools
- Stationary pools: traditional or non-standard
- Concrete or composite
- Building walls
- No. 9. Pool of concrete rings and blocks
- Useful see on the topic
- Number 3. Preparatory work and design
- Reinforcement
Economy option: pool from a banner
If you need an express version of the pool at minimal cost, you can get by with a thick film. For example, an old banner. The fabric used for them is dense, and you can buy an old one at an agency for mere pennies. If you need a pool in the garden - this is exactly the material: the costs are minimal.
So, armed with a banner, we dig a pit, which is much smaller than the canvas.

We put a film in a dug pit, straighten it. For the sample, a small pit was dug: in case you don’t like it. Since the banners, still old, laid two. The second one also tried to straighten.

To prevent the edges of the film from being blown out by the wind, they were pressed down with bricks and a hose was thrown in to draw water.

While the water was collecting, a little earth was poured around the “bowl” under the film, forming the sides. They were covered with bricks.

We left the "pool" to bask in the sun. Three hours later, tests were carried out. Liked the result. It was decided to expand the "swimming" part.

This, of course, is not a super option, but you can refresh yourself. Time for "construction" took 2 hours. The main thing is to dig a pit. And the rest is a matter of several tens of minutes. In the photo below, the same idea, implemented on a larger scale. The film was bought for pools and soldered two pieces - to get a more voluminous "sea".
By the way, here are a few country pools made from improvised materials: a bucket from an excavator and a huge tire.

About building a swimming pool
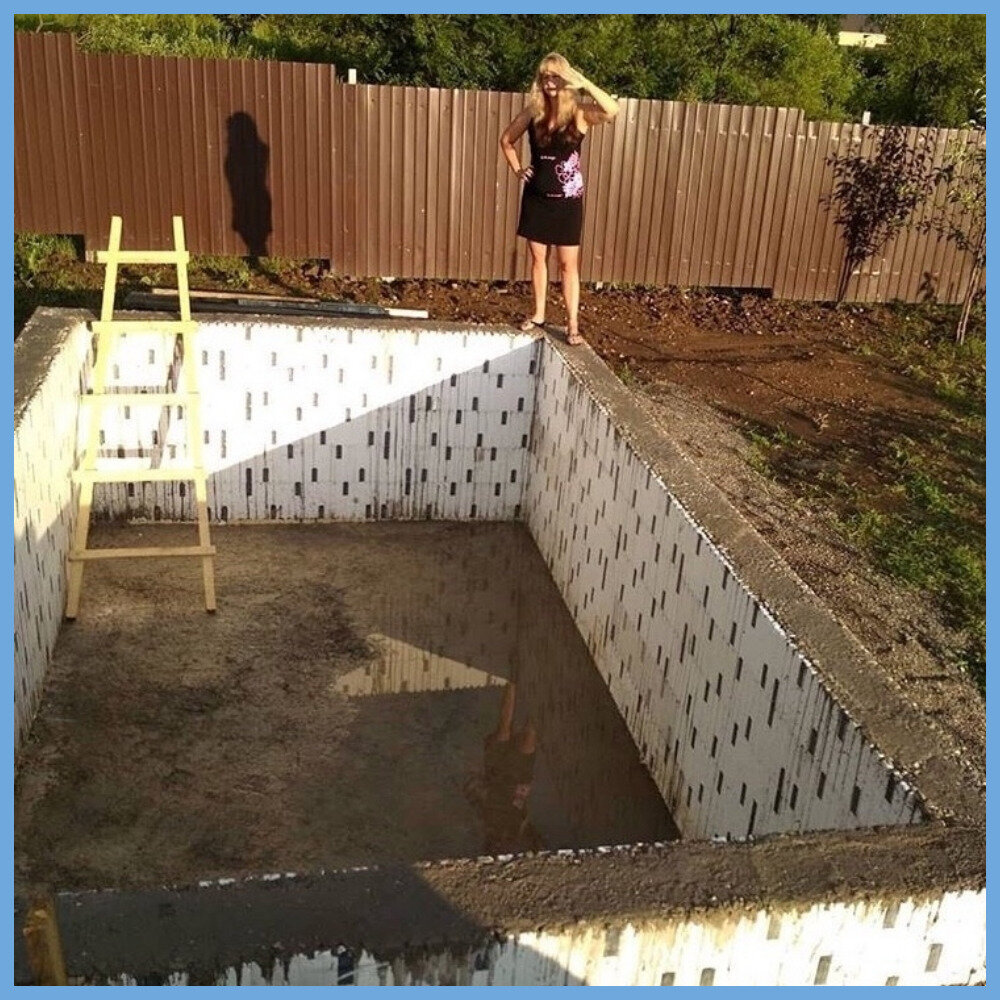
Let's say we decided to build a capital concrete pool. Technically, the simplest (but far from elementary) solution here is to form a bowl in a fixed formwork made of polystyrene foam. The technology is available to a novice master (see video below), but it turns out to be expensive: cassette formwork with accessories costs a lot. However, the issues of frost resistance of the bowl (see below) disappear, because. concrete does not come into contact with water.
Otherwise, you will have to take into account the own water absorption of concrete. It will be saturated with moisture in the pool to the limit, which is why by next spring the bowl will go into frost cracks. Therefore, the construction of the pool on their own has a number of features.
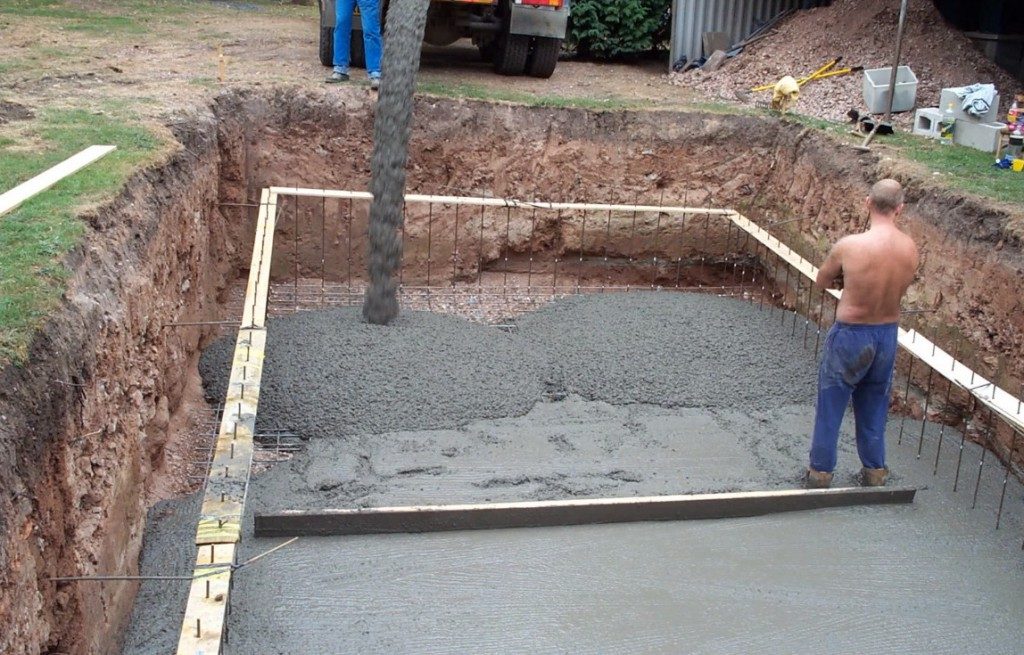
Pillow
A sand and gravel cushion under the slab needs to be reinforced, 20-25 cm each. Each layer is carefully compacted and leveled along the horizon, otherwise the bowl will crack during the initial draft.
Plate
The thickness of the bottom plate is 300-400 mm.Reinforcement - a cage with a mesh of 200x200x200 mm; fittings - 8-A-III GOST5781-82, 10-A-III GOST5781-82, 12-A-III GOST5781-82 and 14-A-III GOST5781-82, for containers, respectively, up to 10 cubes, 10-20 cubes, 20-30 cubes and 30-50 cubes. The connection of the rods is only with a viscous 2 mm knitting wire, welding is not allowed! It is also unacceptable to use composite reinforcement and knitting with plastic "ties"!
The device of a footing for such a heavy monolith is impossible, it will not withstand. Therefore, the reinforcing cage is isolated from the ground, placing fragments of silicate bricks of equal thickness under the cage nodes. In this case, it is silicate that is needed, they are cemented with a solution into one.
Concrete
It is better to fill the slab with ready-made hydrophobic concrete V25P4 W-6 or similar. Homemade frost-resistant concrete can be mixed with the following composition, per 1 cubic meter. m of the finished solution:
- C500 cement - 327 kg.
- Sand of small fractions - 625 kg.
- Mountain crushed stone (without bream) - 1270 kg.
- Technically clean water - 177 liters.
boards
The sides of the bowl are formed from the same concrete on the same frame. Filling is carried out with belts of 0.5-0.6 m using the sliding formwork method. Each belt is poured in layers.
Ironing
Immediately after the formwork is removed, the surface of the monolith is ironed, but not with dry cement; with the sides so in any case will not work. Ironing is done with cement milk, 3-4 handfuls per bucket of water. The suspension is continuously shaken during operation, and applied to the surface to be treated with a plaster brush - maklovitsa. Having applied 0.5-1 sq. m, immediately, until the glass is rubbed with half a trowel.
Do-it-yourself podium from boards
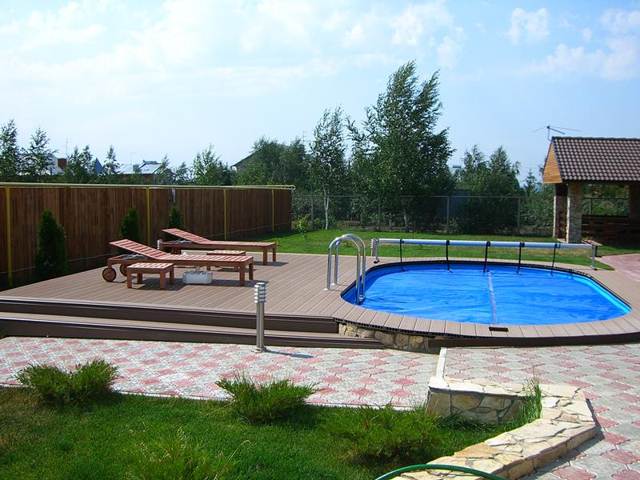
In the country, most often they install small inflatable and frame pools.It is convenient to mount them on supports made of larch or polymer decking. The height of the flooring depends on your tasks. The high platform is convenient because you can remove the pump and other equipment under it. But in this case, you will also need a ladder. A low platform is built faster, as steps are not needed. We will tell you how to make a podium for a pool in the country in its simplest version.
Sequencing
- Prepare the area, clear and level it. Sand is not needed here, as the flooring will be built on a hill.
- Fasten on the prepared area supports of concrete pillars or cinder blocks.
- Lay a beam with a section of 5x5 or 6x6 on them. The lags should be parallel to each other. The smaller the distance between them, the more stable the platform will be. The average step is 30 cm.
- Lay boards 2.5 cm thick perpendicular to the beams. For both natural wood and decking, leave a gap between the boards of 1 cm - in case of temperature shifts.
- Secure them with staples and nails.
- Cover the wood with impregnations to increase moisture resistance and paint.
1 of 7
Instagram @yarche_mir
2 of 7
Instagram @yarche_mir
3 of 7
Instagram @artempatskevich
4 of 7
Instagram @artempatskevich
5 out of 7
Instagram @artempatskevich
6 out of 7
Instagram @vintovayasvaya
7 out of 7
Instagram @vintovayasvaya
On top, you can lay a geotextile or PVC film to protect the flooring from water. But this option is more suitable for small platforms on which there is little or no free space.


Concrete stationary pool - the best solution for home or garden
The modern market today offers the consumer a huge variety of pools for every taste and color.Simple inflatable and large composite structures are manufactured at the factory and installed directly at the customer's home in the shortest possible time. Also in demand are convenient prefabricated products that can be mounted only for the season. But despite this diversity, many owners of suburban areas prefer concrete pools.
The ongoing demand for them is due to a number of advantages that you get from such a design:
a stationary pool can last at least half a century, subject to all construction rules;
unlimited possibilities for a flight of fancy. Due to the fact that it is possible to create a structure of literally any configuration from concrete, overflow pools, structures with hydromassage and original geysers, with countercurrents, appear today. By opting for a concrete structure, you can make it unique, meeting only your personal requirements;
various design options. You can use an inexpensive film or a spectacular mosaic tile of any color, with or without a beautiful ornament, to decorate the walls.
The benefits of such a solution
 wooden ground
Perhaps, thinking about the pool, one immediately imagines a foundation pit, which will then be filled with concrete and tiled. Indeed, this is done in many cases. This requires a lot of time, effort and money. But if you replace the concrete pool with a wooden structure, earthwork may not be required at all. You can independently develop a unique project that will differ in an intricate shape.In addition, at any time the structure can be moved to another location. With the right selection of components, there is no need to dismantle it for the winter. The water inside can simply freeze and expand, but this will not do any harm to the coating. Changing the fluid also does not take much time. In some cases, you don’t even need a pump, it will be enough to connect the hose to the tap at the bottom and, going about your business, wait until the container is empty. Moreover, the drained water can be used to water garden plants. You will be surprised how quickly and easily such a project can be implemented.
Wood is an environmentally friendly material that can fit into any area.
frame
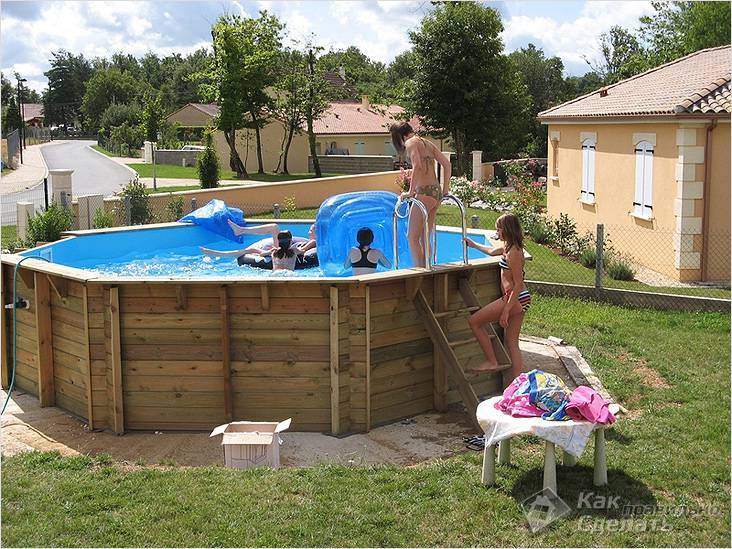
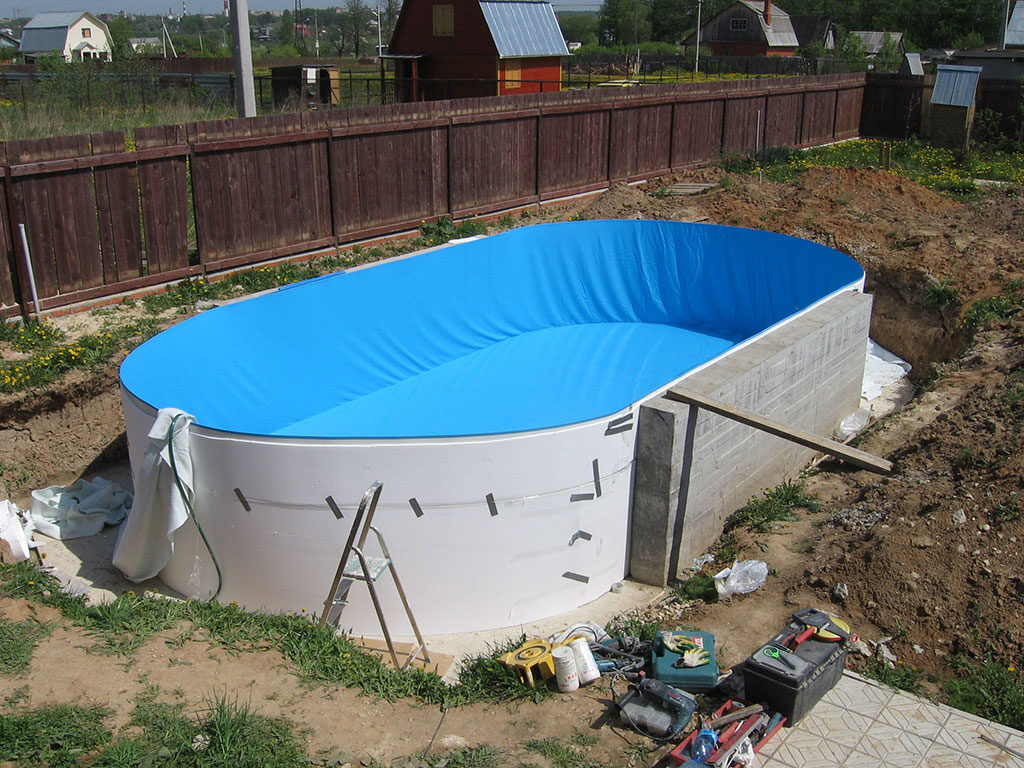
A fairly simple structure, quite suitable for self-construction, is considered a frame pool. Its feature is the design, which consists of a frame "skeleton" of metal pipes. The bowl is lined with three layers of PVC film. Inside it has a special nylon mesh, which gives the material additional tensile strength. The metal frame holds the water pressure.
It is placed with some recess in the ground or simply on the surface. The site for the pool must be prepared: remove all vegetation, and level the bottom of the shallow pit and fill it with sand or gravel. In some cases, even a concrete pad is poured.
Then the entire surface is lined with a heat and water insulator. Penofol or folitep is best suited here. These are modern heat-insulating materials made of polyethylene foam covered with aluminum foil. The mats are laid end-to-end and the seams are glued with construction tape.
After that, the pool itself is assembled according to the instructions attached to the kit. The only tool required for the job is a screwdriver.
Planning and design selection
You should start, of course, with the project. First you need to assess the condition of the site, decide on the place where the pool will be located, choose the size of the tank, the configuration of the bowl, etc.
An important point is the level of occurrence of the first groundwater horizon from the surface on the site. If this indicator is less than one meter, i.e. groundwater runs high; it is not recommended to build a stationary pool in a pit.
Alternatively, you can consider installing a portable frame or inflatable model.
When choosing a place to build your own pool, you should consider the following recommendations of experts:
- The pool should be located at a sufficient distance from a residential building and other buildings, since the close proximity of these structures can have a devastating effect on the integrity of the foundation of the building.
- It is undesirable to place the pool in the immediate vicinity of the trees or plant them afterwards, so that the root system, attracted by a large amount of moisture, does not grow and destroy the frame of the structure.
- The presence of a large number of trees near the pool also increases the intensity of pollution by foreign debris and stimulates the growth of algae.
- Clay soils are best suited for building a pool, which serve as an additional barrier to ground moisture, if there is a choice, just such a site should be allocated for the pool.
- Digging a large pit by hand is an extremely time-consuming task, it is better to choose a place to which construction equipment can be brought: an excavator, a concrete mixer, possibly a crane, etc.
When a place is chosen, you need to take a sheet of paper and draw a future building on it. You should choose the configuration of the bowl and its depth, as well as designate the location of all communications: the place of water supply, the ladder for descent, the installation location of the filter, overflow, lighting, external lighting, etc.
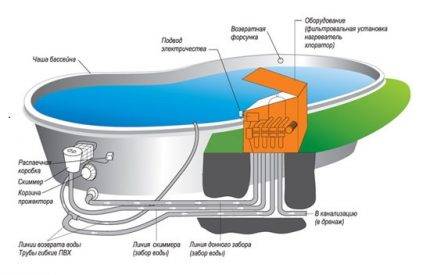 At the planning stage, it is necessary to consider the type of pumping and treatment of water. The diagram shows a skimmer-type pool. Polluted water is pumped out from the surface with a skimmer, and after cleaning with heating, it is supplied through nozzles located opposite (+)
In addition to the main place for draining, it is recommended to provide an emergency water discharge system. Electrical wires must be laid in the corrugation.
At this stage, it is necessary to take into account the predominant wind direction on the site. Debris that has fallen on the surface of the water will be blown away by the wind to a specific side of the pool.
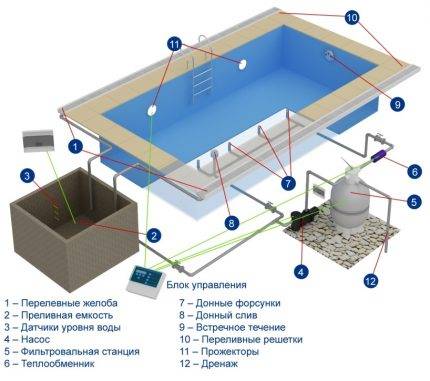
The overflow type of artificial reservoirs involves the outflow of polluted water through the overflow gutter into the container of the same name. After cleaning and heating, it is delivered back to the pool through nozzles located in the bottom area.
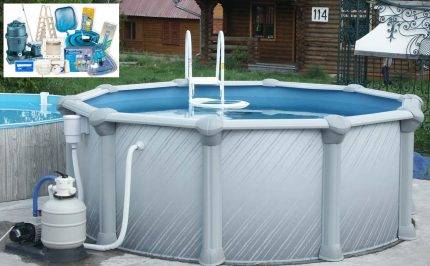
In building stores, you can find pool equipment kits that include everything you need for installation.
This set may include:
- waterproofing materials;
- materials for the construction of the walls of the pool bowl;
- fittings;
- flanges and nozzles;
- filter, pump, skimmer;
- stairs;
- PVC film for decoration, etc.
The basic set can be supplemented with other elements, depending on the features of the project of the future pool.
The easiest way to arrange a pool for the summer season is to purchase a prefabricated version with the accessories and equipment included in the package.
When choosing the dimensions of the structure, it should be remembered that for one adult, a depth of 1.5 m is considered suitable for swimming, and the recommended length of the pool is about 5 m. or more.


The deeper the pool, the larger the volume of its bowl, the thicker the pool walls should be made, respectively, the more materials will be needed to complete the work.
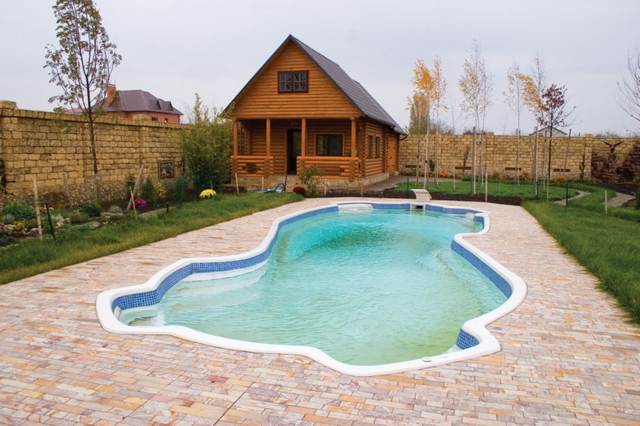
Separately, it is worth discussing the configuration of the future pool. The following principle should be remembered here: the more complex the outlines of the bowl, the more effort will be required to implement the project and the subsequent maintenance of the pool.
The easiest way to build a pool with rectangular, round or oval bowl outlines. If all these points are taken into account in advance, and the project is drawn up correctly, there will be much less problems during construction.
For example, if there is no clear project, after pouring the bowl, you have to additionally drill concrete to make holes for communications.
When choosing a pool of the wrong configuration, it should be borne in mind that the complexity of its installation, as well as maintenance, can increase significantly.
Compliance with technology is a guarantee of quality and durability
How to make a concrete pool with your own hands? The technology for building a concrete pool includes the mandatory implementation of the following steps:
- Project development.
- Foundation preparation.
- Installation of embedded elements.
- Formwork device.
- Reinforcement of the prepared pit.
- Step by step concreting.
- Waterproofing device.
- Finishing work and decoration of the adjacent territory.
In practice, two options for the technological solution for concreting the pool bowl are used:
- creating a monolith using formwork;
- pouring concrete into a structure made of polystyrene foam blocks.
Photo of country pools
All pool designs can be divided into two large groups: stationary and temporary. Stationary structures include all structures partially or completely dug into the ground, which cannot be moved without destruction. The bowls of such pools are made of monolithic concrete, brick, sometimes concrete blocks are used in construction.
Temporary pools are mainly inflatable and frame pools. They differ in that they are installed in the spring, and in the fall, they fold and hide.
What is the best pool for a summer residence? If you are still not sure whether you need such an “attraction” on the site or not, buy the cheapest and fastest mounted: inflatable. It holds water due to the inflated ring. The disadvantage of such a pool is not the greatest depth: 1.2 meters along with the sides is its limit.
But, if you are for the kids, then you can’t imagine better, and adults can “hang” on the wall, relax after “rest” in the country. Depending on the quality and intensity of use, it can last from a couple of years to four or five.
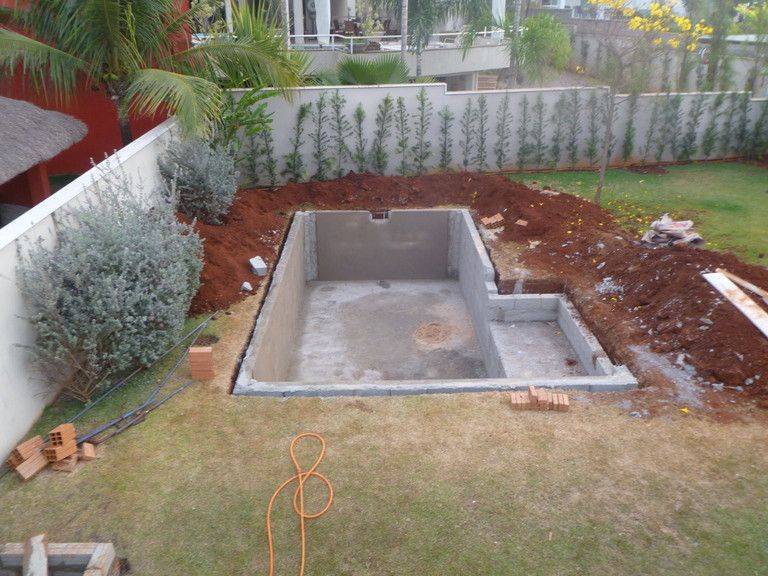
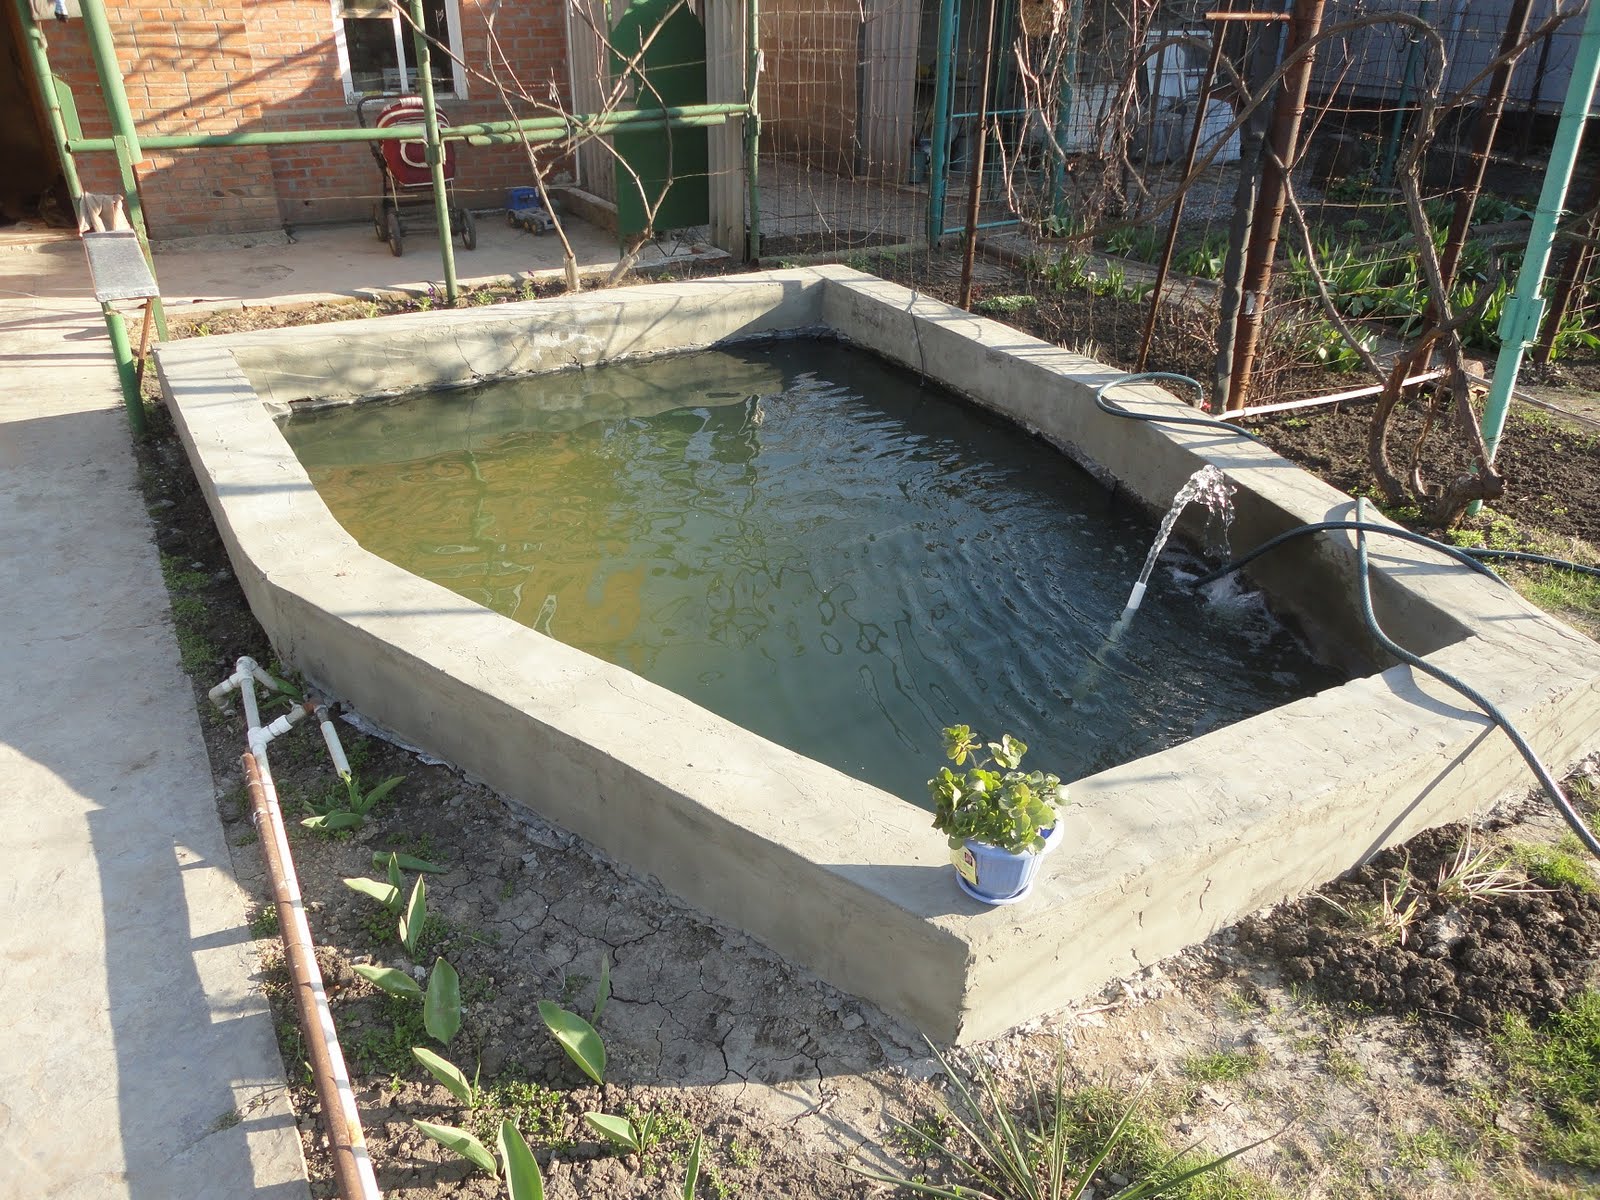
Stationary pools are already for those who decide that a pool in the country is simply necessary for him. The device and maintenance is not cheap.First, a foundation pit is dug, then a monolithic slab is poured, and the walls are erected at the second stage. Measures are needed to waterproof the walls from the outside - so that underground and melt water does not penetrate into the bowl.
But the finished bowl is not the whole stationary pool. It is necessary to clean the water: leaves, dust and debris pour into it, bacteria and algae multiply. To put the water in order, you need a pump, a filter system, chemicals, and also means for “scooping out” leaves and sediment from the bottom. Part of the equipment is also needed to maintain a temporary pool, but since the volumes are smaller, you can often get by with manual cleaning or water replacement, or you can use improvised means. And if there is at least 5-6 tons of water in a stationary pool (this is a small bowl 2 * 3 with a depth of 1.4 meters), then even manually cleaning out such a volume is problematic.
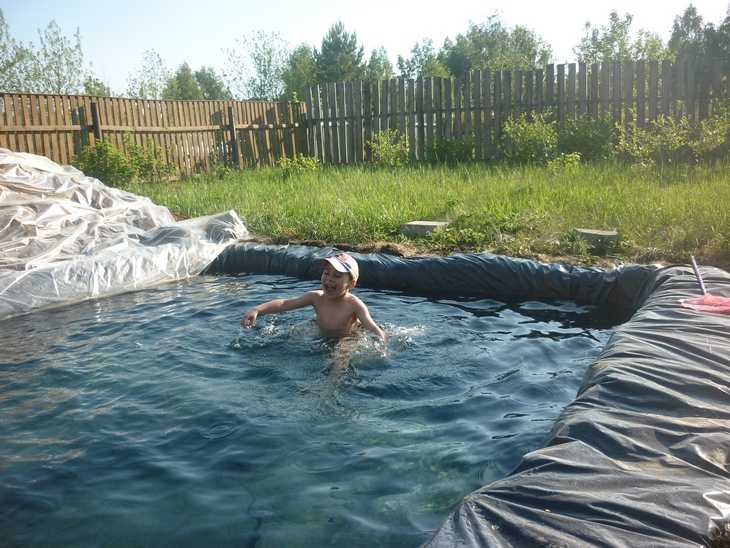
If you need an express version of the pool at minimal cost, you can get by with a thick film. For example, an old banner. The fabric used for them is dense, and you can buy an old one at an agency for mere pennies. If you need a pool in the garden - this is exactly the material: the costs are minimal.
So, armed with a banner, we dig a pit, which is much smaller than the canvas.
To prevent the edges of the film from being blown out by the wind, they were pressed down with bricks and a hose was thrown in to draw water.
While the water was collecting, a little earth was poured around the “bowl” under the film, forming the sides. They were covered with bricks.
We left the "pool" to bask in the sun. Three hours later, tests were carried out. Liked the result. It was decided to expand the "swimming" part.
This, of course, is not a super option, but you can refresh yourself. Time for "construction" took 2 hours. The main thing is to dig a pit.And the rest is a matter of several tens of minutes. In the photo below, the same idea, implemented on a larger scale. The film was bought for pools and soldered two pieces - to get a more voluminous "sea".
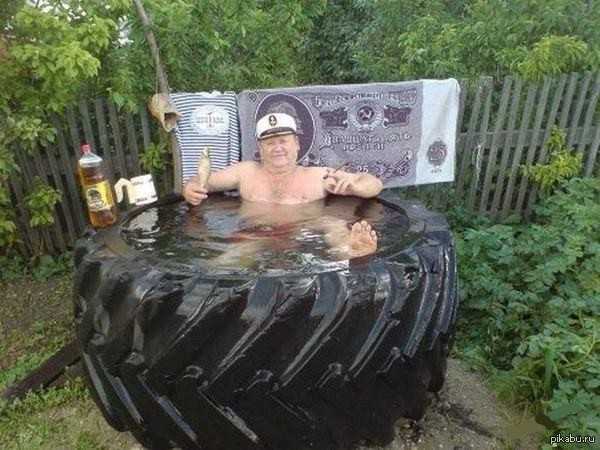
By the way, here are a few country pools made from improvised materials: a bucket from an excavator and a huge tire.
Gorgeous!
Inflatable pool - great for kids
Another option for a polycarbonate pool cover. It is built according to the same methodology as gazebos
The plastic liner can be round
An inflatable pool can also be buried, leaving only a ring on top
The folding canopy is also convenient
The bowl can be placed outside by making a frame for it
Super!
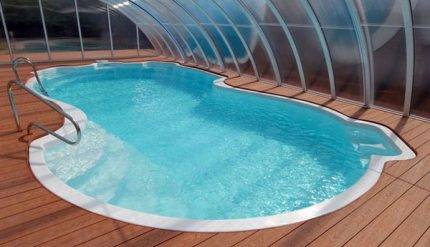
Stationary pools: traditional or non-standard
stationary monolithic pool
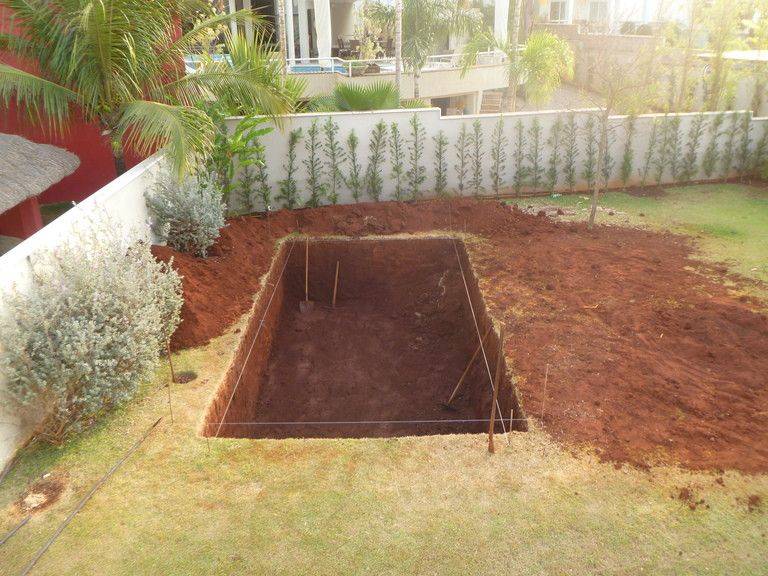
Having decided to install a stationary reservoir on a summer cottage, it is necessary, first of all, to find the optimal place for its location. The device of such a reservoir will require a significant investment of time and money, so the choice of site should be taken carefully and thoughtfully. An example of the arrangement of such pools can be seen. It is undesirable to have trees near the pond, as this will make it difficult to clean it and require the installation of a canopy. Location close to the electrical network and water source will reduce the cost of communications.


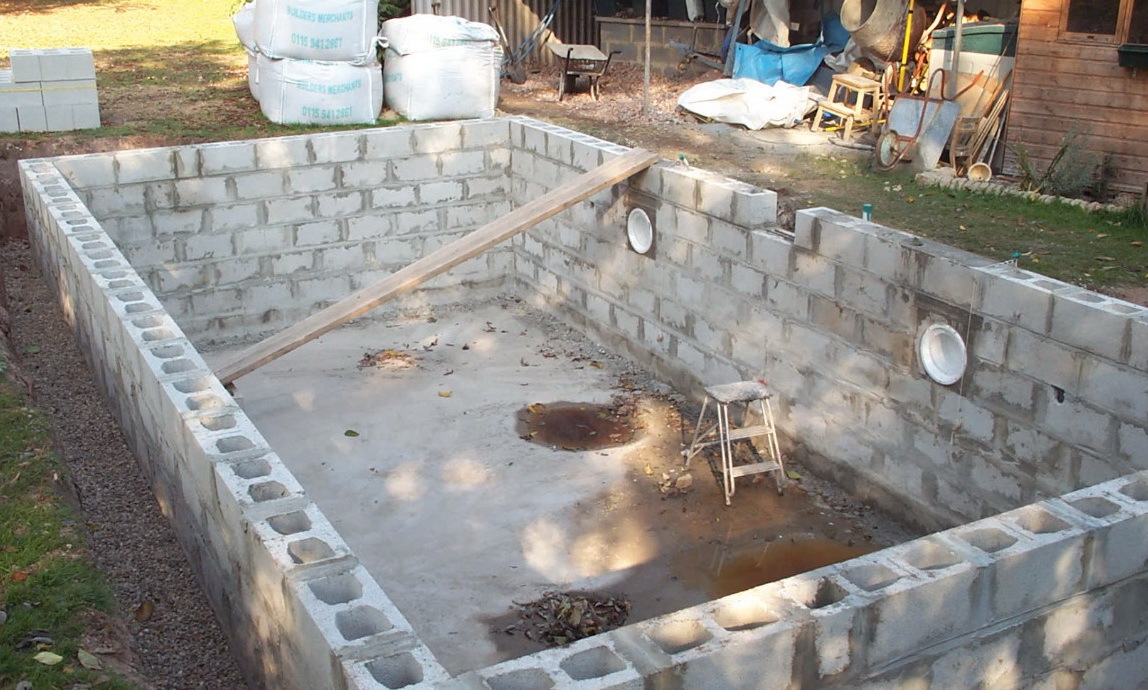
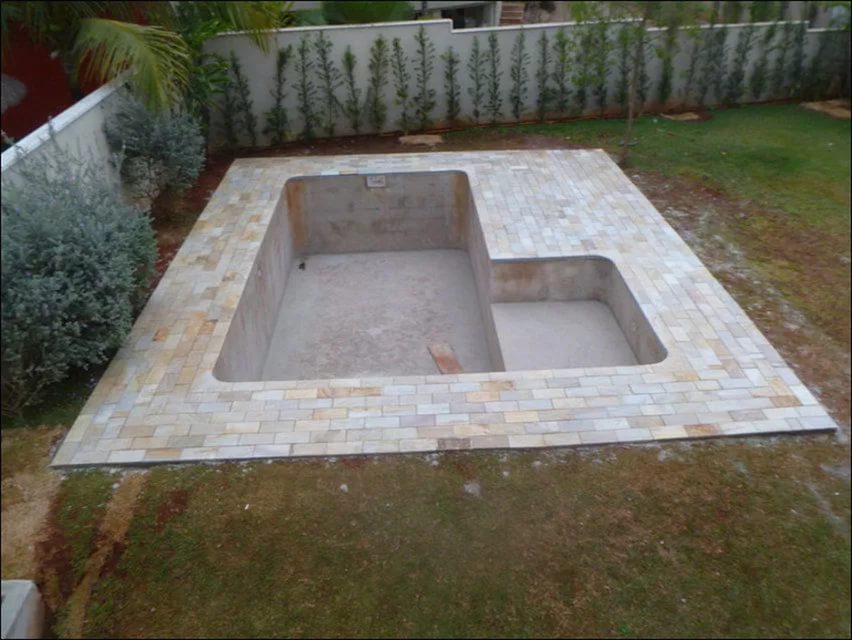
The choice of design and size of the pool, its configuration and depth largely depends on the material of the bowl. If finished products are used, then their forms are limited to the proposal of manufacturers. A do-it-yourself pool made of concrete can be built in a wide variety of configurations. This is the most time-consuming way to build an artificial reservoir, but more economical and durable than using ready-made bowls.
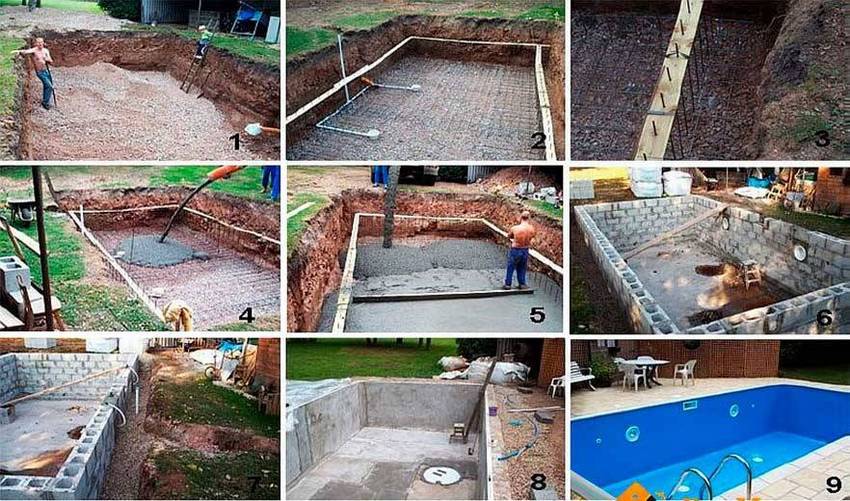
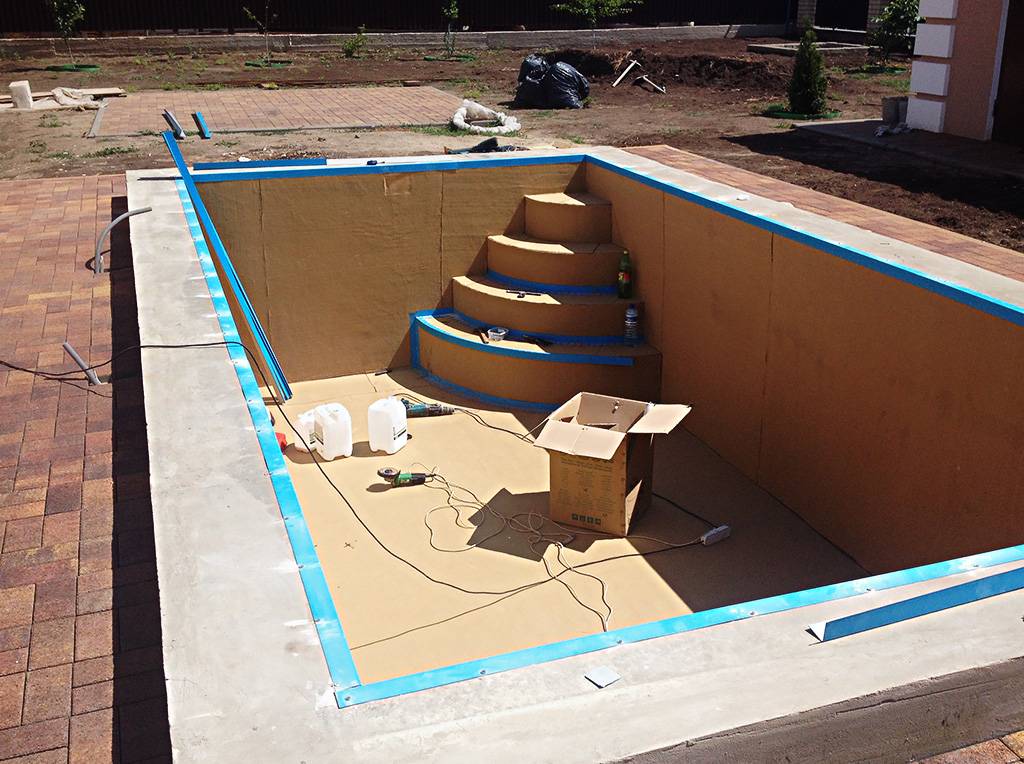
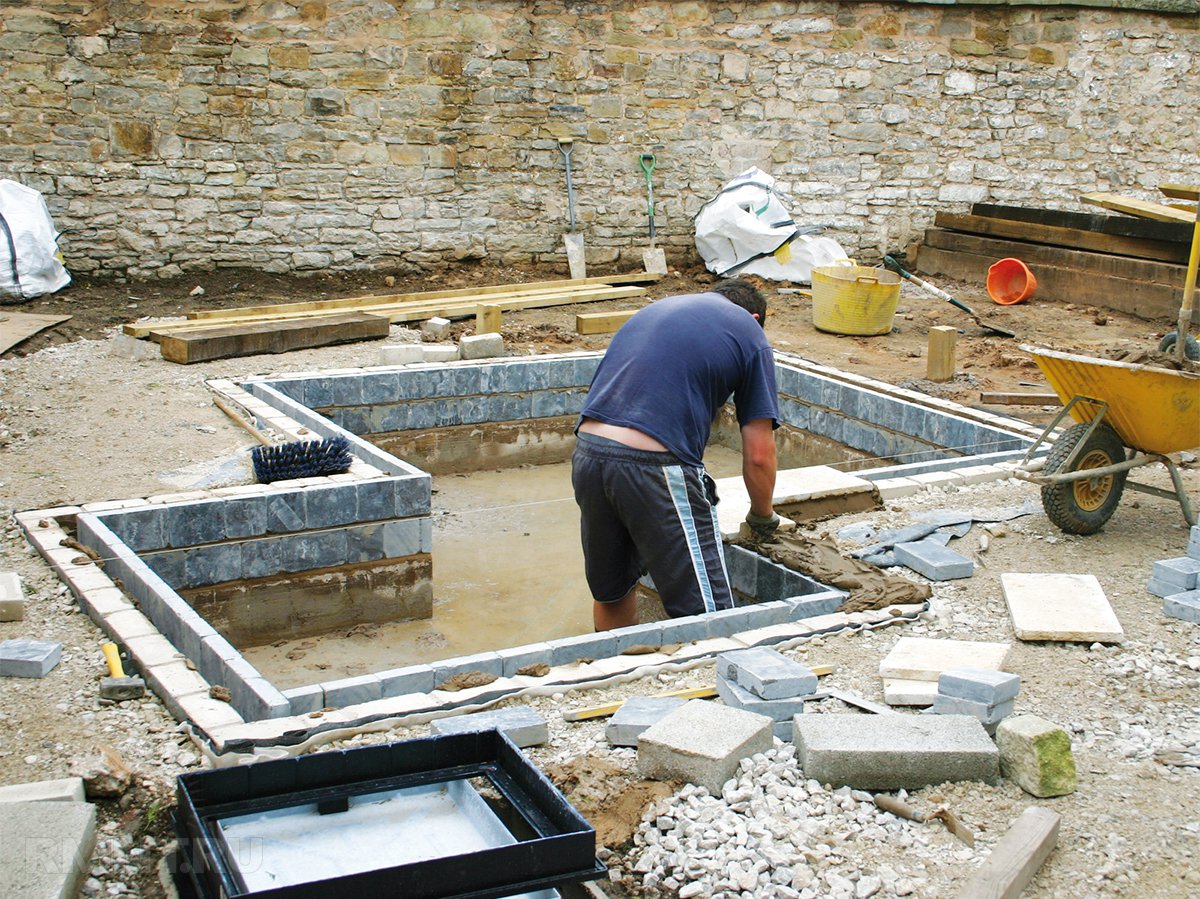
The construction of a concrete pool takes place in several stages:
-
Site preparation
pool pit
The selected place is cleared of debris, marked with twine and pegs, after which, manually or using mechanization, they dig a pit of the desired depth. After the pit has reached the desired size, its bottom is compacted with a rammer and covered with layers of sand and gravel, and then waterproofing is carried out using roofing material on bituminous mastic or other materials.
-
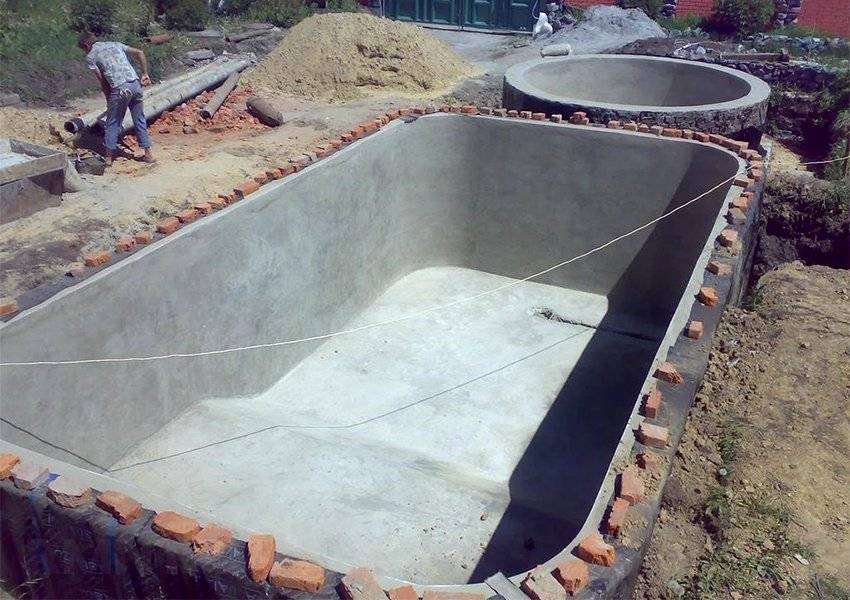
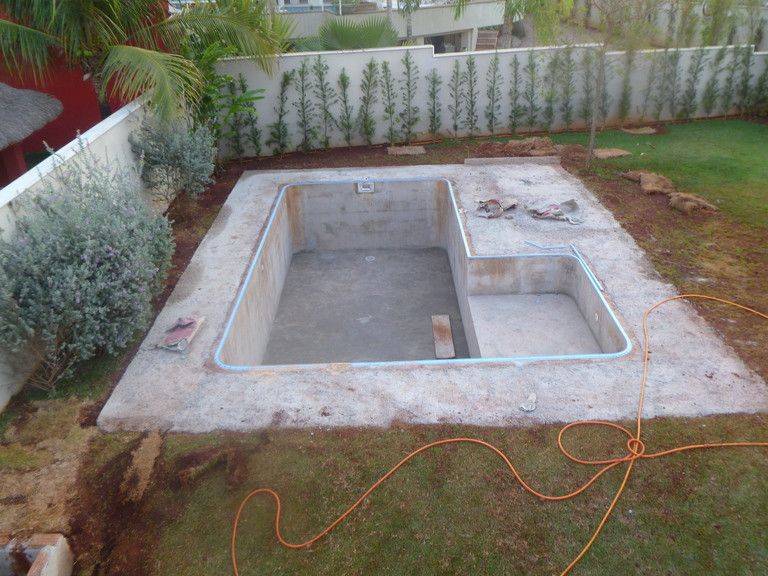
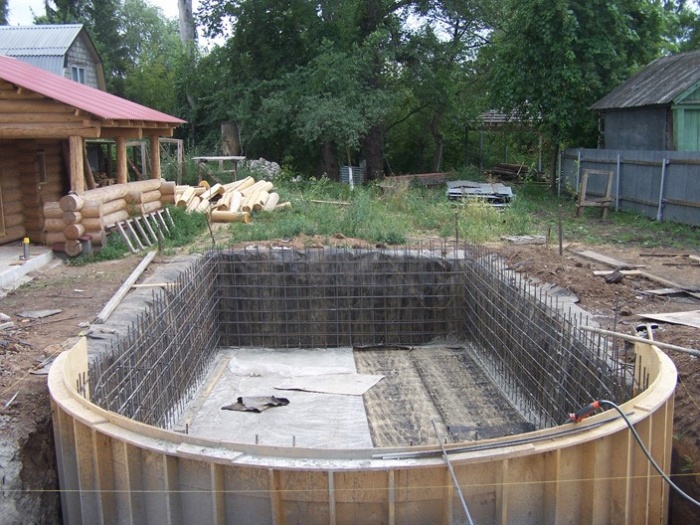
Formwork installation, reinforcement and pouring of the bowl
formwork for pool bowl
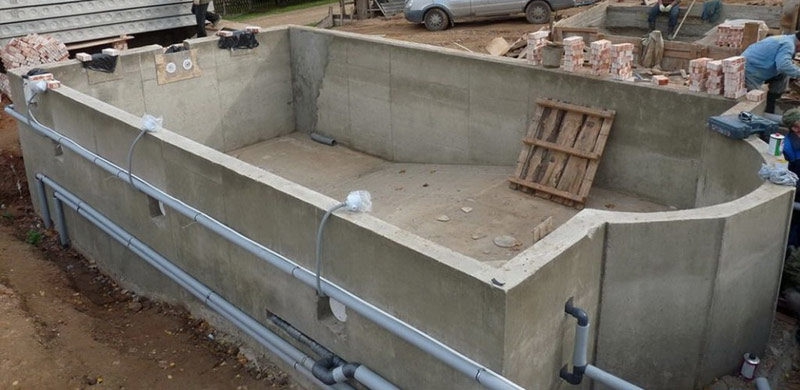
For formwork, boards and moisture-resistant plywood are used, which are coated with protective compounds. First, the bottom of the pool is poured, and after the frame is installed, the concrete bowl is cast. For strength, reinforcement is used, which is tied with wire or welded if the reservoir has a complex configuration.
It is desirable to carry out all works on the installation of the walls of the pool continuously to create a monolithic structure. In addition, before pouring, all communications should be carried out and the necessary holes for installing lighting should be provided.
-
bowl lining
After the concrete has hardened, the formwork is removed, and the inner surface of the resulting tank is covered with a liquid cement mortar with special additives, which provides additional waterproofing. After the wall, the bowls are lined with mosaics or tiles.
-
Equipment installation
One of the important stages of the device of pools is the installation effective water supply and purification system, which is carried out with the help of special equipment. The choice of the necessary equipment occurs at the design stage of the reservoir. At the same time, options for its lighting are also being worked out.
Less labor-intensive arrangement of reservoirs using ready-made forms from a variety of materials. It can be a plastic garden pool, which is a plastic container with an acrylic coating. Technical characteristics, performance properties and service life of such products depend on the type of polymers and the manufacturer. A more modern option is to use glass fiber reinforced composite tanks as bowls. Such designs do not require additional processing, are durable and reliable. Their disadvantages include the possibility of damage due to the volumetric expansion of the soil during freezing.
Composite pools for summer cottages, like plastic ones, are installed as follows:
-
They mark the site and dig a pit, manually or with the help of mechanization.
-
Sand and gravel are laid in layers at the bottom of the pit, compacting them with a rammer.
-
Set the form of plastic or composite material.
-
Install pumping and filtering equipment.
-
Fill the gaps between the walls of the pit and the bowl with sand.
-
Decoration of the coastal zone.
A variety of materials for the manufacture of pools and methods of their installation allow you to choose the best option for any suburban area. It is enough to apply imagination, a little effort and apply some skills and you can enjoy a hot day.
Successful implementation of an inexpensive indoor pool in the country:


Concrete or composite
Along with the construction of private concrete pools, composites are actively used. This is the name of artificially created combinations that combine the advantages of two or more materials.For example, the same reinforced concrete. Reinforcement makes it more durable, concrete mass prevents corrosion. Thanks to reinforcement, it was possible to create many durable polymers.
At first glance, the advantages of composite materials are obvious. But in the case of monolithic pool structures, everything is not so simple. The composite is stronger and cheaper, but it cannot maintain the constancy of its dimensions. The material bends, which significantly complicates the mating process.
Another disadvantage of composite materials is that they are easily scratched during operation. In the future, it will be difficult to repair the damage. Will need a comprehensive overhaul. Under the influence of chemicals, composites age, and micropores allow fungus to pass through. The choice of colors is very limited. This is another argument in favor of choosing a concrete pool.
Building walls
When creating a small reservoir with a volume of 15 cubic meters in the country, it will be enough to fill the walls with a thickness of 20 centimeters. It is most convenient to start construction with the manufacture of formwork and vertical reinforcing mesh. The plane is filled with mortar, it is best to take concrete for the M100 brand pool. By the same principle, the rest of the reinforcing frame is created, but already 50 centimeters thick. Next, you need to attach the vertical rods to the protruding horizontal elements.
Then additional parts are mounted in the walls in the form of pipes, nests in which lamps and special trays for electric cables will be installed. Further on the sides, a wooden formwork is installed, its thickness should be at least 2 centimeters. The structure must be secured with supports, moreover, this must be done on both sides.In this case, the walls will not bulge under the weight of concrete.
READ Features of concreting a platform for a car

After the structure is securely and firmly fixed, proceed to pouring the concrete solution. The mixture is diluted and used immediately, this work must be done in a day. Next, the material is allowed to dry thoroughly, usually it takes up to one month, it completely depends on the weather conditions.
No. 9. Pool of concrete rings and blocks
To simplify their lives, many summer residents go to tricks. Not wanting to deal with formwork and concrete mortar, some use ready-made concrete blocks. In this case, the installation process is reduced to pouring a flat base and mounting the walls of the blocks. They are fastened with mortar, and every third row is reinforced with a mesh. After all this, it remains to carry out waterproofing and finishing.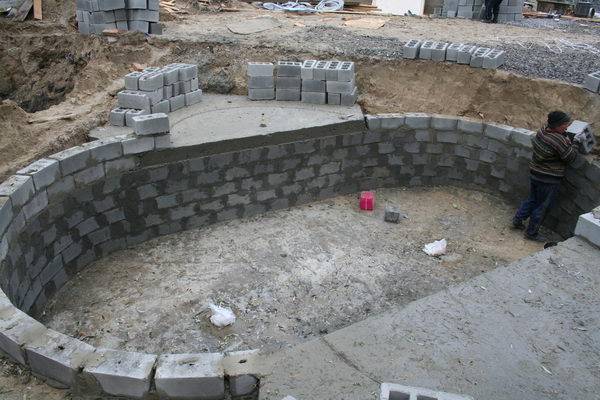
Another option is to use a ready-made concrete ring designed for arranging wells or sewers. It is mounted on a layer of cement mortar, then, as usual: waterproofing and finishing.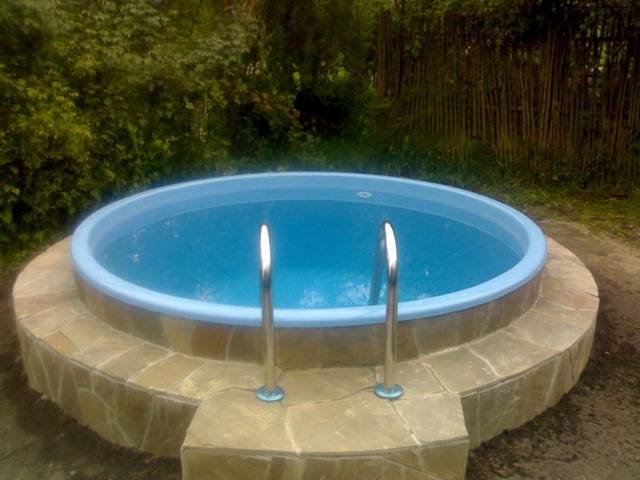
Useful see on the topic
Here, the experience of pouring the bowl of a small rectangular concrete pool is clearly demonstrated:
This video shows in detail the process of finishing the pool with PVC film:
Practical experience in operating the pool and an overview of possible errors, as well as ways to eliminate them, can be viewed in the following video:
The arrangement of your own pool on the site can be done even by a novice master. To do this, you need to correctly design the structure, and then perform all the necessary work, strictly observing the technology. With proper care, a homemade pool will last for many years.
Do you want to get your own pool, but have not decided which one is better to choose? Maybe there is already experience in the construction or is there something to recommend to us and site visitors? Please write comments in the block below, express your opinion, ask questions, post photos on the topic of the article.
Number 3. Preparatory work and design
The first stage on the way to the construction of a concrete pool is the creation of a project and thinking through all the technical details of the future facility
It is important to immediately determine the size and shape of the structure: these parameters directly depend on what place is allocated for the building, and how many people will swim in the pool. For a comfortable stay, a pool 1.5 m deep and 5.5 m long is quite suitable, but in the case of arranging a jumping tower, the depth of the bowl should be at least 2.5 m
Do not forget to consider that there should be space around the pool for normal access to it or for arranging a recreation area. In addition, it is necessary to provide a place for installing all the necessary equipment.
It is not recommended to place the pool too close to the buildings so that the shade does not interfere with the natural heating of the water. Under the crowns of trees, the structure should also not be erected in order to facilitate future maintenance of the pool.
To create a correct pool design, it is necessary to know the characteristics of the soil, the level of groundwater, and also take into account the load on pool walls and bottomwhich determines their thickness. It is worth taking into account the proximity of the location of neighboring foundations, as well as the depth of underground utilities, the distance to the points of supply and discharge of water, and many other points.If you plan to build a more or less large pool, it is better to consult with specialists or even order the design of the future pool from them.
At the preparatory stage, it is advisable to decide on the budget, choose the facing material for the walls, and also think about purchasing a filtration system, an electric heater, a chlorine generator, arranging stairs, a canopy and lighting. Also at this stage, a water exchange system is being considered, which can be:
- skimmer. Good for pools with right angles. The water line passes through the middle of the skimmer window, and the contaminated water enters it under the action of the circulation pump and through the bottom drain enters the filtering equipment, where it is cleaned of mechanical impurities, disinfected, heated and returned to the pool;
-
overflow. It will cost more than a skimmer, but it will be more effective. With such a system, water reaches the edge of the pool and enters a container with an automatic topping device through overflow gutters. From there, the water enters for cleaning and heating, and then returns to the bowl.
Reinforcement
For concreting the pool, it will be necessary to prepare a low formwork and reinforcement, the bars of which should never be welded. To avoid corrosion, use only wire to fasten the mesh.


Formwork for the pool should outline the contour of the future building. Inside it, two levels of reinforcement are neatly stacked:
- The first should rise 5 cm above the edges of the plate.
- The second level is laid 5 cm below the top edge.
- Since a slab with a thickness of about 20 cm is usually poured onto the bottom, the distance between the two layers of reinforcement should be 10 cm.
The reinforcement of the pool is carried out with ribbed rods with a diameter of 10-14 mm and cells of 20 x 20 cm, which are laid on small stones. The laying step is 20 cm. It is necessary to retreat 5 cm from the edge of the slab and bend the rods with the letter “G” (these bends will be required to create the wall frame).


