- Features of the internal device
- The device of modern models
- Drain cisterns with button
- Drain tank device
- Types of fittings for flush cisterns
- Separate and combined options
- Materials for the manufacture of devices
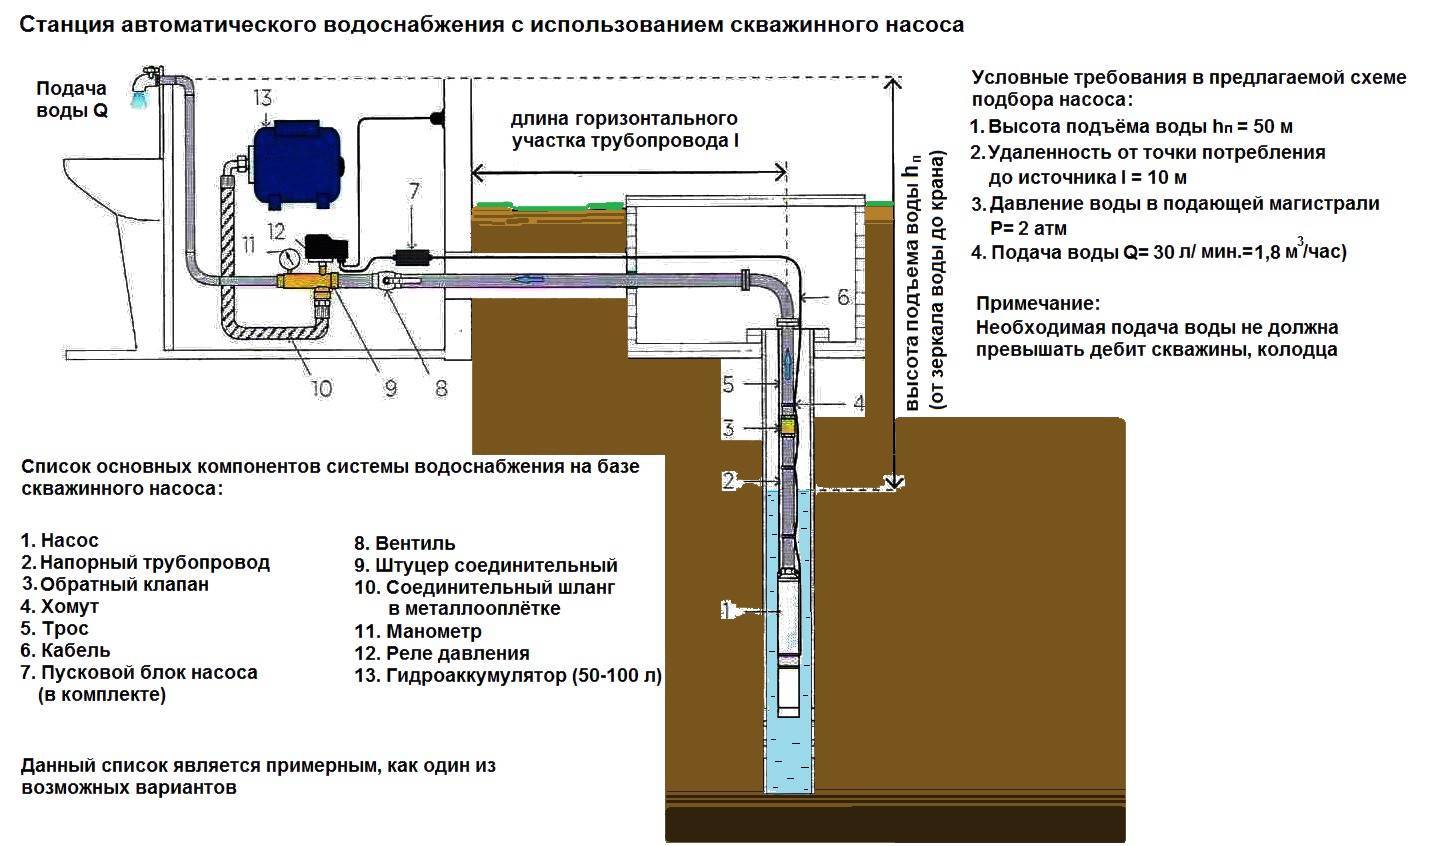
- Place of water supply
- Installation and adjustment of fittings
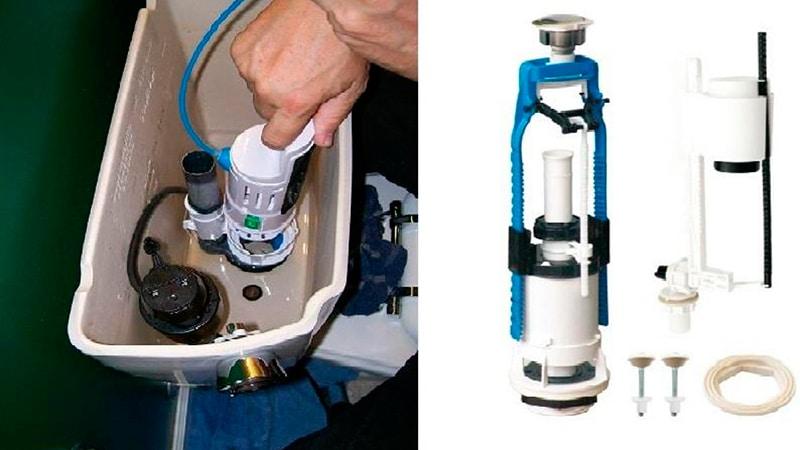
- Installation of toilet cistern fittings
- Armature adjustment
- Replacing cistern fittings
- Next, we adjust the volume of the drain.
- Drain force adjustment
- Frequent breakdowns of the drain tank
- Float skew
- Float mechanism failure
- Worn check valve, seal or rubber gaskets
- Water release lever does not work
- Filling the container is noisy
- Preventive measures
Features of the internal device
The basis of the flush tank for the toilet includes 2 systems - an automatic water intake system and a water drain mechanism. If you know the principle of operation of either system, then it is easy to troubleshoot the problems that have arisen. To make it easier to understand the mechanism of the flush tank, you should first familiarize yourself with the diagram of the old toilet cisterns, since their systems are more understandable and simpler than modern mechanisms.
The device of the old barrel
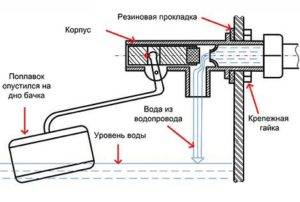
Tanks of old designs consist of elements for supplying water to the tank, as well as a drain device.An inlet valve with a float is included in the water supply mechanism, and a lever and pears are included in the drain system, as well as a drain valve. There is also a special tube, the function of which is to remove excess water in the tank without using the drain hole.
The normal operation of the entire structure depends on the reliable operation of the water supply elements. In the image below you can consider in more detail the scheme of automatic water supply. The inlet valve is connected to the float using a curly lever. One end of this lever is connected to a piston that either shuts off the water or opens the water.
Float mechanism device
When there is no water in the tank, the float is in its lowest position, so the piston is in the depressed position and water enters the tank through the pipe. As soon as the float rises and takes its extreme upper position, the piston will immediately shut off the water supply to the tank.
This design is quite simple, primitive, but effective. If you partially bend the curly lever, you can adjust the level of water intake in the tank. The disadvantage of the mechanism is that the system is quite noisy.
Water is drained from the tank using another mechanism, which consists of a pear blocking the drain hole. A chain is connected to the pear, which in turn is connected to the lever. By pressing this lever, the pear rises up and the water immediately flows out of the tank. When all the water has drained out, the pear will drop down and close the drain hole again. At the same moment, the float drops to its extreme position, opening the valve for supplying water to the tank. And so every time, after draining the water from the tank.
Toilet bowl device | Operating principle
Watch this video on YouTube
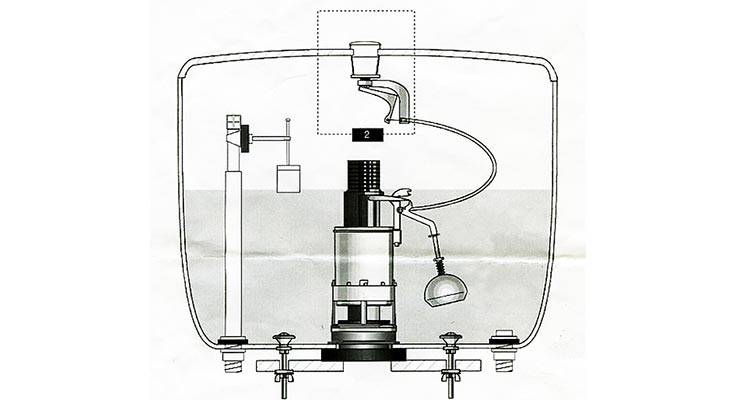
The device of modern models
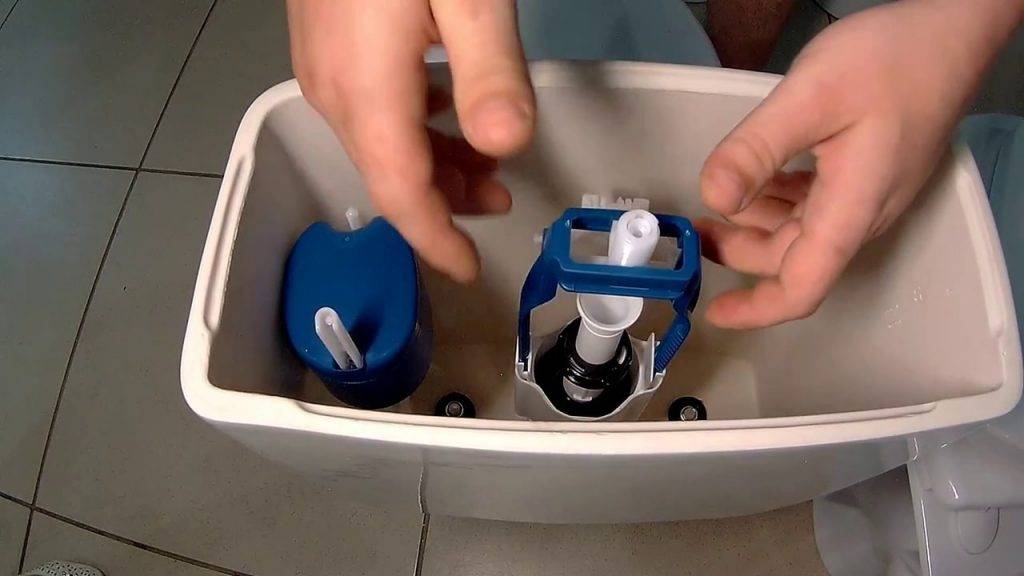
Tanks that have a lower water supply to the tank make less noise. Therefore, we can safely say that this is a more modern version of the device. The inlet valve is hidden inside the tank, which is a tube-shaped structure. In the photo below, this is a gray tube that is connected to the float.
Construction of a modern cistern
The mechanism works in the same way as in older systems, so when the float is lowered, the valve is open and water enters the tank. When the water in the tank has reached a certain level, the float rises and blocks the valve, after which water can no longer flow into a jar. The water drain system also works in the same way, since the valve opens when the lever is pressed. The water overflow system functions in a similar way, but the tube is led into the same hole to drain the water.
Drain cisterns with button
Despite the fact that a button is used as a lever in these tank designs, the water inlet mechanism has not undergone major changes, but the drain system is somewhat different.
With button
The photo shows a similar system, which is mainly used in domestic designs. It is believed that this is a fairly reliable and not expensive system. Imported cisterns use a slightly different mechanism. As a rule, they practice a lower water supply and a different drain / overflow device scheme, which can be seen in the photo below.
Imported fittings
There are several options for such systems:
- With one button.
- The water drains when pressed, and the drain stops when pressed again.
- With two buttons responsible for different amounts of water releasing into the drain hole.
And although the mechanism works in a completely different way, its principle of operation remains the same. In this design by pressing a button the drain is blocked, while the glass rises up, and the rack remains in the mechanism itself. This is precisely the difference in the design of the mechanism itself. Drainage is regulated using a special rotary nut or a special lever.
Drain mechanism for a ceramic tank manufactured by Alca Plast, model A2000
Watch this video on YouTube
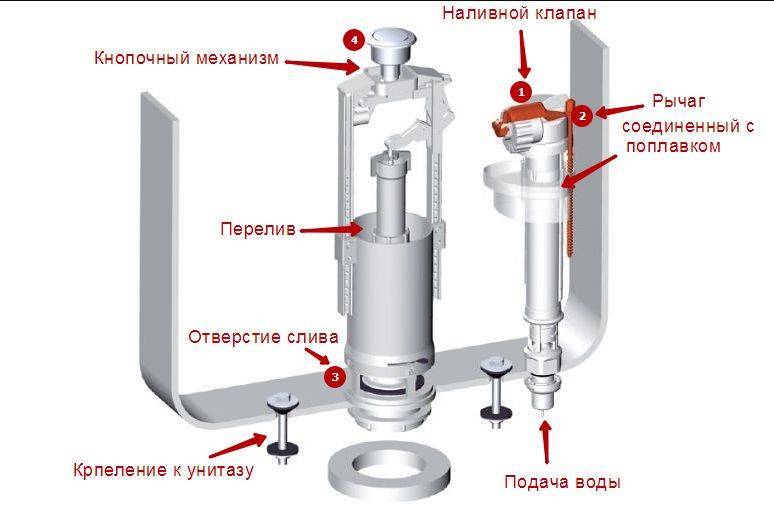
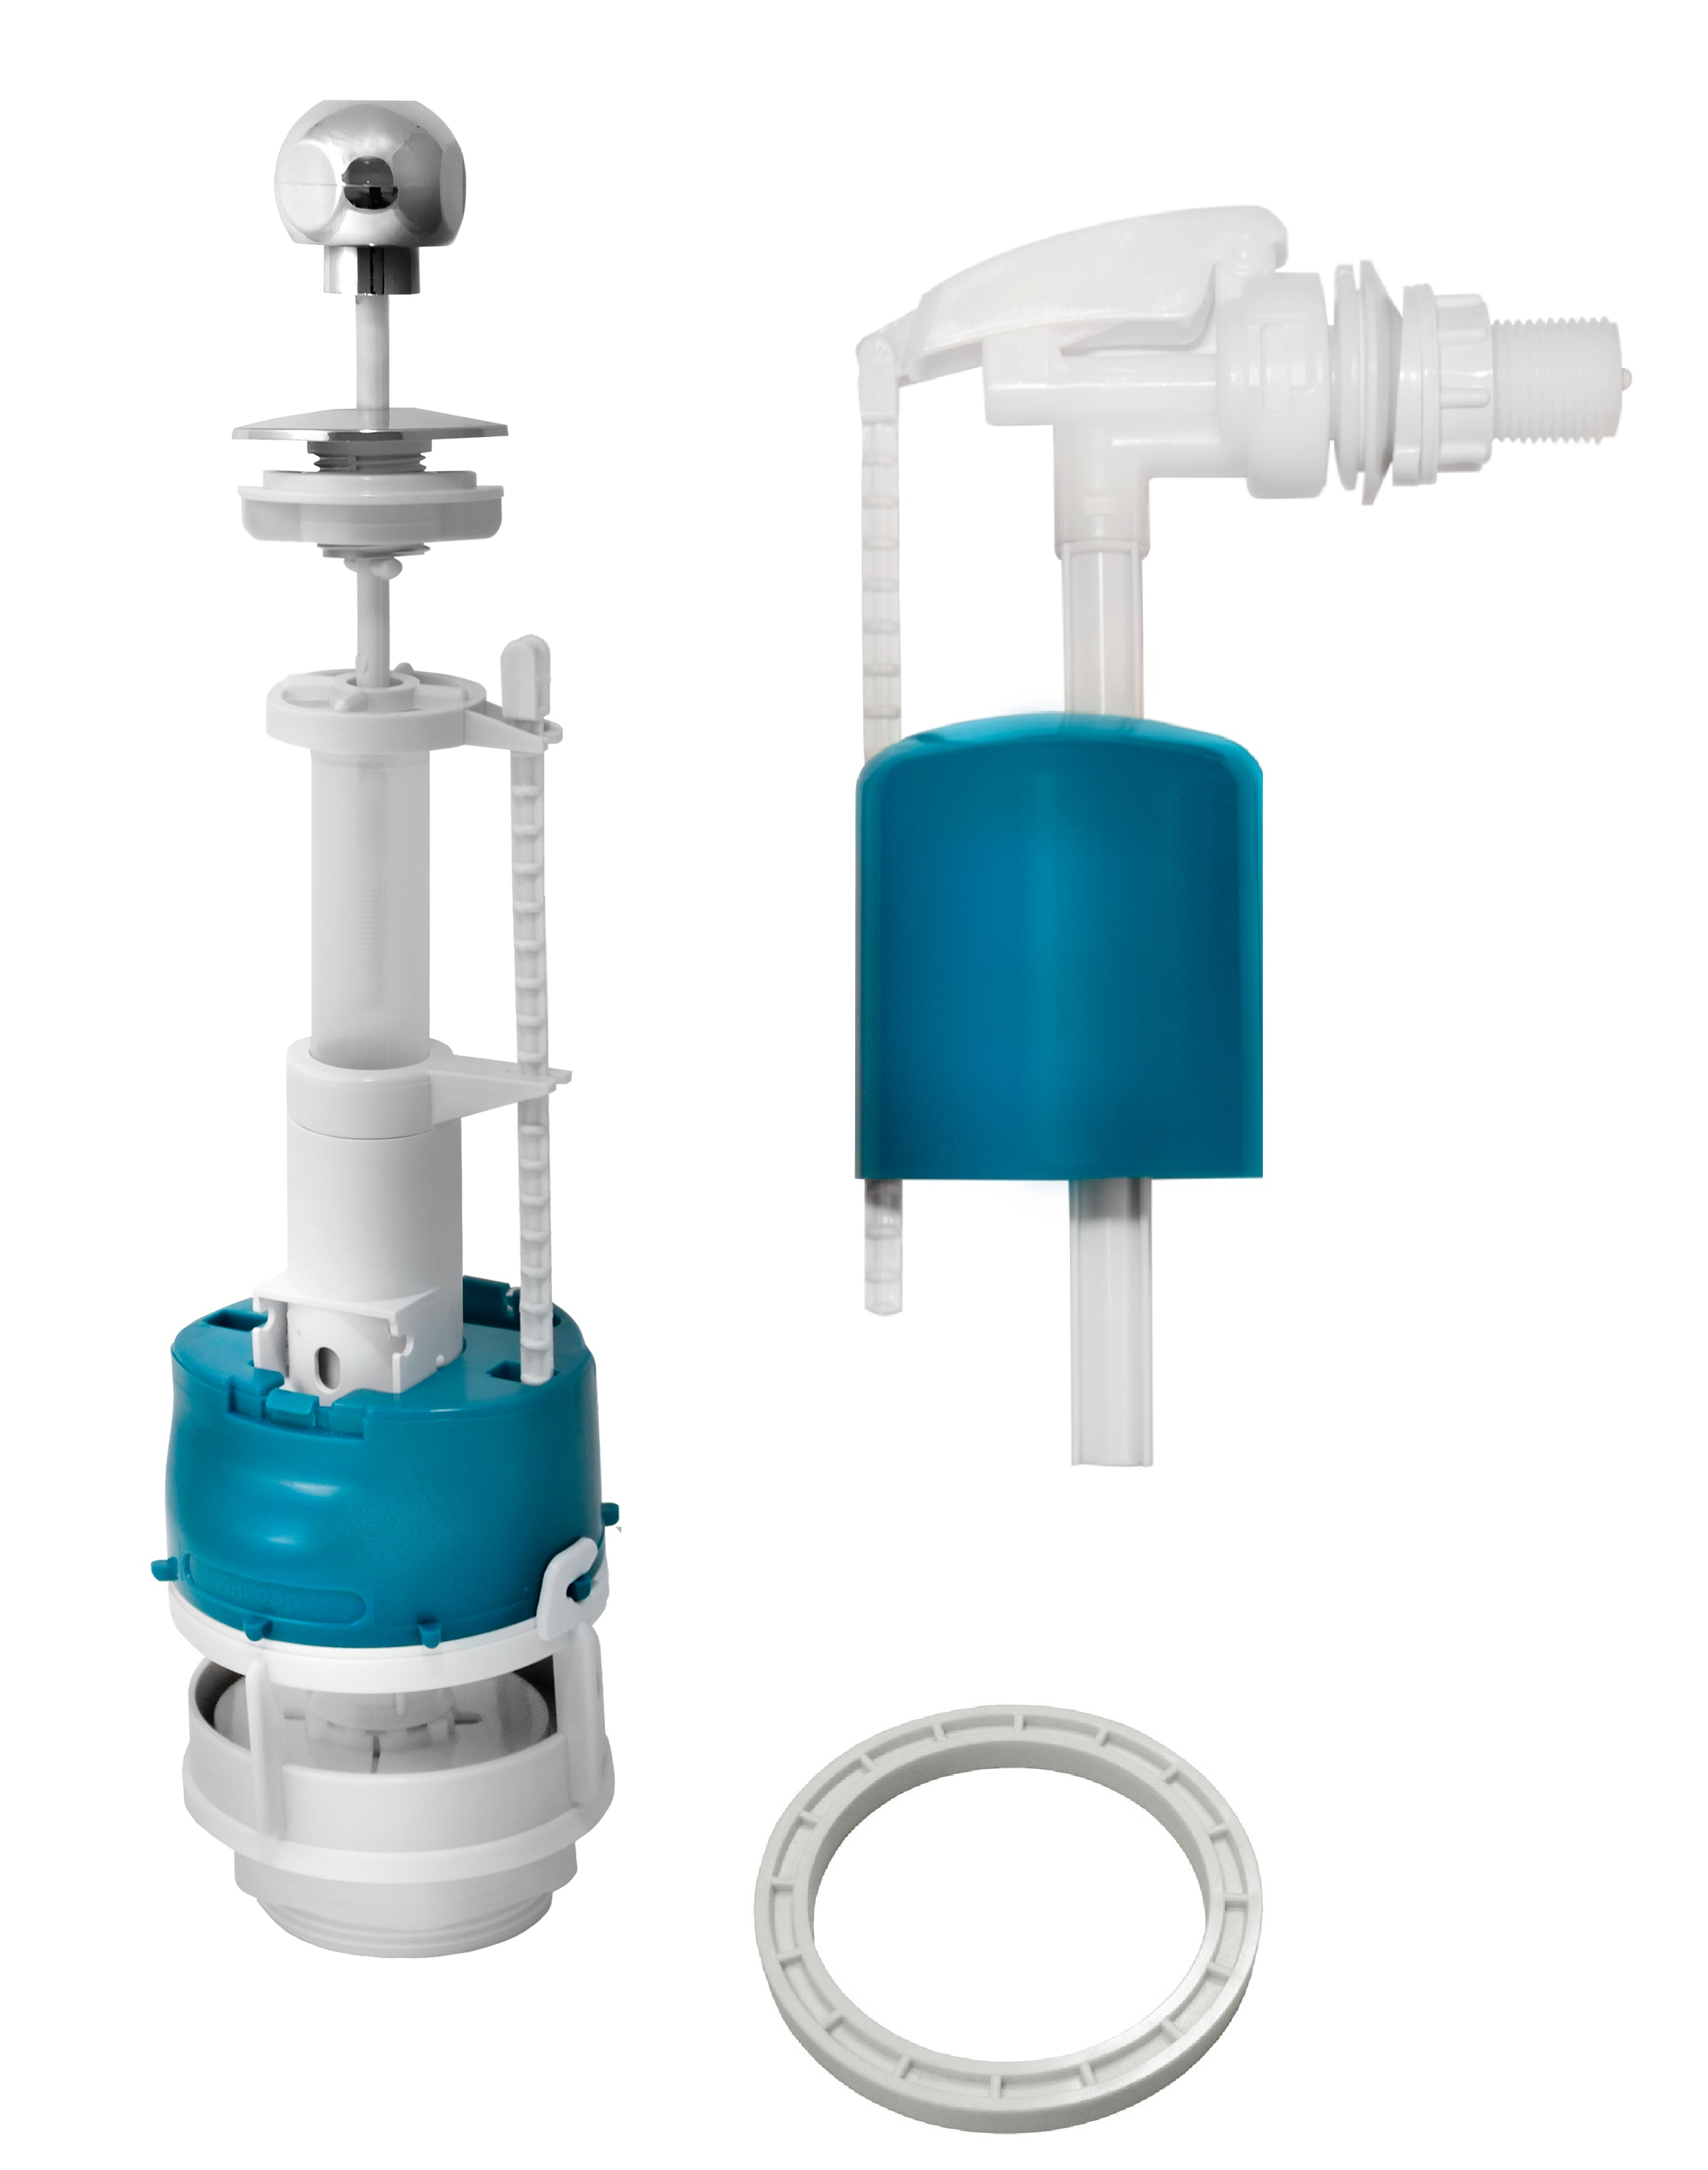
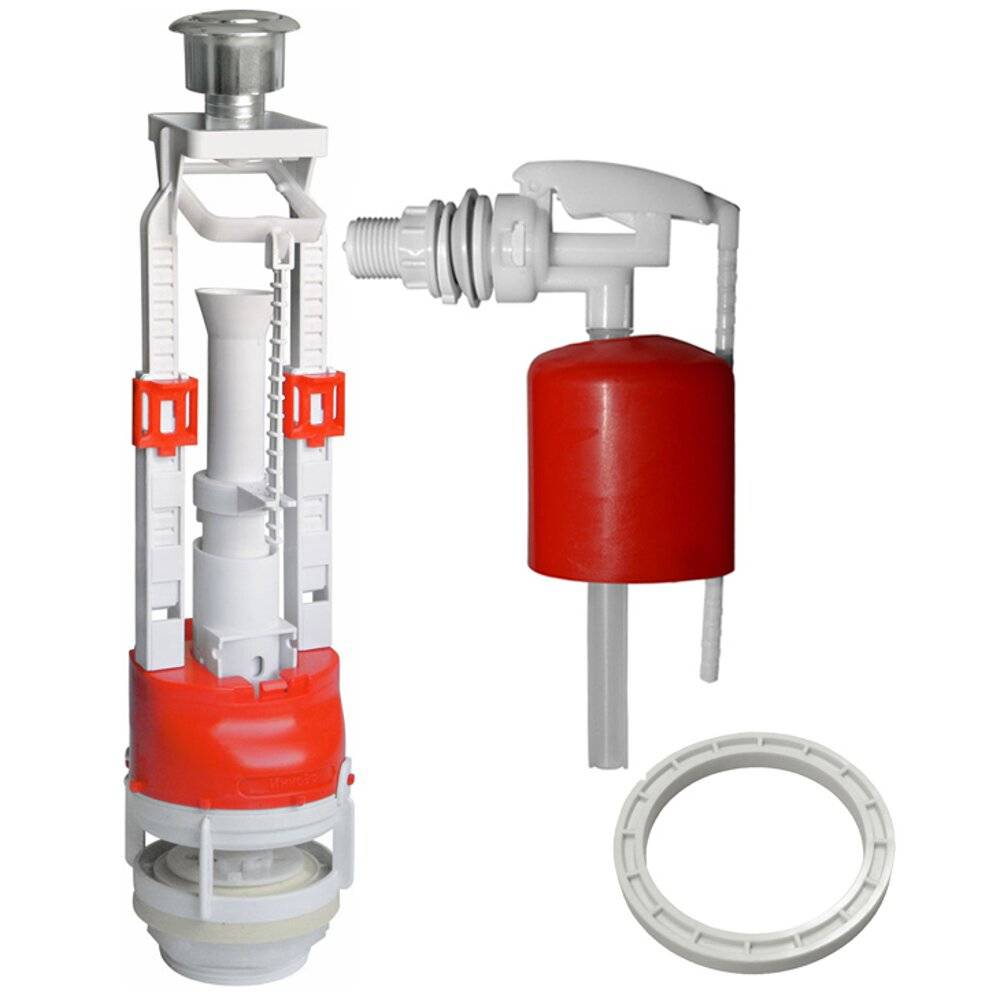
Drain tank device
Most drain tanks consist of several main parts such as:
- Stop valve. This element controls the collection of water directly into the tank. It is part of it that the float is.
- Drain valve. This element is a valve that is responsible for draining.
In our case, it is necessary to consider the structure of the first component of the internal mechanism. Earlier models had a brass rocker at the base, on which a float was installed. As a result of this, after filling the water in the tank to the desired level, it rose, and the second end of the rocker at that time was already blocking the inlet pipe itself.

However, at the same time, the general principle of such a mechanism remained the same. After filling the tank with water to the desired level, the float also rises and due to this access is blocked.


Like any other mechanism, valves also have their own specific breakdowns that occur more often than others. The most popular of them are:
- Insufficient water set for flushing. A similar problem occurs due to incorrect adjustment of the float.
- The situation when water is poured through the hole at the top of the tank.The reason for this may be incorrect adjustment, as well as the presence of a malfunction of the locking device itself.
- If water constantly enters the toilet, even without pressing the flush button. In this case, the shut-off system allows water to pass through due to a violation of the tightness of the overlap of the drain hole.
- Continuous supply of water. This is due to the fact that the float has lost its tightness. As a result, the locking mechanism no longer works.
Please note: the float may initially be installed incorrectly, due to which it will jam, and, accordingly, the flow of water into the tank will not be blocked.
Types of fittings for flush cisterns
The principle of operation of a conventional tank is not complicated: it has a hole through which water enters and a place where water is discharged into the toilet. The first is closed by a special valve, the second - by a damper. When you press the lever or button, the damper rises, and the water, in whole or in part, enters the toilet, and then into the sewer.
After that, the damper returns to its place and closes the drain point. Immediately after this, the drain valve mechanism is activated, which opens the hole for water to enter. The tank is filled to a certain level, after which the inlet is blocked. The supply and shutoff of water are regulated by a special valve.
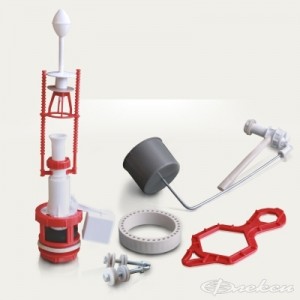
Fittings for drain a tank is a simple mechanical device that draws water into a sanitary container and drains it when a lever or button is pressed
There are separate and combined designs of fittings that collect the volume of water necessary for flushing and drain it after activating the flushing device.
Separate and combined options
The separate version has been used for many decades. It is considered cheaper and easier to repair and set up. With this design, the filling valve and the damper are installed separately, they are not connected to each other.
The shut-off valve for the tank is designed in such a way that it is easy to install, dismantle or change its height.
To control the inflow and outflow of water, a float sensor is used, in the role of which even a piece of ordinary foam is sometimes used. In addition to a mechanical damper, an air valve can be used for the drain hole.
A rope or chain can be used as a lever to raise the damper or open the valve. This is a typical option for models made in retro style, when the tank is placed quite high.
In compact toilet models, control is most often carried out using a button that needs to be pressed. For those with special needs, a foot pedal may be installed, but this is a rare option.
In recent years, models with a double button have been very popular, which allow you to empty the tank not only completely, but also halfway to save some of the water.
The separate version of the fittings is convenient in that you can repair and adjust individual parts of the system separately.
Combined type fittings are used in high-end plumbing, here the drain and inlet of water are connected into a common system. This option is considered more reliable, convenient and expensive.If this mechanism breaks, the system will need to be completely dismantled for repair. The setup can also be a little tricky.
The fittings for the toilet cistern with side and bottom water supply are different in design, but the principles of setting up and repairing them are very similar
Materials for the manufacture of devices
Most often, toilet fittings are made of polymeric materials. Usually, the more expensive such a system is, the more reliable it is, but this method does not give clear guarantees. There are fakes of well-known brands, and quite reliable and inexpensive domestic products. An ordinary buyer can only try to find a good seller and hope for good luck.
Fittings made of bronze and brass alloys are considered much more reliable, and it is much more difficult to fake such devices. But the cost of these mechanisms will be much higher than that of plastic products.
Metal filling is usually used in high-end plumbing. With proper configuration and installation, such a mechanism functions smoothly for many years.
In bottom-fed toilets, the inlet and shut-off valve are very close. When adjusting the valve, make sure that the moving parts do not touch.
Place of water supply
An important point is the place where water enters the toilet. It can be carried out from the side or from below. When water is poured from the side hole, it produces a certain amount of noise, which is not always pleasant for others.
If the water comes from below, it happens almost silently. The lower water supply to the tank is more typical for new models released abroad.


But traditional cisterns of domestic production usually have a lateral water supply.The advantage of this option is the relatively low cost. The installation is also different. The elements of the lower water supply can be installed in the tank even before its installation. But the side feed is mounted only after the tank is installed on the toilet bowl.
To replace the fittings, they are selected taking into account the option of supplying water to the sanitary tank, it can be side or bottom
Installation and adjustment of fittings
After installing the toilet in the allotted place and then connecting the toilet to the sewer system, the next step is to install the cistern fittings: the video, offered as a small instruction, will help to carry out this work correctly.
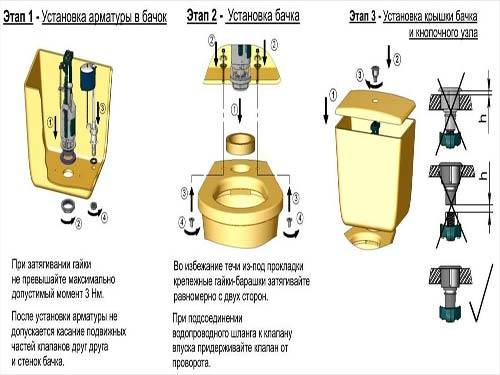
Installation of toilet cistern fittings
Let's consider the installation technology of the fittings of the toilet bowl:
Rules for installing fittings in a drain tank
- Put a rubber gasket on the drain mechanism.
- Install the mechanism in the tank, fasten with a plastic nut.
- Put plastic or iron (depending on configuration) washers and rubber gaskets on the fixing bolts. Insert screws into holes. On the other hand, put on a plastic washer and tighten the nut.
- Slide a rubber o-ring over the plastic nut. If a new ring is used, sealing is not required. If a ring that has already been in use was used, all joints should be thoroughly lubricated with sealant.
Pro tip: Careful inspection of all structural details can reveal minor casting defects. In this case, you will also need to use a sealant. The installation site of the sealing ring must also be smeared with a layer of sealant, having previously cleaned it.
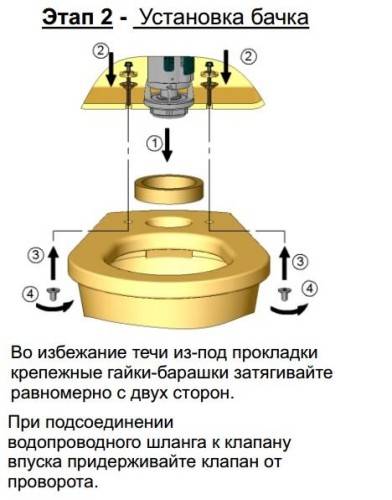
Installation of a tank with fittings on the toilet
- Install the cistern on the toilet seat and secure it with nuts.
- Attach the filling mechanism. Attach the sleeve from the water pipe.
- Put the tank cap back in place. Screw on the drain button.
On this we can assume that the installation of the fittings of the drain tank is completed.
Pro tip: Do not wrap anything around the threads of the mounted drain mechanism when putting on the sleeve. Try not to skew, so as not to strip the threads and spoil the part.
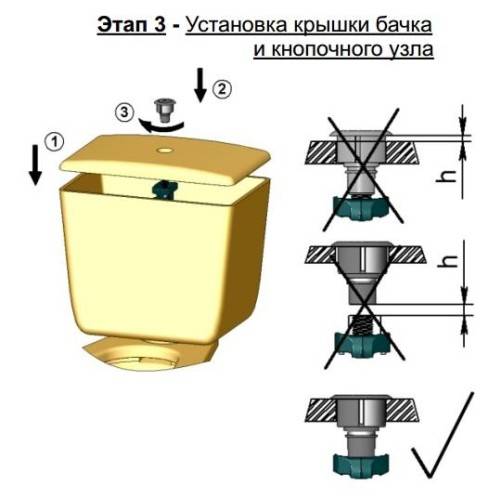
Installing the reservoir cap and button assembly
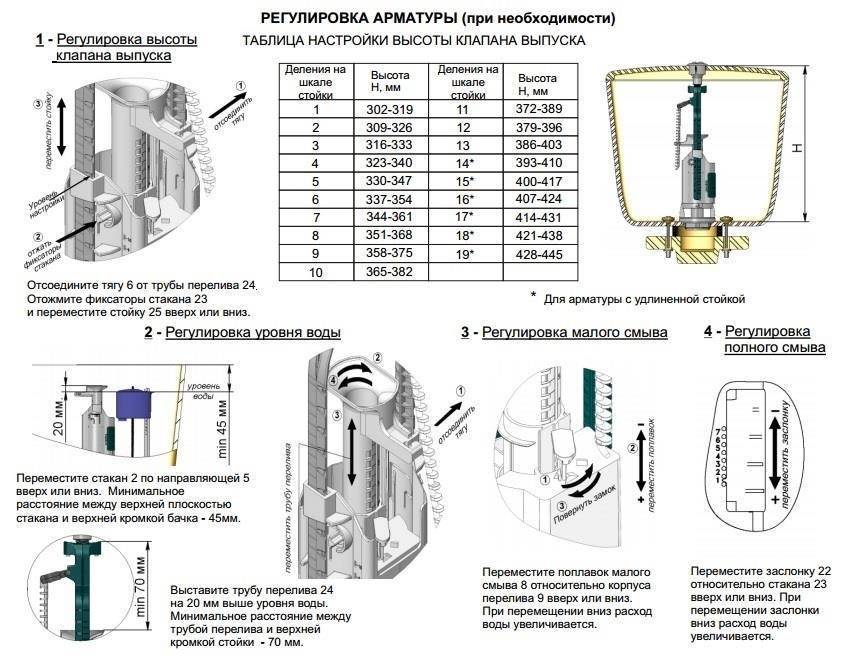
Armature adjustment
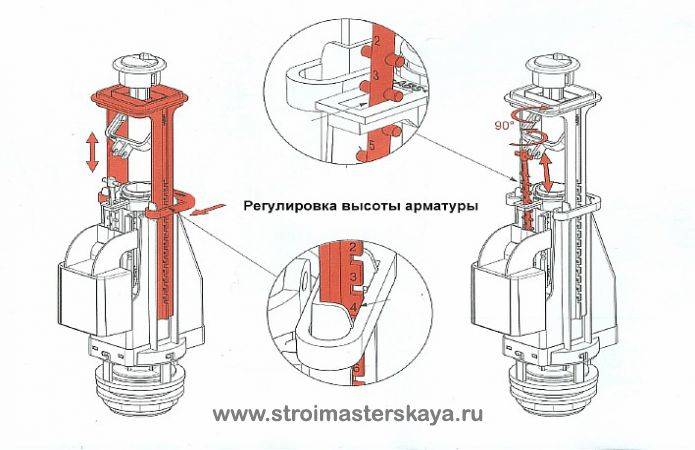
Installing a toilet and cistern should not cause much difficulty. But in some cases, additional adjustment of the toilet fittings may be necessary. So, to adjust the height of the drain valve:
- Disconnect the rod from the overflow pipe.
- Press out the cup retainer.
- Move up or down the rack.
Water level adjustment in a barrel is carried out as follows:
- Adjust the position of the glass - raise or lower it along the guide, leaving a distance from the top of the glass to the upper edge of the tank at least 45 mm.
- Install the overflow pipe 20 mm above the maximum water level and 70 mm below the top level of the rack.
To adjust the small flush, the small flush float must be moved up or down relative to the overflow tube. How to set up a full flush? Move the shutter (up or down) relative to the glass.
Rules for adjusting the fittings of the toilet cistern
Adjusting the toilet fittings for full or low flush implies that moving the float or damper down increases the flow of drained water.
- Autonomous sewerage
- Household pumps
- Gutter system
- Cesspool
- Drainage
- sewer well
- Sewer pipes
- Equipment
- Sewer connection
- The buildings
- cleaning
- Plumbing
- septic tank
- Choosing and installing a hanging bidet with your own hands
- How to choose an electronic bidet
- Choosing and installing a compact bidet
- How to choose a bidet manufacturer
- How to choose, install and connect a floor bidet
- How to install and adjust toilet cistern fittings
- How to connect a dishwasher with your own hands
- How to connect a washing machine with your own hands
- Cleaning sewer pipes: household recipes and equipment
- Heating system made of polyethylene pipes: how to create your own hands
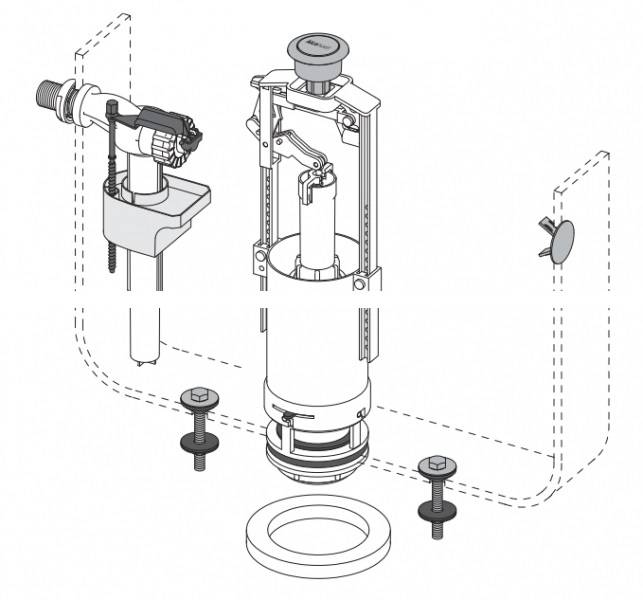
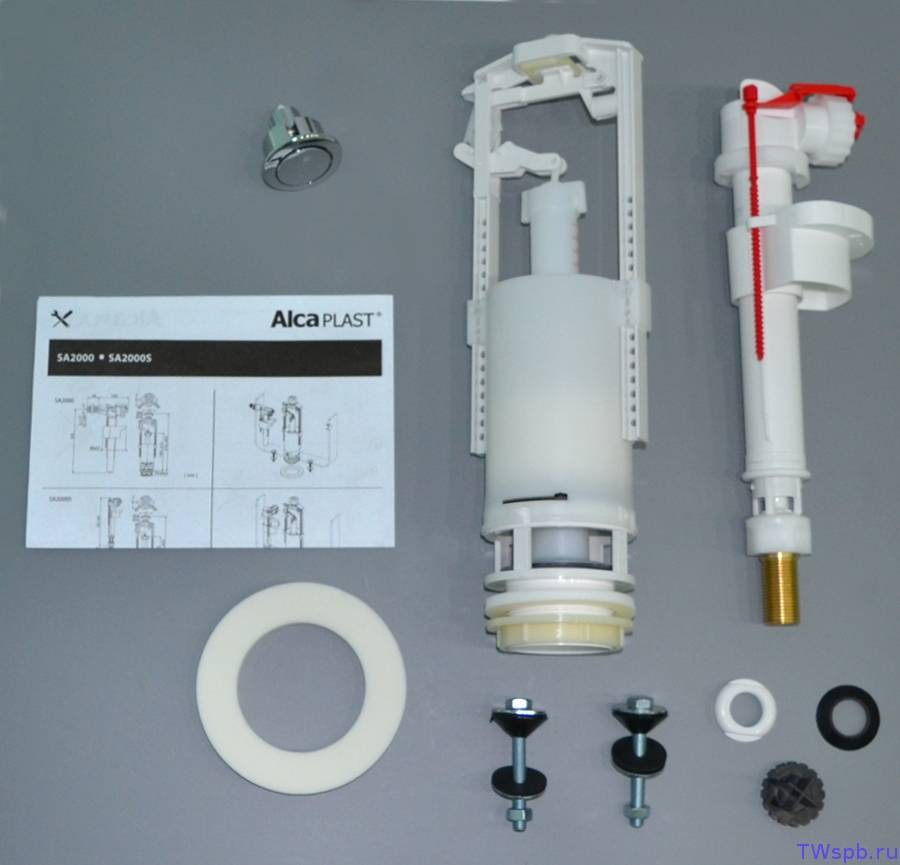
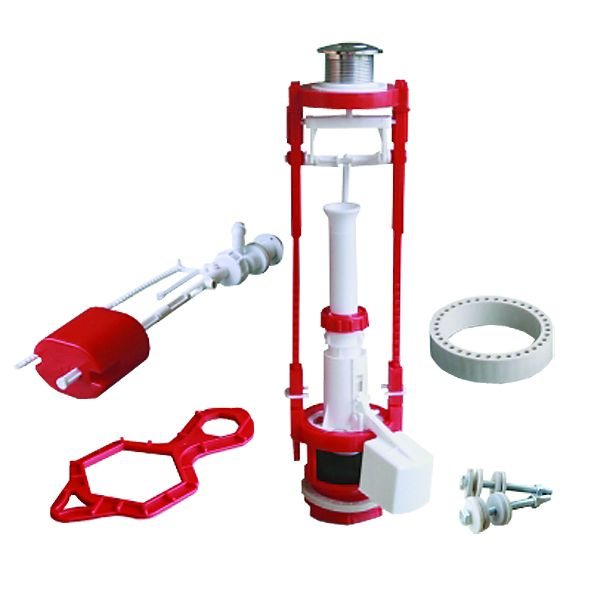
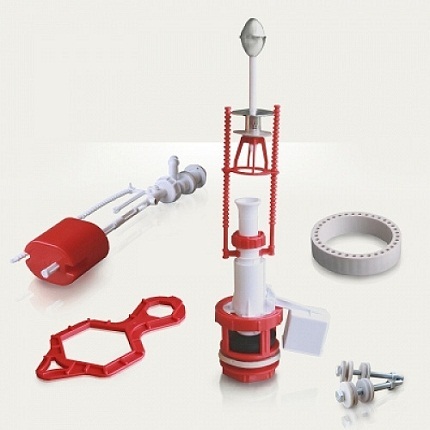
Replacing cistern fittings
In the old toilet bowl, we dismantle the old fittings that have become unusable and install a new water supply and drain system. We purchase universal fittings suitable for all toilet cisterns. For economical use of water, we buy a two-button drain mechanism that allows you to change the amount of drain depending on the type of human waste being washed off.
In such fittings, the manufacturer uses:
- dual-mode push-button mechanism;
- manual adjustment of the volume of small and large water discharge;
- drain mechanism rack adjustable to the height of the tank;
- changing the thrust by reinstalling the lever in one of the existing holes;
- clamping nut with rubber gasket;
- a valve that closes the drain hole in the toilet bowl.
The mechanism for economical draining of water from the tank, carried out using two keys, which are activated by a blue or white pin at the moment one of the buttons is pressed
We will replace the old fittings.To do this, unscrew the button holding the toilet lid and pull it out of the socket. Let's take the cover off. Turn off the water supply to the tank. Disconnect the flexible hose. Unscrew the screws holding the flush tank to the toilet bowl. Remove the reservoir and place it on the seat cover. Remove the rubber seal, and then unscrew the clamping plastic nut by hand. Then we remove the old drain mechanism.


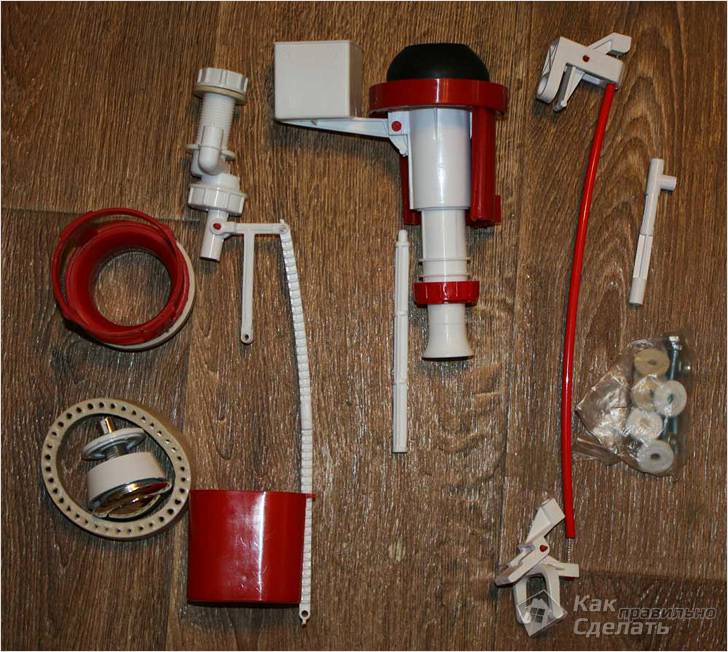


Next, we put a new drain mechanism, after removing the rubber seal from it and unscrewing the clamping fixing nut. After installing the drain mechanism in the hole of the tank, we fix its position with the removed parts. When installing the tank on the toilet, do not forget about the sealing ring that is placed on top of the plastic nut. Then we insert the pins of the tank into special holes in the bowl, screwing the wing nuts on them from below. We tighten the fasteners evenly from both sides, avoiding distortion of the installed part. If necessary, replace the fasteners with new parts with sealing gaskets.
With the help of two fasteners, the tank is securely attached to the toilet bowl. From the bottom of the bowl, wing nuts are screwed onto the screws, thin gaskets are first put on
When connecting the water hose to the side inlet valve, we hold the part inside the tank from turning. Tighten the nut with a special wrench or pliers. Install the tank lid, tighten the button. If necessary, adjust the rack, rearrange the lever.
The two-button button has two pins, with which the desired drain mechanism is activated. The length of the pins reaches 10 cm. They are shortened to the desired length, depending on the height of the tank. Screw into a button.Insert into the cover and fix the position of the button from the inside with a nut. Install the lid on the tank. Turn on the water supply. Press a small part of the button, about 2 liters of water are drained. Press most of the button, about six liters of water are drained.
Next, we adjust the volume of the drain.
It doesn't matter what the set of levers and tappets leading from the button to the valve looks like. Kinematics can be very diverse
But it is important to find a cup with adjustable height on the outside of the node - this is the node responsible for the volume of the drain.
To adjust it, in most cases, you need to disconnect the plastic rod from the button to the drain valve, and then squeeze the plastic petals of the retainer or remove the latch of the glass that regulates the volume of drain water. Holding the glass vertically, it is moved to the desired level and fixed there with spring petals or a latch. Then attach the exhaust valve rod.
The most advanced system may have a dual mode release. Structurally, the unit is made in the form of two separate, independent drain valves, located symmetrically on both sides of the overflow safety siphon. Their settings are exactly the same. Only one valve is set to maximum drain, and the second - to half the first.
When installing the reservoir lid and setting the height of the buttons, make sure that the control buttons on the reservoir lid have a slight play - it is necessary for the normal operation of the entire mechanism.
If adjustment is required for fittings that have already been in operation for some time, then difficulties may arise due to deposits - rust or limescale.Getting rid of them is easy with ordinary vinegar or chemical descalers - just add to a tank filled with water and wait a few hours. And the inner surface of the tank will become noticeably cleaner.
As a bonus, we suggest watching the official video from Geberit, which will help you figure out how the fittings are arranged, how to install and configure them.
source
Drain force adjustment
The adjustment is quite simple, suitable for 70% of conventional toilets with a button. YES, and on other toilets, which have a separate double button (read the article about choosing a toilet), the adjustment will not differ much.
Well, let's not pull, let's go ...
1) Remove the lid from the toilet bowl. It is quite simple to do this, unscrew the plastic button and remove the porcelain cover, just don’t break it carefully, it’s better to immediately put it in a safe place.
2) You can turn off the water supply to the tank, especially if you are doing this for the first time. But you can not turn it off (for those who do this not the first time), the main thing is not to spill the neighbors
3) WE see the device of the drain tank, this is a water shut-off valve and the drain device itself (all this is called fittings). We are not interested in the drain device, we do not regulate it. We need to adjust the water shut-off valve.


4) It is this valve that regulates the water level in the tank. The more water - the greater the drain force, the less water - the drain force is less, but less water is consumed.
5) We look at the valve itself - the device is the simplest. There is a float at the top, a guide on which it sits, an adjusting bolt, a tab at the bottom that locks - opens the water of the valve itself.
6) We will use the adjusting bolt. Now, as you can see, our water is at the maximum level, almost next to the drain neck. We do not need this, such a pressure drains too much water, from experience I want to say that you can reduce the water level by a couple - three centimeters down, this will be more than enough, and less water will be consumed per liter with each drain.
7) To reduce water, simply take and turn the “ribbed” adjusting bolt. To reduce, we simply tighten the bolt, as we twist a regular metal one, so the float becomes lower and the water level in the drain tank decreases. If you need to make the water level higher, then simply unscrew the bolt, the float becomes higher - accordingly, the water level increases.
 For comparison, here is my water level and the plastic bolt relative to the float.
Now we adjust - we twist, the float becomes lower, and, accordingly, the water level. As you can see about 2 - 3 cm below. This level is more than enough.
9) We check the water drain, if it suits you, then you can close the porcelain lid and tighten the plastic button.
That's all, it's so easy and simple to adjust the toilet cistern (namely pressure and water savings).
Now watch the video version of the article
Frequent breakdowns of the drain tank
The most frequent failure is the continuous filling of the container with water and the same continuous leakage.
The reasons for this phenomenon are:
- float tilt;
- breakdown of the float mechanism;
- wear of the shut-off valve, seal or rubber gaskets.
Float skew
Perhaps one of the easiest breakdowns, for which you do not need tools to fix.Lift the lid and move the float at the bottom of the container by hand.


If the cause of the malfunction is its skew, the water will stop flowing into the bowl spontaneously. If the problem persists, correct the shut-off valve, which is also warped.
Float mechanism failure
The toilet cistern is filled to the limit, water overflows, but the inlet valve does not stop the flow. Determine if the problem is actually a faulty inlet valve. Raise it up to the stop, if the float mechanism is working, the water pressure will stop. If this does not happen, the float mechanism should be dismantled and replaced with a new one.
Worn check valve, seal or rubber gaskets
- Finding out whether the cause of the problem lies in the worn parts of the system is simple. Press the valve slightly with your hand, if water starts to flow, you are not mistaken. Repair consists in replacing worn parts.
- Perhaps the reason for the constant leakage of water lies in the wear of the float. A hole has formed in it, through which the outflow of water occurs. In this case, the only way to repair the system is to replace the float.
Fittings for drain tanks, price - from 260 rubles.
- The diaphragm valve protects the structure from possible contamination and mechanical damage. Unfortunately, the membrane itself wears out pretty quickly.
- You can build an impromptu membrane by cutting it out of hard rubber 1.5-2 mm thick. An old worn part will serve as a pattern for the membrane.
- Often, the layman is faced with such malfunctions as too noisy filling of the tank with water and breakage of the lever designed for descent.
Water release lever does not work
The reason for such a malfunction is obvious - damage to the traction. The broken rod should be replaced with a new one.
But remember that impromptu traction will not last long. Soon the wire will begin to bend, and the problem will reappear, so you can't avoid visiting a store that sells spare parts for plumbing repairs in an apartment.
Filling the container is noisy
Not the worst problem, causing a feeling of irritation only at night.
A flexible plastic tube can be attached to the float valve - a silencer. It is installed at the inlet to the float valve vertically above the water level. The lower end is immersed in water. Due to this, the water flow will begin to flow into the tank below the existing level and the noise effect will decrease sharply.
The second option is to install a stabilizing float valve in the system. The device of such a valve differs from the usual one in a hollow structure with a stabilizing chamber at the end. As the water flows through the piston, it enters the stabilizing chamber and equalizes the water pressure on both sides of the piston.
To avoid problems toilet flush repairregularly carry out preventive inspections and minor repairs. This is the list of works that you can do with your own hands.
Preventive measures
To avoid problems associated with leaks, with excessive consumption of water constantly flowing into the toilet bowl from the reservoir, it is important to know the design of the flush tank, to be able to adjust and repair the mechanisms. Recommended systematically:
Recommended systematically:
- check the condition of the flexible piping, connection node;
- inspect the fittings inside the tank, clean it from lime deposits and other contaminants;
- check the tightness of the connecting collar and bolt fasteners with a paper towel;
- inspect the tank and toilet for cracks.
Preventive measures allow you to extend the life of the mechanisms.