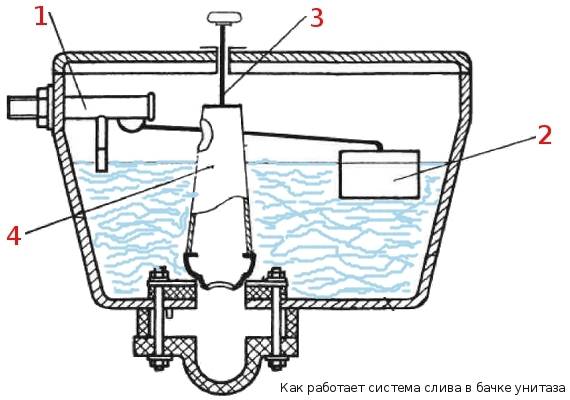
- Water drain mechanism
- Internal organization
- Modern models with lever drain
- Replacing fittings with your own hands
- Rebar dismantling
- Installation of valves
- Device adjustment
- Tank repair
- What to do if the toilet cistern with a button is leaking?
- No water is drawn into the tank
- Decreased flow strength
- Elimination of external leaks
- Condensation forms on the tank
- How to clean a rusty toilet bowl?
- Mounting methods
- Preventive measures
- Troubleshooting
- Rebar replacement
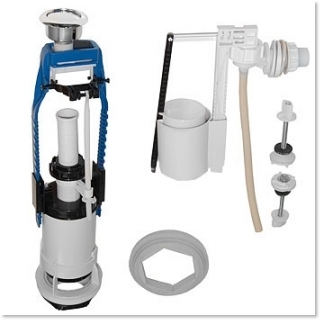
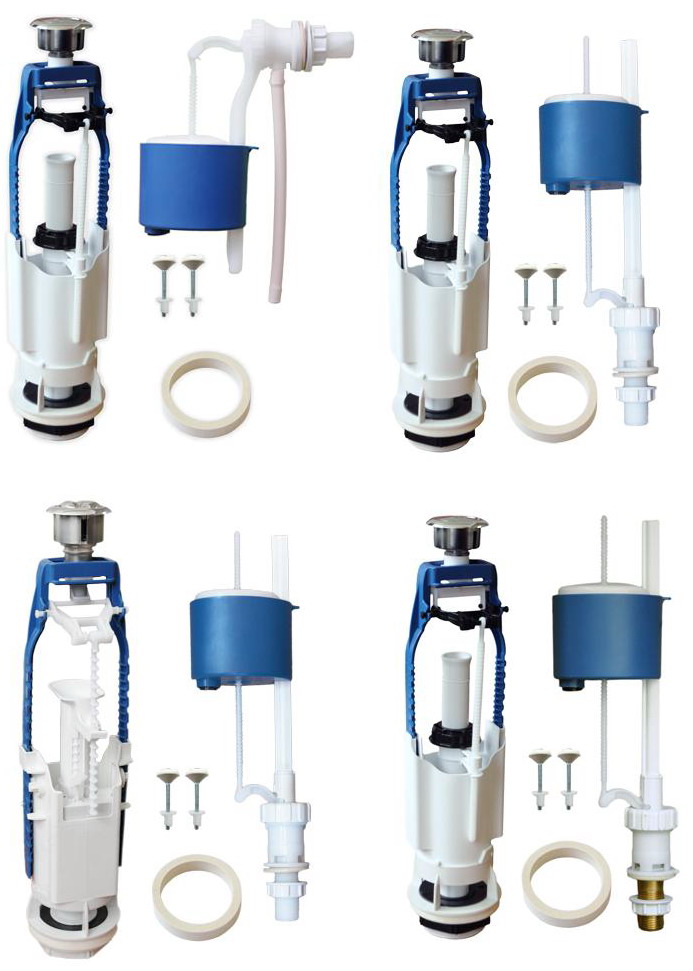
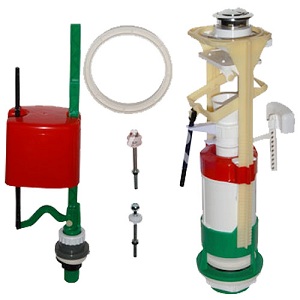
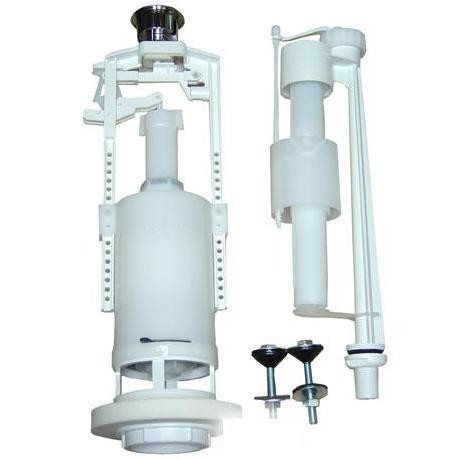
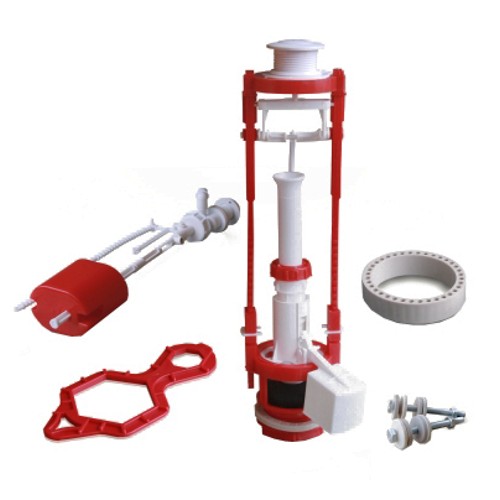
- Types of fittings for flush cisterns
- Separate and combined options
- Materials for the manufacture of devices
- Place of water supply
- Features of the internal device
- The device of modern models
- Drain cisterns with button
Water drain mechanism
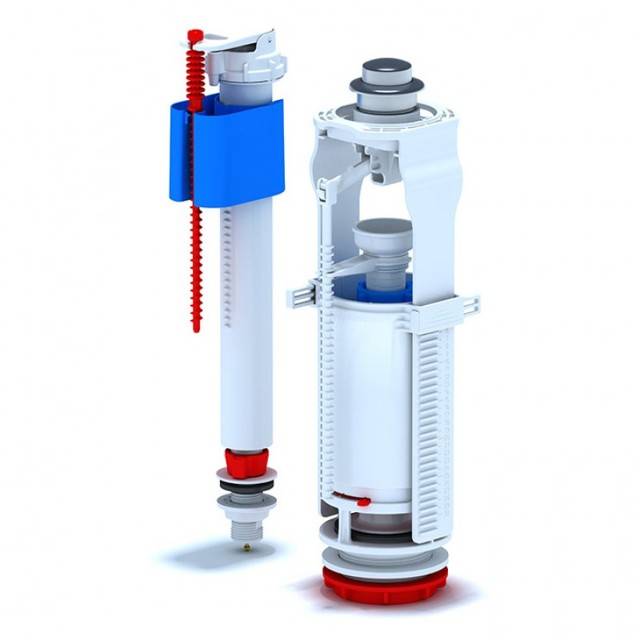
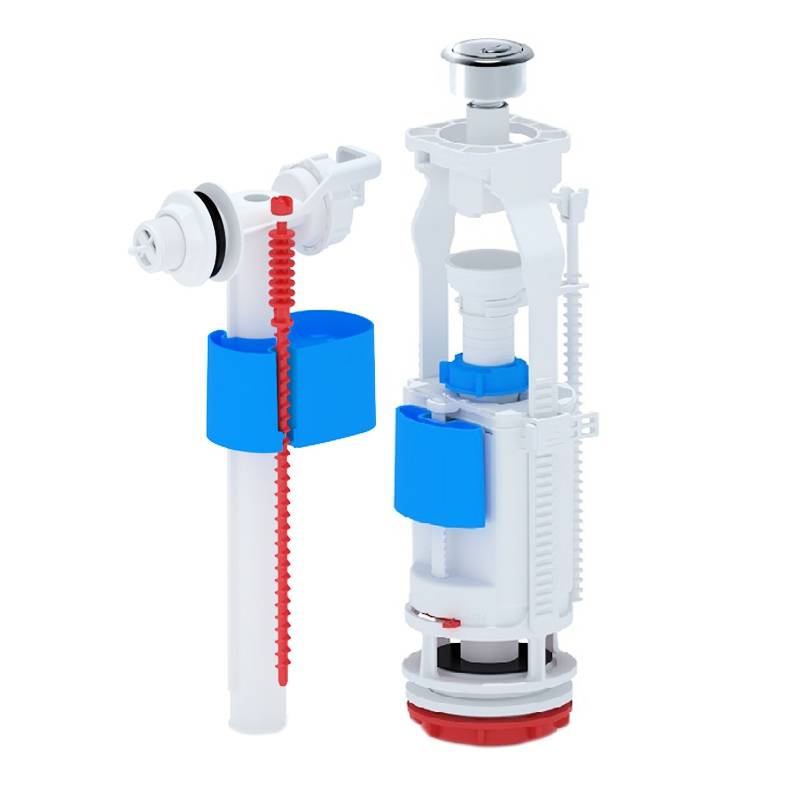
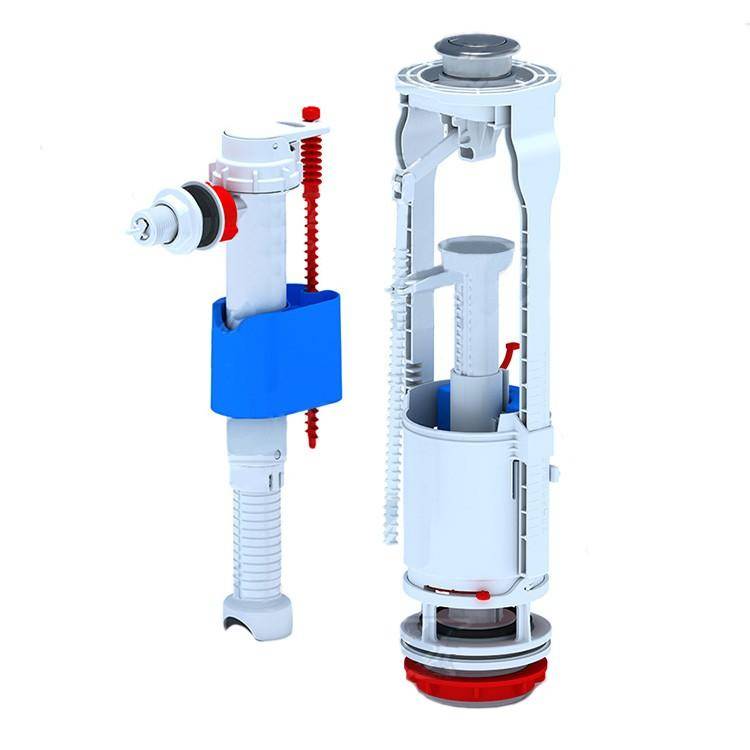
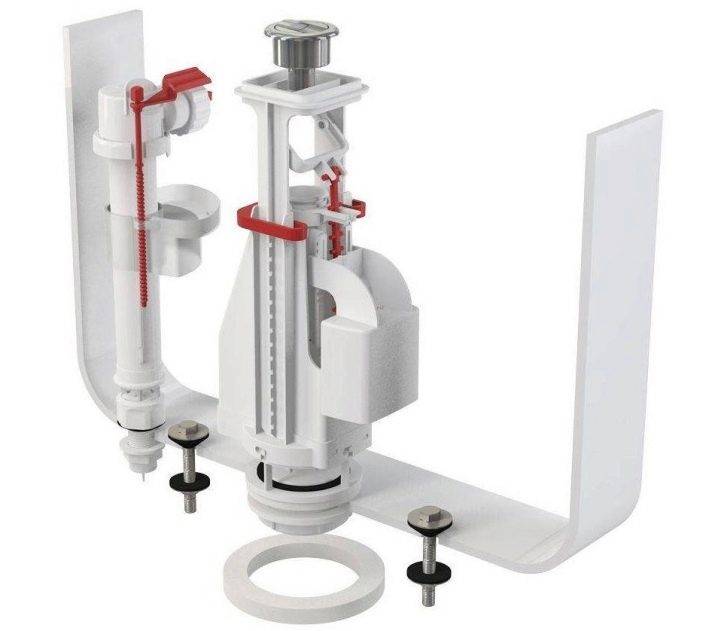
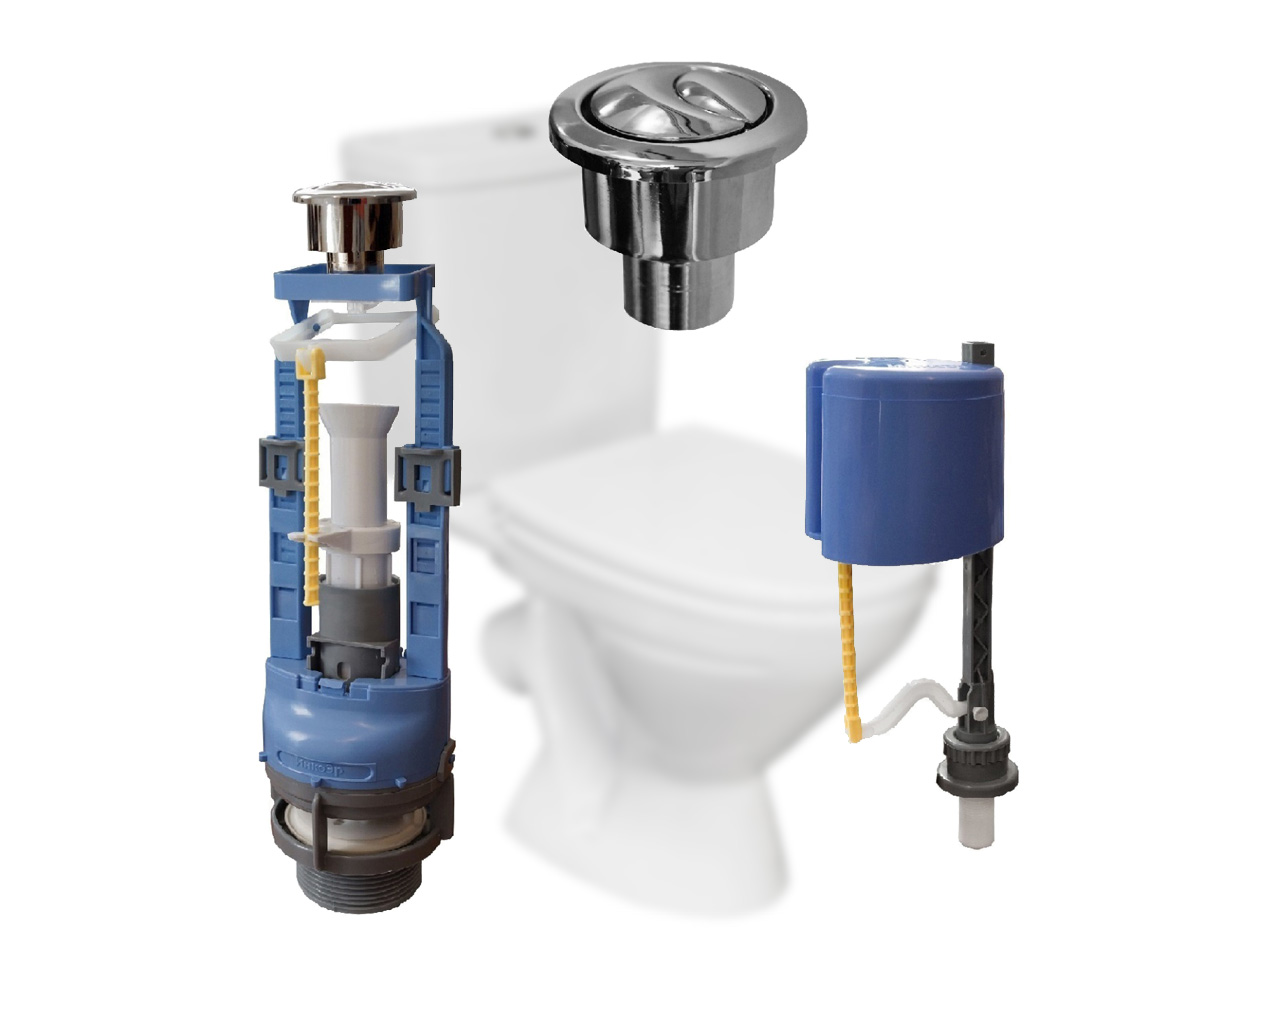
The second component that ensures the operation of the external sewage system is the drain valve for the toilet bowl. Its main components:
- drain hole, which is located at a certain angle;
- overflow tube;
- valve cover with rubber band;
- drain button and its mechanism of operation.
The entire system of drain fittings for different models has design differences. There are push-button models with full drain, with two modes of descent and with the function of interrupting the output of water.For two modes, the button looks like a key, which releases all the liquid from the bull in one position, and only part of it in the other. The drain interrupt function allows you to unlock the drain and close it with a button.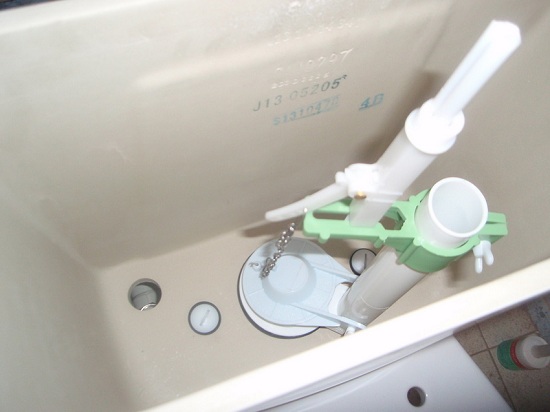
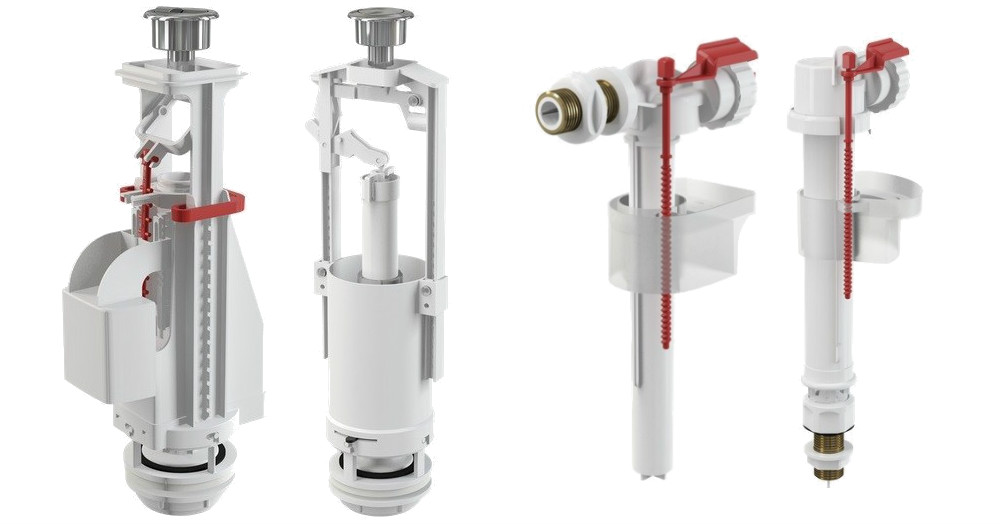
Float valves are most commonly found in three types:
- piston, which control the drain using a lever that has a rigid connection with the piston. In the initial position, the piston tightly closes the drain hole, and when the lever rises, the piston rises with it and the hole opens;
- the Croydon type is also based on a lever mechanism, but was used in earlier models of toilet bowls;
- membrane, having a silicone or rubber membrane, instead of a gasket. Such a membrane moves synchronously with the piston.
Expert advice! When their float fails, it is necessary to replace the entire locking mechanism.
When choosing fittings for the toilet cistern, some rules should be considered:
- the quality of the plastic from which the parts are made. It must have sufficient strength and be resistant to temperature extremes and mechanical stress;
- membranes are not always designed, especially imported versions, for insufficient quality of tap water, which has aggressive impurities. This leads to rapid wear of the membranes;
- manufacturer's brand: inexpensive options from an unverified manufacturer often have manufacturing defects.
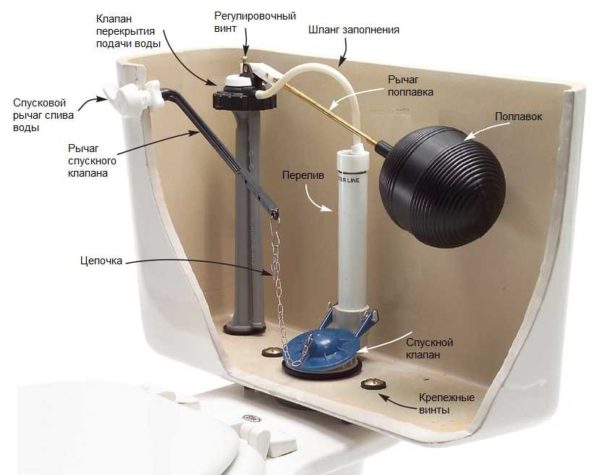
Internal organization
The toilet cistern consists of two simple systems: a set of water and its discharge. To troubleshoot possible problems, you need to understand how everything works and works. First, consider what parts the old-style toilet bowl consists of.Their system is more understandable and visual, and the operation of more modern devices will be clear by analogy.
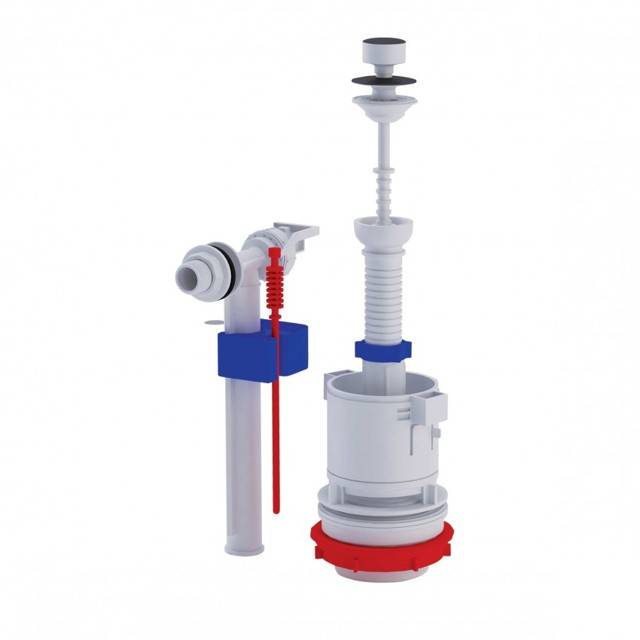
The internal fittings of a tank of this type are very simple. The water supply system is an inlet valve with a float mechanism, the drain system is a lever and a pear with a drain valve inside. There is also an overflow pipe - through it excess water leaves the tank, bypassing the drain hole.
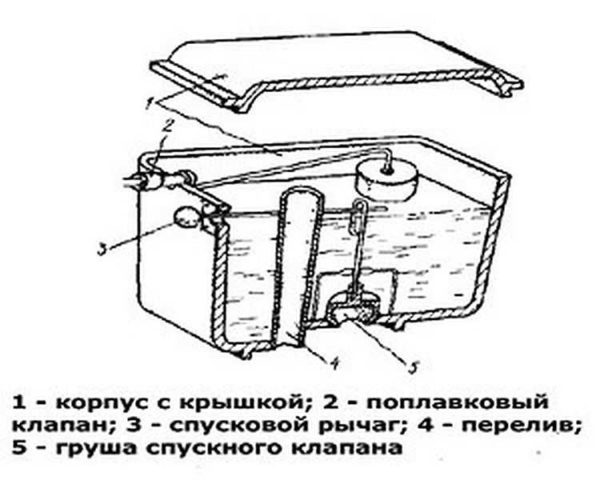
The device of the drain tank of the old design
The main thing in this design is the correct operation of the water supply system. A more detailed diagram of its device is in the figure below. The inlet valve is connected to the float using a curved lever. This lever presses on the piston, which opens / closes the water supply.
When filling the tank, the float is in the lower position. Its lever does not put pressure on the piston and it is squeezed out by water pressure, opening the outlet to the pipe. Water is gradually drawn in. As the water level rises, the float rises. Gradually, he presses the piston, blocking the water supply.
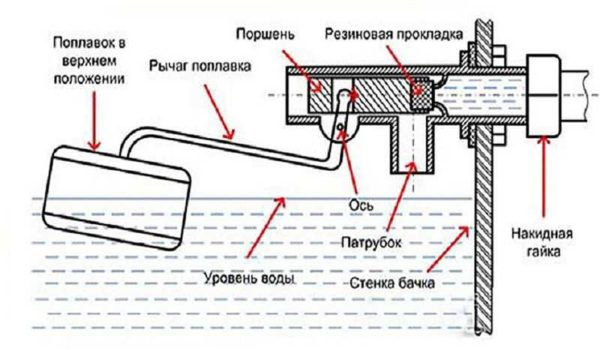
The device of the float mechanism in the toilet bowl
The system is simple and quite effective, the filling level of the tank can be changed by bending the lever a little. The disadvantage of this system is a noticeable noise when filling.
Now let's look at how the drain of water in the tank works. In this embodiment, the drain hole is blocked by a pear of the drain valve. A chain is attached to the pear, which is connected to the drain lever. By pressing the lever, we raise the pear, the water drains into the hole. When the level drops, the float goes down, opening the water supply. This is how this type of cistern works.
Modern models with lever drain
They make less noise when filling the cistern for toilet bowls with a lower water supply.This is a more modern version of the device described above. Here the tap / inlet valve is hidden inside the tank - in a tube (in the photo - a gray tube to which the float is connected).
Drain tank with water supply from below
The mechanism of operation is the same - the float is lowered - the valve is open, water flows. The tank was filled, the float rose, the valve turned off the water. The drain system remained almost unchanged in this version - the same valve that rises when the lever is pressed. The water overflow system has hardly changed either - this is also a tube, but it is brought out to the same drain.
You can clearly see the operation of the drain tank of such a system in the video.
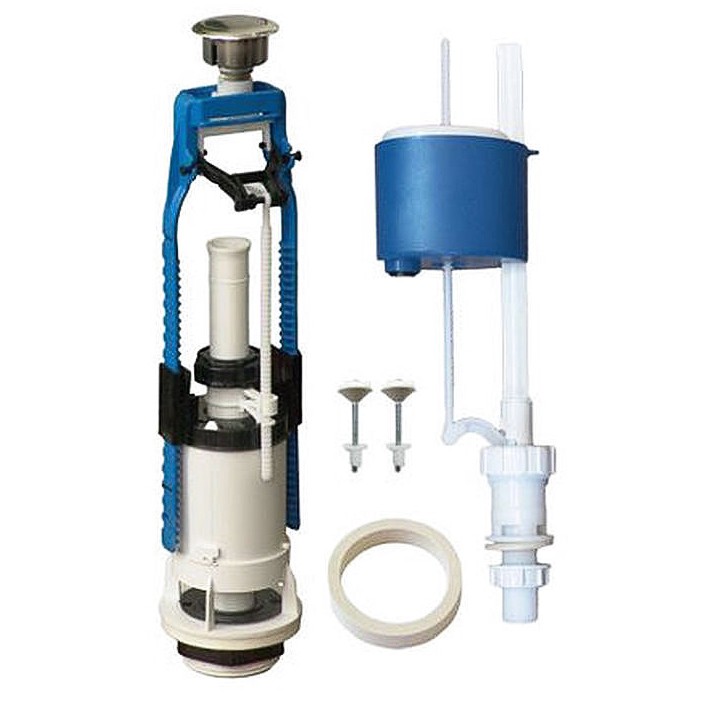
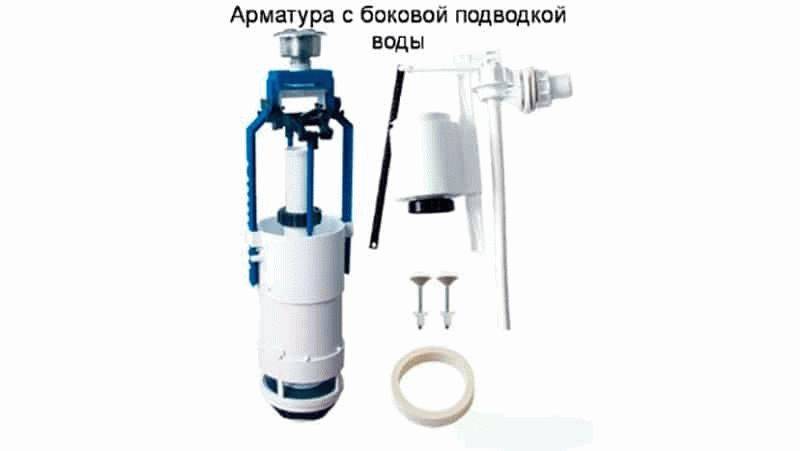
Models of toilet bowls with a button have similar water inlet fittings (some with side water supply, some with bottom) and drain fittings of a different type.
Tank device with push-button drain
The system shown in the photo is most often found in toilet bowls of domestic production. It is inexpensive and quite reliable. The device of imported units is different. They basically have a bottom water supply and another drain-overflow device (pictured below).


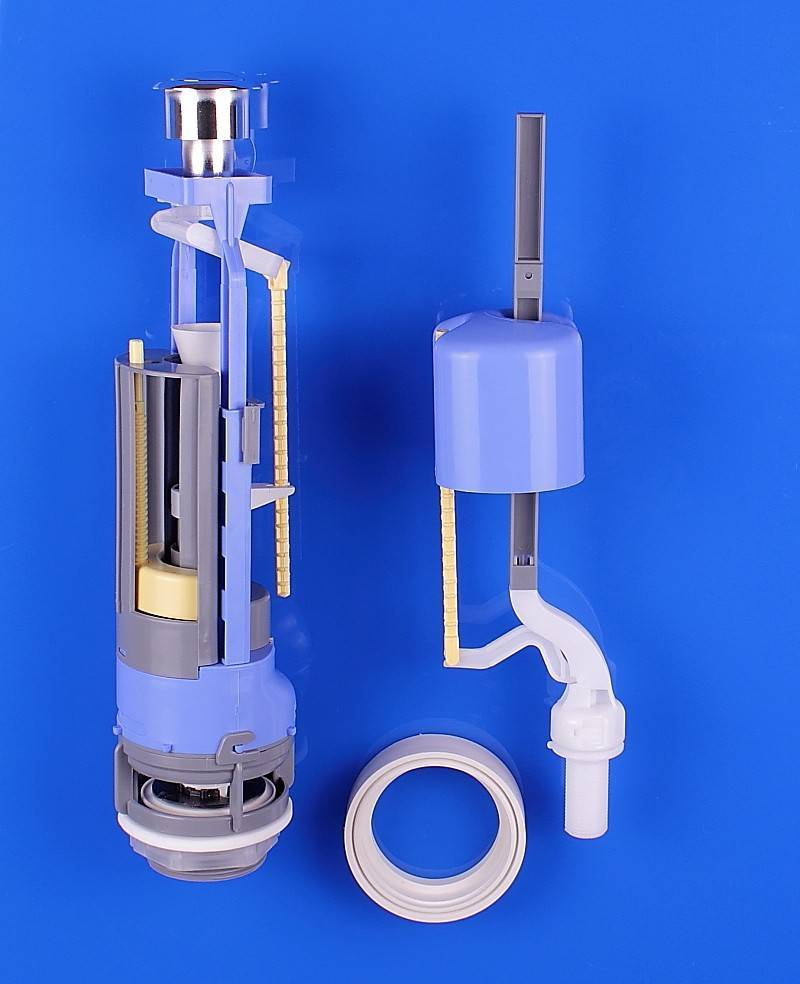


Imported cistern fittings
There are different types of systems:
- with one button, water is drained as long as the button is pressed;
- with one button, draining starts when pressed, stops when pressed again;
- with two buttons that release different amounts of water.
The mechanism of work here is slightly different, although the principle remains the same. In this fitting, when the button is pressed, a glass is raised that blocks the drain, while the stand remains motionless. In short, this is the difference. The drain is adjusted using a swivel nut or a special lever.
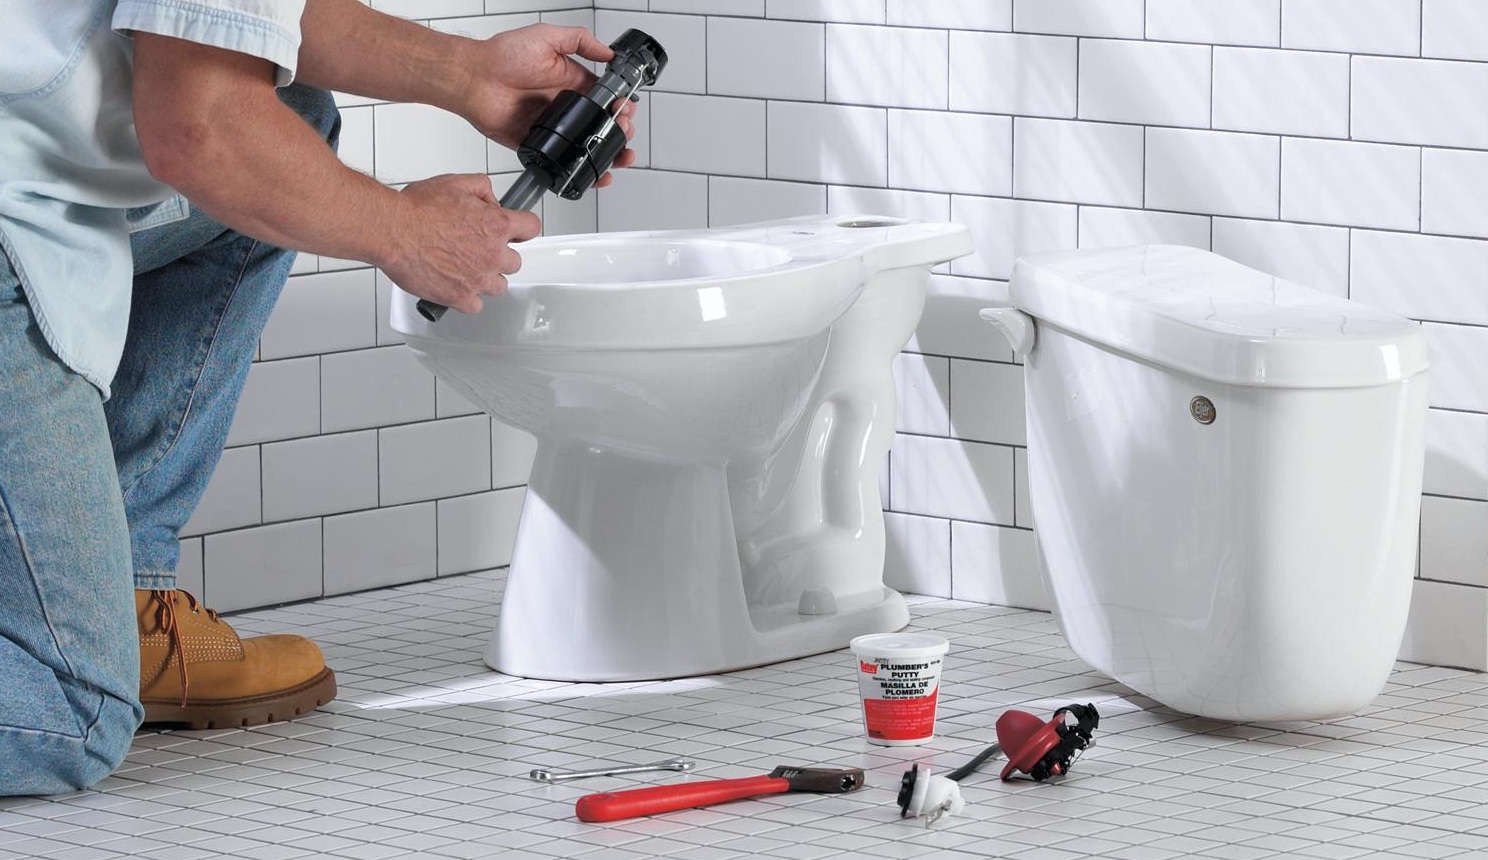
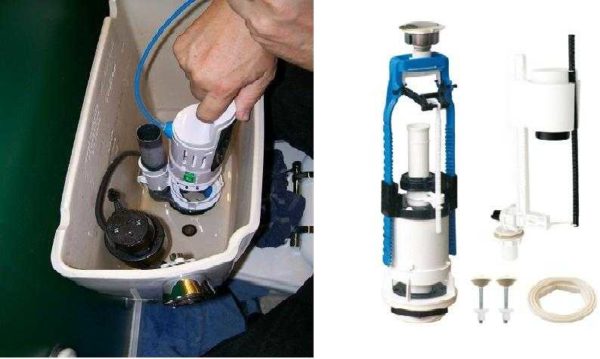
Replacing fittings with your own hands
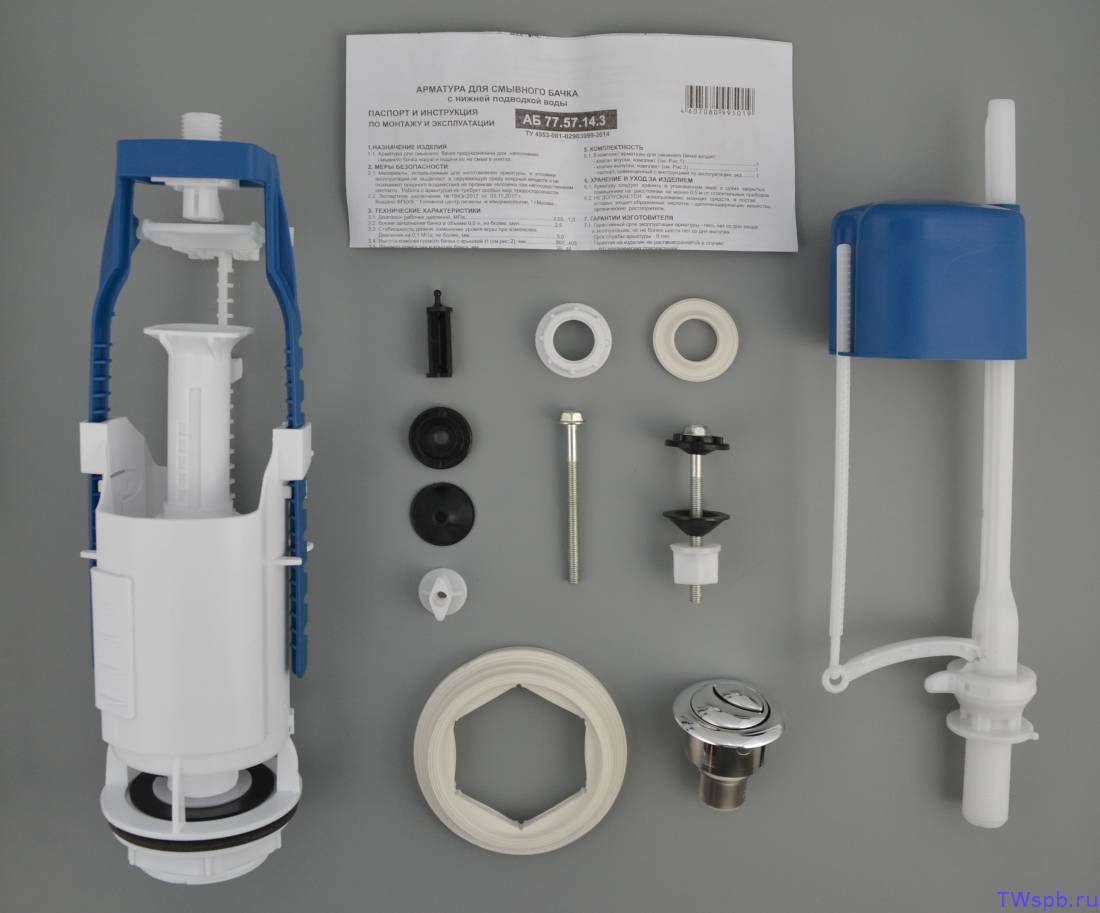
To replace the fittings you will need:
- wrenches of various diameters or an adjustable wrench;
- gasket installed between the tank and the toilet bowl;
- silicone sealant.
The process of replacing fittings for a toilet cistern is carried out in several stages:
- dismantling of old equipment;
- installation of a new drain system;
- final adjustment.
Rebar dismantling
To remove the fittings that have become unusable from the toilet bowl, you must:
- turn off the water supply. For this, a separate tap is located next to the plumbing device;
- unscrew the water supply hose connecting the tank and water pipes. After dismantling, a certain amount of water remains inside the hose, therefore, the operation must be carried out very carefully so as not to flood the room;
Removing the inlet hose
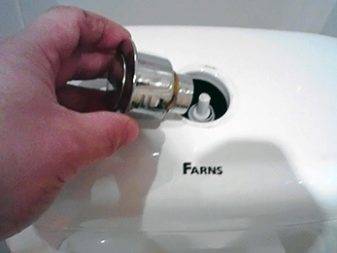
- the tank lid is removed. To do this, unscrew the drain button or lever;
Removing the button to remove the cover
- the remaining water is removed from the tank;
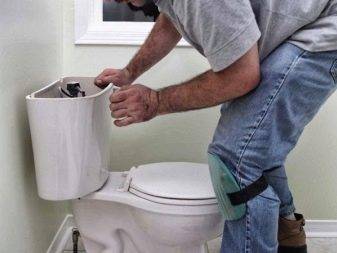
- the tank is removed. To carry out this procedure, it is necessary to unscrew the fixing bolts located at the bottom of the device;
Removing the cistern from the toilet
- reinforcement is removed. To remove the bleeder, it is necessary to unscrew the nut located in the lower part on the outside of the tank;
- if a drain device with a lower supply is installed, then in the same area the nut is unscrewed, which fixes the mechanism for filling the tank. To remove fittings with lateral inlet, unscrew the corresponding nut on the side of the container. After loosening all fixing elements, the devices can be easily removed from the drain tank.
Places for fixing fittings to the drain tank
After dismantling all the fittings, it is recommended to clean the inside of the tank from dirt and accumulated deposits.
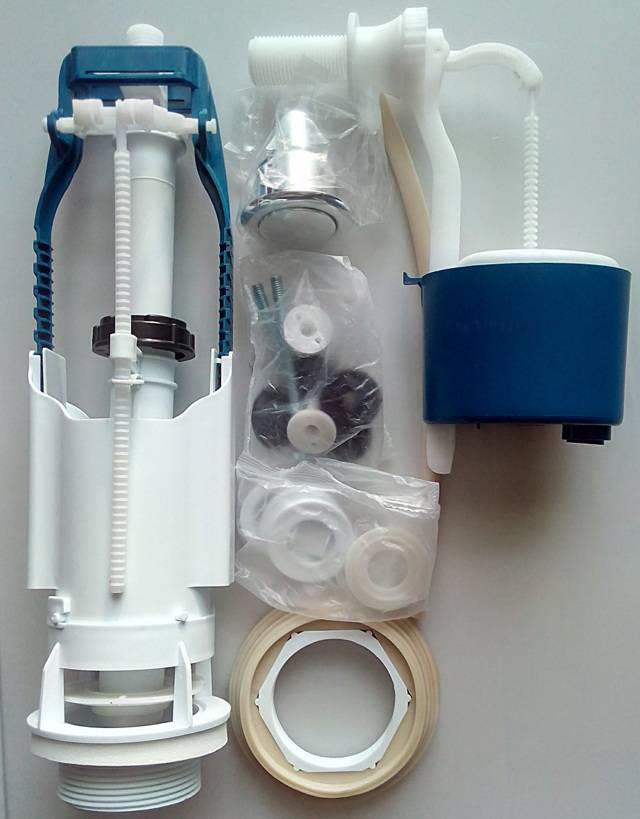
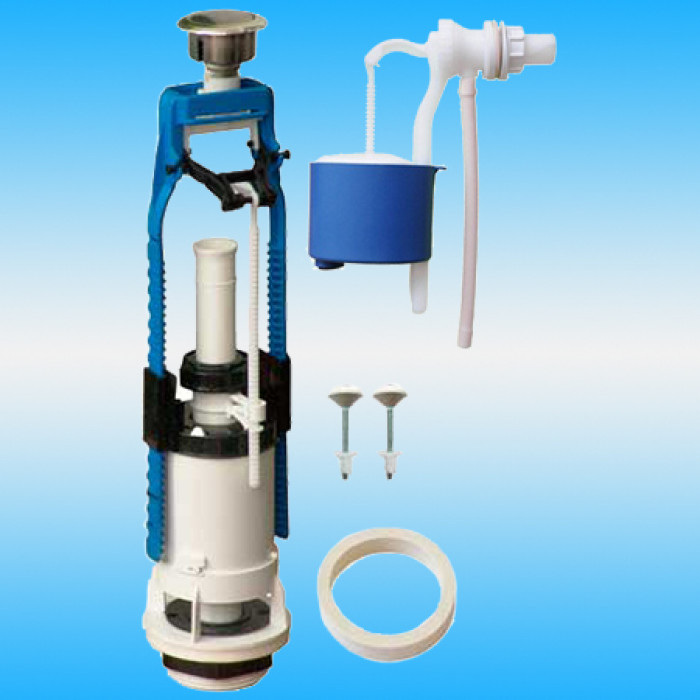
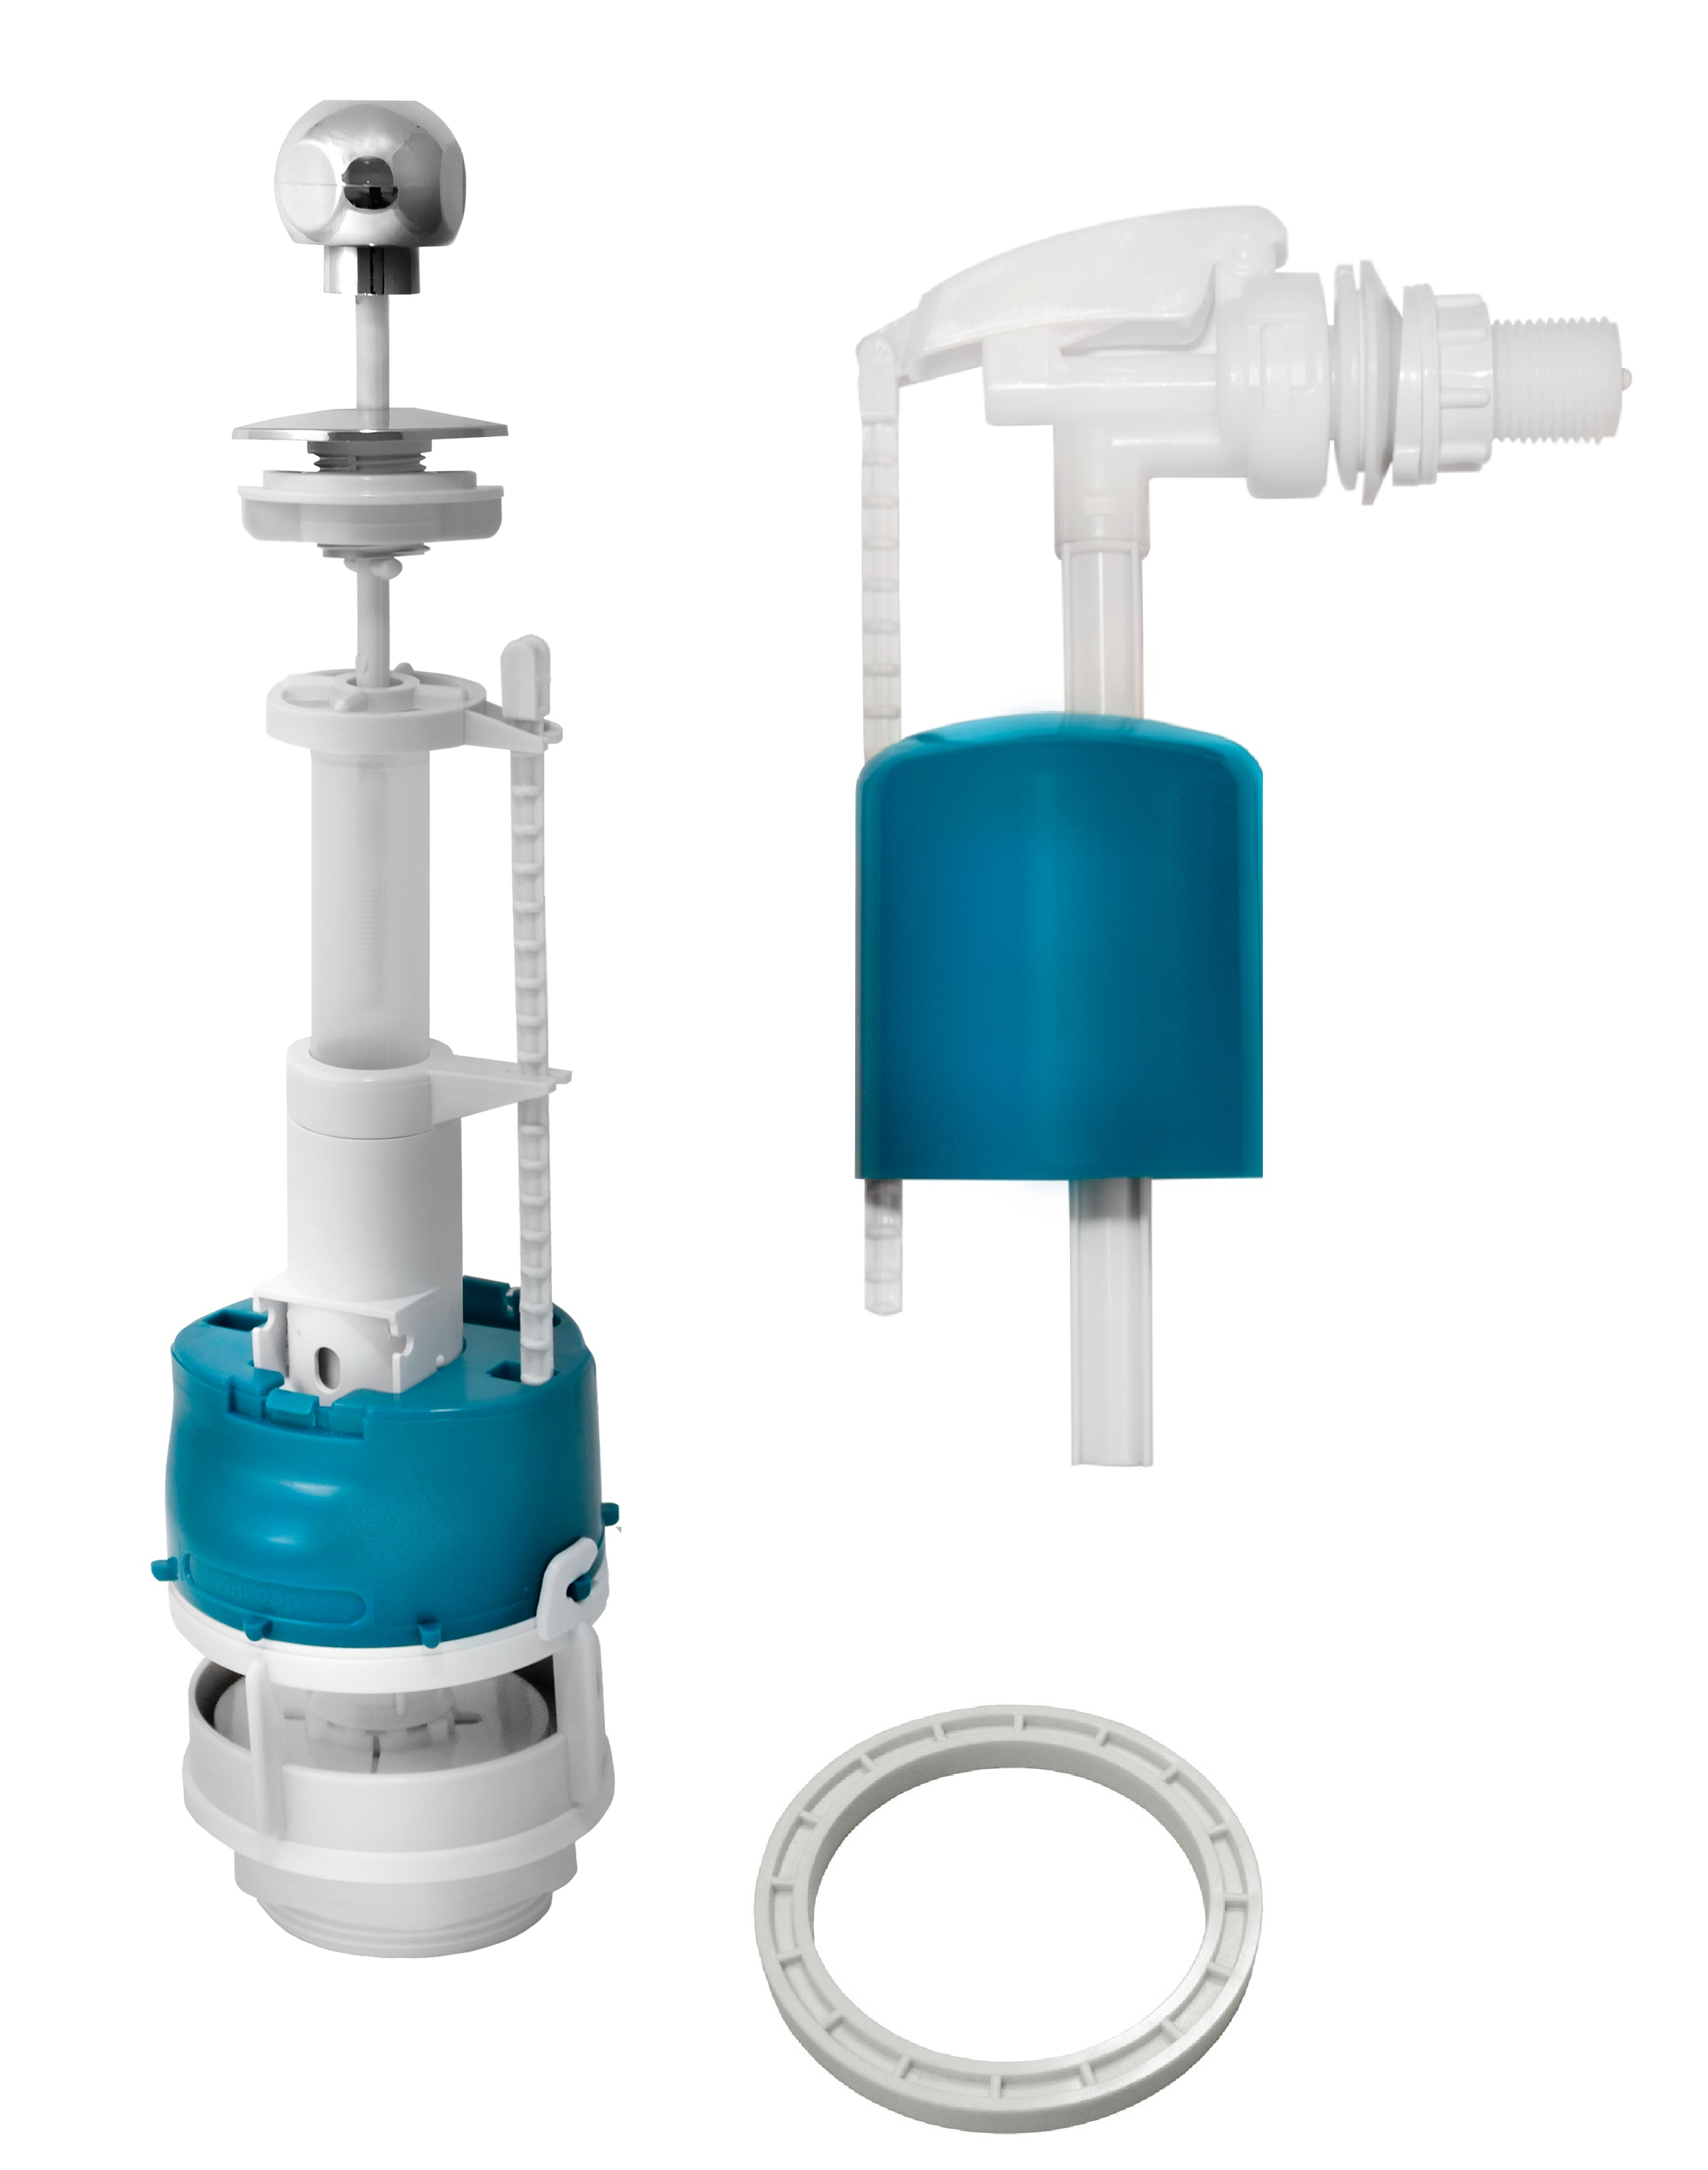
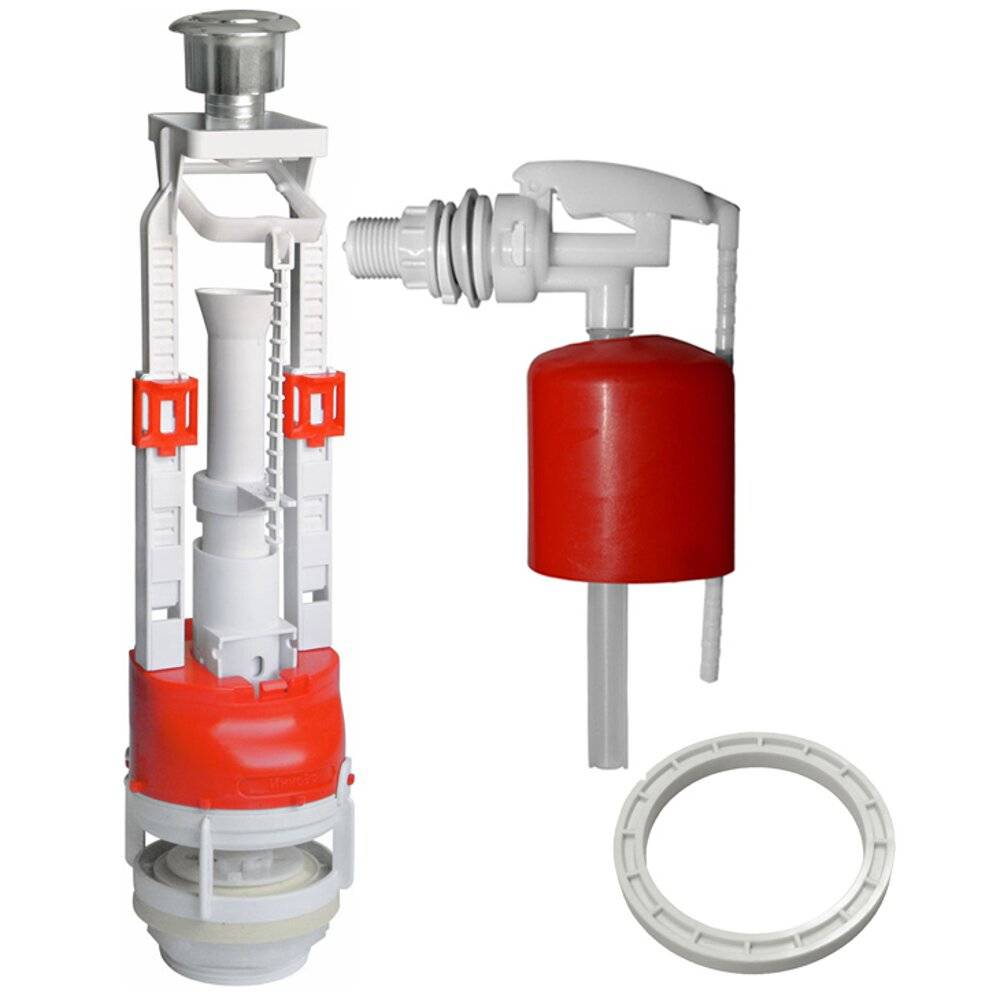
Installation of valves
Before installing a new set of fittings, it is recommended to check the completeness of the device. The installation process is as follows:
- assembly begins with the installation of the trigger (drain) mechanism. To do this, the fixing nut is unscrewed from the bottom of the device. The mechanism is inserted into the hole. A sealing gasket is installed between the release valve and the reservoir tank (silicone sealant can be used for additional sealing). The drain valve is fixed with a compression nut;
Trigger attachment to tank
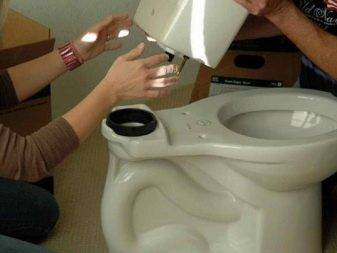
- the next step is to attach the tank to the toilet. Before installing the tank, it is recommended to replace the sealing ring. The tank is fixed with special bolts;
The scheme of fixing the tank to the toilet
- then the filling valve is fixed. A sealing gasket is also installed between the device and the tank, sealing the connection. The device is fixed with a nut;
Tank filling system attachment
- the last step is to connect the flexible hose to the filling mechanism.
Device adjustment
Shut-off valve for the drain tank is installed. However, final adjustment is required for correct operation.


Consider how to adjust the fittings yourself. In most cases, detailed instructions for performing this operation are attached to the device.
If a small amount of water is collected in the tank capacity, then it is necessary:
- adjust the filling mechanism.Depending on the type of device, the mechanism responsible for filling the toilet bowl can be regulated by a special pin that raises the float higher, or by a lever on which the float is fixed;
- adjust the position of the exhaust valve. To do this, loosen the latches holding the central part of the device (glass) and install it in the desired position.
Rebar alignment for correct operation
For the valve to work correctly, it is necessary that the water level in the tank be 4-5 cm below the edge of the tank and at least 1 cm below the overflow pipe.
After carrying out all the work, checking the operability of the system and the tightness of all attachment points, you can install a lid on the tank.
The whole process of replacing valves is presented in the video.
Tank repair
Any, even the most reliable mechanism, can fail sooner or later, this undeniable axiom applies to the drain system. Consider several characteristic shelves of the tank fittings and how to eliminate them without the help of a plumber.
What to do if the toilet cistern with a button is leaking?
There are several reasons that can lead to water leaking into the toilet bowl, we list them:
- The float on the shutoff valves has gone astray, as a result, after filling a certain level, water flows through the overflow pipe. This is easy to find by removing the tank cap and inspecting the insides. To eliminate the leak, it is enough to adjust the height of the float. Alternatively, there may be a loss of tightness by the float, in which case it must be removed and replaced, or repaired (sealed).
- The regulator responsible for the height of the button has shifted, as a result, a gap has formed between the drain valve and the hole in the toilet bowl.To fix the problem, just adjust the height of the button.
- The valve on the stop valve broke. It is checked by pressing the lever coming from the float, if the water does not stop flowing, this indicates a valve malfunction. In this case, the shut-off valves should be changed (not forgetting to first shut off the water supply).
- At the base of the overflow tube, the nut has loosened, as a result, water drips into the toilet bowl, the connection should be tightened.
No water is drawn into the tank
This malfunction clearly indicates problems with the shutoff valves, as a rule, this is a clogged valve or a float stuck on the pulley. In the first case, it is necessary to clean the valve (the procedure did not give results; the fittings will need to be replaced, but before that it is recommended to check the presence of water supply), in the second, adjust the float.
Decreased flow strength
If even with a completely filled tank, due to a weak flow, the cleaning of the toilet bowl is unsatisfactory, this indicates that the drain hole has become clogged. The reason may also be a jumped off rubber hose (installed to reduce noise). In this case, you will need to dismantle the tank (by disconnecting it from the water and removing the mounting bolts) and clean it.
Elimination of external leaks
If water begins to appear under the toilet, this indicates an external leak. It is available in the following locations:
- Between cistern and toilet. The reason can be caused by both improper installation of the tank, and aging of the gasket. In any case, the tank must be dismantled, then the joints must be cleaned and dried, and only after that a gasket of the same type should be installed.Silicone adhesive can be used to guarantee tightness (applied to the joints and gasket).
- At the point of water supply. Turn off the water, then remove the hose, wind the thread around the thread and twist the connection.
- The places where the mounting bolts are installed let water through, the reason is improper installation or the rubber seals have dried up. To eliminate the leak, it is necessary to unscrew and remove the fasteners (the tank can not be dismantled) and change the gaskets (we recommend installing conical gaskets).
Condensation forms on the tank
There are two reasons for such a visual manifestation of the laws of physics:
- High room humidity. Eliminated by installing forced ventilation.
- A malfunction associated with the constant flow of cold water into the tank (water is leaking into the toilet bowl). It is enough to eliminate the malfunction, and the condensate will stop collecting.
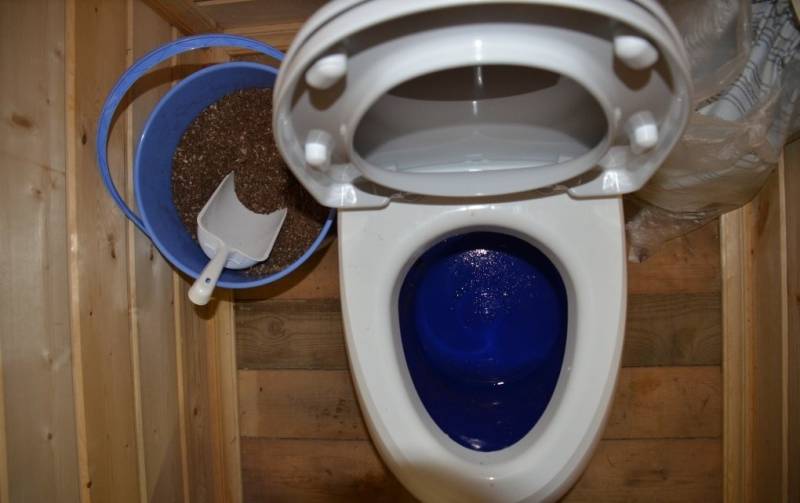
How to clean a rusty toilet bowl?
The accumulation of dirt and rust is one of the reasons for the failure of the drain mechanism, so regular maintenance is necessary. To do this, it is necessary to completely drain the water and treat the inner surface with special products, such as Domestos or Sanfor, and then rinse the tank several times with water.
There is another way to clean rust: Sanoxgel is poured into the water of the toilet tank, after which about half a liter of vinegar essence is added. Leave this mixture for a couple of hours, after which it is necessary to draw and drain water several times.
Mounting methods
 Flush toilet system
The ease of installation of the tank is often a decisive factor when choosing it.Next, we consider in detail the installation of drain structures of all three types.
The easiest option to use is a cistern mounted on the toilet bowl. You don't need a lot of tools to install it. This process is carried out as follows:
- The parts that make up the drain mechanism are fixed inside the tank
- A sealant is placed at the installation site of the tank. For greater certainty, you can use silicone glue. The seal will ensure the proper level of tightness in the place where the drain hole is located.
- The tank is placed on the toilet so that the location of the bolts of both parts strictly coincides, and the seal is under the bottom of the drain.
- Plastic washers and cone-shaped rubber gaskets are put on the connecting bolts, after which they are threaded through special holes. Then the next set of fasteners is pulled, also consisting of gaskets, only flat ones, and plastic washers. After that, the nuts are tightened with a wrench.
When carrying out the installation steps, make sure that the level of tightening of the bolts is moderate. Strong pressure on the gasket leads to its rapid wear, and the load of the bolts on the ceramic tank can cause cracks to appear on it. The final step will be to level the structure using a level and install plastic pads on the bolt heads. It remains only to put the tank lid back in place, start the water supply and make sure that the water drain button works.
Installation of a hinged tank will require some effort and the involvement of outside help.
First of all, it is necessary to decide where exactly on the wall the tank will be located, at what height. To do this, a pipe is attached to the toilet, which will connect it to the tank, and the right place is marked. The pipe is purchased in advance in accordance with the desired distance from the bowl to the drain tank.


In the right place, using a pencil and a tape measure, the points for the location of the tank mounts are marked.
With a drill or puncher, holes are drilled in the wall for fasteners and dowels are installed.
A drain device is assembled, which is fixed in the tank. A pipe is attached to the structure. The use of a sealing seal when attaching a hanging tank is also necessary.
The finished tank is hung on the wall, the bolts are tightened moderately tight. The pipe is connected to the toilet. After that, the previously blocked water is opened and the tightness and functioning of the toilet bowl as a whole is checked.
A hidden tank requires careful study of the manufacturer's diagram, but the general steps for installing it are the same for all models of this design:
- The optimal location of the installation is calculated and points are marked where the frame fasteners will be located.
- Holes are made in the determined places with a perforator using suitable drills in accordance with the material of the walls.
- The frame is attached to the floor and wall, after which all the components of the drain structure are installed on it.
- The drain outlet is connected to the water supply.
- The frame is sewn up with drywall or panels, then tiles are laid on top of the box.
- A flush button is placed in a pre-prepared hole.
- Upon completion of all stages, the toilet itself is attached.
Before making a final decision on the choice of a drain tank, study the opinions of people who have recently changed plumbing. Online reviews show that the installation is considered the most popular option today.
Owners of classic toilet bowls with a tank do not complain, but they call such models “dust collectors” and recommend paying attention to built-in devices.
Preventive measures
To avoid problems associated with leaks, with excessive consumption of water constantly flowing into the toilet bowl from the reservoir, it is important to know the design of the flush tank, to be able to adjust and repair the mechanisms. Recommended systematically:
Recommended systematically:
- check the condition of the flexible piping, connection node;
- inspect the fittings inside the tank, clean it from lime deposits and other contaminants;
- check the tightness of the connecting collar and bolt fasteners with a paper towel;
- inspect the tank and toilet for cracks.
Preventive measures allow you to extend the life of the mechanisms.
Troubleshooting
 Among the possible malfunctions and flaws in the work are the following:
- wasteful water consumption;
- tank prosthesis;
- weak drain;
- gasket wear.
- Tank leak. It turns out the reasons: the flow of water through the overflow or the wear of the pear. In the first case, the fittings are adjusted for lower fluid consumption: the brass lever is bent or the fixing screw is adjusted. When the pear is worn, it is weighted with metal hangers or replaced with a new one.
- Weak drain. To eliminate it, it is necessary to check the patency of the drain channel, perhaps something got into it. To fix the problem, pull out, if possible, this item.If this is not possible, then remove the tank and clean the channel.
- If the gaskets are worn, they must be replaced. Replacing gaskets is carried out only when certain parts are removed. Before installing a new gasket, the joint is degreased and cleaned of rust.
Rebar replacement
Often people believe that if one thing breaks, everything else will break. Many people prefer a complete replacement to a partial repair. This opinion is hasty and often erroneous, because you can try to correct the situation.
The algorithm for independent replacement actions is quite simple:
- Close the tank tap.
- Remove the drain button.
- Remove the cover and unscrew the hose.
- Take out the upper part of the column, to pull it out, rotate it 90 degrees.
- Unscrew fasteners.
- Remove the tank.
- Unscrew the fasteners and remove the old fittings.

After you have installed all the components, check for leaks, the correct functioning of the float system. Position valve float on the lever is adjusted so that when the supply valve is completely closed, the water level is below the drain line. Everything is quite simple, so it is not necessary to be a professional to do such a job.
You will learn more about replacing fittings in the toilet cistern in the following video.
Types of fittings for flush cisterns
The principle of operation of a conventional tank is not complicated: it has a hole through which water enters and a place where water is discharged into the toilet. The first is closed by a special valve, the second - by a damper. When you press the lever or button, the damper rises, and the water, in whole or in part, enters the toilet, and then into the sewer.


After that, the damper returns to its place and closes the drain point.Immediately after this, the drain valve mechanism is activated, which opens the hole for water to enter. The tank is filled to a certain level, after which the inlet is blocked. The supply and shutoff of water are regulated by a special valve.
A cistern fitting is a simple mechanical device that draws water into a sanitary container and drains it when a lever or button is pressed.
There are separate and combined designs of fittings that collect the volume of water necessary for flushing and drain it after activating the flushing device.
Separate and combined options
The separate version has been used for many decades. It is considered cheaper and easier to repair and set up. With this design, the filling valve and the damper are installed separately, they are not connected to each other.
The shut-off valve for the tank is designed in such a way that it is easy to install, dismantle or change its height.
To control the inflow and outflow of water, a float sensor is used, in the role of which even a piece of ordinary foam is sometimes used. In addition to a mechanical damper, an air valve can be used for the drain hole.
A rope or chain can be used as a lever to raise the damper or open the valve. This is a typical option for models made in retro style, when the tank is placed quite high.
In compact toilet models, control is most often carried out using a button that needs to be pressed. For those with special needs, a foot pedal may be installed, but this is a rare option.
In recent years, models with a double button have been very popular, which allow you to empty the tank not only completely, but also halfway to save some of the water.
The separate version of the fittings is convenient in that you can repair and adjust individual parts of the system separately.
Combined type fittings are used in high-end plumbing, here the drain and inlet of water are connected into a common system. This option is considered more reliable, convenient and expensive. If this mechanism breaks, the system will need to be completely dismantled for repair. The setup can also be a little tricky.
The fittings for the toilet cistern with side and bottom water supply are different in design, but the principles of setting up and repairing them are very similar
Materials for the manufacture of devices
Most often, toilet fittings are made of polymeric materials. Usually, the more expensive such a system is, the more reliable it is, but this method does not give clear guarantees. There are fakes of well-known brands, and quite reliable and inexpensive domestic products. An ordinary buyer can only try to find a good seller and hope for good luck.
Fittings made of bronze and brass alloys are considered much more reliable, and it is much more difficult to fake such devices. But the cost of these mechanisms will be much higher than that of plastic products.
Metal filling is usually used in high-end plumbing. With proper configuration and installation, such a mechanism functions smoothly for many years.
In bottom-fed toilets, the inlet and shut-off valve are very close.When adjusting the valve, make sure that the moving parts do not touch.
Place of water supply
An important point is the place where water enters the toilet. It can be carried out from the side or from below. When water is poured from the side hole, it produces a certain amount of noise, which is not always pleasant for others.
If the water comes from below, it happens almost silently. The lower water supply to the tank is more typical for new models released abroad.
But traditional cisterns of domestic production usually have a lateral water supply. The advantage of this option is the relatively low cost. The installation is also different. The elements of the lower water supply can be installed in the tank even before its installation. But the side feed is mounted only after the tank is installed on the toilet bowl.
To replace the fittings, they are selected taking into account the option of supplying water to the sanitary tank, it can be side or bottom
Features of the internal device
The basis of the flush tank for the toilet includes 2 systems - an automatic water intake system and a water drain mechanism. If you know the principle of operation of either system, then it is easy to troubleshoot the problems that have arisen. To make it easier to understand the mechanism of the flush tank, you should first familiarize yourself with the diagram of the old toilet cisterns, since their systems are more understandable and simpler than modern mechanisms.
The device of the old barrel
Tanks of old designs consist of elements for supplying water to the tank, as well as a drain device. An inlet valve with a float is included in the water supply mechanism, and a lever and pears are included in the drain system, as well as a drain valve.There is also a special tube, the function of which is to remove excess water in the tank without using the drain hole.


The normal operation of the entire structure depends on the reliable operation of the water supply elements. In the image below, you can see in more detail the scheme of automatic water supply. The inlet valve is connected to the float using a curly lever. One end of this lever is connected to a piston that either shuts off the water or opens the water.
Float mechanism device
When there is no water in the tank, the float is in its lowest position, so the piston is in the depressed position and water enters the tank through the pipe. As soon as the float rises and takes its extreme upper position, the piston will immediately shut off the water supply to the tank.
This design is quite simple, primitive, but effective. If you partially bend the curly lever, you can adjust the level of water intake in the tank. The disadvantage of the mechanism is that the system is quite noisy.
Water is drained from the tank using another mechanism, which consists of a pear blocking the drain hole. A chain is connected to the pear, which in turn is connected to the lever. By pressing this lever, the pear rises up and the water immediately flows out of the tank. When all the water has drained out, the pear will drop down and close the drain hole again. At the same moment, the float drops to its extreme position, opening the valve for supplying water to the tank. And so every time, after draining the water from the tank.
Toilet bowl device | Operating principle
Watch this video on YouTube
The device of modern models
Tanks that have a lower water supply to the tank make less noise.Therefore, we can safely say that this is a more modern version of the device. The inlet valve is hidden inside the tank, which is a tube-shaped structure. In the photo below, this is a gray tube that is connected to the float.
Construction of a modern cistern
The mechanism works in the same way as in older systems, so when the float is lowered, the valve is open and water enters the tank. When the water in the tank has reached a certain level, the float rises and blocks the valve, after which water can no longer flow into the tank. The water drain system also works in the same way, since the valve opens when the lever is pressed. The water overflow system functions in a similar way, but the tube is led into the same hole to drain the water.
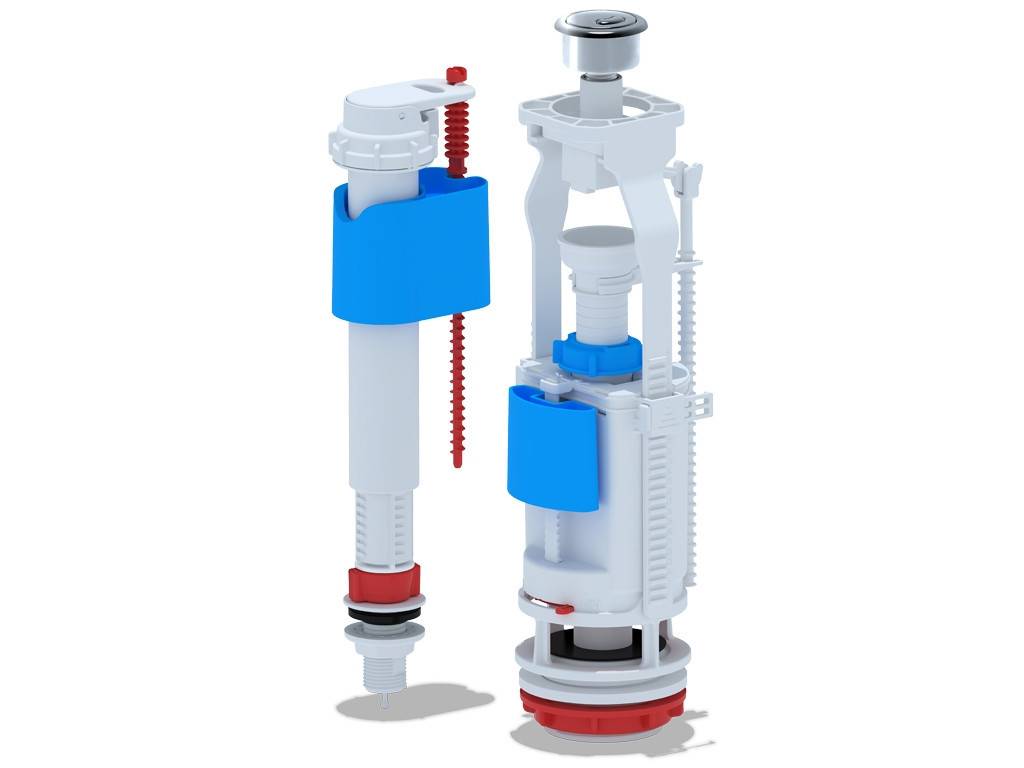
Drain cisterns with button
Despite the fact that a button is used as a lever in these tank designs, the water inlet mechanism has not undergone major changes, but the drain system is somewhat different.
With button
The photo shows a similar system, which is mainly used in domestic designs. It is believed that this is a fairly reliable and not expensive system. Imported cisterns use a slightly different mechanism. As a rule, they practice a lower water supply and a different drain / overflow device scheme, which can be seen in the photo below.
Imported fittings
There are several options for such systems:
- With one button.
- The water drains when pressed, and the drain stops when pressed again.
- With two buttons responsible for different amounts of water releasing into the drain hole.
And although the mechanism works in a completely different way, its principle of operation remains the same.In this design, by pressing the button, the drain is blocked, while the glass rises, and the rack remains in the mechanism itself. This is precisely the difference in the design of the mechanism itself. Drainage is regulated using a special rotary nut or a special lever.
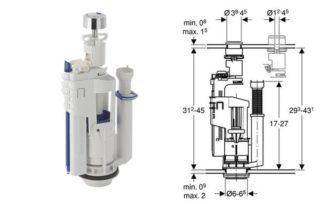
Drain mechanism for a ceramic tank manufactured by Alca Plast, model A2000
Watch this video on YouTube