- Idea number 4 - Apartment option
- The nuances of the apartment option
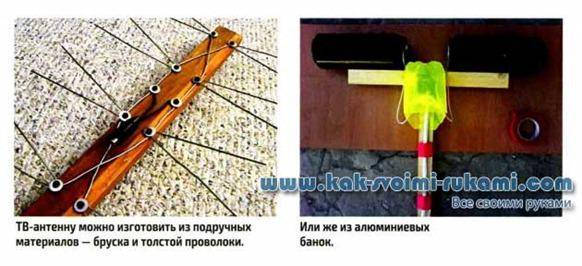
- How to make a do-it-yourself antenna for a TV from beer cans
- Place for antenna installation
- A simple Wi-Fi antenna from a metal can
- Dimensions and Assembly
- Swing for a summer residence
- Log swing
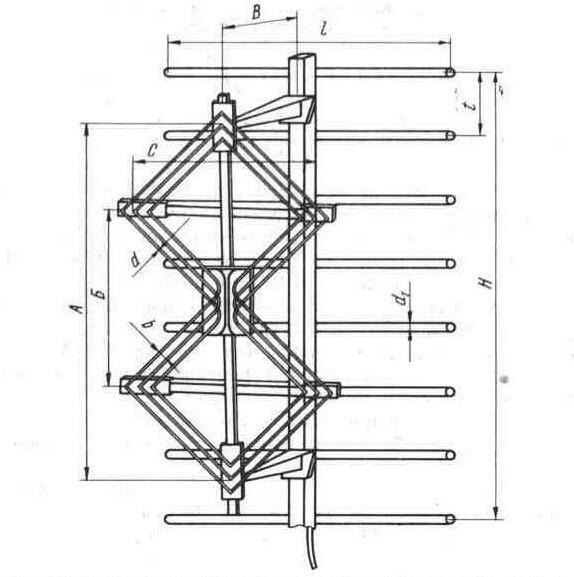
- Types of antennas
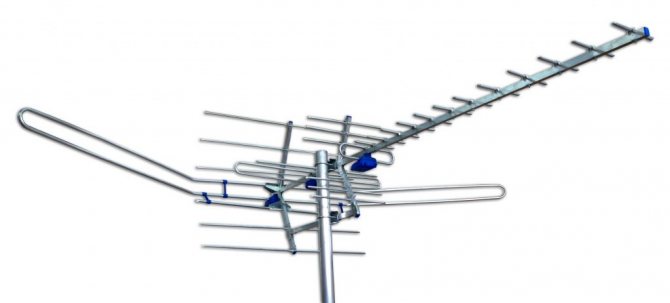
- Do-it-yourself digital TV antenna
- How to determine the channel and calculate the perimeter of the frames?
- Assembly
- Idea number 2 - Use wire
- The nuances of manufacturing signal catchers
- Making a garage oven from old rims
- materials
- Tools
- Manufacturing schemes
- Assembly order
- Required Components
- Blacksmith's forge from a cylinder
- In the first option, we will consider how to make a classic antenna for giving with your own hands
- Conclusions and useful video on the topic
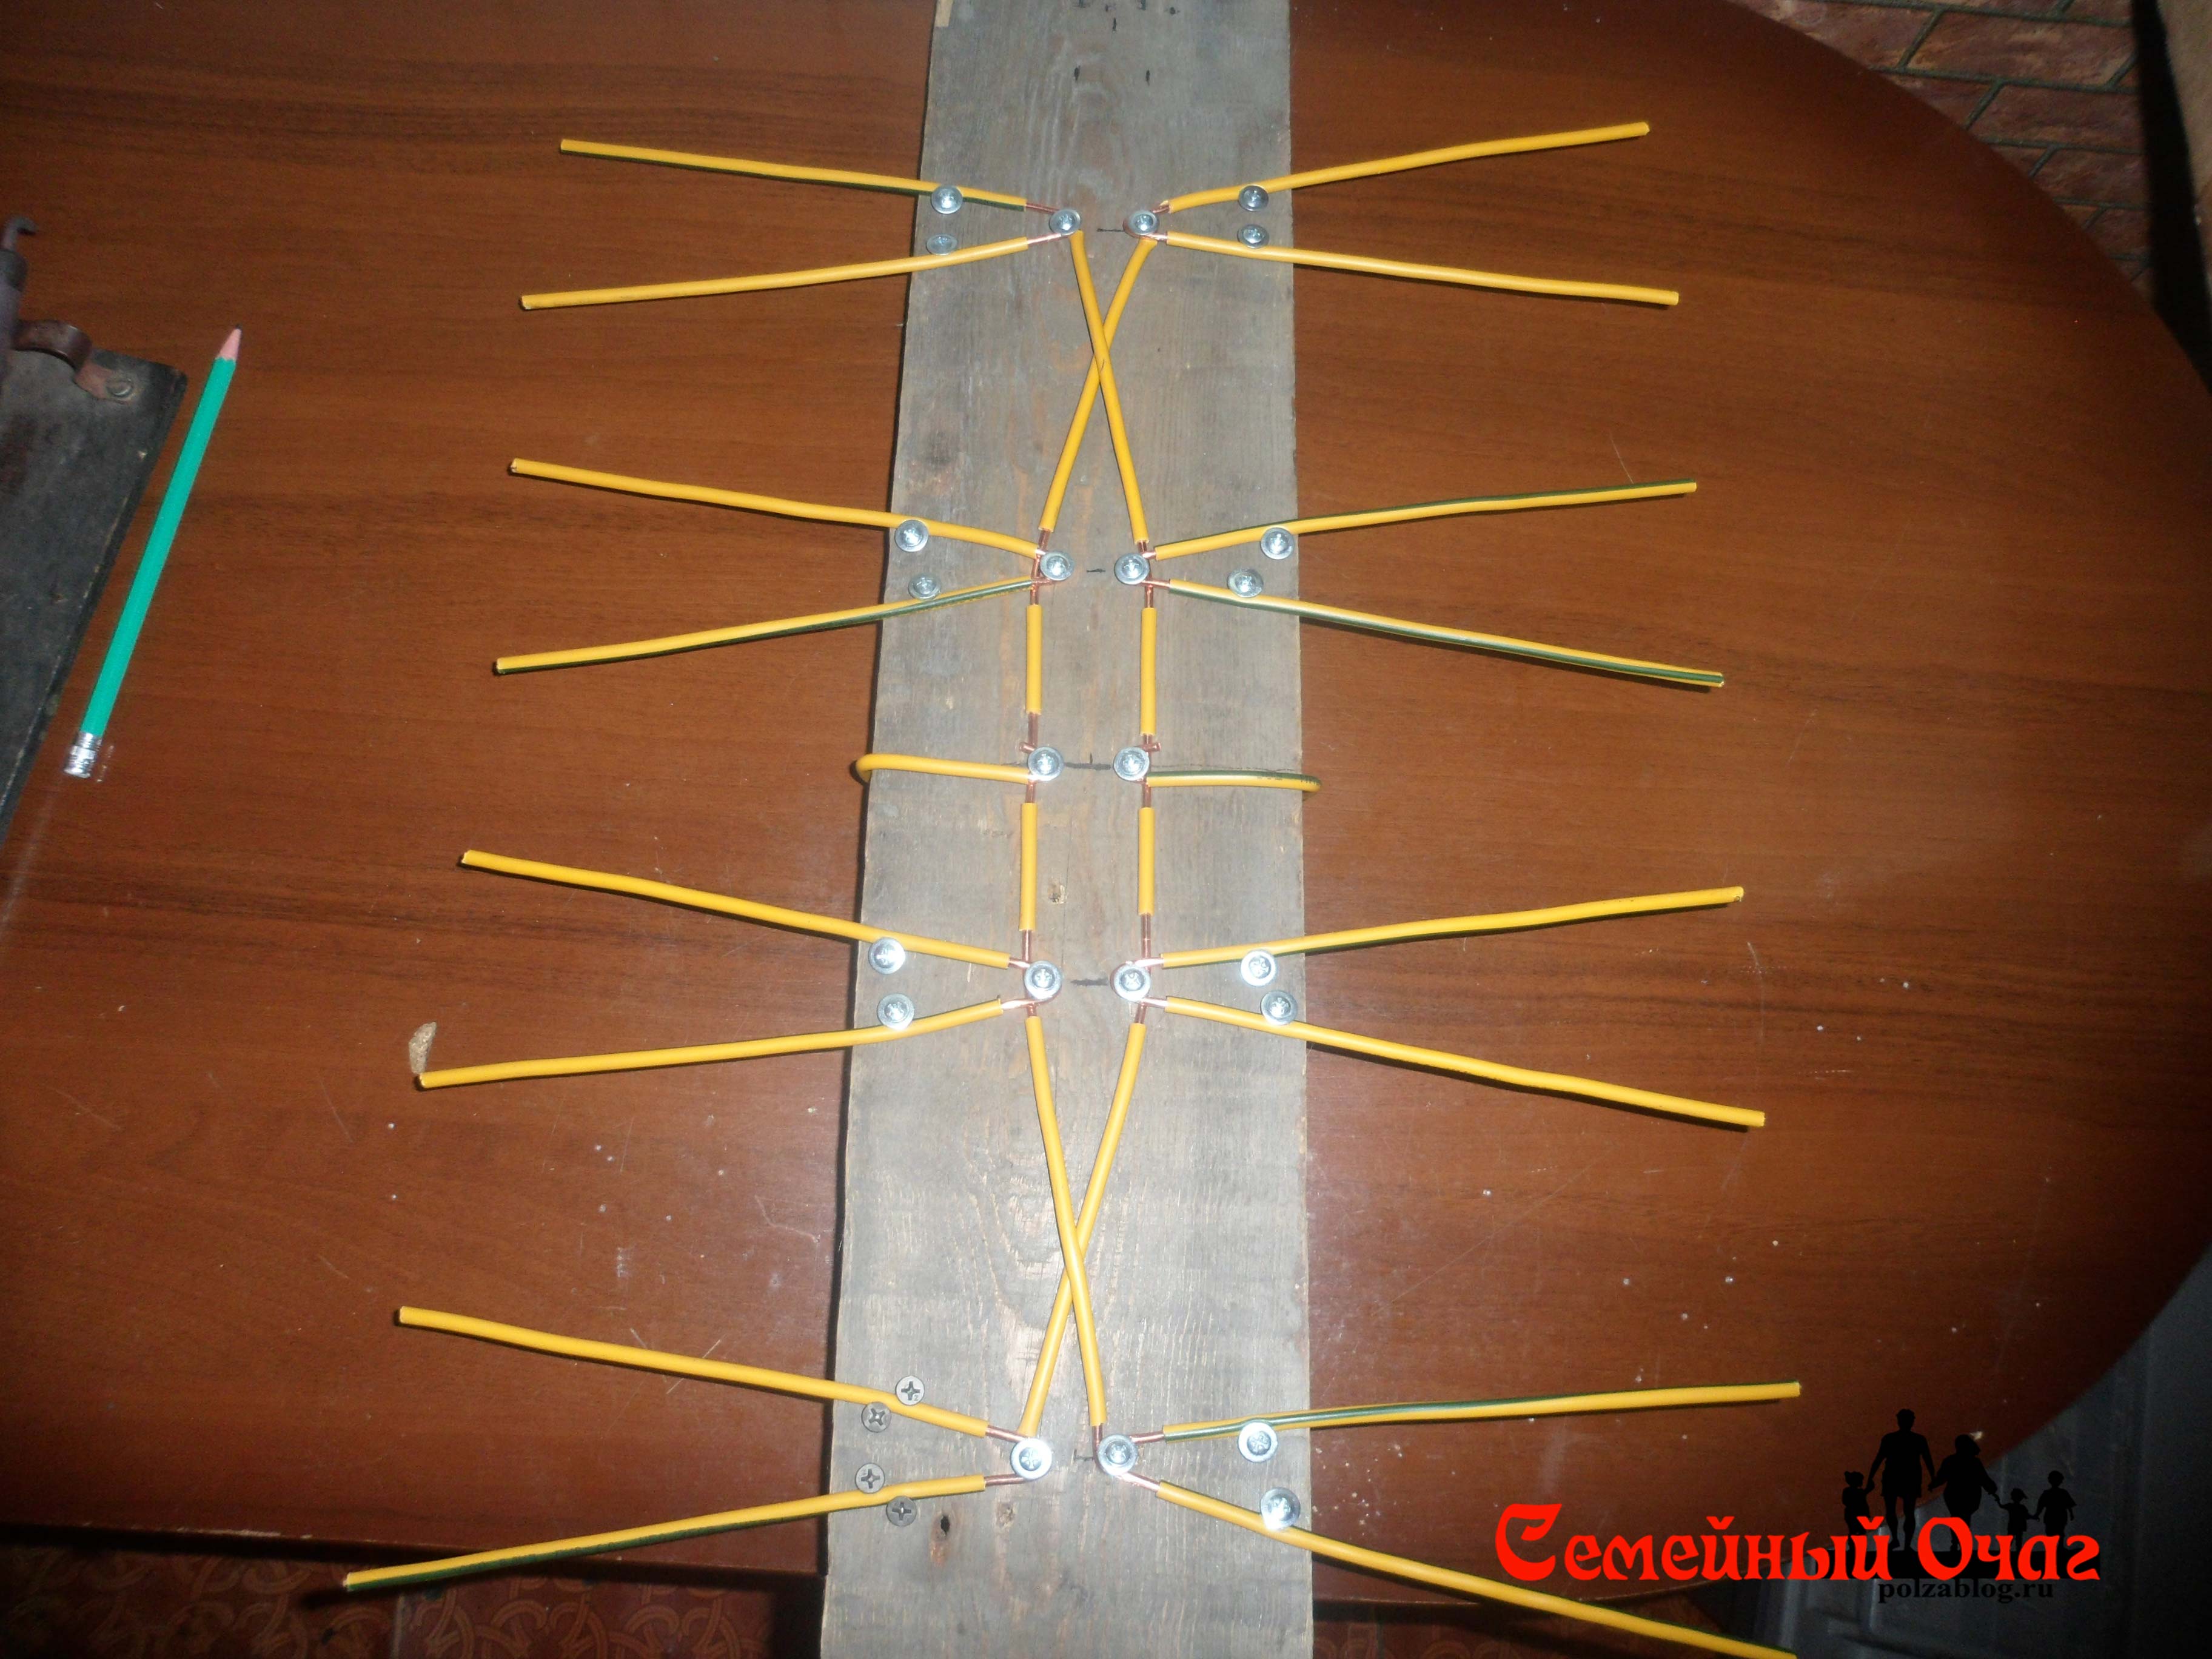
Idea number 4 - Apartment option
There is another way to make a powerful TV antenna from improvised means, which is suitable for both outdoor and residential use.
To make the device, you will need the following materials and tools:
- 4-meter wire made of copper, with a cross section of 4 mm.kv;
- a board of arbitrary thickness, 55 cm long and 7 cm wide;
- wood screws;
- ruler or tape measure;
- simple pencil;
- screwdriver;
- soldering iron;
- plug.
So, first, according to the drawing, we drill holes in the board: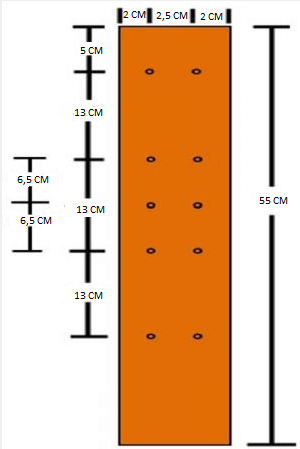
Then we transfer the drawing data to the board and drill in the appropriate attachment points.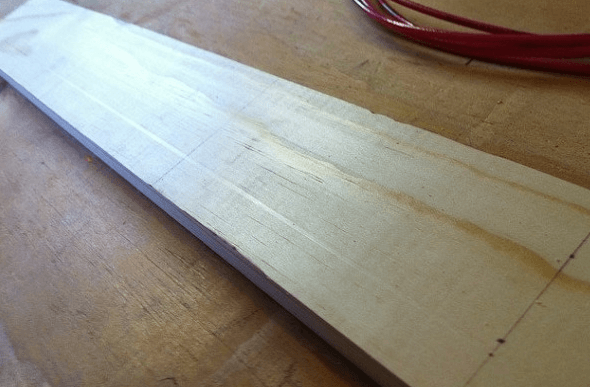
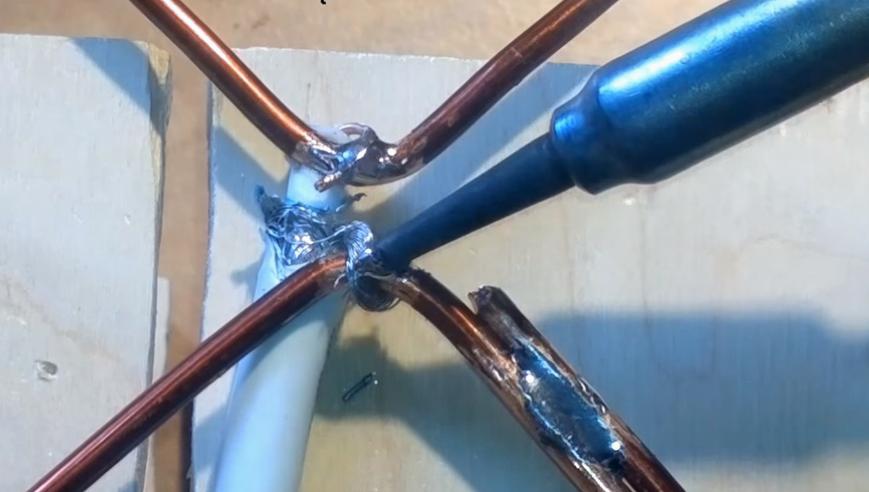
Next, the copper wire must be cut into 8 pieces of 37.5 cm each.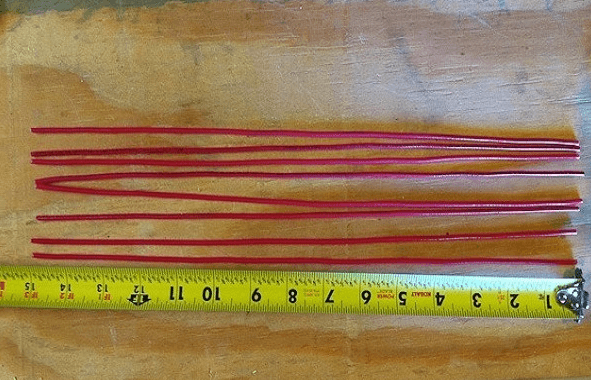
In the middle of each of the 37.5 cm pieces, insulation must be removed (as shown in the picture).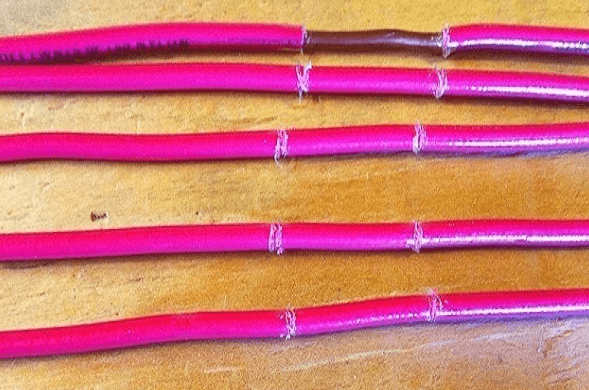
We cut off 2 more copper pieces of wire 22 cm long and conditionally divide them into 3 equal parts, while at the inflection points, again, we remove the insulation.
We bend the prepared wire in bare places
We draw your attention to the fact that for those segments that are bent in half, the distance between the ends must be made 7.5 cm (the optimal value for receiving a signal from a home-made television antenna)
Next, we attach a plug to the finished homemade product, and we already connect a television cable to it.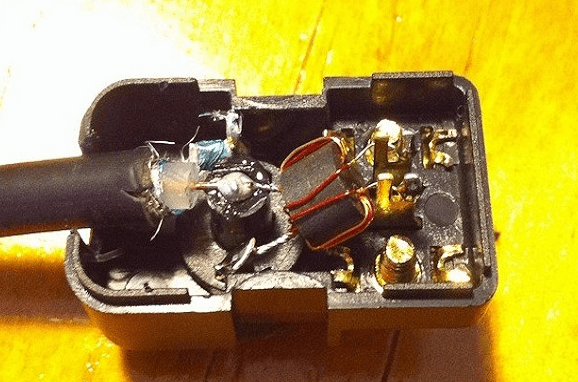
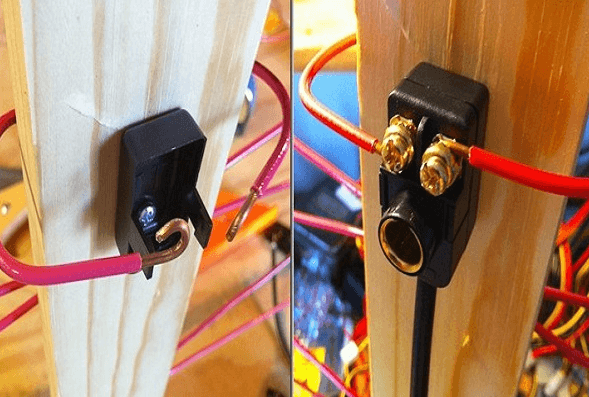 This completes the manufacturing process. We choose a suitable place and install the device.
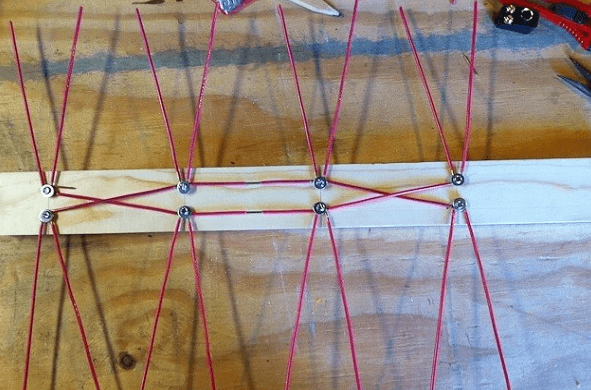
Here we have provided the most simple instructions
We hope that now you know how to make a home TV antenna with your own hands! We draw your attention to the fact that today on the Internet you can find many other options in which the inventors do without cans and wire. Of the other improvised means, copper tubes, aluminum disks and electrodes are often used.
The advantage of the options we have listed is that you can quickly make such antennas for a TV with your own hands without spending the whole evening on it.
Related content:
The nuances of the apartment option
In the manufacture of some types of structures, you can make an antenna amplifier with your own hands. Try to make a quality amplifier from scrap materials that can be used for both outdoor and residential use.
To carry out the work, the following materials will be required:
- a copper wire, the length of which is 4 m and a diameter of about 4 mm;
- a board of any thickness with a width of 70 mm and a length of 550 mm;
- self-tapping screws and a screwdriver;
- plug and soldering iron;
- pencil and ruler.
The device with an amplifier is a complex structure
Follow the drawing. First, drill holes in the surface. The parameters from the diagram are transferred to the board, and drilling is performed in certain places. Copper wire is measured and cut into 8 identical sections. In the middle of each segment, you need to remove the insulation.


Cut two pieces and conditionally divide them into three parts, and remove the insulation layer at the fold points. In bare areas, you need to bend the wire. On these elements, the distance between the edges should be about 75 mm. This is the optimal distance for good signal reception. You need to attach the plug to the prepared homemade product, and then connect the cable to it. Then you need to find a suitable place to mount the device.
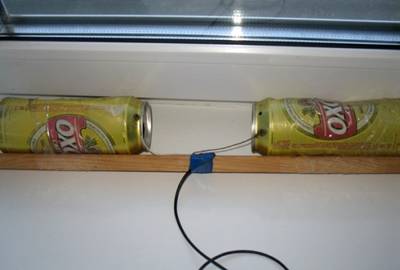
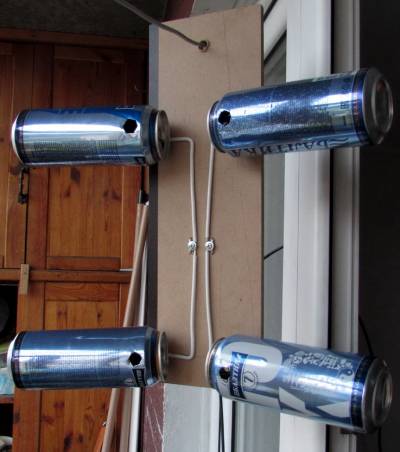
How to make a do-it-yourself antenna for a TV from beer cans
The easiest and most unusual option to construct an antenna is from beer cans. And according to experts, as many as seven channels will be shown. To build a similar structure, prepare:
- a couple of washed and dried beer cans;
- a couple of screws;
- several meters of television cable;
- soldering iron with tin;
- screwdriver;
- electrical tape.
Deciding how to make an antenna DIY for TV, keep in mind that the gap between the end parts of the cans should be about 75 mm. And the best location of the structure near the windows.
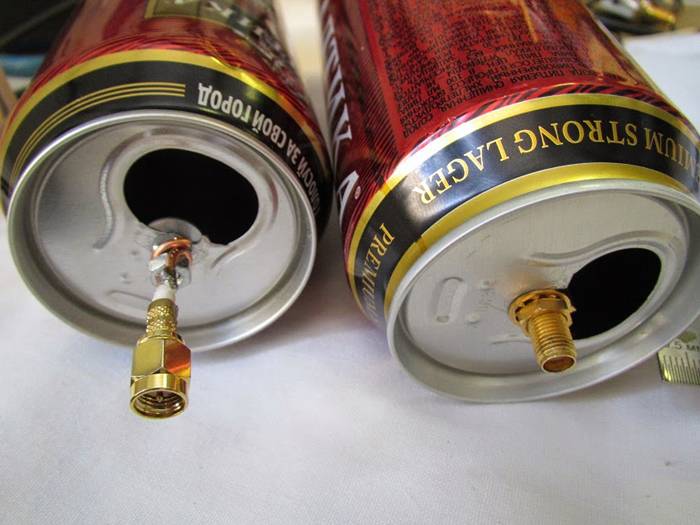
Mounting options can vary greatly
The stick that will be used for the antenna must be made of wood. You can not take aluminum or titanium options. Parts of the cable can be soldered.Instead of tape, you can use electrical tape or even a band-aid. The containers for creating the device must be well washed and must be dried. To improve image quality, you can "play around" with the distance between the banks.
Table 1. Beer can antenna
| Image | Stages |
|---|---|
 | Prepare the cable. To do this, make an incision from one edge and remove the insulation layer. Then the middle layer is cut off. At the other end, a plug for the TV antenna is mounted. |
 | Stock up on banks. Their capacity should be 1 liter! |
 | Bring contacts. One end of the twisted cable is mounted to the bank, and the other with a copper core to the other. Fastening is carried out using a screwdriver and a soldering iron. |
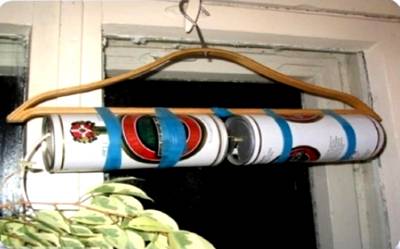 | Assemble the antenna. A trempel is used as a carrier. |
 | Set up your device. |
Related article:
Place for antenna installation
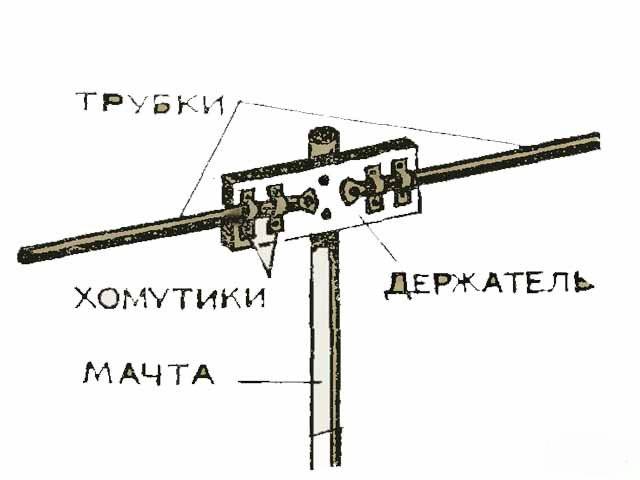
The main parameters for choosing a place to install an antenna are the location of the nearest repeater (TV tower) and the type of signal that you want to catch. An important role is played by the terrain on which the cottage is located. If it is in a ring of hills, be prepared for the fact that the antenna will have to be raised as high as possible.
Masts can be both bought and made independently - as an economical option for these purposes, they often choose a long wooden beam, a skinned trunk of a young tree, a small diameter pipe or a long metal
corner. Mast length varies depending on terrain conditions and surrounding buildings. After attaching the antenna to the mast, it is necessary to direct it towards the repeater. The cable from the antenna to the TV must be secured with clamps on the mast and passed inside the house.As a rule, for this, a hole is drilled in the window frame with an upward slope. This prevents rain from getting inside the room. In this case, it is better to leave the cable with a slight allowance in front of the frame, as it is subject to temperature changes.
The main question that appears after determining the direction of the antenna is where to mount the mast?
The most convenient option is to mount on the pediment of the building
But it must be used carefully, knowing for sure that it is possible to do this with external decoration and wall material. If you have aerated concrete or siding, it is better not to fasten the mast in this way
In such cases, the mast is attached parallel to the wall on the bar, which in turn rests on the rafters or stretch marks. Sometimes people resort to another method, mounting the antenna on a tall tree. If the house has a chimney, the antenna can be mounted on a pipe.
Making a decimeter antenna yourself is not difficult. But you need to understand that in cases where the repeater is located far away, a homemade antenna will have a rather weak and “dirty” signal. To eliminate interference, it is desirable to install a simple amplifier along the cable from the antenna to the TV (the closer to the antenna, the better), which can be found in any radio store.
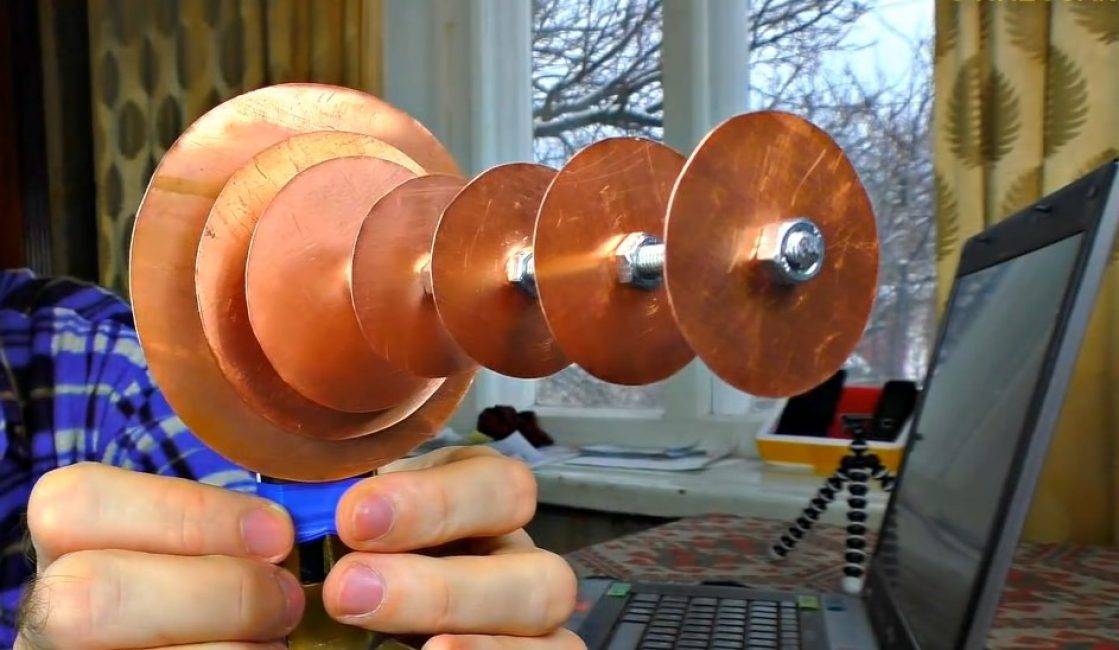
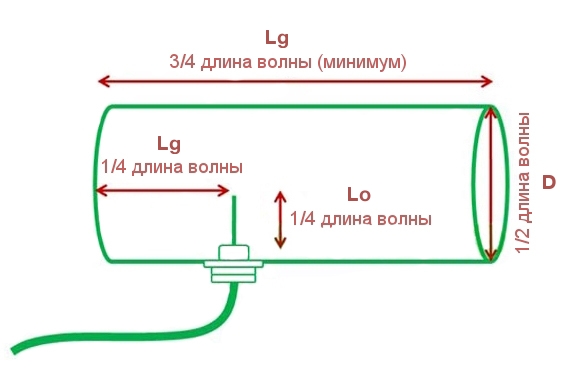
A simple Wi-Fi antenna from a metal can
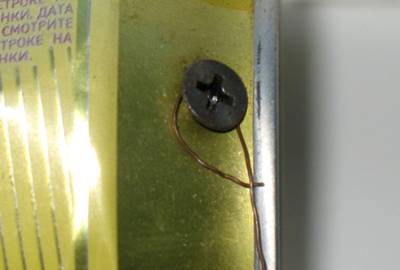
An antenna for receiving a Wi-Fi signal can also be made from improvised means - from a tin can. This do-it-yourself TV antenna can be assembled in half an hour. This is if everything is done slowly. The jar should be made of metal, with smooth walls. Tall and narrow cans are great.If you put a homemade antenna on the street, find a jar with a plastic lid (as in the photo). The cable is taken antenna, coaxial, with a resistance of 75 ohms.
This is what a can antenna for Wi-Fi looks like from the outside
In addition to the can and cable, you will also need:
- radio frequency connector RF-N;
- a piece of copper or brass wire with a diameter of 2 mm and a length of 40 mm;
- cable with a socket suitable for a Wi-Fi card or adapter.
The Wi-Fi transmitters operate on the 2.4 GHz frequency with a wavelength of 124 mm. So, it is advisable to choose a jar such that its height is at least 3/4 of the wavelength. For this case, it is better that it be more than 93 mm. The diameter of the jar should be as close as possible to half the wavelength - 62 mm for a given channel. There may be some deviations, but the closer to the ideal, the better.
Dimensions and Assembly
When assembling, a hole is made in the bank. It must be placed exactly at the right point. Then the signal will be amplified several times. It depends on the diameter of the selected can. All parameters are given in the table. Measure exactly the diameter of your jar, find the right line, have all the right sizes.
How to make a do-it-yourself Wi-Fi antenna
| D - diameter | Lower limit of attenuation | Upper damping limit | LG | 1/4 LG | 3/4 LG |
|---|---|---|---|---|---|
| 73 mm | 2407.236 | 3144.522 | 752.281 | 188.070 | 564.211 |
| 74 mm | 2374.706 | 3102.028 | 534.688 | 133.672 | 401.016 |
| 75 mm | 2343.043 | 3060.668 | 440.231 | 110.057 | 330.173 |
| 76 mm | 2312.214 | 3020.396 | 384.708 | 96.177 | 288.531 |
| 77 mm | 2282.185 | 2981.170 | 347.276 | 86.819 | 260.457 |
| 78 mm | 2252.926 | 2942.950 | 319.958 | 79.989 | 239.968 |
| 79 mm | 2224.408 | 2905.697 | 298.955 | 74.738 | 224.216 |
| 80 mm | 2196.603 | 2869.376 | 282.204 | 070.551 | 211.653 |
| 81 mm | 2169.485 | 2833.952 | 268.471 | 67.117 | 201.353 |
| 82 mm | 2143.027 | 2799.391 | 256.972 | 64.243 | 192.729 |
| 83 mm | 2117.208 | 2765.664 | 247.178 | 61.794 | 185.383 |
| 84 mm | 2092.003 | 2732.739 | 238.719 | 59.679 | 179.039 |
| 85 mm | 2067.391 | 2700.589 | 231.329 | 57.832 | 173.497 |
| 86 mm | 2043.352 | 2669.187 | 224.810 | 56.202 | 168.607 |
| 87 mm | 2019.865 | 2638.507 | 219.010 | 54.752 | 164.258 |
| 88 mm | 1996.912 | 2608.524 | 213.813 | 53.453 | 160.360 |
| 89 mm | 1974.475 | 2579.214 | 209.126 | 52.281 | 156.845 |
| 90 mm | 1952.536 | 2550.556 | 204.876 | 51.219 | 153.657 |
| 91 mm | 1931.080 | 2522.528 | 201.002 | 50.250 | 150.751 |
| 92 mm | 1910.090 | 2495.110 | 197.456 | 49.364 | 148.092 |
| 93 mm | 1889.551 | 2468.280 | 194.196 | 48.549 | 145.647 |
| 94 mm | 1869.449 | 2442.022 | 191.188 | 47.797 | 143.391 |
| 95 mm | 1849.771 | 2416.317 | 188.405 | 47.101 | 141.304 |
| 96 mm | 1830.502 | 2391.147 | 185.821 | 46.455 | 139.365 |
| 97 mm | 1811.631 | 2366.496 | 183.415 | 45.853 | 137.561 |
| 98 mm | 1793.145 | 2342.348 | 181.169 | 45.292 | 135.877 |
| 99 mm | 1775.033 | 2318.688 | 179.068 | 44.767 | 134.301 |
The procedure is as follows:
- Cut off the top of the jar, wash thoroughly, dry.
-
On the sidewall we mark the point at which the emitter should be installed. She needs to be screwed up. We take something with a sharp tip (a large-diameter drill is suitable, for example), put it exactly at this point, and strike the drill.It should not be strong so that the bank is not wrinkled. But not too weak - there should be a trace.
-
- You will need a set of drills - you need to start drilling from a small size, gradually increasing to 12-16 mm - according to the size of the purchased RF connector.
- We process the edges with a file or sandpaper.
-
It is necessary to solder a copper or brass wire of a given length to the RF connector - 30.5 mm. For normal soldering quality, we process the end of the wire with sandpaper until pure metal appears (without an oxide film). It is more convenient to solder by clamping the connector in a vise, putting the output vertically up. We heat the processed end of the wire with a soldering iron, solder it to the output of the RF connector. It is necessary to ensure that the emitter is strictly vertical.
- We install the connector in the prepared place in the bank, tighten it with a clamping bolt.
- Solder the cable to the back of the connector.
- Do-it-yourself Wi-Fi antenna is ready.


You can do without an RF connector, but with it everything is much simpler - it is easier to set the emitter vertically upwards, connect the cable that goes to the router (router) or Wi-Fi card.
Swing for a summer residence
Trips to the country with the family suggest the presence of entertainment elements on the site that will delight children. The most common way to occupy young summer residents is a swing.
Building a swing yourself is not an easy task, but quite doable. Of course, you can always take a stick, tie it with a rope and hang the structure on a tree, but this can hardly be called a full-fledged swing. Real craftsmen prefer to build comfortable structures with a comfortable seating area.
Log swing
Log swing
Structural components:
- two logs;
- strong rope.
Indicators:
- log diameter - 85 mm;
- log length - 700 mm;
- the distance between the ropes is 500 mm.
Making a swing
Stage 1. We stretch the ropes between the logs.
Stage 2. We wrap each log with ropes.
Stage 3. We release the ropes out.
Stage 4. We tighten the ropes by 3 knots.
Stage 5. We fix the swing on the tree.
Types of antennas
There are different types of antennas that you can make yourself at home:
All-wave antenna. Easy to make and cheap. It is possible to make such an antenna in just an hour. This is an ideal option for urban residents, but it will no longer work in settlements far from television towers.


Z-shaped antenna. This option is quite labor-intensive, both in terms of material and physical. However, it has very good technical characteristics, it can receive a wide range of signals.

If you are making several antennas, then you will need to lay a cable between them, which will have to pass through the zero potential value.

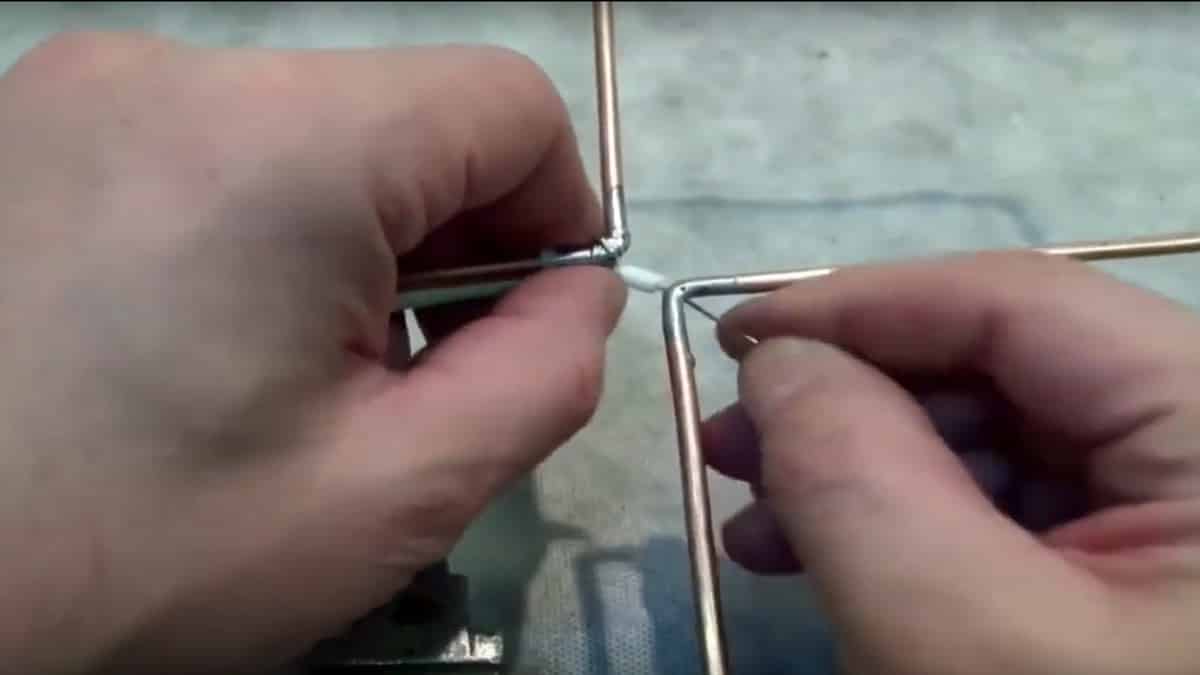
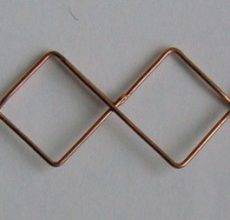
Do-it-yourself digital TV antenna
Antenna design - frame. For this version of the receiver, you will need a crosspiece made of wooden boards and a television cable. You will also need electrical tape, a few nails. All.


We have already said that to receive a digital signal, you only need a decimeter terrestrial antenna and an appropriate decoder. It can be built into TVs (new generation) or made as a separate device. If the TV has a signal reception function in the DVB T2 code, connect the antenna output directly to the TV. If the TV does not have a decoder, you will need to purchase a digital set-top box and connect the output from the antenna to it, and it to the TV set.
How to determine the channel and calculate the perimeter of the frames?
In Russia, a program has been adopted, according to which towers are constantly being built. By the end of 2015, the entire area should be covered by repeaters. On the official website http://xn--p1aadc.xn--p1ai/when/ find the closest tower to you. It shows the broadcast frequency and channel number. The perimeter of the antenna frame depends on the channel number.

It looks like a map of the location of digital television towers
For example, channel 37 broadcasts at a frequency of 602 MHz. The wavelength is considered as follows: 300 / 602 \u003d 50 cm. This will be the perimeter of the frame. Let's calculate the other channel in the same way. Let it be channel 22. Frequency 482 MHz, wavelength 300/482 = 62 cm.
Since this antenna consists of two loops, the length of the conductor must be equal to twice the wavelength, plus 5 cm per connection:
- for channel 37 we take 105 cm of copper wire (50 cm * 2 + 5 cm = 105 cm);
- for 22 channels you need 129 cm (62 cm * 2 + 5 cm = 129 cm).
Maybe you are more interested in working with wood? How to make a birdhouse is written here and about making a doghouse - in this article.
Assembly
Copper wire is best used from the cable that will go further to the receiver. That is, take the cable and remove the sheath and braid from it, freeing the central conductor of the desired length
Handle with care, it can't be damaged.
Next, we build a support from the boards, as shown in the figure. To do this, you need to determine the length of the side of the frame. Since this is an inverted square, we divide the found perimeter by 4:
- for channel 37: 50 cm / 4 = 12.5 cm;
- for 22 channels: 62 cm / 4 = 15.5 cm.
The distance from one nail to another must correspond to these parameters.The laying of copper wire starts on the right, from the middle, moving down and further along all points. Only in the place where the frames come close to one another, do not short the conductors. They should be at some distance (2-4 cm).
Homemade antenna for digital television
When the entire perimeter is laid, the braid from a cable a few centimeters long is twisted into a bundle and soldered (wound if it is not possible to solder) to the opposite edge of the frame. Next, the cable is laid as shown in the figure, winding it with electrical tape (more often, but the laying route cannot be changed). Then the cable goes to the decoder (separate or built-in). All the antenna for giving with your own hands for receiving digital television is ready.
How to make an antenna for digital television with your own hands - another design - is shown in the video.
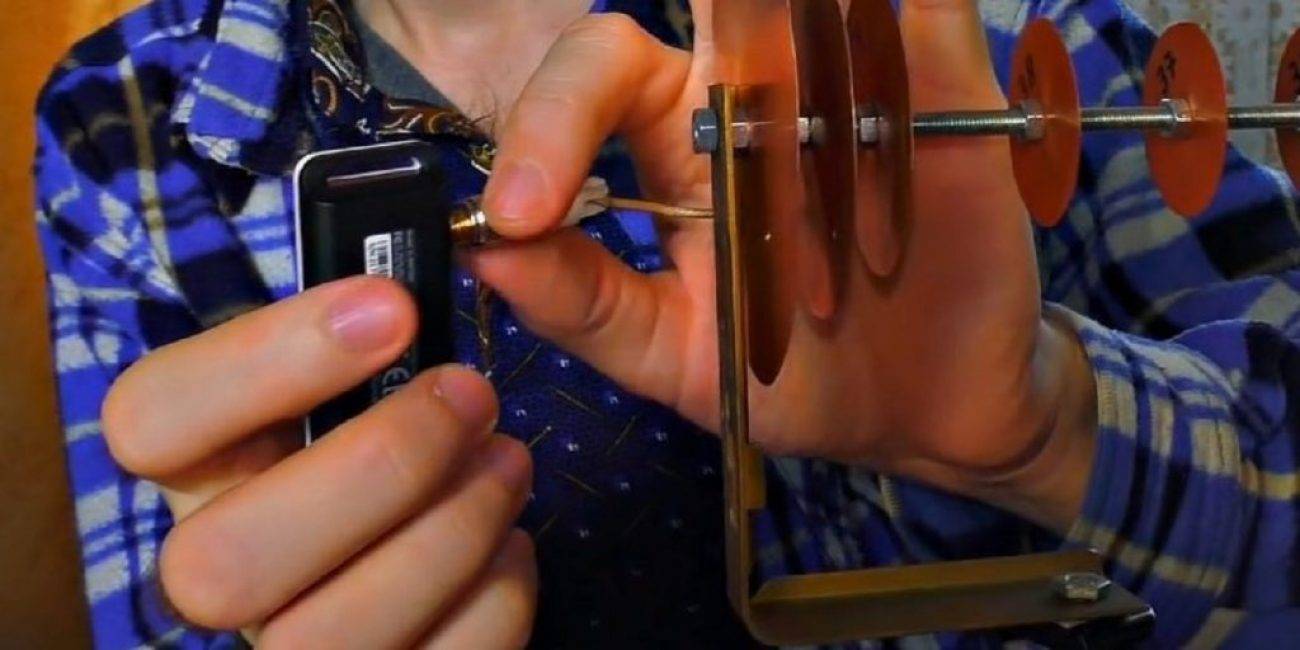
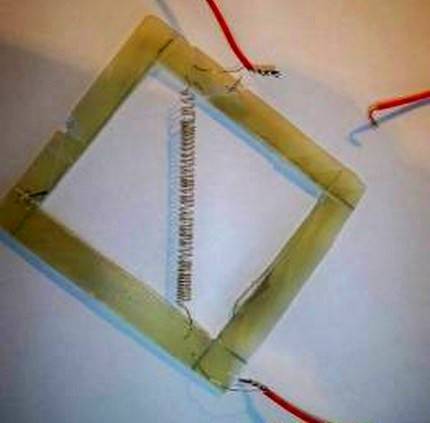
Idea number 2 - Use wire
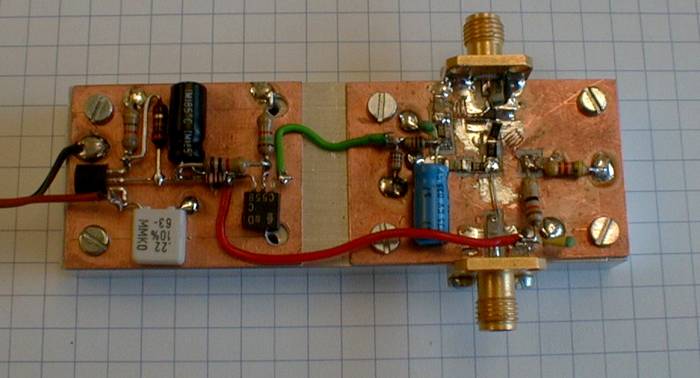
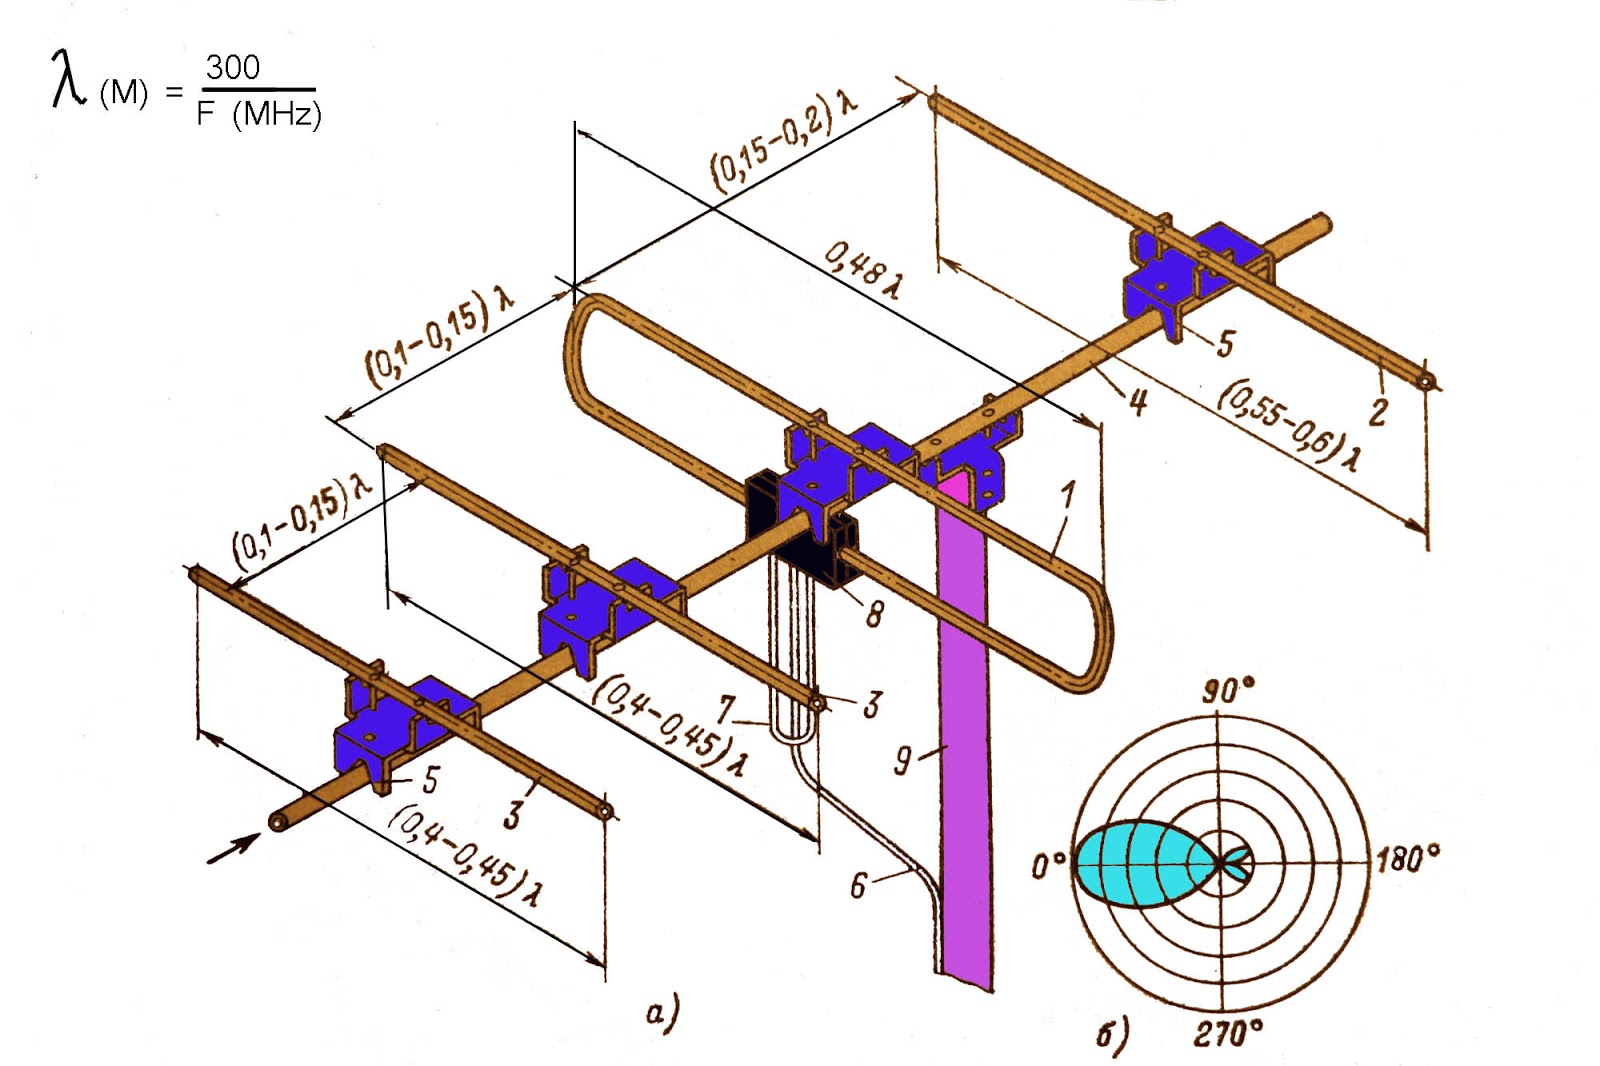
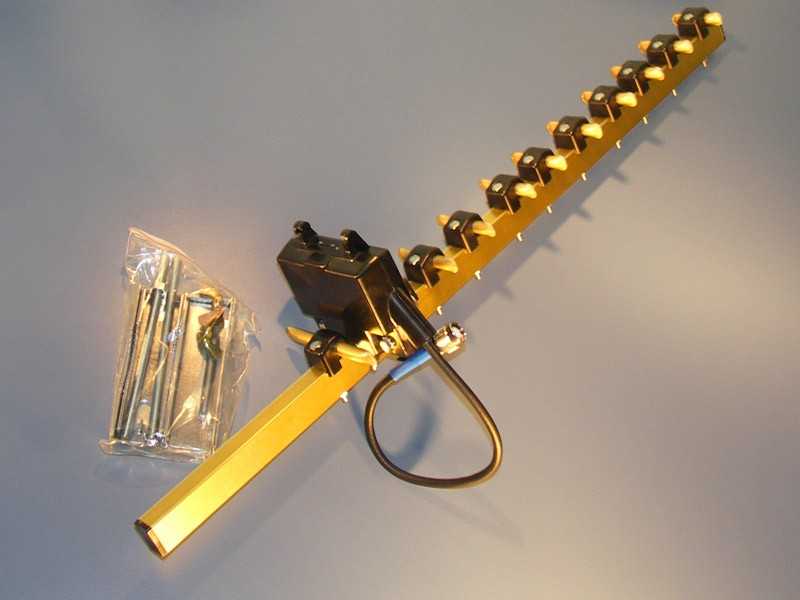
Another equally good option that is advisable to use in the countryside is a homemade copper wire antenna with an amplifier.
All you need to make is:
- amplifier (suitable from an old device);
- two pieces of wire 180 cm each;
- a piece of metal (or wooden) plate 15 * 15 cm;
- electric drill with a set of drills (or a welding machine);
- small bolts;
- a hammer;
- iron pipe;
- television cable of suitable length.
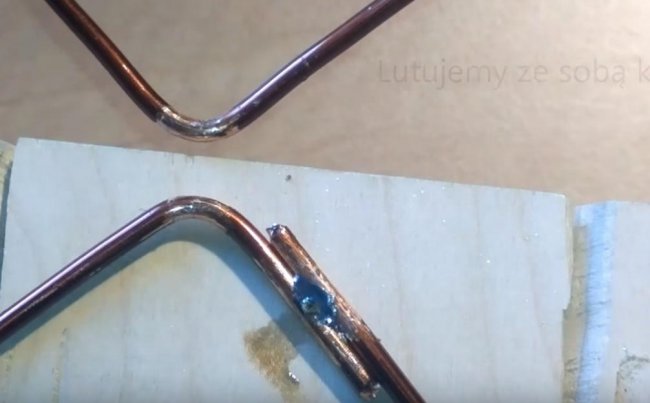
So, in order to make a tv antenna copper wire, follow these steps:
- We prepare the trap: we bend the wire with a rhombus so that all sides are strictly 45 cm each (the inventor of the homemade product claims that these are the optimal dimensions of the device).
- We fix the wire to the prepared plate: flatten the wires at the attachment points, drill holes and tighten the bolts.If you have a welding machine, things will go faster - you just need to grab the signal catchers to the plate. Immediately you need to connect the amplifier (as shown in the photo).
- We connect the cable. Everything is simple here, because. you just need to insert the plug into the socket.
- We create a mast, for which we use a metal pipe of a suitable height. We dig it in and the homemade antenna for the TV is ready, you can start tuning the channels.
Pay attention - on the photo examples, both the amplifier, and the reflector, and the wire are covered with paint. Painting protects the structure from corrosion and other adverse factors, significantly extending the life of a homemade TV antenna
The nuances of manufacturing signal catchers
Getting Started making a homemade device, it is necessary to have an idea about the possible design options and the rules for their assembly.
The whole variety of television antennas is usually divided into several types:
- All-wave. The frequency-independent antenna is the cheapest and easiest to manufacture. The base is a metal frame, and tin containers or beer cans are used as receivers. The design does not have high operating parameters, but it is quite suitable for giving if the broadcast tower is located nearby.
- log-periodic. The principle of operation is comparable to a fishing net that sorts prey during catching. The device is easy to manufacture, and its parameters exceed the characteristics of all-wave models. Antennas are consistent with the feeder for any range.
- Decimeter. Designs that function well regardless of reception conditions. Various forms of execution are possible: zigzag, diamonds, circle, etc.
Antenna parts, through which useful signal currents circulate, are joined by welding or soldering. However, when placing the device on the roof of the house, corrosion will corrode such contacts over time.


 One of the conditions for sufficient purity and stability of reception is the minimum number of joints in the design of the signal catcher
In addition to this norm, when creating an antenna for a summer residence with your own hands, it is advisable to adhere to the following rules:
The central core, the braid is made of inexpensive alloys that are resistant to corrosion processes
However, they are difficult to solder - work is carried out with extreme caution so as not to burn the wire.
To connect the elements, you must use a 40 W soldering iron, flux paste, low-melting solder.
It is undesirable to use aluminum wire to create structural details. The material quickly oxidizes, losing the ability to conduct a signal
The best option is copper, an affordable alternative is brass.
The receiving area of the trap must be large. In order to increase it, metal bars can be symmetrically attached to the frame, which screens out ethereal noise.
 Connecting the simplest signal amplifier to the antenna will significantly improve the quality of the broadcast. Factory products are already equipped with this element
A tandem of a homemade antenna and an amplifier will provide the necessary reception power. It is enough to take the structure to the roof and install it in the direction of the nearby television tower.
Making a garage oven from old rims
This method is quite popular with motorists, since old unnecessary wheel rims can be found at any car depot or in a garage cooperative.The undoubted advantage of such structures is the large thickness of the metal of car rims, such a design will not burn through for a long time and will serve its owner for many years.
Below is a photo of a do-it-yourself oven made of rims in a garage:
materials
Only disks of solid diameters, for example, from trucks or special equipment with large wheels - tractors, graders, etc., will go into work. How to weld a garage oven from rims and what materials are needed for this:
- Two or three car rims. It is better to use stamped ones, as they are made of thicker metal. But alloy wheels with an admixture of aluminum cannot be used, such a furnace will simply melt during operation.
- Corners or channel for legs, 4 or 6 pieces of 25 - 30 centimeters.
- Door hinges.
- Bolts and nuts.
- Sheets of metal 4 - 5 mm thick.
- Two circles, with a diameter of the edge of the disc rim (for the bottom and roof).
- A branch pipe with a diameter of 125 - 150 millimeters for the chimney outlet.
- Round grate.
Tools
Tools for creating a stove from discs are used almost the same as when creating a stove from a pipe, but there are differences. List of what you need for assembly:
- Electric welding machine;
- Gas cutter (if available), but you can do without it;
- Angle grinder or grinder;
- Electric drill;
- Hand saw for metal;
- Hammer or sledgehammer;
- A set of files;
- Pliers or pliers;
- Marking tool - ruler, core, marker;
- Building level;
- Roulette;
- Paint brush.
Manufacturing schemes
Do-it-yourself iron garage stove, made of rims, and various options for its design are shown in the diagram:

Assembly order
A vertical stove made of old wheel disks can work on the principle of a buleryan stove or a stove for long-term combustion of wood fuel. Only a homemade version will come out much cheaper for the owner. A do-it-yourself metal oven for a garage is a good savings.
To do this, the furnace space is divided into two chambers, the chimney pipe exits the second, and the combustion itself takes place in the first chamber. You can also make a simple single-chamber stove, like a stove from a pipe or a gas cylinder, but the consumption of burned wood will be much higher.
- First, the inner parts of the discs are cut out, that is, the rims with holes with which the car wheel is attached to the hub. In this work, it is best to use a gas cutter, but in the absence of it, you can do this work with an angle grinder or grinder. True, the work will be painstaking and long, since it will be necessary to work with internal steel surfaces of great thickness.
- Then the grate is installed by welding at the junction of the disks. If the furnace will consist of three parts, then the grate is welded between the first and second disk from below.
- After the main part of the work, the lower and upper covers are fixed. A hole is cut in the upper part for the chimney pipe, then it is welded to it. This must be done from the side opposite the main firebox, otherwise the Buleryan effect will not work.
- Legs-racks are installed on the lower disk. A furnace door is cut out in the center, then it is fastened with hinges and a latch.A hole is cut in the lower disk for air to enter the furnace and remove ash, its cover is cut from a piece of thick metal and fixed with bolts.
- After that, the discs themselves are welded to each other. The work should be carried out with special care and the seams should be welded well, in order to avoid the ingress of carbon monoxide into the heated room. The final stage of the main part will be the installation of a partition in the middle, to achieve the effect of long-term burning of fuel.
- The disc stove is almost ready, it remains to weld decorative elements, handles or paint the stove with heat-resistant paint. Do not forget about the test kindling and checking the welds for leaks, this procedure should be performed only in the open air.
Required Components
You ask: what do you need to make an antenna with your own hands? First, it is worth listing the main materials:
- Wire, preferably aluminum or copper, is the basis of our antenna. You can use any other material that conducts current;
- Coaxial cable - for connecting to a TV;
- Connector for connecting to a TV;
- Nails or screws - antenna mount;
- Soldering iron with flux for soldering copper/aluminum (depending on wire material).
And now let's talk about additional, optional components:
- You can use a junction box for wires or a jar lid as a case;
- Additional insulation for wires - recommended if you hang the antenna outside.
Blacksmith's forge from a cylinder
The forge allows you to heat the metal for further forging and processing. The device can be made from a 25-liter old gas cylinder.
Homemade master class with our own hands - we make a forge forge:
- Cut off the ends of the cylinder using an angle grinder with a cutting disc. Do not throw away the cut parts, they will be useful for making the door and back.
- Finish the inner surface of the cylinder with refractory karma wool. The maximum allowable temperature for the material is 1200°C.
- On top of the cotton wool, apply a layer of fireclay clay, which can withstand temperatures up to 1500 ° C.
- Lay out the bottom of refractory bricks or fireclay slabs.
- Make a hole in the top and install a compact shackle to install a gas burner. Use a sufficiently powerful burner capable of delivering temperatures in excess of 1000°C. For home forging, this will be enough.
In the photo of a homemade product made by one's own hands, one can clearly see the design of a home forge and the process of its manufacture.
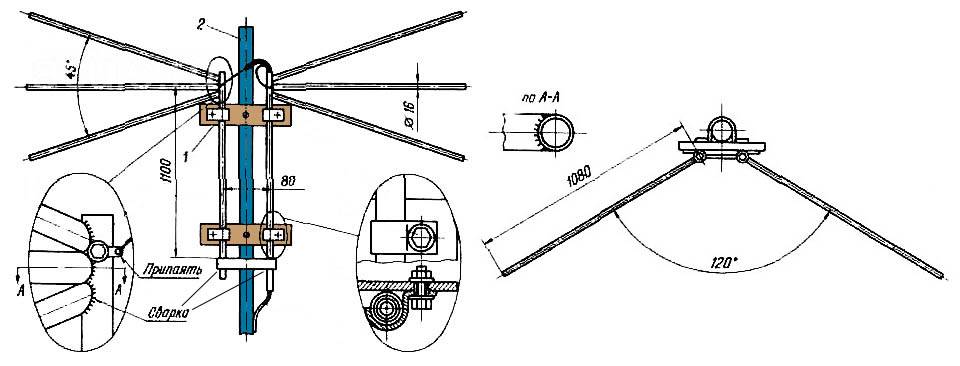
In the first option, we will consider how to make a classic antenna for giving with your own hands
1) Wire. A high-quality conductor should be chosen by you on the basis of: 1.5-2 meters per antenna, 5-6 meters (depending on your interior) for the distance from the antenna to the TV. Let's assume that you have chosen a wire with a diameter of 1.5 mm.


2) The outer part of the antenna. Made from prepared wire. 1-1.5 meters must be twisted into a ring, the diameter of which will be from 356 mm. up to 450 mm.
3) The inside of the antenna. It is necessary to make a second ring out of wire, correspondingly smaller than the first (about 180 mm).
4) Finished rings - this is the basis of the future antenna - you need to fix it on a small piece of plywood. Instead of plywood, you can use any suitable piece of wood. The tree should not overlap the rings, nor should it dangle, so that the entire antenna is clearly fixed on the roof.
5) The finished structure must be directed with rings in the direction of the signal source. No doubt the signal will be strong towards the city. At this stage, ask for help: you need to turn the antenna in different directions and check where the signal will be better. After you find the best option, your antenna is finally ready!
Conclusions and useful video on the topic
Step-by-step instructions for making a television antenna from aluminum cans:
Calculation, assembly of a digital broadcasting antenna according to Kharchenko:
A home-made design will save the budget, because a primitive signal catcher can be built from improvised means. Manufacturing work does not take much time.
Subject to a number of standards, assembly and connection technology, it will be possible to make an effective device for replacing a standard television antenna.
Do you have a homemade antenna installed in your country house? Please share with other users a unique photo of your homemade product, tell us what materials at hand you needed and how long it took you to assemble.
Or maybe you assembled a television antenna according to one of the schemes considered in this material? Tell us about your experience of using this model, add a photo in the comments block.


