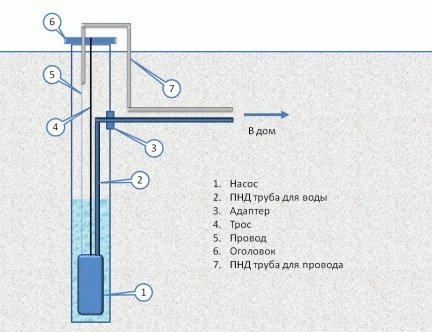
- Installation of external water supply
- Site preparation
- trench excavation
- Pipe and cable preparation
- Well adapter installation
- Tying the water supply inside the house in the boiler room
- Instruction on equipping the well with an adapter
- earthworks
- Mounting the mating part
- Installing the main part
- Equipment selection
- Caisson or adapter
- Pump units
- Accumulator and relay
- Well cap
- Well adapter - a useful novelty
- Instruction on equipping the well with an adapter
- Preparation of the necessary materials
- earthworks
- Installing the main part
- Mounting the mating part
- What is the advantage of the adapter for well construction
- Adapter Selection Criteria
- Necessary equipment for well construction
- How to make a caisson yourself
- Monolithic concrete structure
- Caisson from concrete rings
- Budget camera made of bricks
- Sealed metal container
- Connecting the deep pump to the water supply system
Installation of external water supply
Site preparation
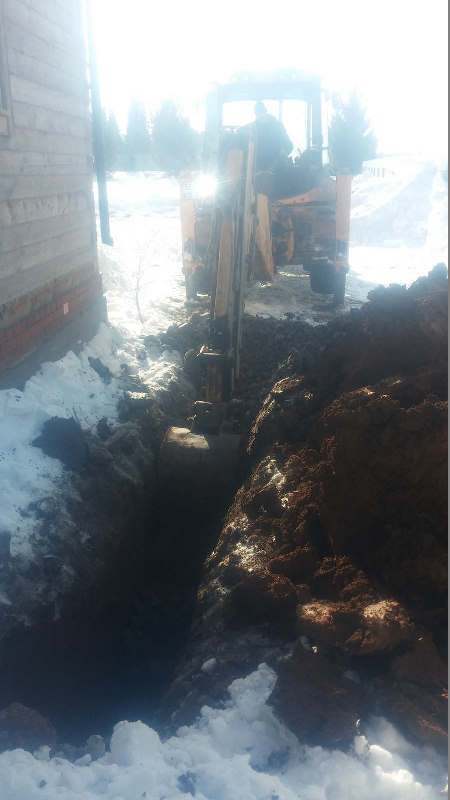
The installation of the water supply system was carried out in February of this year, there was plenty of snow, for a start the excavator cleared the digging area from snow.

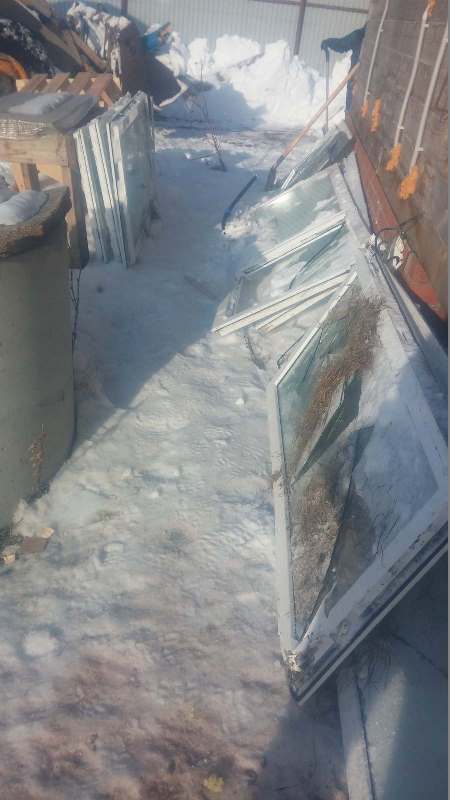
There was a lot of glass, we were lucky that not a single piece of glass damaged the wheels of the tractor.
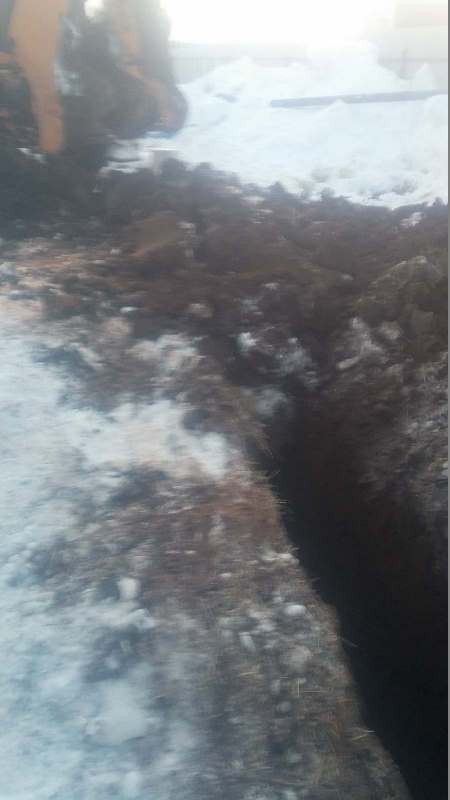
trench excavation
After the excavation site is cleared of snow, we begin to dig. We try with a bucket, the bucket does not take, we put on a hydrocline and begin to hollow the ground.
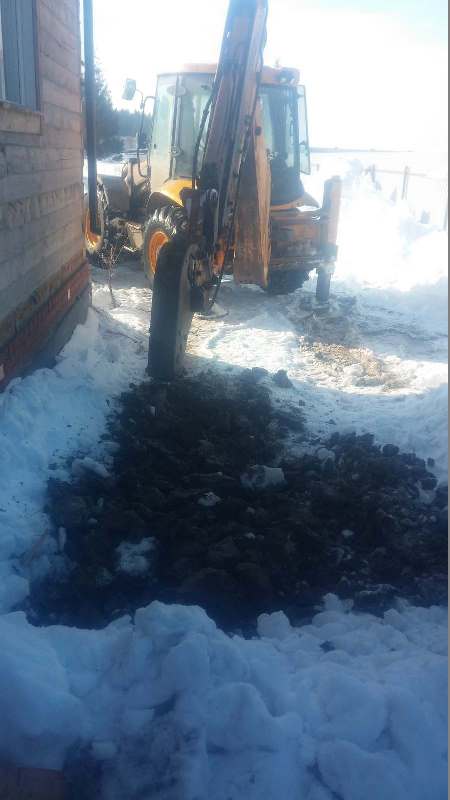
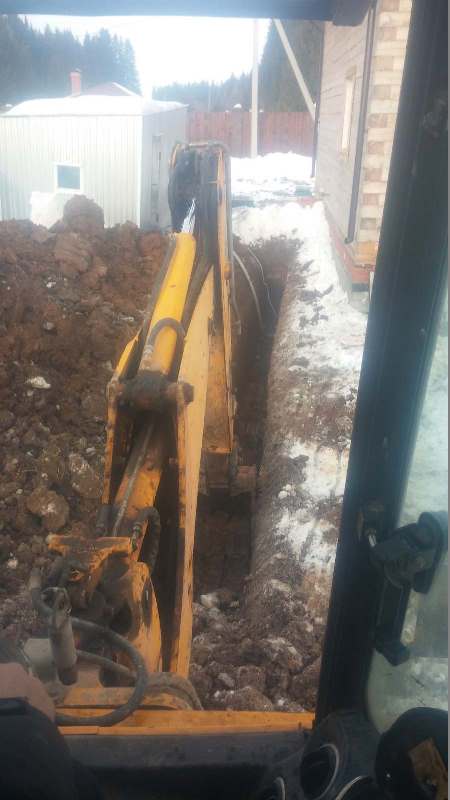
We change the hydraulic wedge to a bucket and dig. By the way, the ground in this area froze a little more than half a meter.
The trench was 15 meters. The excavation with a hydrocline and a bucket was approximately 6 hours. This is a very long time; in the summer, an excavator digs such a trench in 30 minutes.
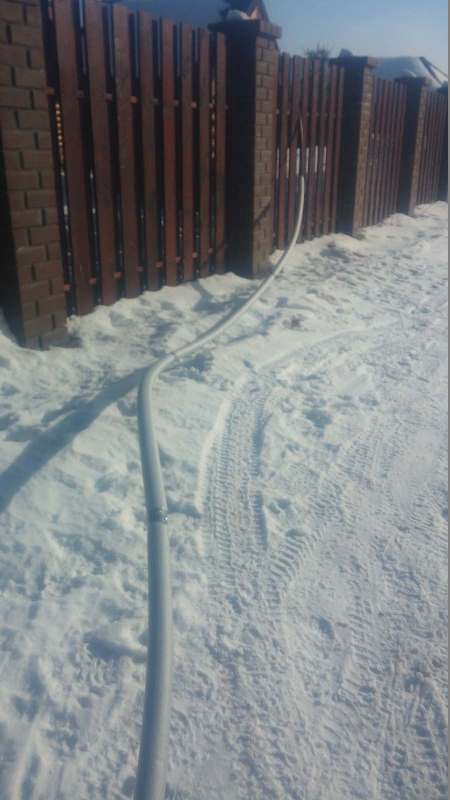
Pipe and cable preparation
While the excavator was digging a trench, we prepared a pipe for laying in the ground and insulated it with energy flex. We also prepared an electrical cable for connecting the pump to electricity, threaded it into the corrugation.

It is better to lay out the pipe in advance, especially in winter, so that it takes shape and straightens up.
Well adapter installation
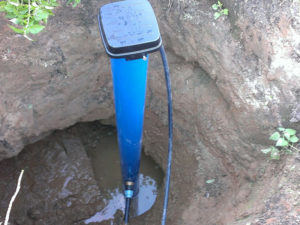
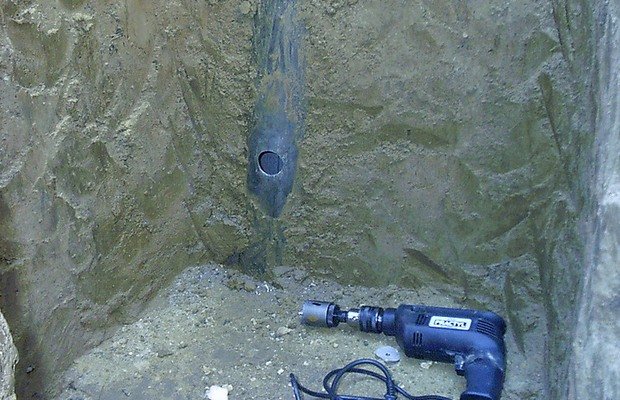
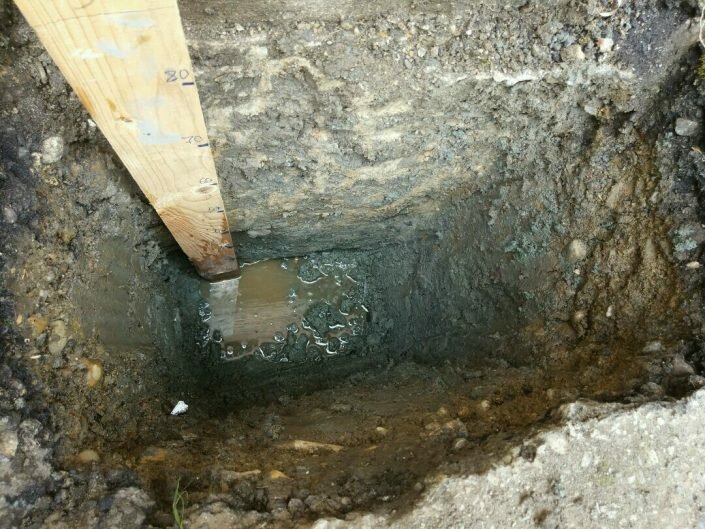
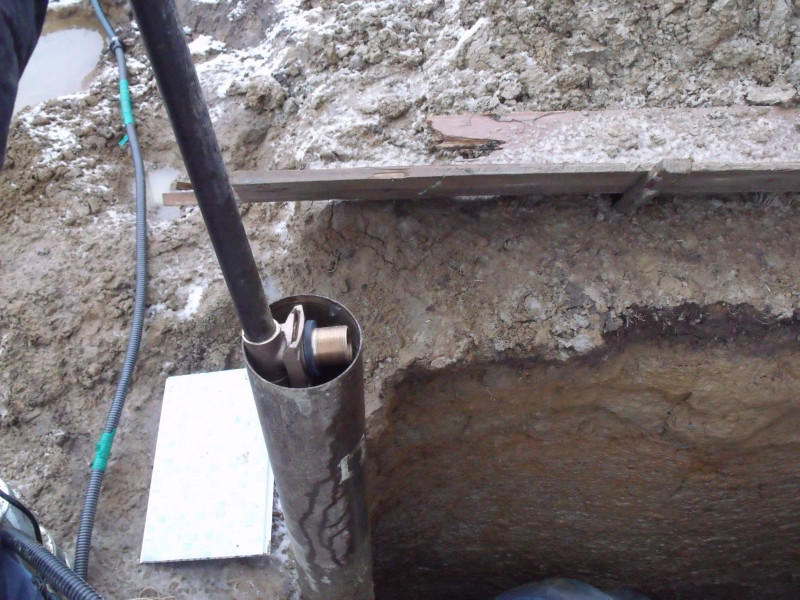
So, the trench is ready, the well pipe is visible, we start drilling a hole for the adapter at a depth of 2 meters.
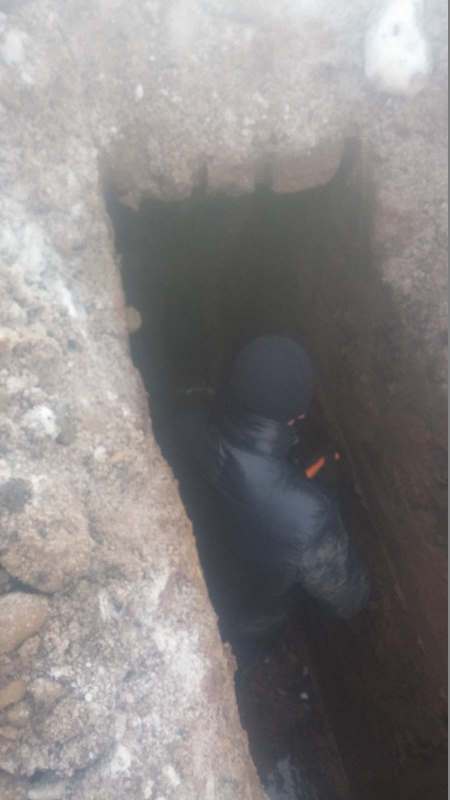
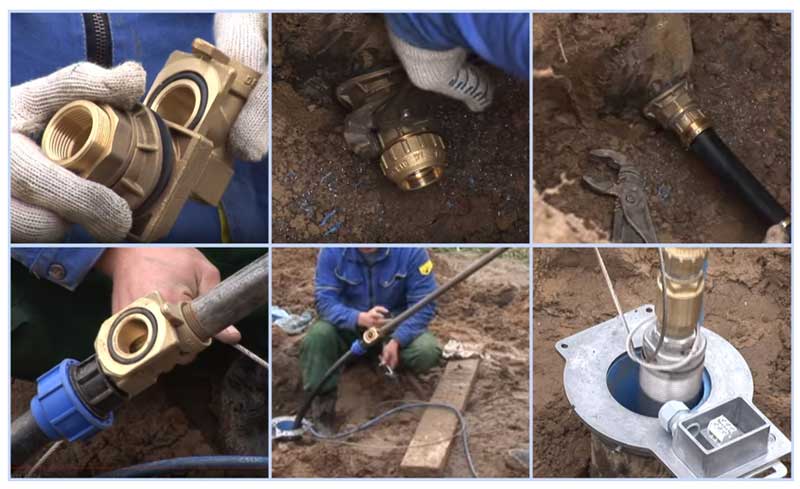
After the hole was ready, it was necessary to install the adapter into this hole using a special key.
We made this wrench out of aluminium-reinforced polypropylene pipe. The key is strong enough, ideally you need a metal pipe. But I was also comfortable with PP.

A standard head was installed on our well, after which the head was removed, the pump was taken out of the well and it became clear that our key with the adapter would not fit through.
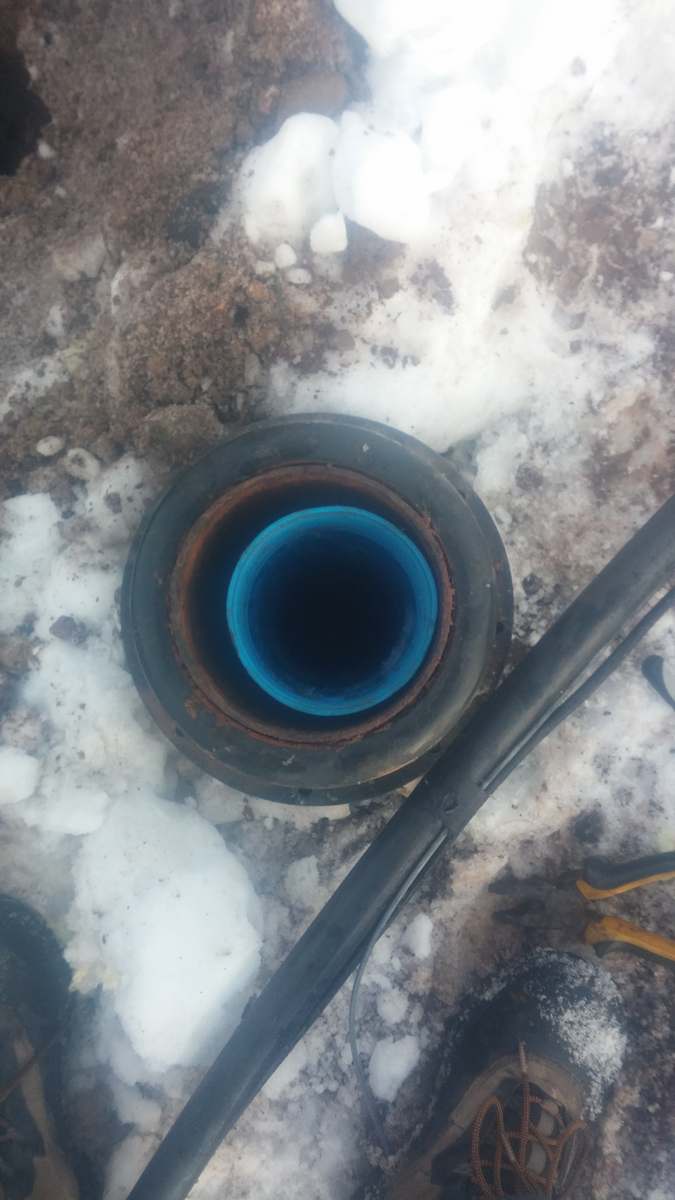
I had to remove the blue plastic pipe from the well, or rather one joint 4 meters high. It unscrewed easily and was successfully removed. After that, our adapter with a key easily crawled into the well and was installed on the cut hole in the well wall.
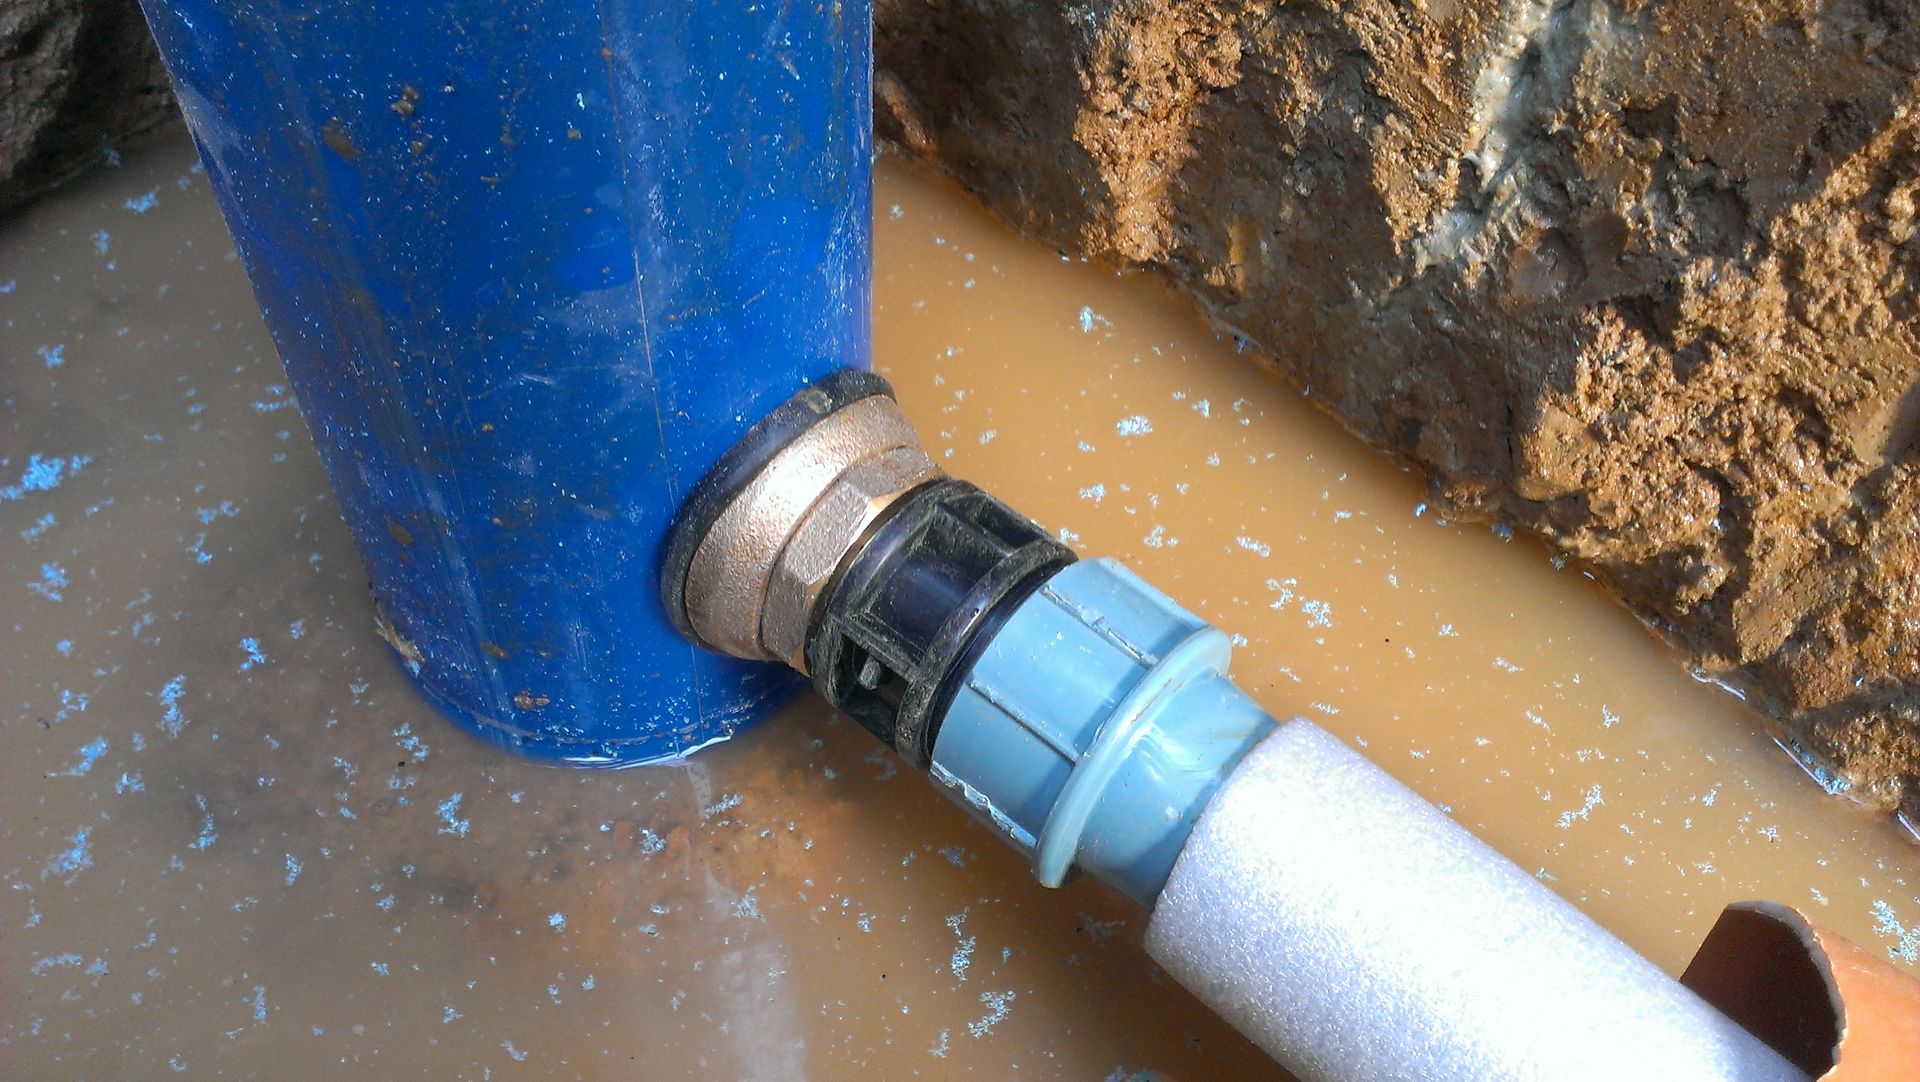
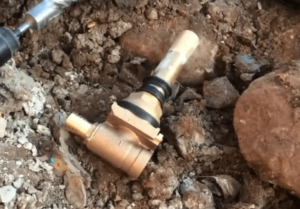
You can see the carving here.

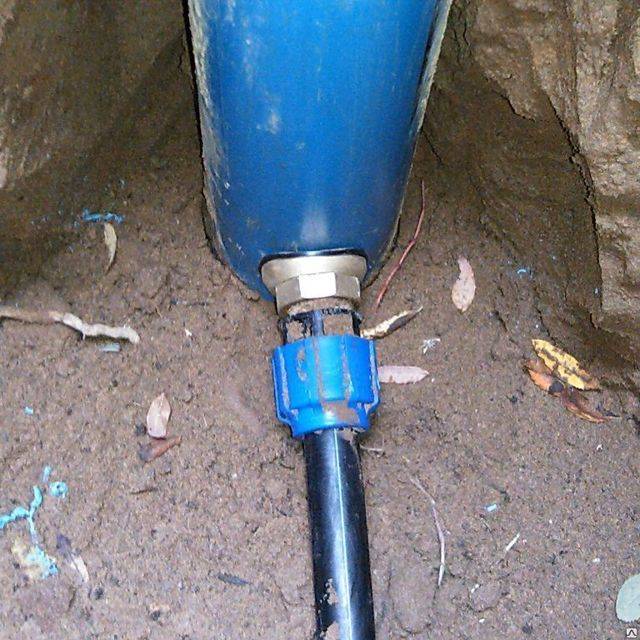
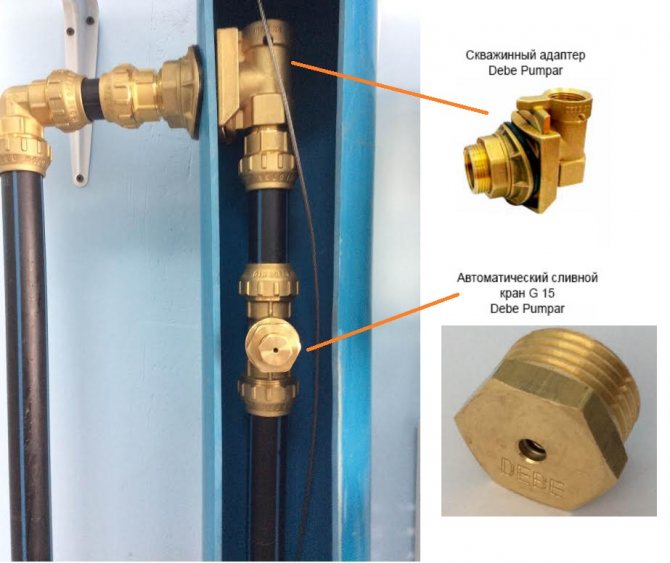
After that, a sealing gum was installed on the adapter fitting and it was all tightened with a clamping nut.A HDPE coupling was also screwed onto the fitting, a pipe was laid in a trench and connected to the coupling, both at the well and in the house.
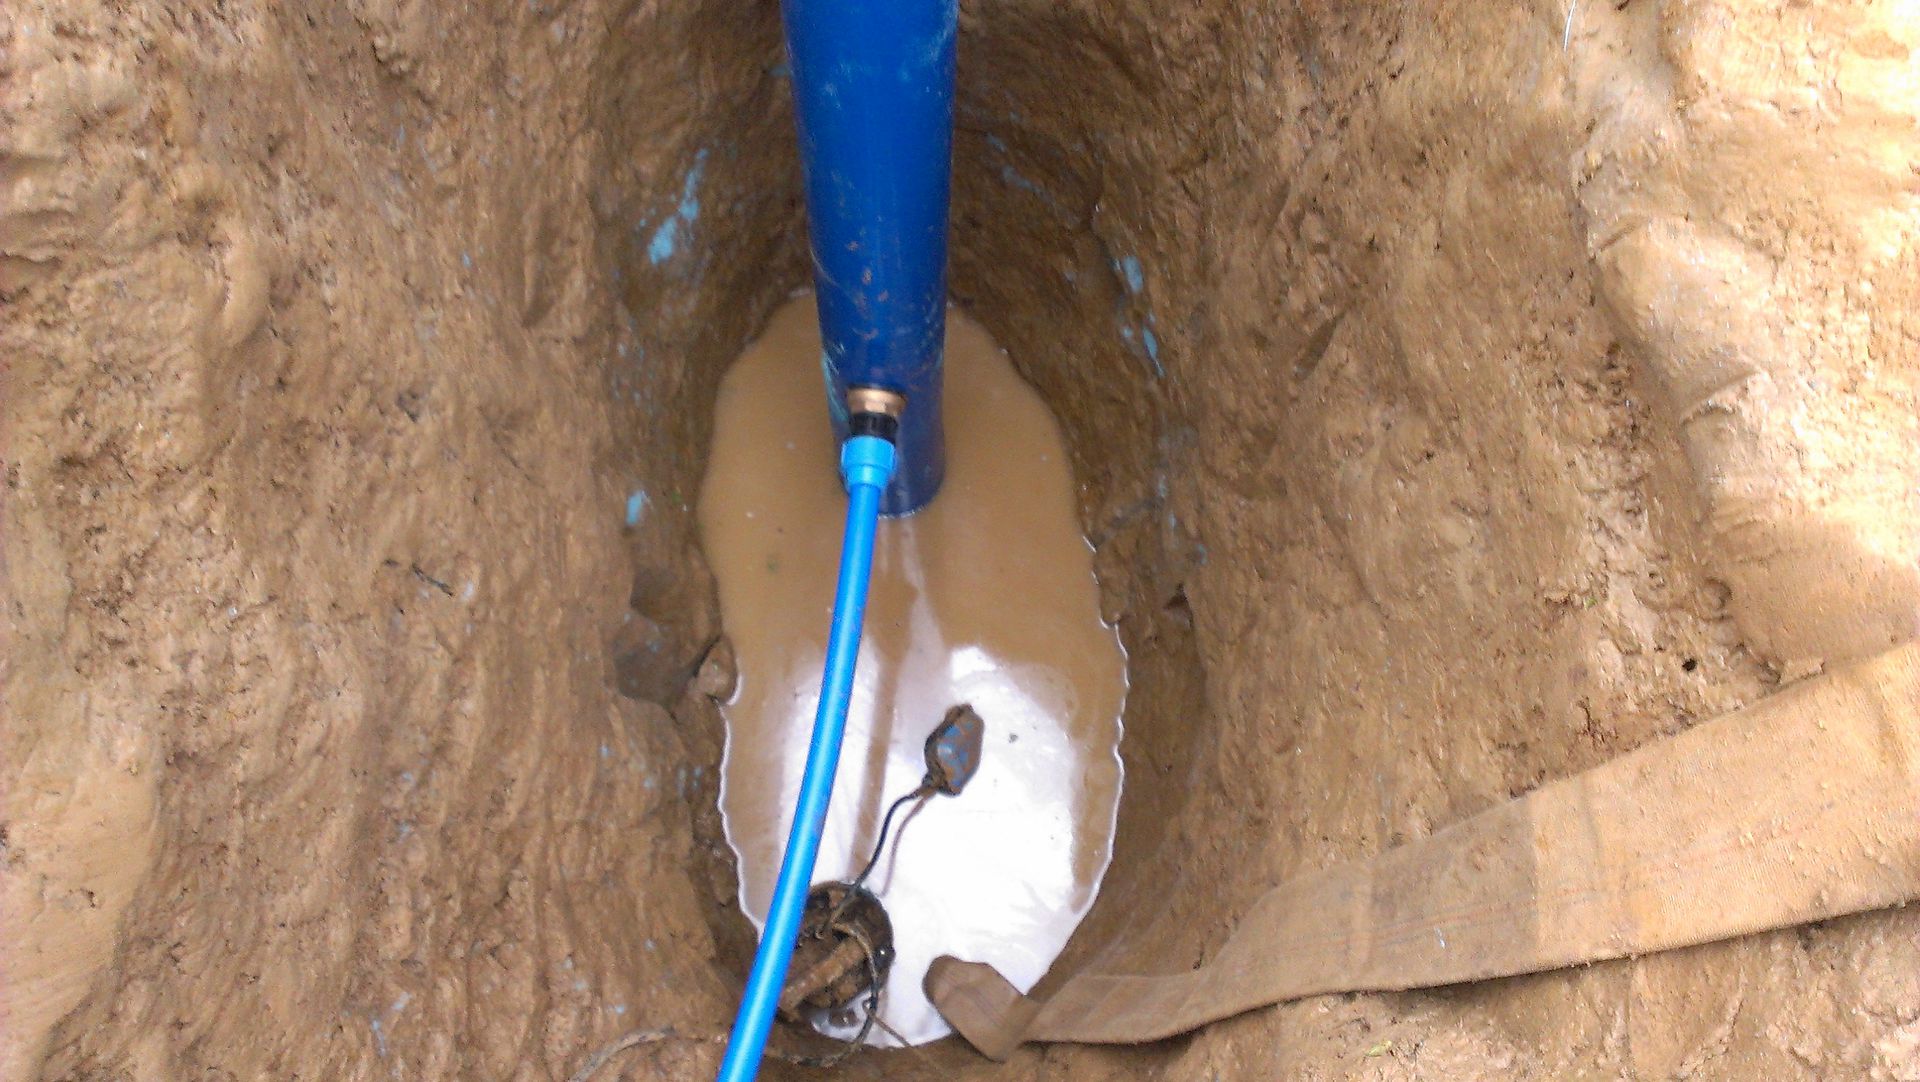
Now you can lower the pump on the key with the adapter and it is important to get into the mating part of the adapter installed in the wall of the well
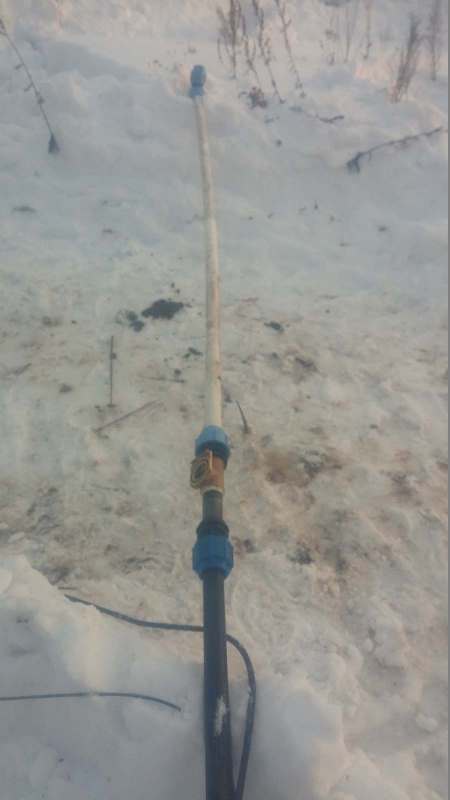
Everything is installed, you can dig a trench with a laid pipe.
Faucet for summer water supply. Be sure to consider draining water for the winter from the summer water supply.


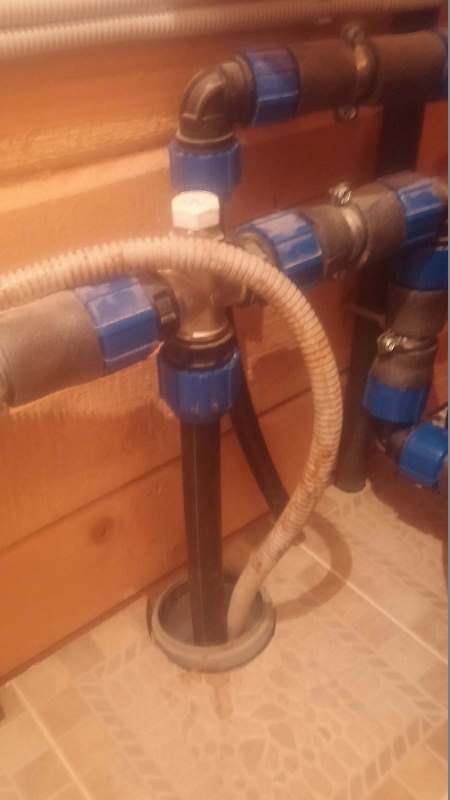
Tying the water supply inside the house in the boiler room


The process of connecting the well to the house took us all day, but this is due to the frozen ground and its long chiselling. This work had to be done in the winter period, since there is a large Kama River 100 meters from the site, at other times of the year the groundwater level is 50 cm, which will not make it possible to do such excavations. The borehole adapter is more than ever useful here, while the caissons need to be additionally anchored and sealed. The adapter doesn't need it. Sealing rubber bands last for years.
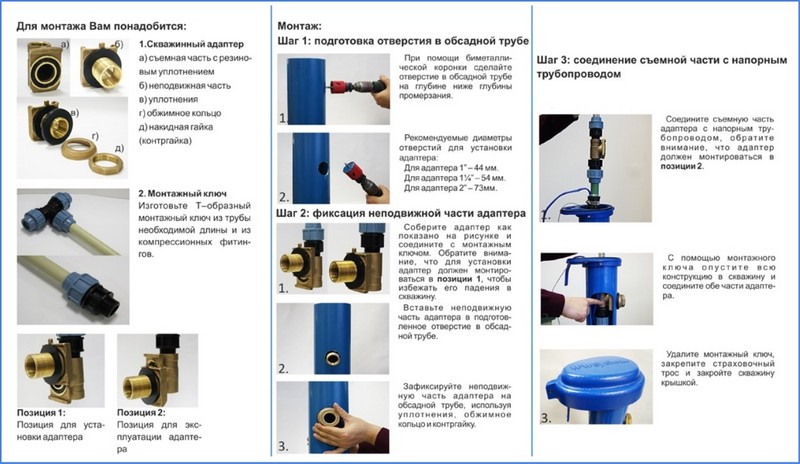
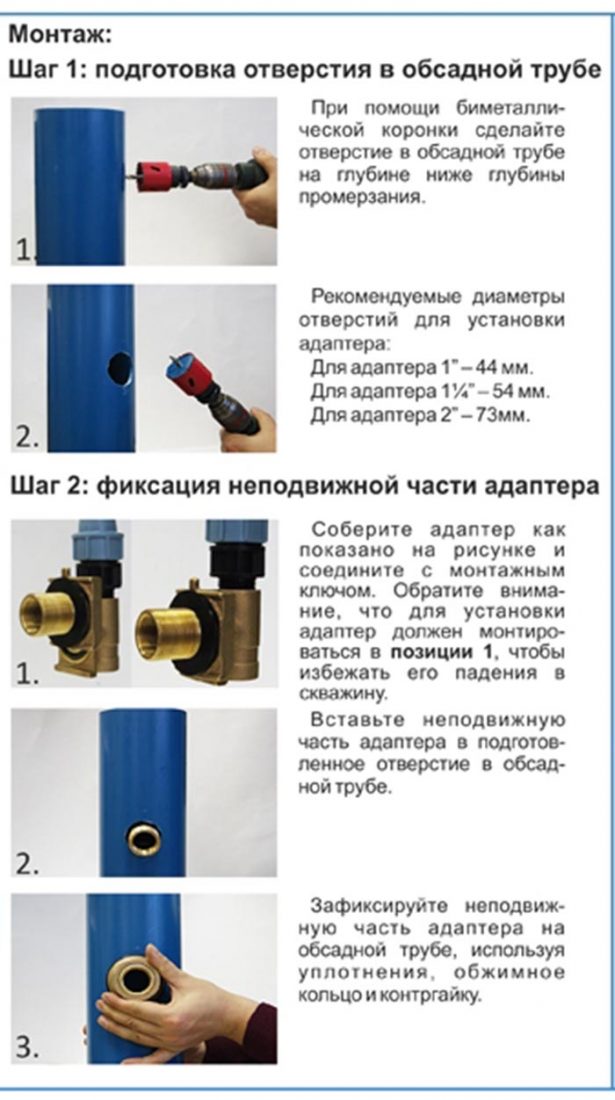
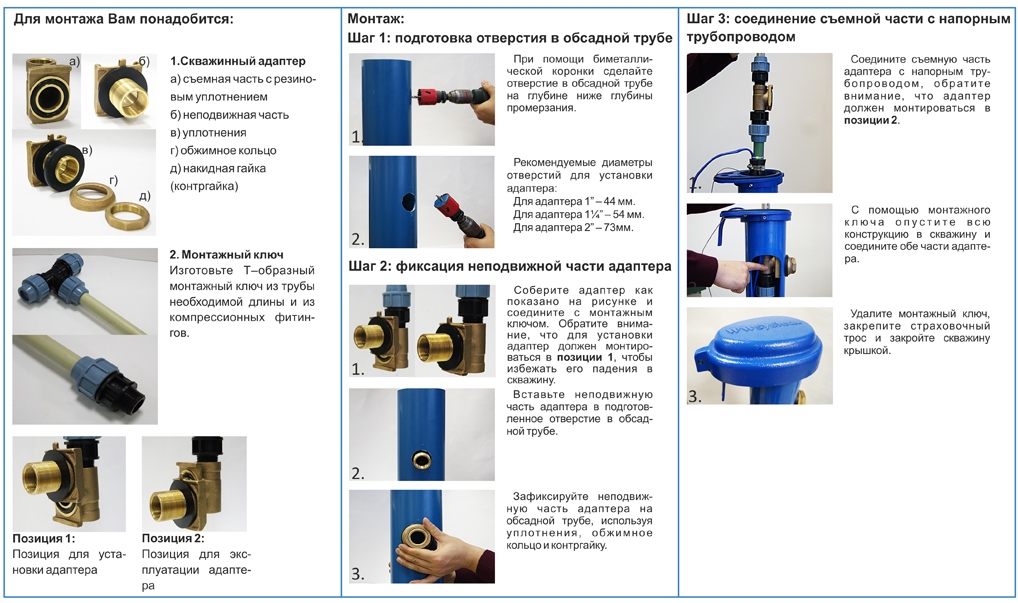
Instruction on equipping the well with an adapter
You can put the adapter with your own hands not only on a new well, but also on an existing one. In the second case, installation is complicated by the need to dig a hole around the casing.
To cut a hole in the wall of the casing, you will need a drill and a special nozzle for it - a bimetallic crown. Hole diameter:
- adapter 1 inch - 44 mm;
- adapter 1 ¼ inch - 54 mm;
- adapter 2 inches - 73 mm.
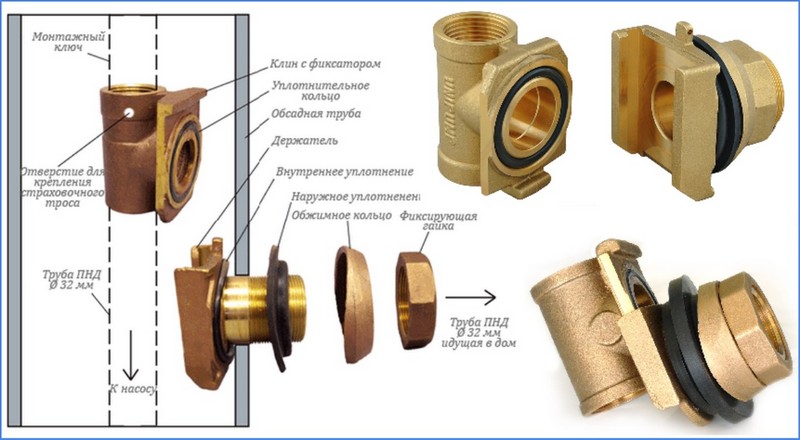
To install a downhole adapter, you will need to make a mounting key from 3 pieces of steel or plastic pipe and a tee fitting. It's a "T" shaped device.The length of the vertical part should be equal to the distance from the edge of the casing string to the intended installation site of the device. The diameter of the mounting pipe must be such that the key fits snugly into the upper hole of the adapter.
earthworks
Land processing.
If the well is active, then a hole must be dug around it. Its depth should be such that it is convenient to drill a hole and mount a borehole adapter below the freezing level of the soil. The diameter of the pit is made so that you can freely sit in it and work with a drill. From the casing pipe to the house, they dig a trench for the pipeline, also with a depth below the freezing level of the soil.
Mounting the mating part
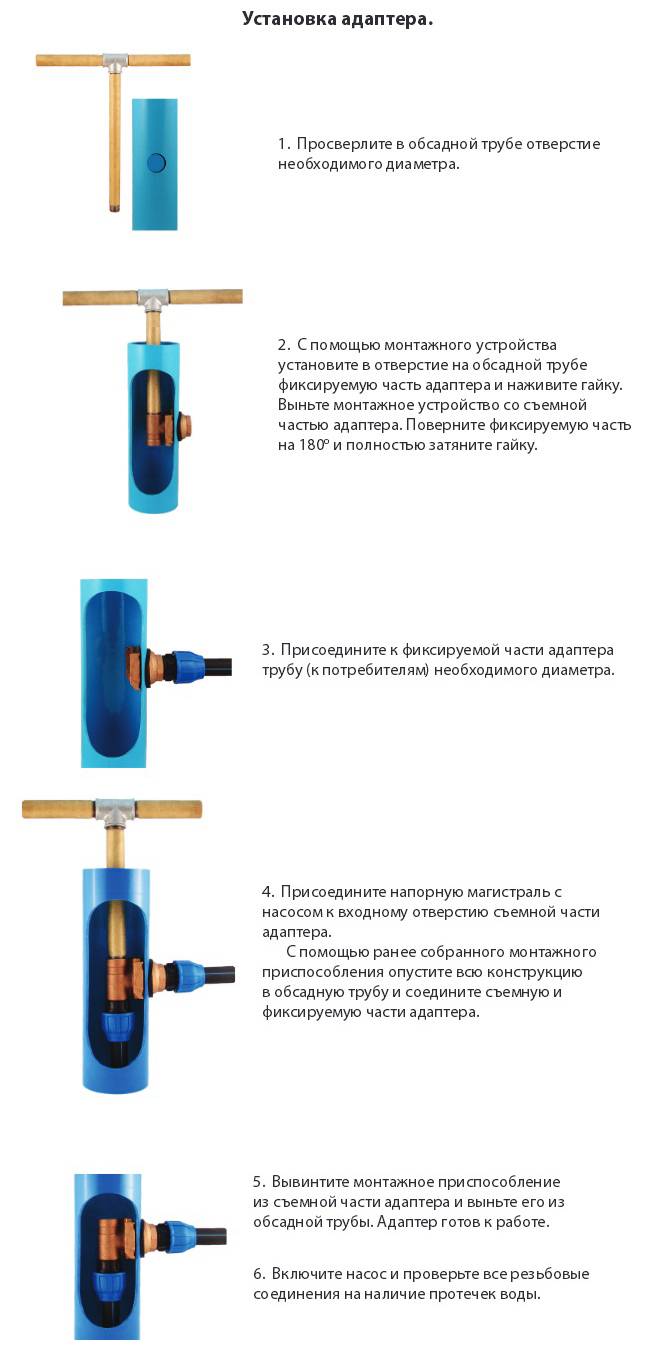
There are 2 positions of downhole adapter parts relative to each other - mounting and working. Before starting the installation, it is necessary to bring the adapter into the “for installation” position and attach the key to the top hole. Otherwise, there is a risk of the adapter falling into the well. Installation begins by drilling a hole in the wall of the casing. Its edges must be cleaned of burrs.
After removing the cover from the well, the adapter with the inserted installation key is lowered into the casing string to the drilled hole. The fixed part of the adapter is placed in it and fixed from the outside with a rubber gasket, a compression ring and a union nut.
With the help of the mounting pipe, the inner movable part of the device is removed from the casing string. The installed counterpart is rotated 180° and the nut is finally tightened. A pipe going into the house is attached to the threaded pipe. The diameter of the pipeline is selected taking into account the number and performance of water intake points.
Pump connection.
Installing the main part
A pressure pipe from the pump is connected to the lower inlet of the adapter. The device is again lowered into the well and put on the wedge sled of the installed fixed part. The adapter must be in working position. After that, you can disconnect the mounting key. At the last stage, the safety cable is fixed. It removes part of the load on the adapter and the walls of the column from the pump. Then they put a cover on the well. Turning on the pump, check the tightness of the connections. The pit around the casing is covered first with sand, then with soil.
Equipment selection
The choice of equipment for arranging your future well is one of the most important stages, since the quality and duration of its work will depend on the right choice.
The most important equipment to pay attention to is: a pump, a caisson, a well head and a hydraulic accumulator
Caisson or adapter
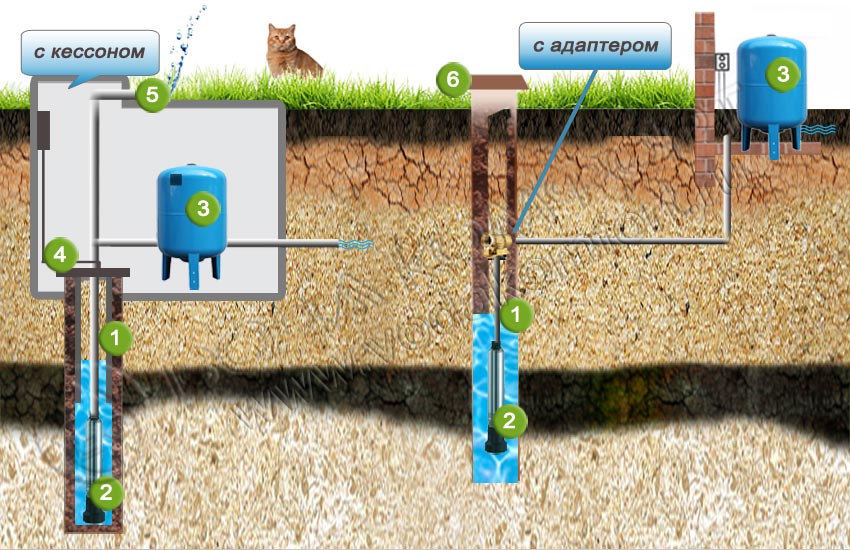
The principle of arrangement with a caisson or adapter
The caisson can be called the main design element of the future well. Outwardly, it resembles a container similar to a barrel and is used to protect equipment from groundwater and freezing.
Inside the caisson, you can place all the necessary components for automatic water supply (pressure switch, membrane tank, pressure gauge, various water purification filters, etc.), thus freeing the house from unnecessary equipment.


The caisson is made of metal or plastic. The main condition is that it is not subject to corrosion. The dimensions of the caisson are usually: 1 meter in diameter and 2 meters in height.
In addition to the caisson, you can also use an adapter.It is cheaper and has its own characteristics. Let's consider below what to choose a caisson or adapter and what are the advantages of each.
Caisson:
- All additional equipment can be placed inside the caisson.
- Best suited for cold climates.
- Durable and reliable.
- Quick access to the pump and other equipment.
Adapter:
- To install it, you do not need to dig an additional hole.
- Fast installation.
- Economical.
The choice of caisson or adapter also follows from the type of well
For example, if you have a well in the sand, many experts advise paying attention to the adapter, since the use of a caisson is not always beneficial due to the short life of such a well
Pump units
One of the key elements of the entire system is the pump. Basically, three types can be distinguished:
- Surface pump. Suitable only if the dynamic water level in the well does not fall below 7 meters from the ground.
- Submersible vibration pump. A budget solution, it is rarely used specifically for the water supply system, as it has low productivity, and it can also destroy the walls of the well.
- Centrifugal borehole pumps. Profile equipment for water supply systems from a well.
Borehole pumps are widely represented on the market by a large variety of manufacturers, for every taste and budget. The selection of the characteristics of the pump takes place according to the parameters of the well and directly to your water and heat supply system.
Accumulator and relay
The key function of this equipment is to maintain a constant pressure in the system and to store water.The accumulator and pressure switch control the operation of the pump, when the water in the tank runs out, the pressure drops in it, which catches the relay and starts the pump, respectively, after filling the tank, the relay turns off the pump. In addition, the accumulator protects plumbing equipment from water hammer.
In appearance, the accumulator is similar to a tank made in an oval shape. Its volume, depending on the goals, can range from 10 to 1000 liters. If you have a small country house or cottage, a volume of 100 liters will be enough.
Hydraulic accumulator - accumulates, relay - controls, pressure gauge - displays
Well cap
To equip the well, a head is also installed. Its main purpose is to protect the well from the ingress of various debris and melt water into it. In other words, the cap performs the function of sealing.
headroom
Well adapter - a useful novelty
Home craftsmen know that the water supply pipes of a private house must be laid below the soil freezing mark. If you do not pay attention to this rule, with the onset of cold weather, the entire water supply system may freeze, and the pipes that make it up may burst. To comply with this requirement, when connecting a casing pipe product and a water supply system, a special pit is usually arranged and the caisson is installed. Thus, the part of the system, which is located near the surface of the soil, is protected from frost.
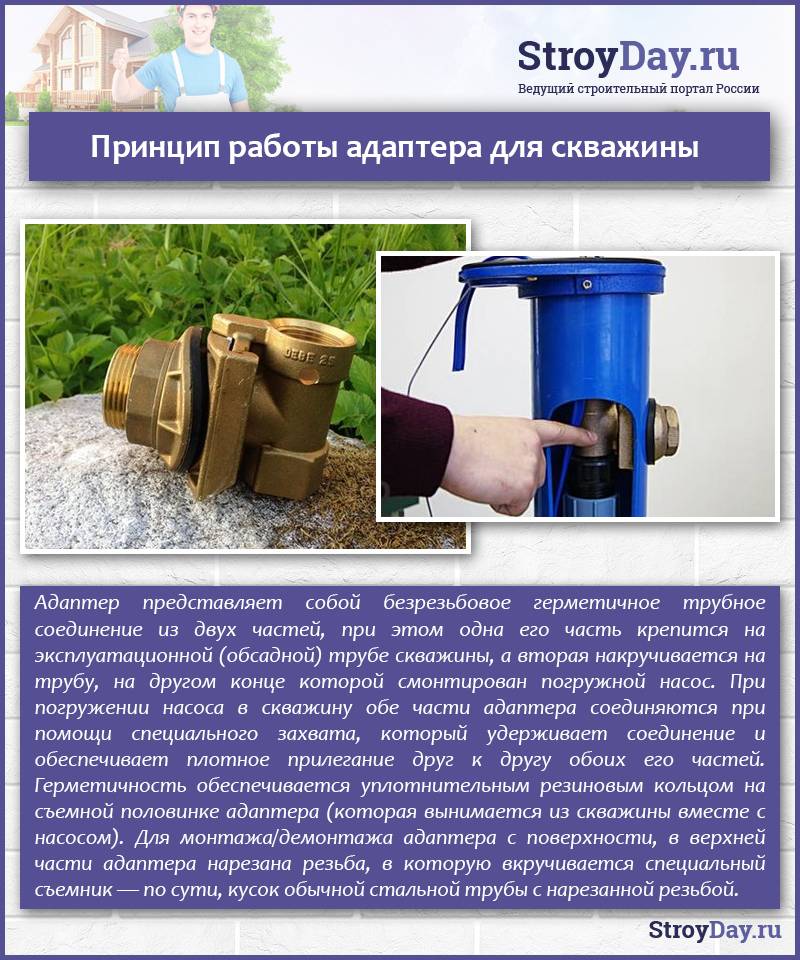
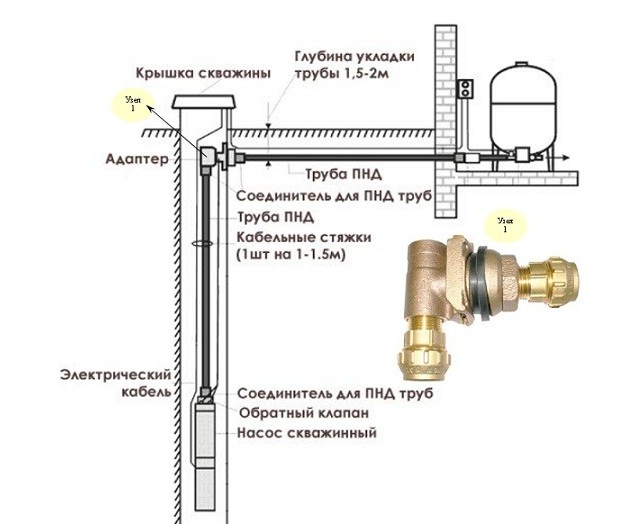
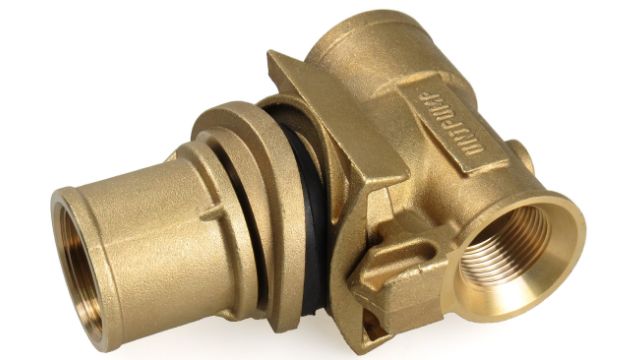
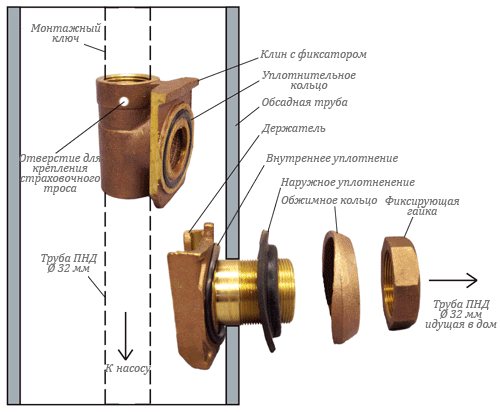
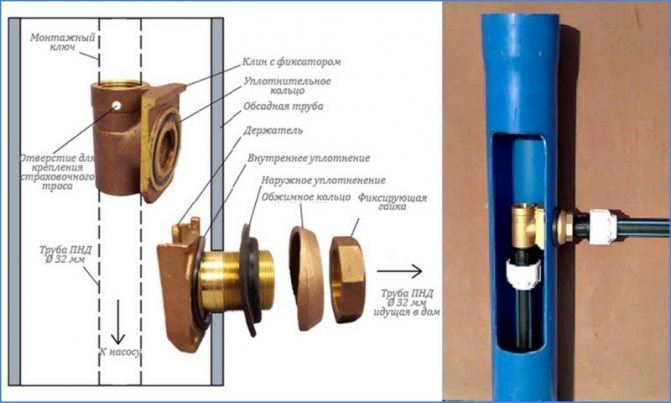
Well adapter
In recent years, this technique has become give up one's ground. It is being replaced by the technology of protecting the water supply system using a downhole adapter.It allows you to connect the horizontal water pipe with the casing as tightly as possible and at the same time below the freezing mark of the soil. The adapter is structurally made of two parts. One of them is connected to the mains for supplying water to the dwelling. And the second part is mounted at a certain depth directly into the casing. Then the adapter is connected into a single structure. All work on the installation of the described device is carried out by hand.
The arrangement of wells with an adapter is also characterized by some other advantages. These include:
- the ability to completely hide the well underground;
- affordable cost of the adapter (prices for such equipment are 8–10 times lower than for traditional caissons);
- reduction of labor costs for the performance of work on laying the system (no need to dig a pit, call specialists to install the caisson).
Another advantage of using an adapter is that it can be installed in areas with a fairly high groundwater level. They are not afraid of such a device. Water will never enter the adapter, as it is completely sealed (two parts of the device are securely fixed with o-rings). As you can see, with your own hands it is better to install the equipment of interest to us, and not an ordinary caisson. But note that the adapters have some disadvantages. Firstly, the choice of such devices for wells in the country is not very large.


We recommend to read
- Polycarbonate shower cabin: step-by-step manufacturing instructions
- Rescue mission: we make a grease trap for the sewer
- Crane boxes with rubber and ceramic liners: do-it-yourself quick repair
Secondly, additional water intake points cannot be directly connected to them (for example, for watering a garden, for a bathhouse or a detached household building). The way out of this situation is to install a tee. Well, you can put up with a relatively small assortment of adapters. There will be fewer problems when choosing a device. And choosing an adapter is not as easy as it seems. More on this later.
Instruction on equipping the well with an adapter
It is allowed to mount a protective device on the casing pipe not only in the hydraulic structure under construction, but also in the system that is in operation.
When choosing the dimensions of the equipment, it is necessary to take into account the space occupied by the product fixed on the wall of the casing pipe: the diameter of the pipeline must exceed the diameter of the pump by 25 mm.
Preparation of the necessary materials
Installation requires the use of the following set of tools:
- bayonet shovel for digging a trench;
- adjustable wrench for fixing fasteners;
- a set of metal pegs for earthworks;
- crown cutter bimetallic.
A neutral water-repellent lubricant is used to treat the tie-in site before placing the structure underground.
Before starting work, prepare the following materials:
- puller - a steel mounting pipe of the appropriate size with an end thread;
- set of connecting fittings;
- silicone-based sealant;
- FUM tape.
The basic element of the system is the adapter. The factory product must be cleaned of industrial grease before installation. The sealing ring is treated with silicone sealant.
earthworks
The off-season is considered the best time for arranging an autonomous source: saturated with moisture and cooled soil crumbles less. When starting earthworks during a dry period, it is recommended to first strengthen the walls of the mine with cuts of boards or sheets of chipboard.
The initial stage of work is the formation of a pit, the lower mark of which is 40 cm below the soil freezing limit. To simplify the insertion of the device, it is necessary to dig a trench with a width of more than 50 cm.
Installing the main part
A hole is cut in the casing with a bimetallic hole cutter at the level of the water pipe. Using a puller, do-it-yourself installation of the first half of the device. To ensure reliable fastening of the product in the pipe cavity, a special crimp ring is used. The connecting nut is tightened with an adjustable wrench. The threaded pipe must protrude from the outside of the column.
The water outlet is docked with the outer part of the adapter. FUM tape or similar material is intended to seal the threaded connection.
Mounting the mating part
The second half of the device is fixed on the pump hose. After the pump is lowered to the prescribed depth, the two parts are docked and the dovetail mechanism is snapped into place.
To reduce the load caused by the weight of the equipment, the use of a safety rope allows. It is brought to the wellhead and fixed with metal pegs. The risk of mechanical destruction of the structure is reduced.
The final stage of installation work is connecting the pump to the electrical supply and testing the functionality of the system.
It is important to identify faults in a timely manner and take corrective action.
What is the advantage of the adapter for well construction
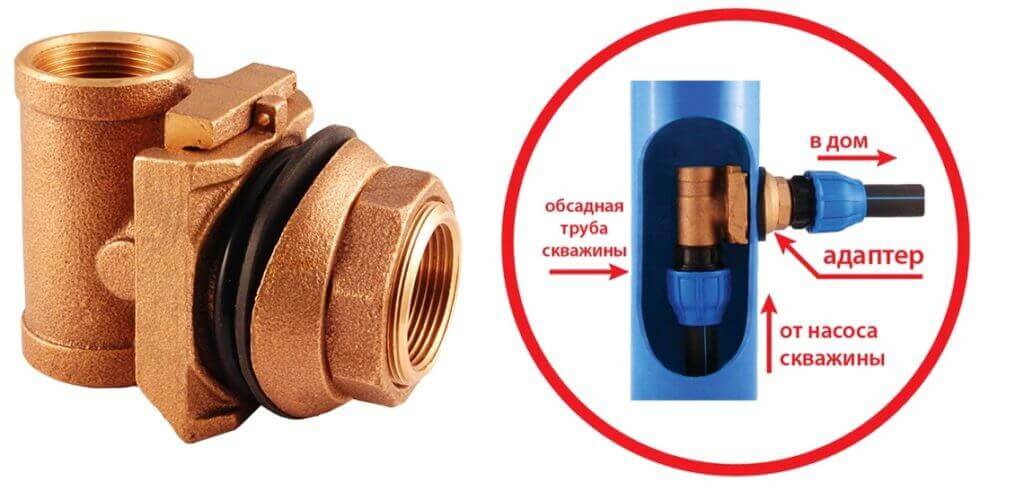
The adapter for the well is a special device by which water pipes are brought out through the casing. A distinctive feature that characterizes such a device is the possibility of removing pipes at a depth where the soil does not freeze through (in fact, an adapter is needed just for this). At the same time, the tightness of the water supply connections is in no way violated.
It should immediately be noted the simplicity of the adapter device, the design of which provides for two components:
- An element installed on the casing pipe;
- Unit mounted on a pipe connected to a pump.
When the pump is immersed in water, both blocks are tightly connected due to the provided grip. A tight rubber ring attached to the removable part of the adapter makes the design airtight.


- Installation without the involvement of professionals.
- Acceptable cost - the average price for a downhole adapter varies within 4.5 thousand rubles, so such devices are much more profitable than caissons.
- Ease of use.
- Long service life.
- Possibility of installation regardless of the season.
- Aesthetic appearance of the overall design.
- Easy repair in case of failure.
- Unlike the bulky caisson design, the pitless device does not require additional space.
Well adapters consist of two parts, the first is mounted in the holes on the casing pipes, and the second is connected to the hoses of submersible pumps
Among the most popular options are the Baker downhole adapter and Debe brand devices.The first is made of bronze, the second is made of brass. The Debe adapter can be purchased slightly cheaper due to brass's less corrosion resistance and lower strength. At the same time, the Debe downhole adapter serves properly for a long period of time, so we can talk about the equivalence of both options.
Adapter Selection Criteria
The adapter for the well is selected taking into account a number of criteria:
- Such a purchase is made only from a trusted seller or in a store whose employees are ready to provide documents confirming the quality of the product. You should not make a purchase, tempted by a low price or external beauty. Often these adapters are made of powdered metal. Such a device is unlikely to last long.
- Such products are made exclusively from metals that are not susceptible to corrosion. Often it is brass or stainless steel. You should not purchase structures made of iron, but with a beautiful galvanized coating.
- You need to strive to purchase an adapter from reputable manufacturers. As a rule, such brands are heard, so it is quite difficult to make the wrong choice.
- The adapter is installed on pipes of various diameters. As a rule, this is 1 or 1.24 inches. Before choosing a device, you need to make sure the parameters are accurate.
By following these simple rules, you can choose an adapter at a bargain price, while having high performance.
Necessary equipment for well construction
Among the necessary equipment for creating a well in a country house, a fairly large number of elements are needed, among which a special place is occupied by:
- A pump designed directly to receive water from a well, as well as parts without which the pump piping will not be completed.
- Downhole head designed for complete sealing of the main casing pipe.
- Pressure switch that allows you to control the pump and monitor the status of its operation.
- Steel cable, necessarily made of stainless material, and always the same stainless cable clamps.
- PE water pipes, necessary for the construction of a water supply system, subsequently used exclusively for household purposes.
- A non-return valve for water that allows fluid to pass in only one direction - towards the house or any other building, for which a private borehole water supply system is created.
- Nipples, preferably brass, threaded at the ends and connecting pipes to each other, as well as other types of fasteners and connections, correctly selected for a particular project.
- Directly a hydraulic accumulator that transfers the volume of fluid in the right direction under pressure.
- Tees that allow you to create branches from the main water pipe.
- A manometer that also allows you to control the water pressure in the pipes.
- Hoses and faucets that make it possible to direct water to the right points in the house.
- Various consumables, such as sealant, electrodes and others.
- The caisson itself, a waterproof chamber that protects devices at depth from water entering them from a well.
- An adapter that leads pipes through the main casing of the entire created well, as well as an additional adapter required for sealing in case of failure of the caisson.
The largest and most expensive part is the caisson, the rest of the equipment can mostly be called consumables, the amount of which depends on the size of the system being designed.
In addition to proper organization, well-chosen equipment, such as a borehole adapter, also ensures a high water level and durability of the well, so it is also worth paying attention to when preparing a project.
How to make a caisson yourself
To do it yourself, first you need to decide on the material, system parameters.
Monolithic concrete structure
A square shape is suitable for the device, it is also much easier to build formwork.
First you need to decide on the size of the pit, which is dug under the structure. The length and width are standardly equal, so they can be calculated as follows: measure the size of the caisson from the inside, add the thickness of 2 walls (10 cm).
It is also necessary to calculate the depth of the pit, which should be 300-400 cm more than the height of the chamber. If everything is calculated, then the drainage layer can be installed at the bottom of the pit.
If further concreting of the base of the structure is not planned, then the following procedure is chosen
But when it is necessary to fill the bottom with concrete, the height must be taken into account. In addition, the pit should be such that the surface of the cover of the structure is flush with the soil. In order to have more space for a person when repairing the system, it is best to place the camera not in the middle in relation to the casing, but on the side
And the equipment will be conveniently placed
In order to have more space for a person when repairing the system, it is best to place the camera not in the middle in relation to the casing, but on the side. And the equipment will be conveniently placed.
Construction of a monolithic concrete caisson.
The work is carried out as follows:
- Start by digging a hole. At this point, you can immediately dig a trench for water pipes to the house. Then they begin to install drainage, which consists of 2 layers: sand (up to 10 cm high) and crushed stone (up to 15 cm). With such drainage, even if water gets inside the caisson, it will not stay inside, but will quickly go into the soil.
- After you need to equip the formwork. Often the wall of the pit is used as the outer layer of the formwork. The side of the pit must be covered with polyethylene to avoid seepage of water from the concrete into the soil. After you need to make a frame using reinforcement.
- Mix concrete solution. Pour it in small parts, compacting well with an electric vibrator. If there is no device, then you can use a pin, a thin pipe and weld the handles. This device is quickly lowered into the concrete, and then slowly pulled out to get rid of air and water bubbles, thereby making the concrete denser.
- After that, it is necessary to dry the structures, regularly spraying the surface with water so that the concrete does not crack. If it's hot, you can cover it with a damp cloth.
- After a week, the formwork can be removed. And in 4 weeks to install the equipment.
Caisson from concrete rings
The borehole system of concrete rings provides for the following:
- First, the pit is prepared. The calculations are the same as in the previous manufacturing method.
- Fill the bottom with concrete and drill a hole for the pipe.
- They take concrete rings, which are pre-coated with a special waterproofing compound. Let dry.
- After each ring is lowered into the pit, while connecting the joints with a mixture for bonding. The seams are foamy.
- There may be voids around the structure that need to be filled.
From concrete rings, a caisson for a well.
Budget camera made of bricks
Brick caisson device:
- First, a foundation pit is dug out, a strip foundation and a trench are installed at the bottom, which are covered with sand and rammed.
- It is necessary to lay waterproofing on the foundation (for example, roofing material).
- Brick laying starts from the corner, be sure to fill the seams with a special solution.
- After bringing the masonry to the desired height, let it dry, plaster.
Sealed metal container
The process is like this:
- Dig a hole again, suitable for the size and shape of the chamber.
- A hole for the casing pipe is cut out at the bottom.
- Install the cover, clean the seams of slag. The seams must be double-sided to ensure the tightness of the caisson.
- The structure must be treated with a protective layer.
If necessary, the chamber can be insulated, after which the caisson can be lowered into the pit and a column, sleeves, and cable can be installed. The sleeve is welded, everyone falls asleep.


Connecting the deep pump to the water supply system
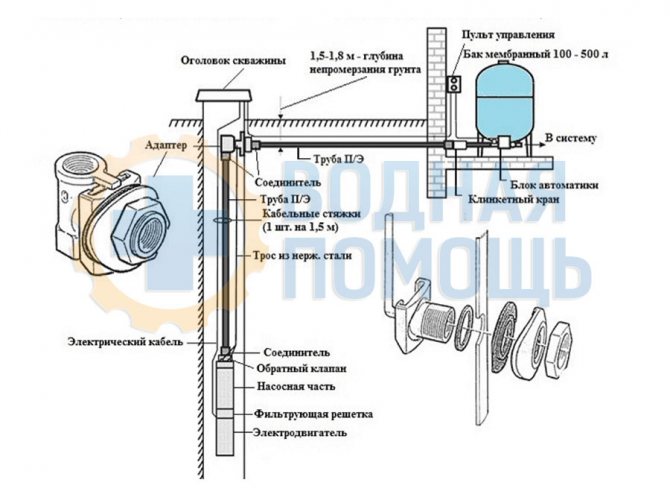
When constructing an individual water supply system, even at the stage of drilling operations, one should know the diameter and material of the pipeline, the depth of the water line, and the operating pressure in the system for which the equipment is designed. When installing and turning on the water supply, the following recommendations are guided:
When using the plumbing system in winter, you will have to take measures to protect it from the cold. Typically, pipes are laid underground and they must come out of the head of the well, so a caisson pit will be needed to install and maintain equipment. To make it more convenient and reduce the depth, the water line is insulated and heated with an electric cable.
Rice. 6 Assembling a pumping station with your own hands - the main stages
- When determining the immersion depth of the electric pump, set the dynamic level with the equipment turned on and hang the unit 2 meters below the set mark, the minimum distance to the bottom for deep models is 1 meter.
- When using sand wells, it is mandatory to install sand or coarse filters in the water line before the equipment.
- Electric pumps change their pumping efficiency when the supply voltage changes, so for stable operation it is better to purchase a voltage stabilizer and connect equipment to it.
- For ease of operation and maintenance, a do-it-yourself pumping station is often assembled. A pressure gauge and a pressure switch are mounted on the accumulator using a standard five-inlet fitting, but since there is no branch pipe for attaching a dry-running relay, it will have to be installed on an additional tee.
- Often electric pumps have a short power cable, not long enough to connect to the mains. It is extended by soldering, similar to the further insulation of the connection point with a heat shrink sleeve.
- The presence of coarse and fine filters in the plumbing system is mandatory.They must be placed before the automation of the control system, otherwise the ingress of sand and dirt will lead to their incorrect operation and breakdowns.
Rice. 7 Placement of automatic equipment in the caisson pit