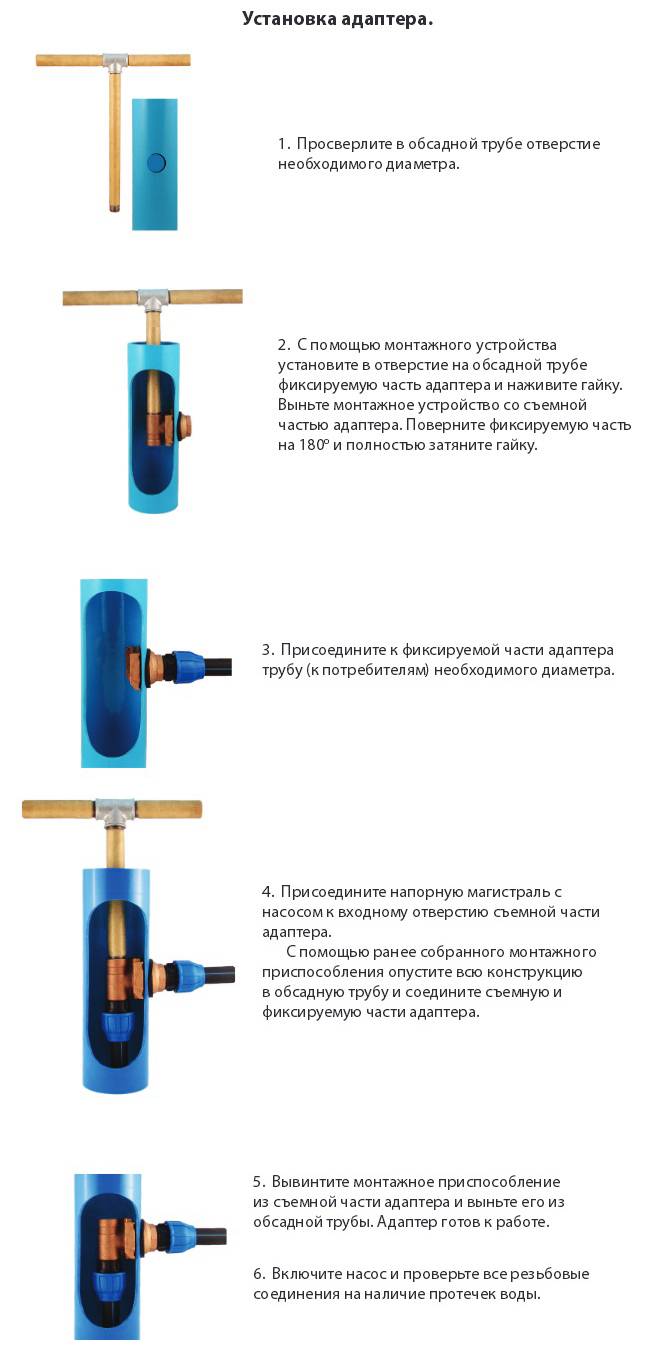
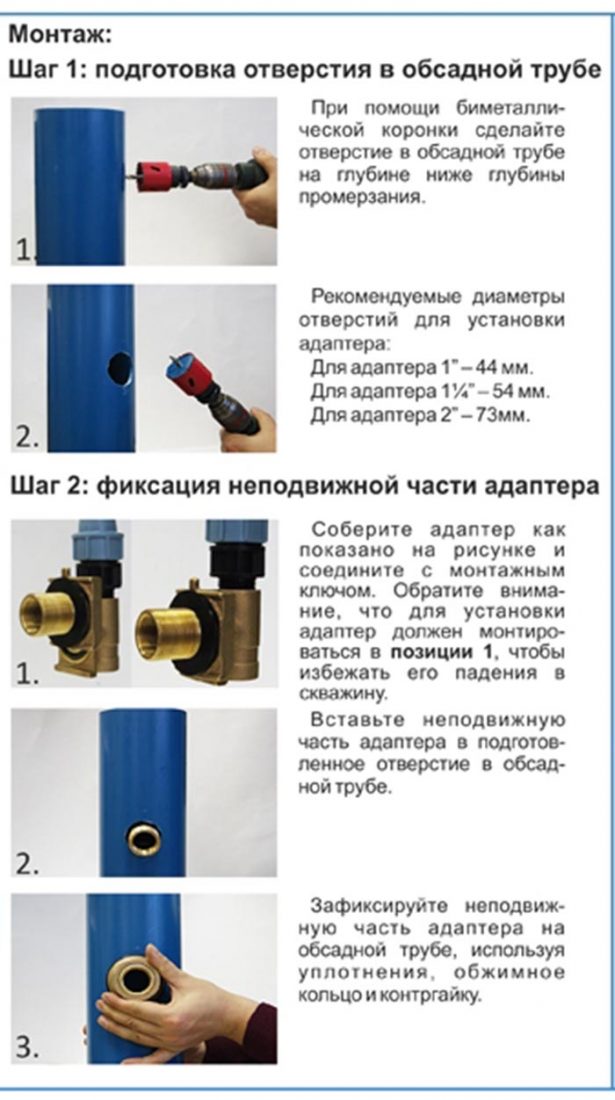
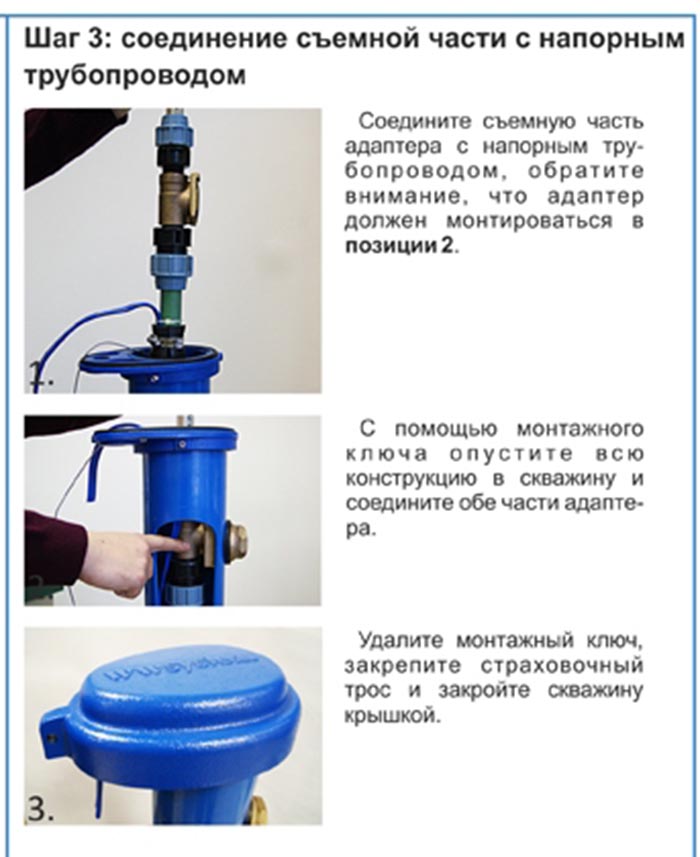
- Step-by-step instructions for installing the adapter in the casing
- Downhole Pump Performance Calculator
- Video - Downhole adapter tie-in
- Pros and cons
- The main advantages of the adapter
- How to properly install a pitless adapter
- Installation of the main part of the downhole adapter
- Mounting the mating part
- Do-it-yourself automation for a well or with the help of professionals
- General principle of operation of automation
- Types of automation for borehole pumps
- First generation ↑
- Second generation ↑
- Third generation ↑
- Do-it-yourself automatic block ↑
- Basic assembly schemes ↑
- Installation Tips ↑
- Recommendations for mounting adapters
- Equipment selection
- Caisson or adapter
- Pump units
- Accumulator and relay
- Well cap
- Peculiarities
- Why you need a downhole adapter
- Main advantages
Step-by-step instructions for installing the adapter in the casing
Let's get acquainted with the installation steps; for the convenience of visitors, the information is presented in the form of a step-by-step guide. But first, let's get acquainted with the list of what is required for work:
- electric drill;
- FUM tape;
- bimetallic nozzle for an electric drill, corresponding to the diameter of the adapter outlet;
- building level;
- Adjustable wrench.
Well Adapter Installation Instructions
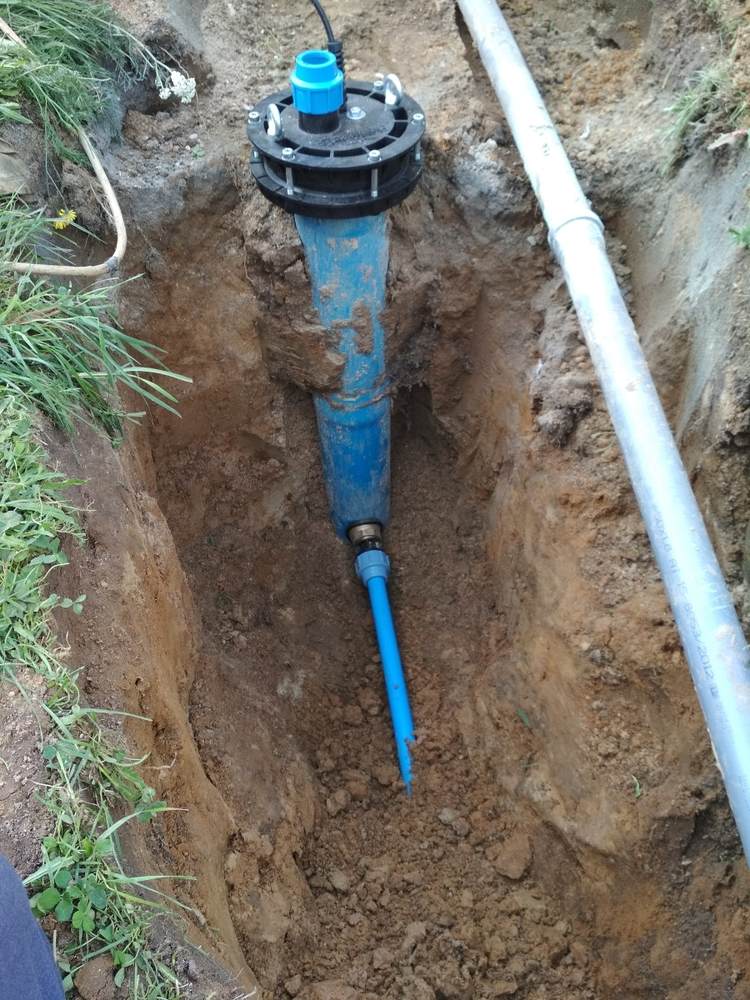
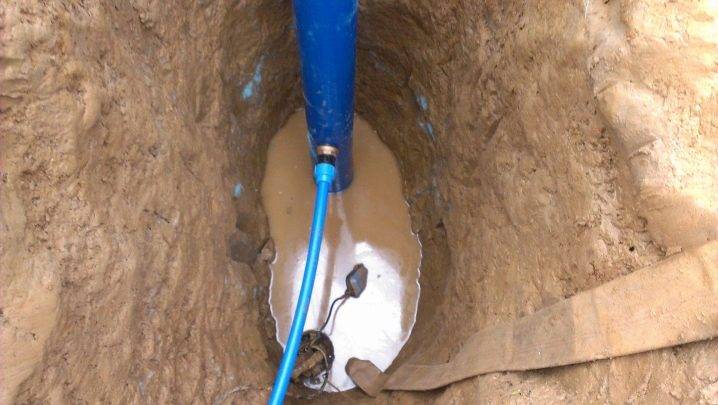
Step 1.First of all, the well itself, the casing and the ditch for the pipeline are equipped.
Digging a trench for a water pipeArrangement of a trench
Step 2. Everything necessary for the well equipment is being prepared, in particular, a pump. It is desirable that the cable for the pump be connected to the hose with plastic ties - this will make it easier to install the device.
Hose and cable are connected with a tie
Downhole Pump Performance Calculator
Step 3. The casing pipe is cut to the ground level, which is best done with a grinder. After that, it also cleans the place of the cut.
Use a protective mask or goggles Casing is cut Cleaning the cut
Step 4. Then the adapter itself is prepared. It is necessary to check its integrity and completeness - the device should not have dents, chips and other defects, and all the necessary parts must be included in the kit.
The adapter must be checked Checking the integrity of the elements
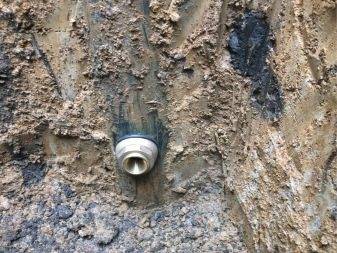
Step 5. A hole is drilled in the desired location of the casing pipe, corresponding to the diameter of the adapter. For this purpose, a crown nozzle having the required size is placed on the electric drill.
A hole needs to be drilled in the casing
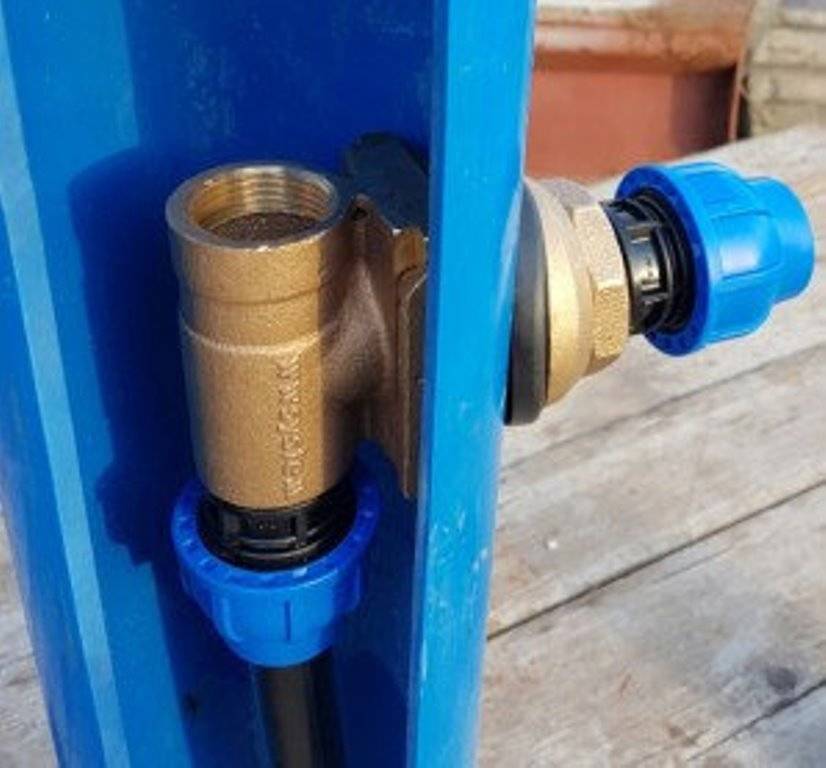
Step 6. The outer part of the device, which will be connected to the water supply, is installed
To do this, it is carefully lowered into the casing pipe to the drilled hole so that the branch pipe with a threaded connection eventually comes out. Then a rubber seal and a clamping ring are installed from the outside.
At the end, the nut is carefully tightened.
The outer part of the device is installed. The seal is put on. The nut is tightened.
Step 7Next, a connector with a pipeline is screwed to the outer part of the adapter. It is recommended to pre-wrap the threads with FUM tape to increase tightness (as an option, you can use plumbing thread instead of tape).
Connector with water pipeConnector is screwed
Step 8. The outer part of the adapter is connected to the pipeline leading to the house using a connector.
The pipeline is connectedAnother photo of the process
Step 9. A well cover is installed at the top of the casing pipe. To fix it, a hex key is used.
Well coverThe cover is installedUse a hex wrench to fix the cover
Step 10. A safety cable is attached to the pump, due to which the load on the adapter will decrease, which means that the service life of the latter will increase.


Step 11. The pump is lowered with a power cable, hose and cable deep into the well. For this work, assistants will be required, since it requires the application of considerable physical strength.
The pump is lowered into the well The pump is lowered with power cable, hose and rope The pump is almost lowered
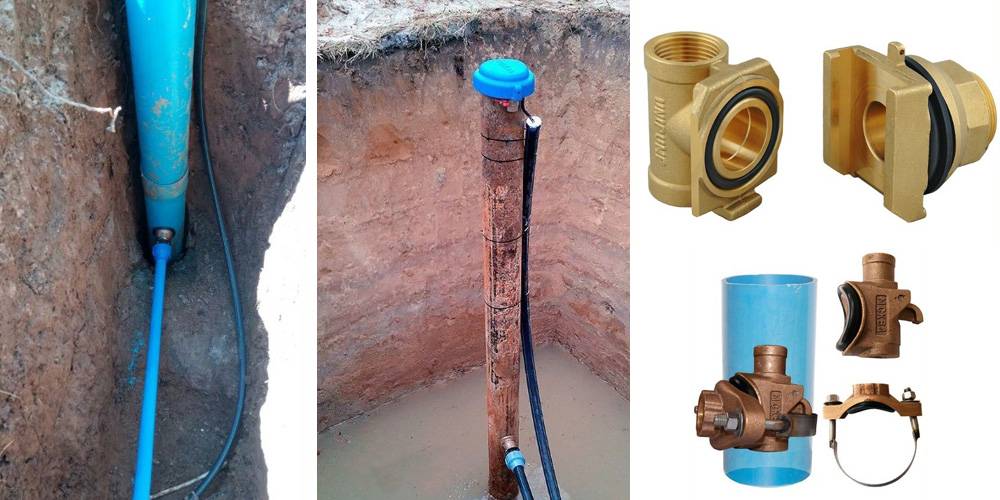
Step 12. The end of the hose, which is immersed with pumping equipment, is cut off, after which the other part of the adapter is prepared - it is connected to the fitting. The finished structure is fixed at the end of the hose, which was cut off earlier.
The hose is cut offThe second part of the adapterConnecting the second part of the adapter to the fitting
Step 13. The mounting tube is screwed to the top threaded connection located on the inside of the adapter. Further, with the help of a pipe, the part is inserted into the well and connected to the outer part (the above-mentioned dovetail connection is used). Then the pipe is unscrewed and removed.
Mounting pipe is screwed onConnection point
Step 14. The safety cable is fixed on the well cover. The system is being tested for functionality. If everything is done correctly, then a strong stream of water will come out of the water supply.
The safety cable is fixedTest run of the equipment
That's all, the well is equipped, and the adapter for it is installed. Now you have clean and high-quality drinking water at your disposal!
Video - Downhole adapter tie-in
The downhole adapter, located in the cavity of the water intake channel, prevents the hole from icing up in winter. The device is a metal tee that allows you to bring the flow of water from the well into a pipeline located in the soil. The use of an adapter allows you to reduce the cost of creating a water supply system for a country house.
Pros and cons

Drilling with a small-sized installation Like any source, the structures under consideration have their positive and negative sides.
The advantages include:
- short term of drilling operations (one-two days in the absence of difficulties);
- penetration is carried out by a small-sized installation, which is convenient when working in hard-to-reach places or in a limited area;
- does not require obtaining permits and licensing;
- long service life with proper operation;
- easy access to equipment located in the well, which allows you to quickly remove the pump for maintenance or repair;
- the total cost of work is much lower than when drilling artesian sources.
Among the shortcomings, experts distinguish the following:
- low predictability of aquifer formation;
- the aquifer is located close to the surface, which affects the quality of the water into which chemicals and organics enter from the surface;
- the volume depends on the level of precipitation;
- risk of silting;
- low flow rate;
- requires regular cleaning of the well.
The main advantages of the adapter
Relatively recently, the only acceptable method of well construction was the installation of a caisson. It is worth noting that such a design is quite effective, but at the same time its installation has a lot of difficulties.
The arrangement of a well with an adapter is a modern ideal solution to an existing problem. According to statistics, the vast majority of Europeans and Americans prefer this particular device.
This is due to a lot of reasons:
- firstly, its cost is several times lower than the price of the caisson;
- secondly, the installation and operation of such a device does not have technical difficulties;
- thirdly, the service life of the adapter is calculated in tens of years.
Other advantages due to which rural residents choose to install an adapter include the possibility of year-round operation of the well, aesthetics and ease of repair.
Adapters are made of brass. Because of this, it is not afraid of corrosion. It would be useful to point out that this device merges with the landscape, so it rarely becomes the object of theft, which cannot be said about caissons.
How to properly install a pitless adapter
Installing a downhole adapter does not require any special knowledge and skills. Everything is done quite simply according to the following algorithm:
- From the side of the house, the well casing is dug to the required depth.The depth of soil freezing depends on the region. In the middle lane, it is a maximum of 1.5 m, although most often this figure is much less.
- A hole of the desired diameter is drilled in the pipe. It is equal to the diameter of the main part of the adapter.
- The outer part of the adapter is inserted into the hole.
- A cover is placed on the well to cover it.
- A water pipe is attached to the main part, which is laid along a trench leading to the house.
- The counterpart of the downhole adapter is connected to the submersible pump hose.
- The submersible pump is lowered into the well and both parts of the adapter are connected.
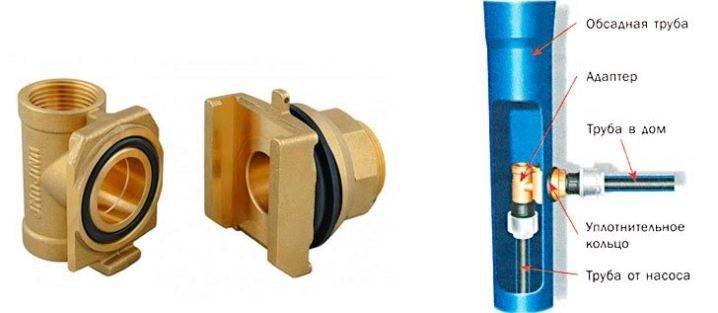
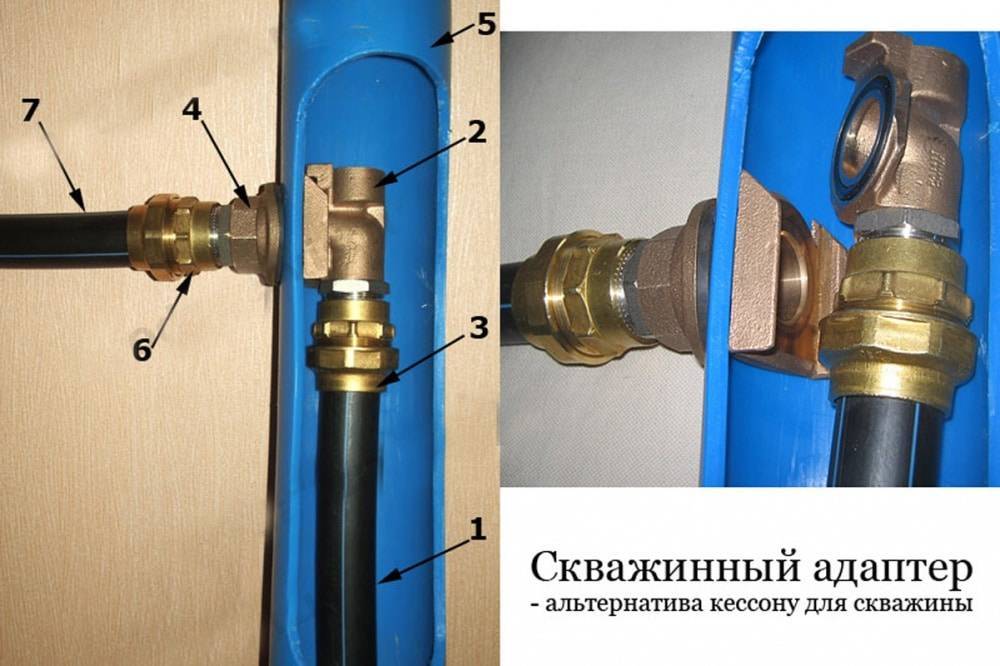
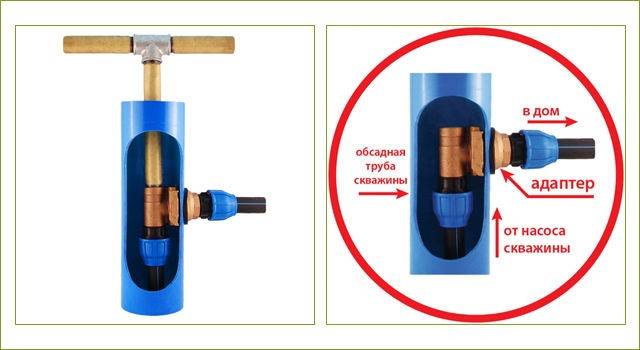
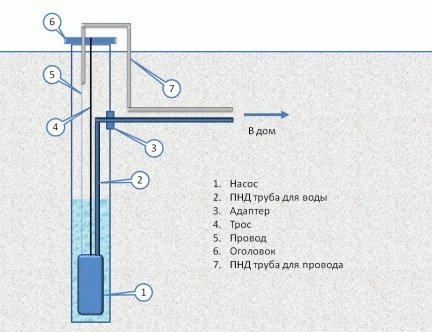
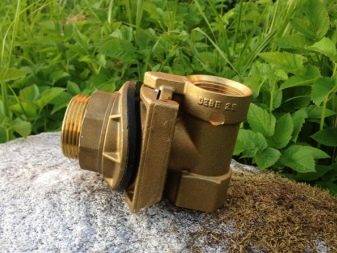
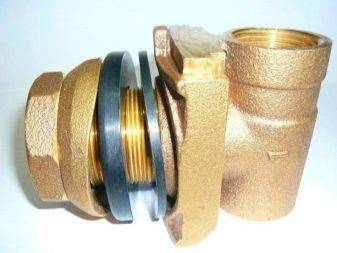
The downhole adapter has two components. One part is inserted into the hole on the casing, and the second is attached to the hose leading from the pump.


Installation of the main part of the downhole adapter
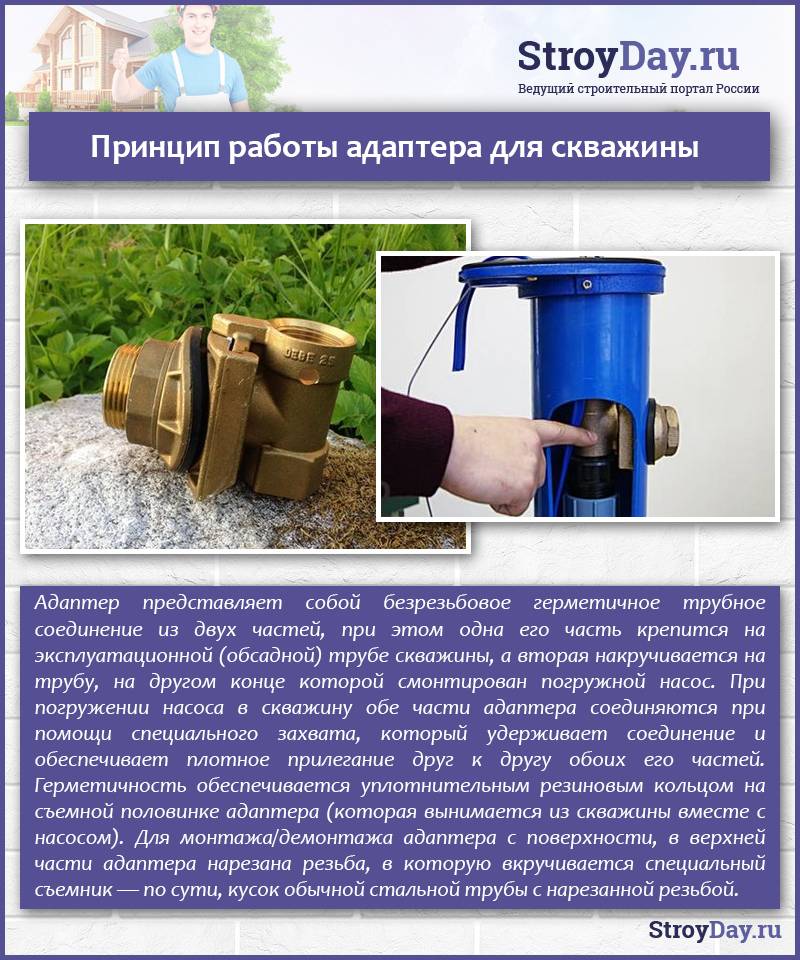
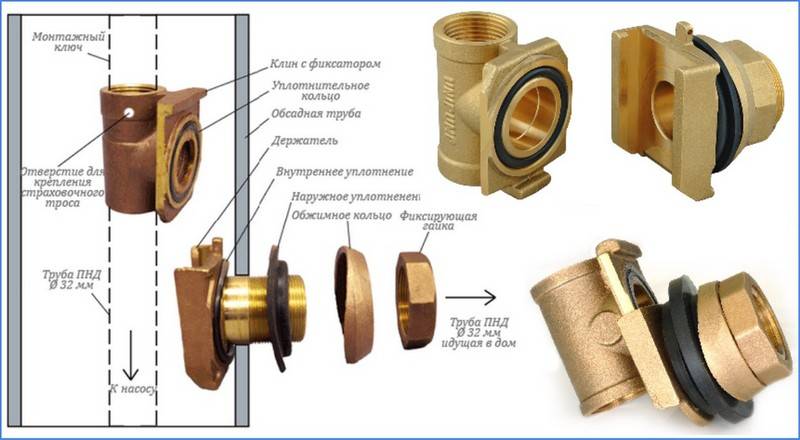
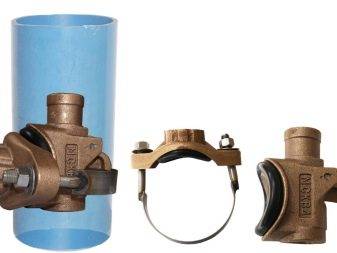
Let's take a closer look at how to mount the adapter on the casing. Before starting installation, it is necessary to make the correct hole in it. To do this, you need to get a bi-metal hole cutter, which is able to cut a hole with smooth edges in the metal. Its diameter is selected in such a way that it exactly matches the diameter of the adapter. After that, the second part of the adapter is lowered into the pipe and inserted into the hole. Outside, it is fixed with a crimp ring. Both inside and outside, rubber seals in the form of rings are put on the adapter. After that, both parts are tightened with an adjustable wrench. The pipe from the water supply is connected to the adapter from the outside by means of a threaded connection, which must be insulated to prevent leakage.
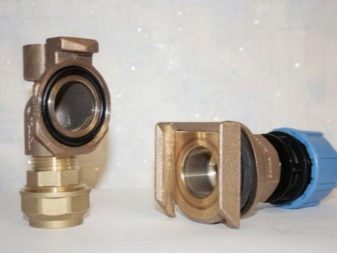
Mounting the mating part
Before starting the installation of the mating adapter, it is necessary to correctly install the pump. It is lowered to the required depth and fixed in this position.The pipe or hose from the pump is cut off and inserted into the counterpart of the part. Even before the start of all these works, it is best to assemble the pump indoors by attaching a hose, cable and cable to it. All this is brought to the well, where it is laid on a clean place to prevent dirt from entering the well. After that, you will need to take a special pipe, which is designed to facilitate the installation of the adapter. It is screwed into the hole on the inside of the adapter designed for it. After that, the pipe, together with a part of the adapter, is placed inside the well and both parts of the device are connected. Then this pipe is unscrewed and removed. It will only be needed when you need to get the pump again.
When mounting the adapter for the well, a special pipe with a thread cut on it is used. It is screwed into the hole on the inside of the adapter and removed after the device is installed in place.
Please note that after removal of the mounting tube, the threads in the device may be damaged by moisture. For this reason, the pipe can not be unscrewed, but simply cut flush with the neck of the well so as not to interfere. After the installation of the adapter is completed, the safety cable is brought out and rigidly fixed.
This reduces the load on the adapter from the hanging pump. At the final stage, power is supplied to the pump and the operability of the installed system is checked. Most often, downhole adapters are made from durable and corrosion-resistant materials such as copper or brass. Nevertheless, once a year the device should be disassembled and lubricated with special grease. Such a measure will significantly extend the life of the device itself and the seals in it.
After the installation of the adapter is completed, the safety cable is brought out and rigidly fixed. This reduces the load on the adapter from the hanging pump. At the final stage, power is supplied to the pump and the operability of the installed system is checked. Most often, downhole adapters are made from durable and corrosion-resistant materials such as copper or brass. Nevertheless, once a year the device should be disassembled and lubricated with special grease. Such a measure will significantly extend the life of the device itself and the seals in it.
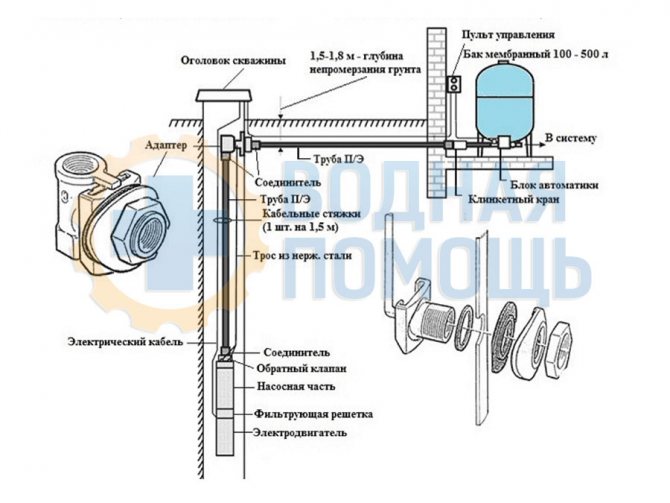
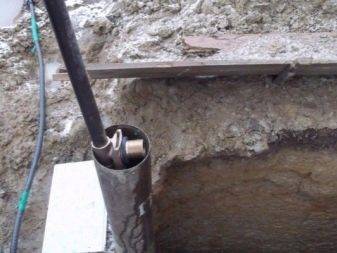
Full scheme of installation of a downhole adapter in real scale
Installing a borehole adapter can significantly reduce the cost of arranging a water well, as it eliminates the need for the construction of additional structural elements for pipeline insulation.
Do-it-yourself automation for a well or with the help of professionals
General principle of operation of automation
Despite the difference in price and functionality, modern automatic units work according to the same scheme - various sensors monitor the pressure level and adjust it as necessary.
A good example is the principle of operation of the simplest pressure switch:
- The device is installed in two positions - the maximum and minimum pressure in the system - and is connected to the accumulator.
- The accumulator membrane reacts to the amount of water, that is, to the pressure level.
- When the minimum allowable level is reached, the relay turns on, which starts the pump.
- The pump stops when the top sensor is triggered.
More advanced systems that operate without a hydraulic accumulator can be equipped with additional options, but the main principle of operation of automation for a borehole pump remains unchanged.
Types of automation for borehole pumps
First generation ↑
The first (simplest) generation of automation includes the following devices:
- Pressure switch;
- Hydraulic accumulator;
- Dry run sensors-blockers;
- Float switches.
The pressure switch was mentioned above. Float switches react to a critical drop in the liquid level by turning off the pump. Dry running sensors prevent the pump from overheating - if there is no water in the chamber, the system stops functioning. As a rule, such a scheme is used in surface models.
The simplest automation for a borehole pump can be easily installed with your own hands. The system is also suitable for drainage equipment.
Second generation ↑
Block machines of the second generation are more serious mechanisms. It uses an electronic control unit and several sensitive sensors fixed in different places of the pipeline and pumping station. The signals from the sensors are sent to the microcircuit, which maintains full control over the operation of the water supply system.
The electronic "watchman" reacts in real time to any deviations from the norm. In addition, it can be equipped with additional features:
- Temperature control;
- Emergency shutdown of the system;
- Checking the liquid level;
- Dry run blocker.
Important! The big disadvantage of such an automation scheme for borehole pumps is the need for fine-tuning, a tendency to breakdowns and a rather high price.
Third generation ↑
Important! If you do not have experience in water supply, you will not be able to install automation for a well with your own hands. Only a specialist can determine which algorithm is better to program the system
Do-it-yourself automatic block ↑
Do-it-yourself automation for a borehole pump is often cheaper than a factory set of equipment. When buying units separately, you can always choose the best option for the purchased pump model without overpaying for unnecessary additional options.


Important! Such amateur performance requires a certain level of knowledge. If you cannot call yourself an expert, it is better to purchase pumping equipment with pre-installed automation.
Basic assembly schemes ↑
Among the automation schemes for borehole pumps, the following types have proven themselves well:
All automation nodes are assembled in one place. In this case, the accumulator can be located on the surface, and water is supplied to it through a pipe or flexible piping. The scheme is suitable for both surface and deep-well pumps.
Control unit on hydraulic accumulator
With this arrangement, it is recommended to connect the system manifold to the pump supply pipe. It turns out a distributed station - the unit is located in the well, and the control unit with a hydraulic accumulator is installed in the house or utility room.
Distributed pumping station
The automation unit is located near the cold water collector, maintaining a constant pressure level in it. The pressure pipe departs from the pump itself.With such a scheme, it is better to use surface models.
Installation Tips ↑
In order for automatic equipment to serve you faithfully, you need to take care of the correct place for its installation in advance:
- The room must be heated all year round.
- The closer to the well is the remote unit, the better. The ideal option is to equip a small boiler room near the caisson.
- To avoid pressure losses, install the pumping station in close proximity to the collector.
- If the equipment will be located in the house, carry out high-quality soundproofing of the room.
Recommendations for mounting adapters
Since vibrations occur during the operation of the pump, it is recommended to use steel casing strings when arranging a well with an adapter. The material supports the weight of the pump with piping installed and secures the safety wire securely.
The assembly of the pump module with the pressure pipe and the mating part of the adapter is carried out on a flat surface in a closed room. Then the cables and hoses are rolled up into coils, and then the parts are taken out to the installation area.
Such a procedure improves the assembly quality of the pressure module and excludes the ingress of soil into the cavities of the hydraulic unit. When arranging a well with an adapter, it should be taken into account that the protruding part of the outer part imposes restrictions on the diameter of the pump.
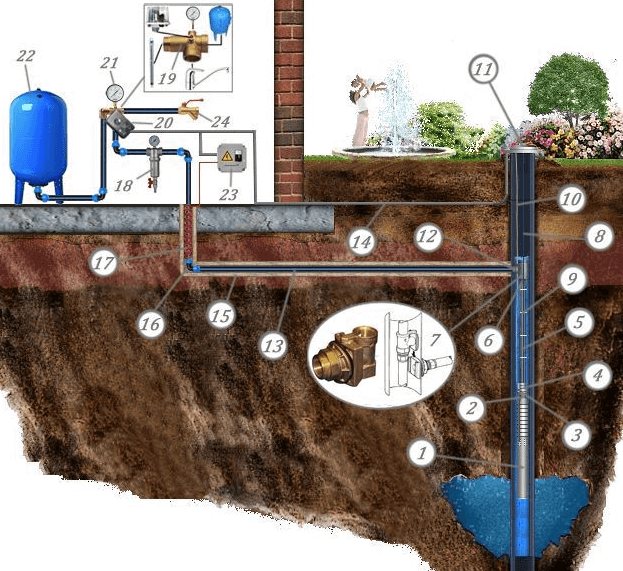
Equipment selection
The choice of equipment for arranging your future well is one of the most important stages, since the quality and duration of its work will depend on the right choice.
The most important equipment to pay attention to is: a pump, a caisson, a well head and a hydraulic accumulator
Caisson or adapter
The principle of arrangement with a caisson or adapter
The caisson can be called the main design element of the future well. Outwardly, it resembles a container similar to a barrel and is used to protect equipment from groundwater and freezing.
Inside the caisson, you can place all the necessary components for automatic water supply (pressure switch, membrane tank, pressure gauge, various water purification filters, etc.), thus freeing the house from unnecessary equipment.


The caisson is made of metal or plastic. The main condition is that it is not subject to corrosion. The dimensions of the caisson are usually: 1 meter in diameter and 2 meters in height.
In addition to the caisson, you can also use an adapter. It is cheaper and has its own characteristics. Let's consider below what to choose a caisson or adapter and what are the advantages of each.
Caisson:
- All additional equipment can be placed inside the caisson.
- Best suited for cold climates.
- Durable and reliable.
- Quick access to the pump and other equipment.
Adapter:
- To install it, you do not need to dig an additional hole.
- Fast installation.
- Economical.
The choice of caisson or adapter also follows from the type of well
For example, if you have a well in the sand, many experts advise paying attention to the adapter, since the use of a caisson is not always beneficial due to the short life of such a well
Pump units
One of the key elements of the entire system is the pump. Basically, three types can be distinguished:
- Surface pump. Suitable only if the dynamic water level in the well does not fall below 7 meters from the ground.
- Submersible vibration pump.A budget solution, it is rarely used specifically for the water supply system, as it has low productivity, and it can also destroy the walls of the well.
- Centrifugal borehole pumps. Profile equipment for water supply systems from a well.
Borehole pumps are widely represented on the market by a large variety of manufacturers, for every taste and budget. The selection of the characteristics of the pump takes place according to the parameters of the well and directly to your water and heat supply system.
Accumulator and relay
The key function of this equipment is to maintain a constant pressure in the system and to store water. The accumulator and pressure switch control the operation of the pump, when the water in the tank runs out, the pressure drops in it, which catches the relay and starts the pump, respectively, after filling the tank, the relay turns off the pump. In addition, the accumulator protects plumbing equipment from water hammer.
In appearance, the accumulator is similar to a tank made in an oval shape. Its volume, depending on the goals, can range from 10 to 1000 liters. If you have a small country house or cottage, a volume of 100 liters will be enough.
Hydraulic accumulator - accumulates, relay - controls, pressure gauge - displays
Well cap
To equip the well, a head is also installed. Its main purpose is to protect the well from the ingress of various debris and melt water into it. In other words, the cap performs the function of sealing.
headroom
Peculiarities
The downhole adapter has appeared recently, but with great success it replaces the caissons in the wells, because this mechanism has a number of positive characteristics. A well adapter is an installation that connects the outlet of a well to a plumbing system that goes into a dwelling. The device is located in the casing at a level below the freezing point of the soil. Thanks to such an installation, the functionality of the well and the design of an autonomous water supply of a dwelling in the winter, even in severe frosts, are achieved. The need for thermal insulation work for the plumbing system is automatically eliminated.
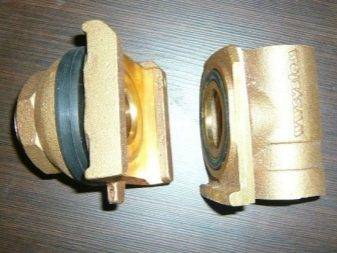
The device consists of two parts: external and internal. The first element is a fitting, which is installed in a micro-hole prepared in advance in the casing. On the part of the nozzle that remains inside, a notch is placed to fix both parts of the downhole adapter. On the outside, there is a threaded thread for connecting to a water pipe, auxiliary sealing parts to protect against leakage and ingress of groundwater, as well as a union nut that firmly fixes the entire system in one position.
The second element of the downhole adapter is placed inside the casing. It is a modernized elbow, one end of which is connected to a hose remote from the pump in the well, and the other end to the part described in the previous paragraph. To do this, the part is equipped with a dovetail stud and a rubber sealing ring, which makes the connection tight.
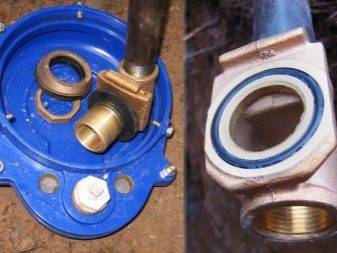
To facilitate the installation procedure, the upper part of the internal part of the downhole adapter is equipped with a blind threaded micro-hole. A mounting tube is screwed into it, through which the product is immersed in a water well. There it is installed in the groove of another adapter element. After that, the special assembly pipe is simply unscrewed and pulled out. You can make such a mechanism yourself.


The downhole adapter has such advantages as:
acceptable product price. Compared to the cost of the caisson, the adapter is 5-7 times cheaper
If the budget is not enough, you should pay attention to these mechanisms;
liquid at the mouth of the water well does not freeze;
ease of installation. Installation of such equipment can be done by anyone who knows how to hold a drill in their hands;
- compactness. A casing pipe with an adapter does not take up usable space, nor will it be a design that spoils the entire look of the homestead. Indeed, only the cover of the water well, whose diameter is 30–40 cm, will be placed above the ground;
- possibility of installation near the communication system;
- the possibility of hidden installation of the pumping mechanism;
- design aesthetics. The well in the suburban area is practically invisible, which is very good for owners who are afraid of theft;
- reliability;
- possibility of application at high levels of groundwater;
- 100% tightness of the system. Even during spring floods, the water remains clean. This condition is met if the correct installation of the equipment and further maintenance of the system have been carried out;
- if the water system does not need to be used for a long time, the downhole adapter allows you to drain the water.It is enough to disengage the connection of the elements, and all the liquid will drain.
In addition to positive characteristics, the adapter also has negative aspects, such as:
- rubber part (seal) may fail over time. But it depends on the manufacturer of this design and on the quality of the manufactured product;
- the joints may oxidize, so that this does not happen, it is necessary to lower and raise the pump 1-2 times a month;
- the cable that lifts the pump does not hold it in working position. This function is performed by the adapter. Perhaps premature wear or kurtosis of sealing the connection from constant vibration that comes from the pumping mechanism;
- often there are problems with the gasket, which is located between the soil and the outer walls of the device. It can dry out, which will lead to a violation of the seal. As a result, groundwater will enter the mechanism, and in the future the water well will be destroyed;
- there is no way to connect additional sources of water intake from the well, for example, for watering the garden, for a detached outbuilding.
Why you need a downhole adapter
To do this work correctly, you need to know what functions it performs and what it is intended for.
So:
- The purpose for which adapters for wells are used is the need to bring the pipe that supplies water from the well pump to the house into a working well pipe to a depth that is greater than the soil freezing value.But at the same time, it is necessary not to violate, on the one hand, the reliability of the well casing pipe, to prevent melt water from entering the pipe, and on the other hand, to preserve the method of disassembling the pump itself and the pipe that is used to lift water from the aquifer.
- If everything is installed correctly and works flawlessly, there is no need to equip other structures, such as a caisson, a pit, a specially equipped warm room above the well: the entire system through which water enters the house is protected from freezing, and at the same time it remains possible to repair and operate, as well, and the pump immersed in it.
Main advantages
By making this choice, you will gain several advantages, you should know them and only after that make the right decision:
- This is not a difficult installation, which is not difficult to do with your own hands. You will not incur costs in this matter;
- The price of the product itself is not high, so everyone can afford it;
- Installation does not take much time;
- You can save money on this, the problem with installing a caisson and making a pit disappears. This will already go towards reducing costs;
- You get the opportunity to completely hide the well, it will be located under the ground.
These are the main benefits. But you shouldn't make decisions right away. You must first weigh everything, how much such an installation will be appropriate in your case.


